
In common with many amateur watchsmiths, my early experiences with engine room interventions were largely concerned with revivification and modification of properly ropey old Seiko divers’ watches. Some of those projects were sourced from job lots of junk from eBay dealers and some from whatever I could dredge up from private eBay auctions or watch forum sales corners.

That was an innocent time in the sense that it preceded the era in which old watches became regarded more for their potential for integration into an investment portfolio than for the pleasure they might offer to an enthusiast. The modification craze, as it existed at the time, was fed by a thriving cottage industry in third party parts, inspired by a mix of iconic watch designs and outlandish surrender to all sorts of garish flights of fancy. The standard basis of many Seiko dive watch modifications was the 6309A, the mainstream workhorse automatic mechanical movement employed by Seiko from the late 1970s through to the end of the following decade. The appeal of the 6309-powered mod was the availability not just of bespoke third-party parts but also the vast sea of compatible OEM Seiko parts deriving from all sorts of watches powered not just by the 6309 (and 75 series quartz) movement but also the whole family of non-chronograph 61 series movements.

However, during the noughties, interest in 7S26-powered mods started to gather momentum as the potential of the SKX diver’s watch as a basis of an emerging modded-watch culture started to mature. Among the 7S26-compatible parts manufacturers was MkII, a company that would go on to become a watch-producer in its own right, but which, at the time was known mostly for its markedly higher quality parts (at considerably higher prices) and a more finely-tuned attention to detail compared to some of the competition.
With that as the backdrop, I conceived a plan to mitigate the consequences of an ill-judged purchase of a Seiko 6105 that had been fitted with a fake dial (see here for the full story). That plan was founded on the principle that, in the absence of a genuine Seiko 6105 dial to replace the hateful fake, it would be better to choose a sterile aftermarket dial with no Seiko association and transform the watch into something which could never be mistaken for anything other than a modified watch. Even though prices of 6105s were much lower than they are now, they were still regarded with some reverence and commanded prices that disincentivised casual modders from taking the plunge. I felt I had little to lose with mine though, and so set about finding a configuration with which I was happy. Before taking the plunge, I knocked up a photoshop image of what I had in mind, combining a stock image of the MkII Bund dial paired with Benrus-style Type I hands with a photograph of the case of my wonky 6105.
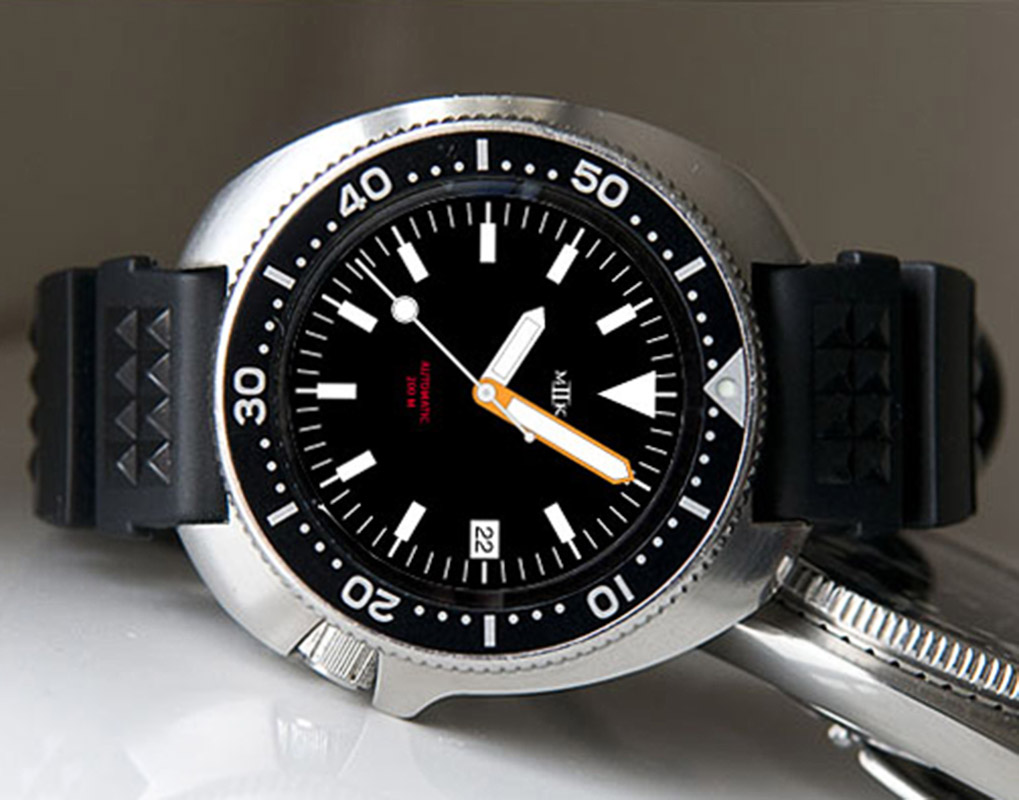
That simulation provided a remarkably accurate rendering of the finished article, whose converged ingredients comprised: one MkII bund dial (designed to fit the 7S26 movement), a set of Type I orange and white hands plus a lollypop seconds hand, a sapphire crystal and a SKX007 bezel insert. The movement was the somewhat bastardised 6105B that came with my erroneous eBay purchase with the remaining parts those that were original to the watch as received (caseback, crown, turning ring, chapter ring, crystal gasket and crystal retaining ring).

The resulting watch achieved a good balance between striking and subtle and the fact that it was based on a 6105 also made it very unusual. There was, however, one compromise in the build that added a whiff of hackery: the dial was designed for a 7S26 movement and not 6105/6309 and so the dial feet were in the wrong place. Moreover, the position of the date aperture was ever so slightly too far out-board which meant that the printed date on the date disk sat too close to the inner edge of the window. The dial foot issue was ‘solved’ by removing the feet and fixing the dial to the movement using sticky dial pads but that did mean that the dial was ever so slightly mobile and it made it tricky to keep the date aperture properly aligned (you should be able to see in the image above that the date sits too far to the left, relative to the aperture and too high).
The passing of time brought developing dissatisfaction with those compromises and the hatching of a plan to revert the watch to its correct original Seiko configuration (see here). This reversion therapy liberated the MkII dial and handset and since 2014, they have sat in the bottom level of a stack of watch parts trays, all but forgotten. Until now.
With progress on more substantial projects thwarted by an ongoing building project at home, I have been limited to just one rather drawn-out project (see the preceding post) and the emergence of an idle thought that turned into something tangible. The idle thought was triggered by my coming across the MkII dial and hands while looking for another part: why not put these rather nice parts to some use? I started off thinking that I might use them with parts sourced from one of a number of new companies selling what appear to be high-quality cases, bezels, crowns, case backs and so on based around the Seiko SKX /SRP/other Seiko watch case construction.

All of these parts should, in principle, retain a high degree of compatibility with each other as well as with original OEM parts designed for the appropriate Seiko model. The cases that are sold through those sites are mostly modelled on Seiko original designs such as the SKX007, SKX013, 62MAS and 6105 but all manufactured by third party case makers based in China/Hong Kong. They all claim modern standards of water resistance and, given that the engineering apes that of modern Seiko divers watches, I have no reason to doubt that claim. In mulling over these options, I considered re-creating my old 6105 mod but using up-to-date parts, powered by a new NH35 movement. However, none of the cases that mimic the cushion-case 6105-8110 really does the original design justice. They all seem to miss the mark to a greater or lesser degree and so I discounted this as an option. I was also conscious of the fact that I would be working to a modest budget, and the cost of assembling a complete watch started to venture into territory unbefitting of an idle thought.
It was at this point that I turned my attention to Aliexpress. They have a bewildering array of options, some offered as complete watches, sold under a number of different homage brand names, such as Rdunae, and others as complete cases without movement, dial and hands. As I was after just the case, it quickly became evident that there was in fact just one option, if what I wanted was a case that closely resembled the original (rather than being a caricature).

The case finishing looks extremely good but the low price suggests that compromises may lurk elsewhere. Some additional detective work suggested that this is the case used by Rdunae in their well-regarded Retangular Rdunae homage watch. So I placed an order, feeling that I had not much to lose, and waited for the case to arrive. In the intervening period, I sourced a new Seiko NH35 from Cousins, a couple of spare stems and a dial milling tool in anticipation of the need to come up with a dial foot solution that did not use sticky pads.
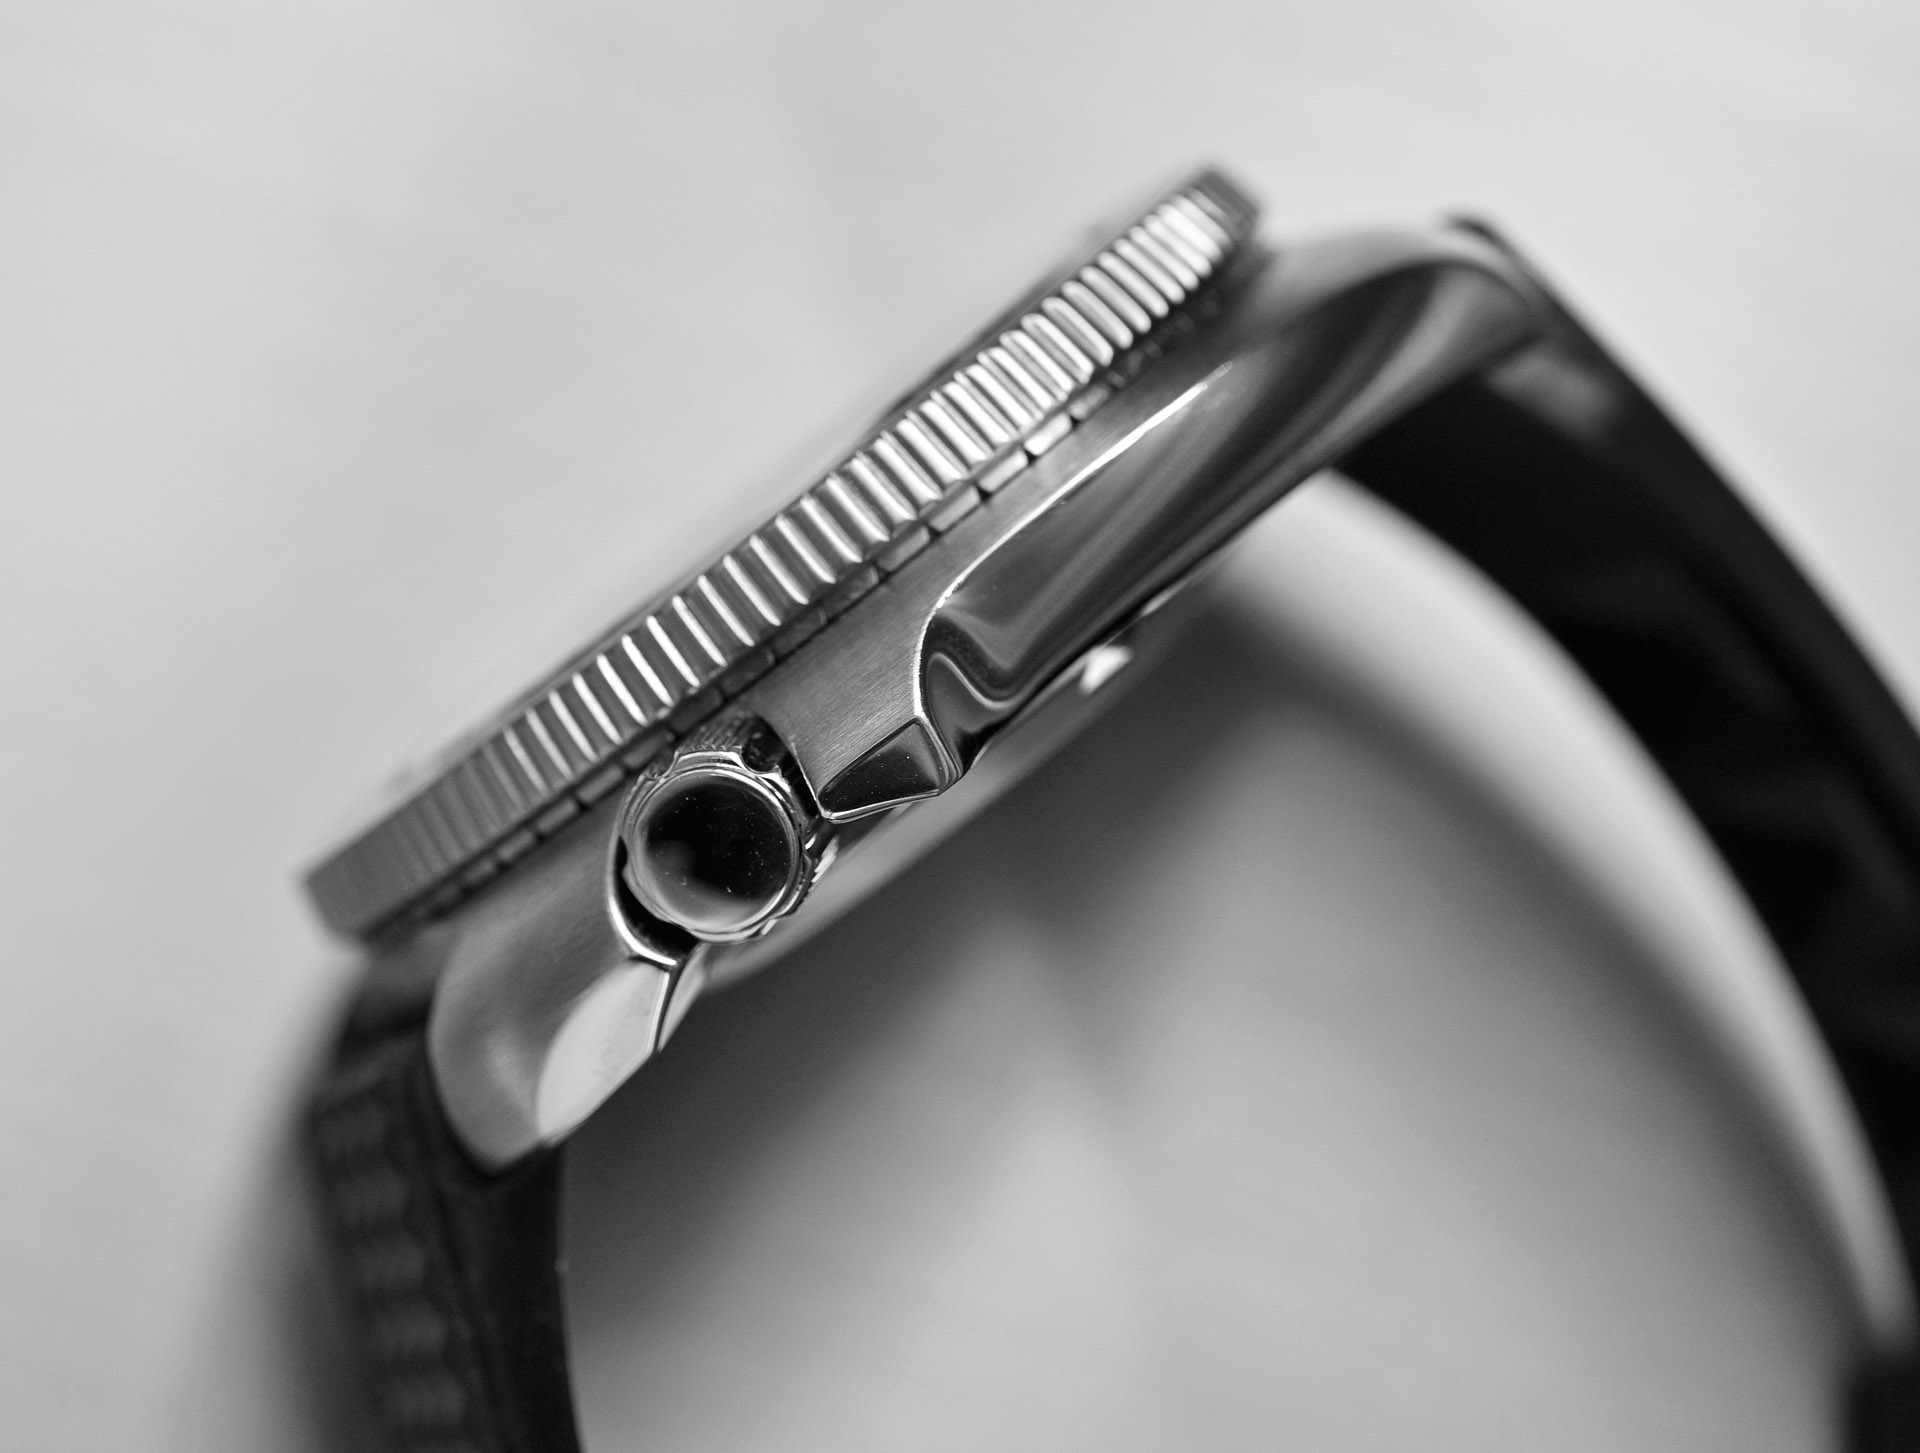
In the hand, the first impressions of this case are very good indeed. The finishing is very nicely executed and the shaping and detailing close enough to the original to retain much of its aesthetic appeal. The shape, balance and general impression are pretty much spot on, especially considering the very low price.

One particularly nice touch is the inclusion of the machined click grooves to the underside of the bezel turning ring (lower right image, above). This is purely for show though, there being no functional purpose to it other than as a stylistic nod to the original (see below).

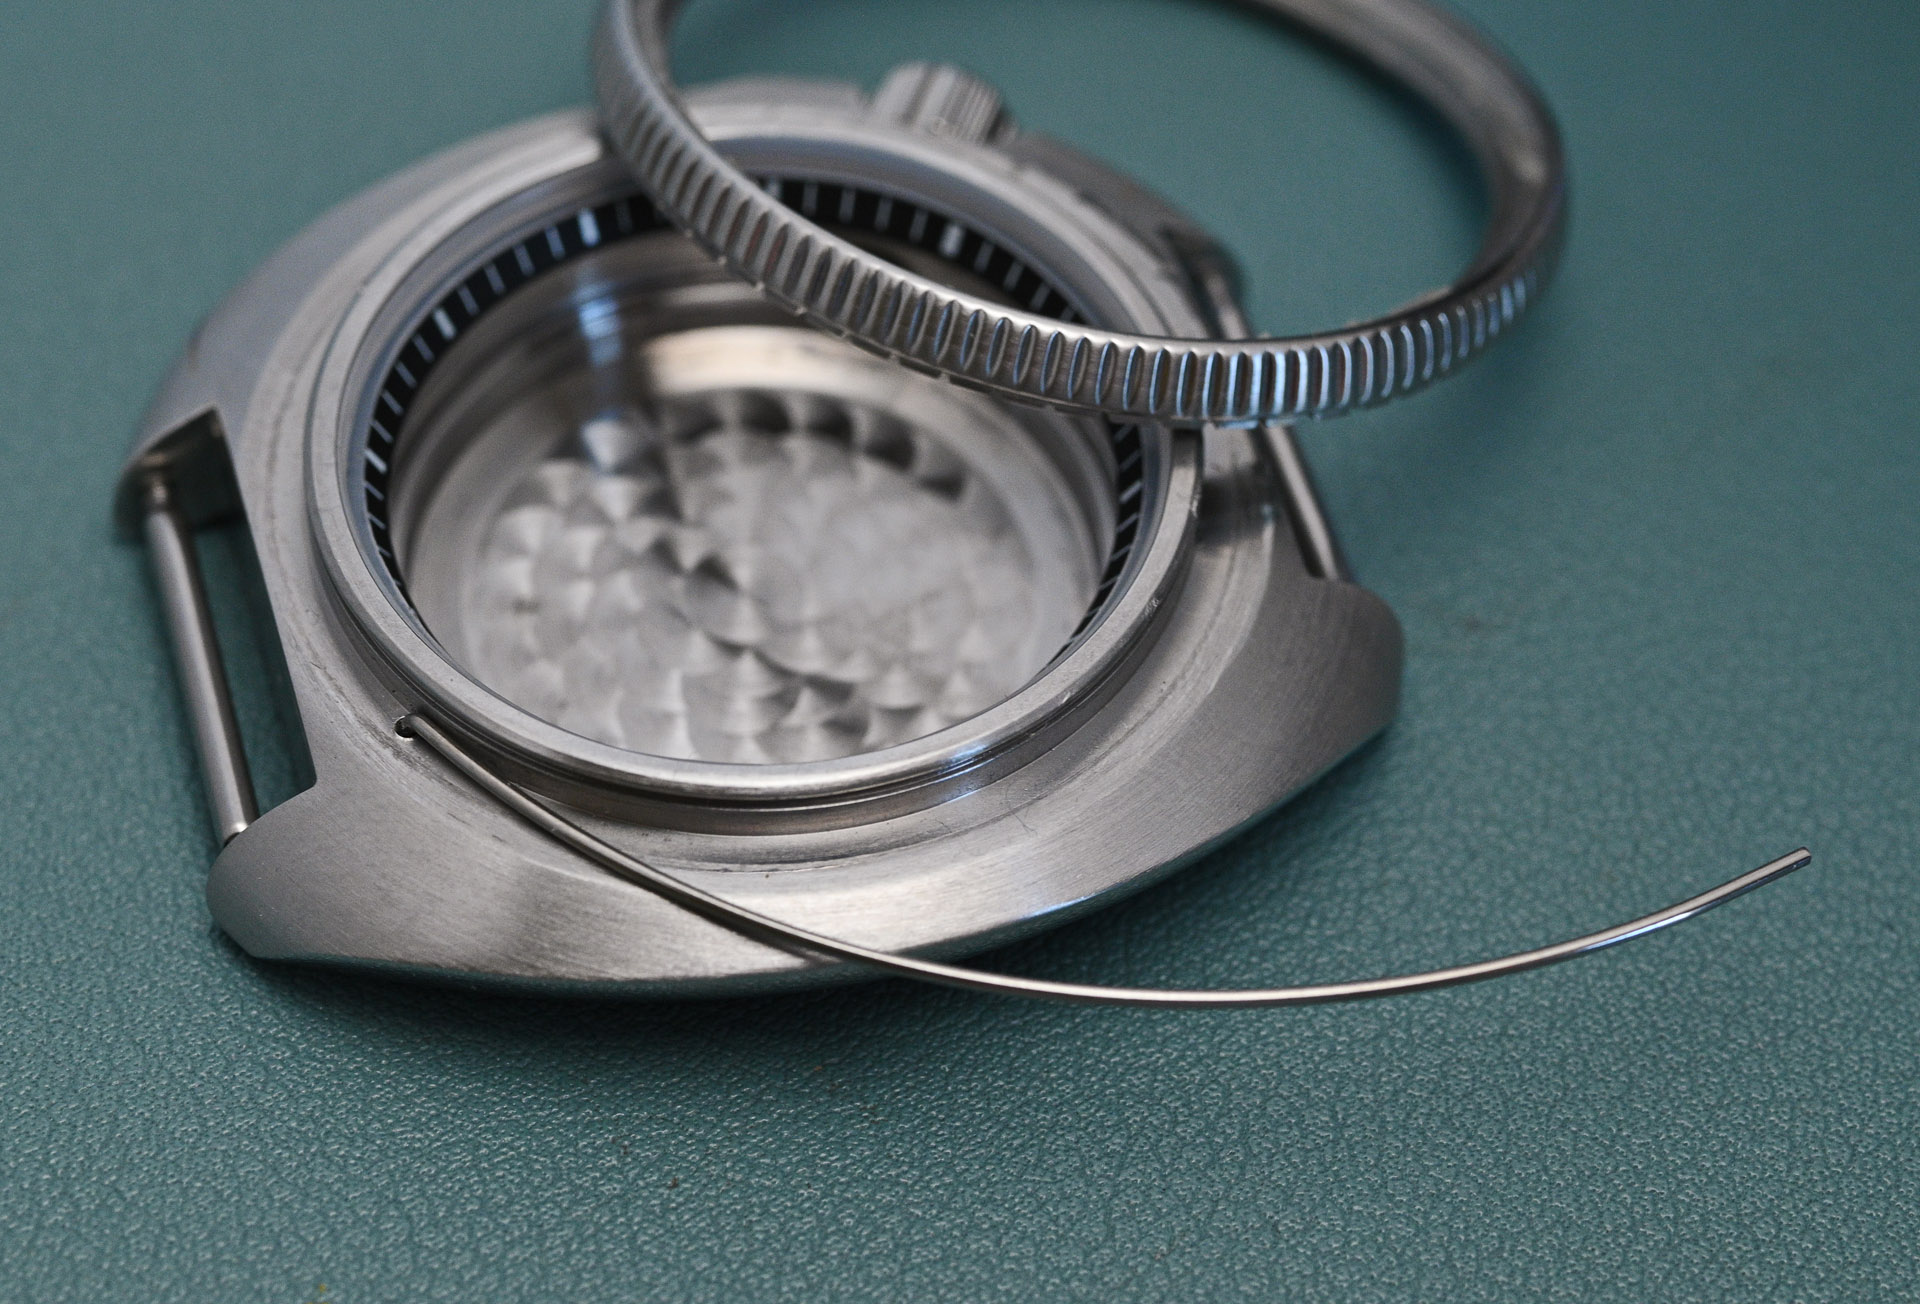
It’s not all good news though. The chapter ring is misaligned and incorrectly seated, the locating pin clearly not located in the groove machined for its reception.
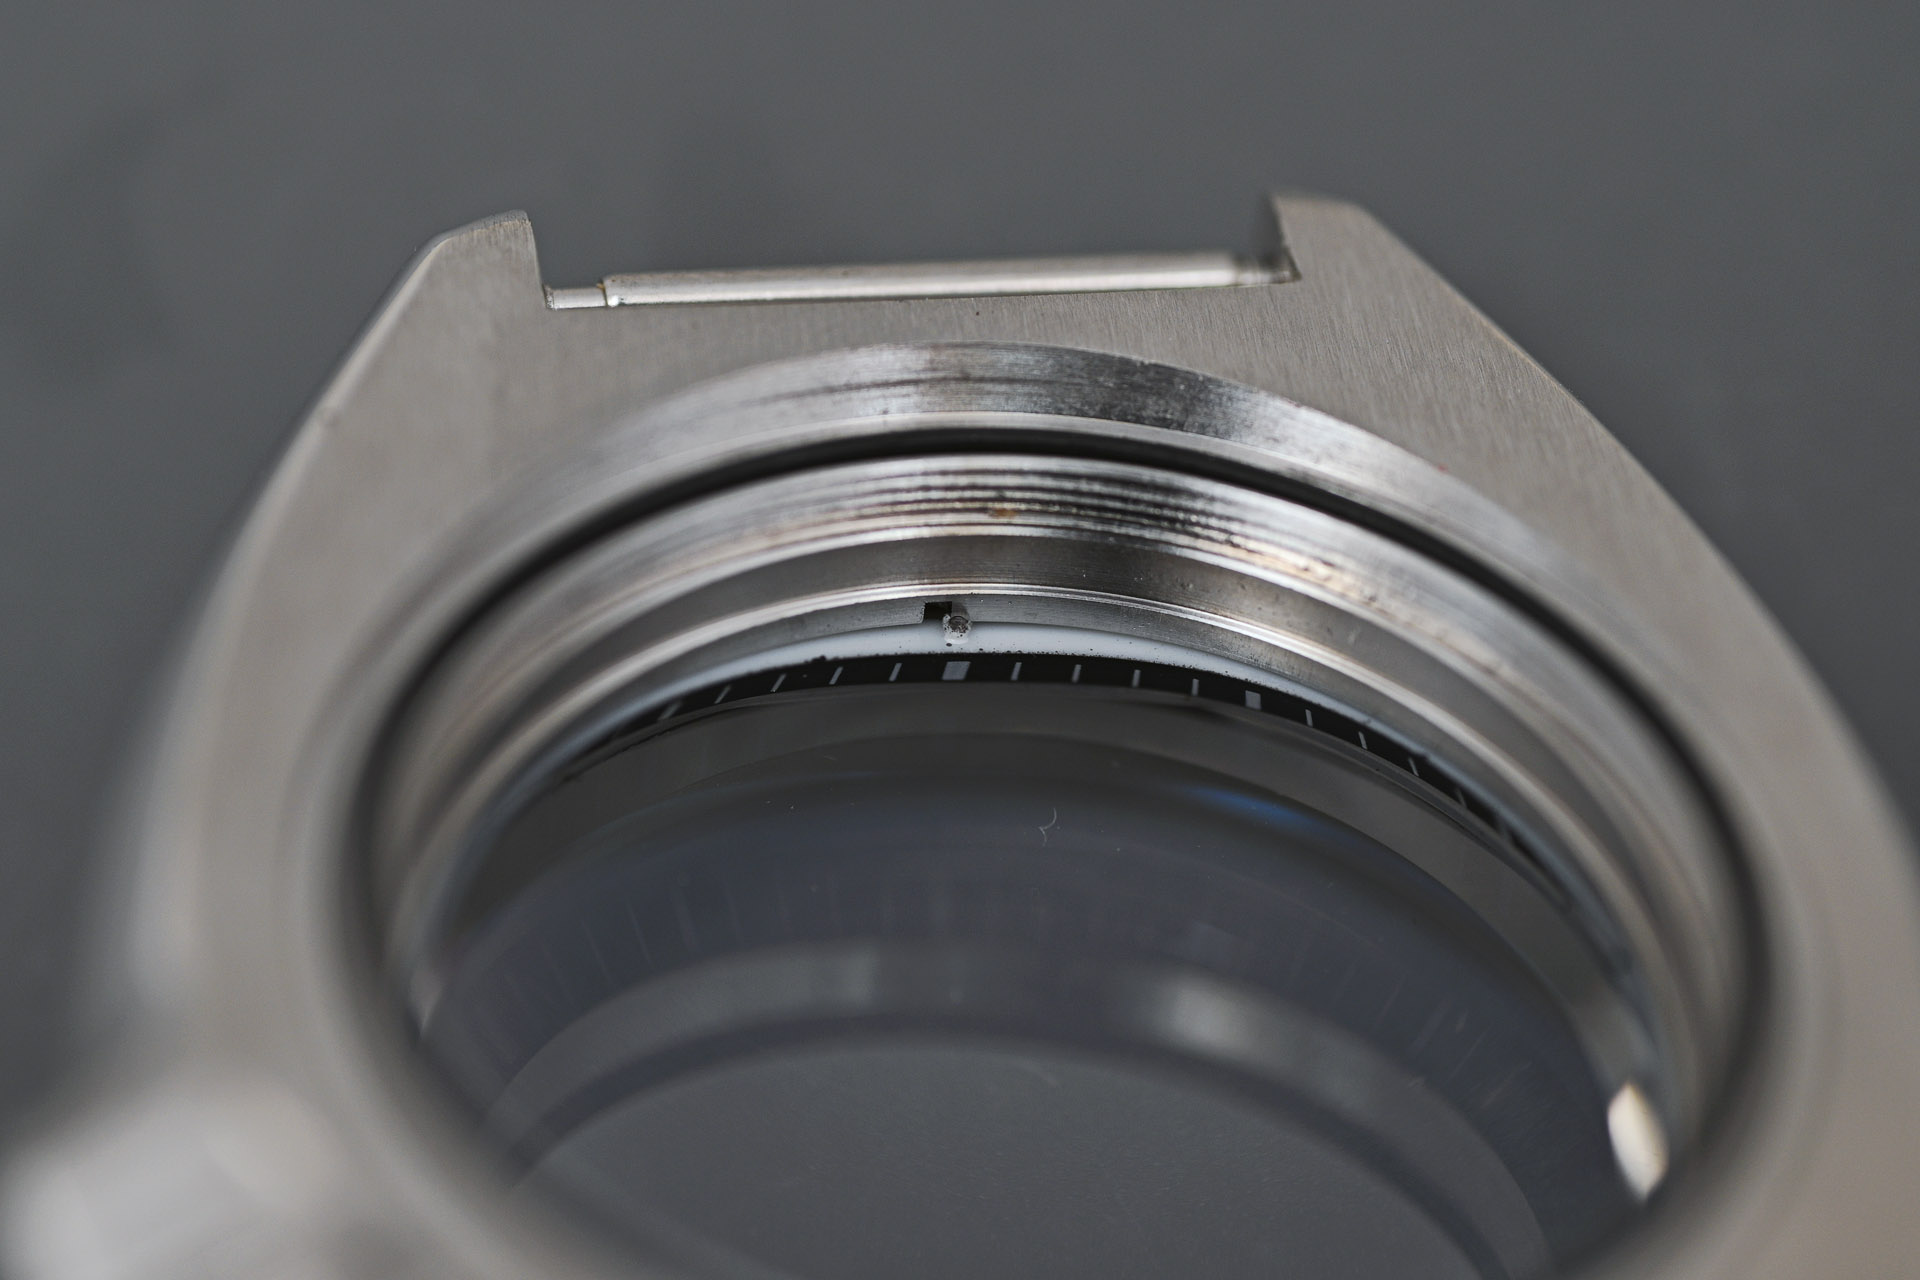
In fact, it appears that the crystal gasket is also not seated properly, in the region of the 12 o’clock position. The only way to access the chapter ring is to remove the crystal. The usual order of play would be to remove the bezel turning ring, and then press the crystal out from within. However, removing the turning ring on these cases is easier said than done and the likely outcome of any such attempts is the destruction of the bezel (ask me how I know). We shall see shortly what the correct process is to remove the bezel but for the moment let’s pretend that I have not learned the hard way and press on with the crystal removal first.
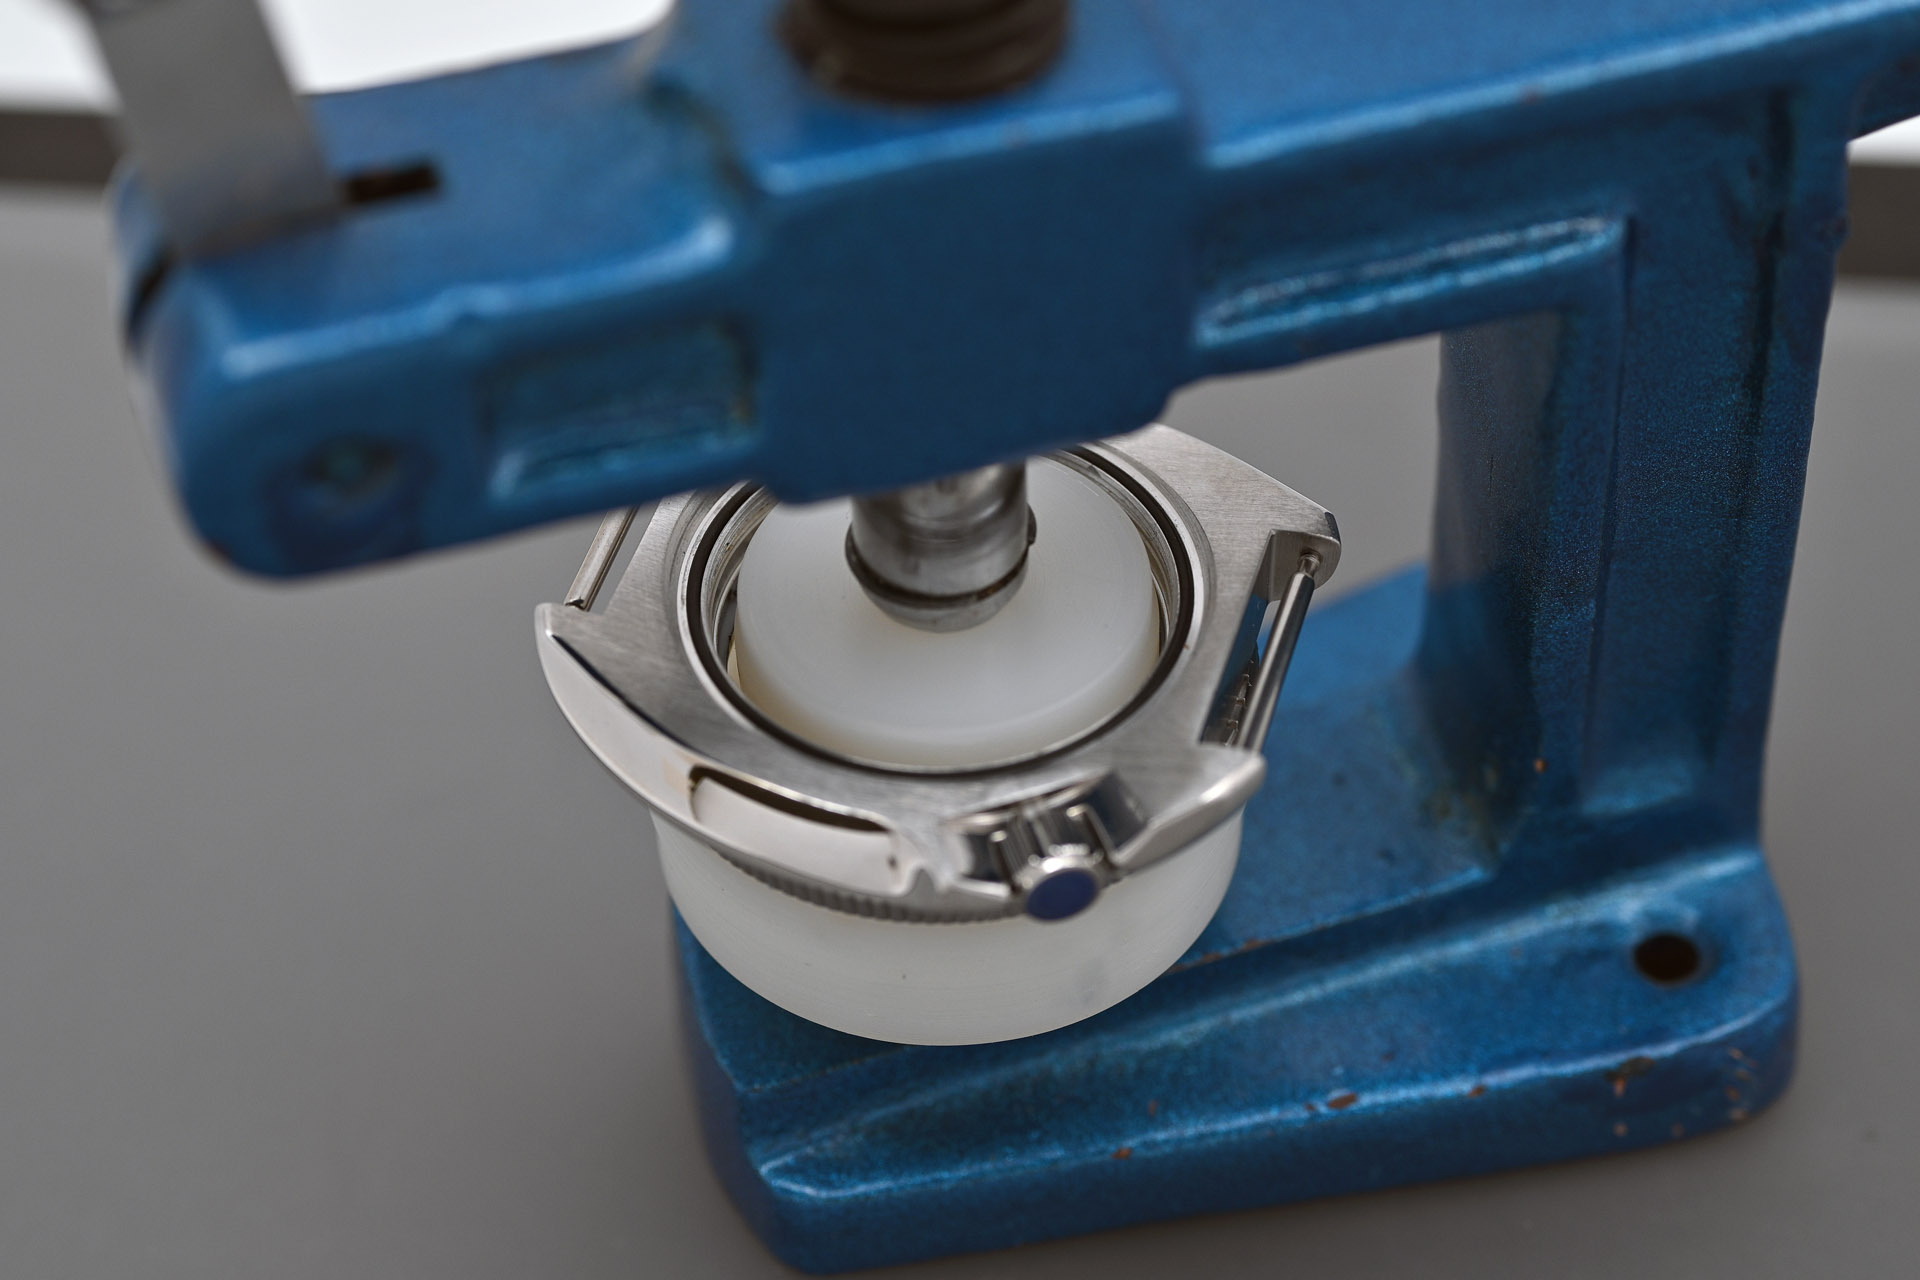
The inner diameter of the bezel insert is large enough to allow sufficient clearance for the crystal to press straight through. With the crystal out, it is clear that its removal was the correct decision. The nylon gasket has been pinched during the original fitting of the crystal and damaged to the point that I do not believe it can serve its intended purpose.

You can see the crimp in the photo of the partially disassembled case below.

Somewhat to my surprise, the bezel insert quality is very nice, so nice in fact that I abandon my plans to replace it. However, it will need to come out temporarily so that I can optimise its alignment with the dial minute markers once the movement, dial and hands are in position. The insert is secured in place with some double-sided sticky stuff and comes away quite easily with some careful teasing.

With the insert removed, we can see that the bezel turning ring is secured to the mid-case using a retaining spring, much like the arrangement in the 62MAS and first generation 6105. However, removal of the turning ring requires the spring to be removed first through the gap provided once the insert is out. This is a very inconvenient process but does at least have in its favour the very secure partnership between turning ring and case.
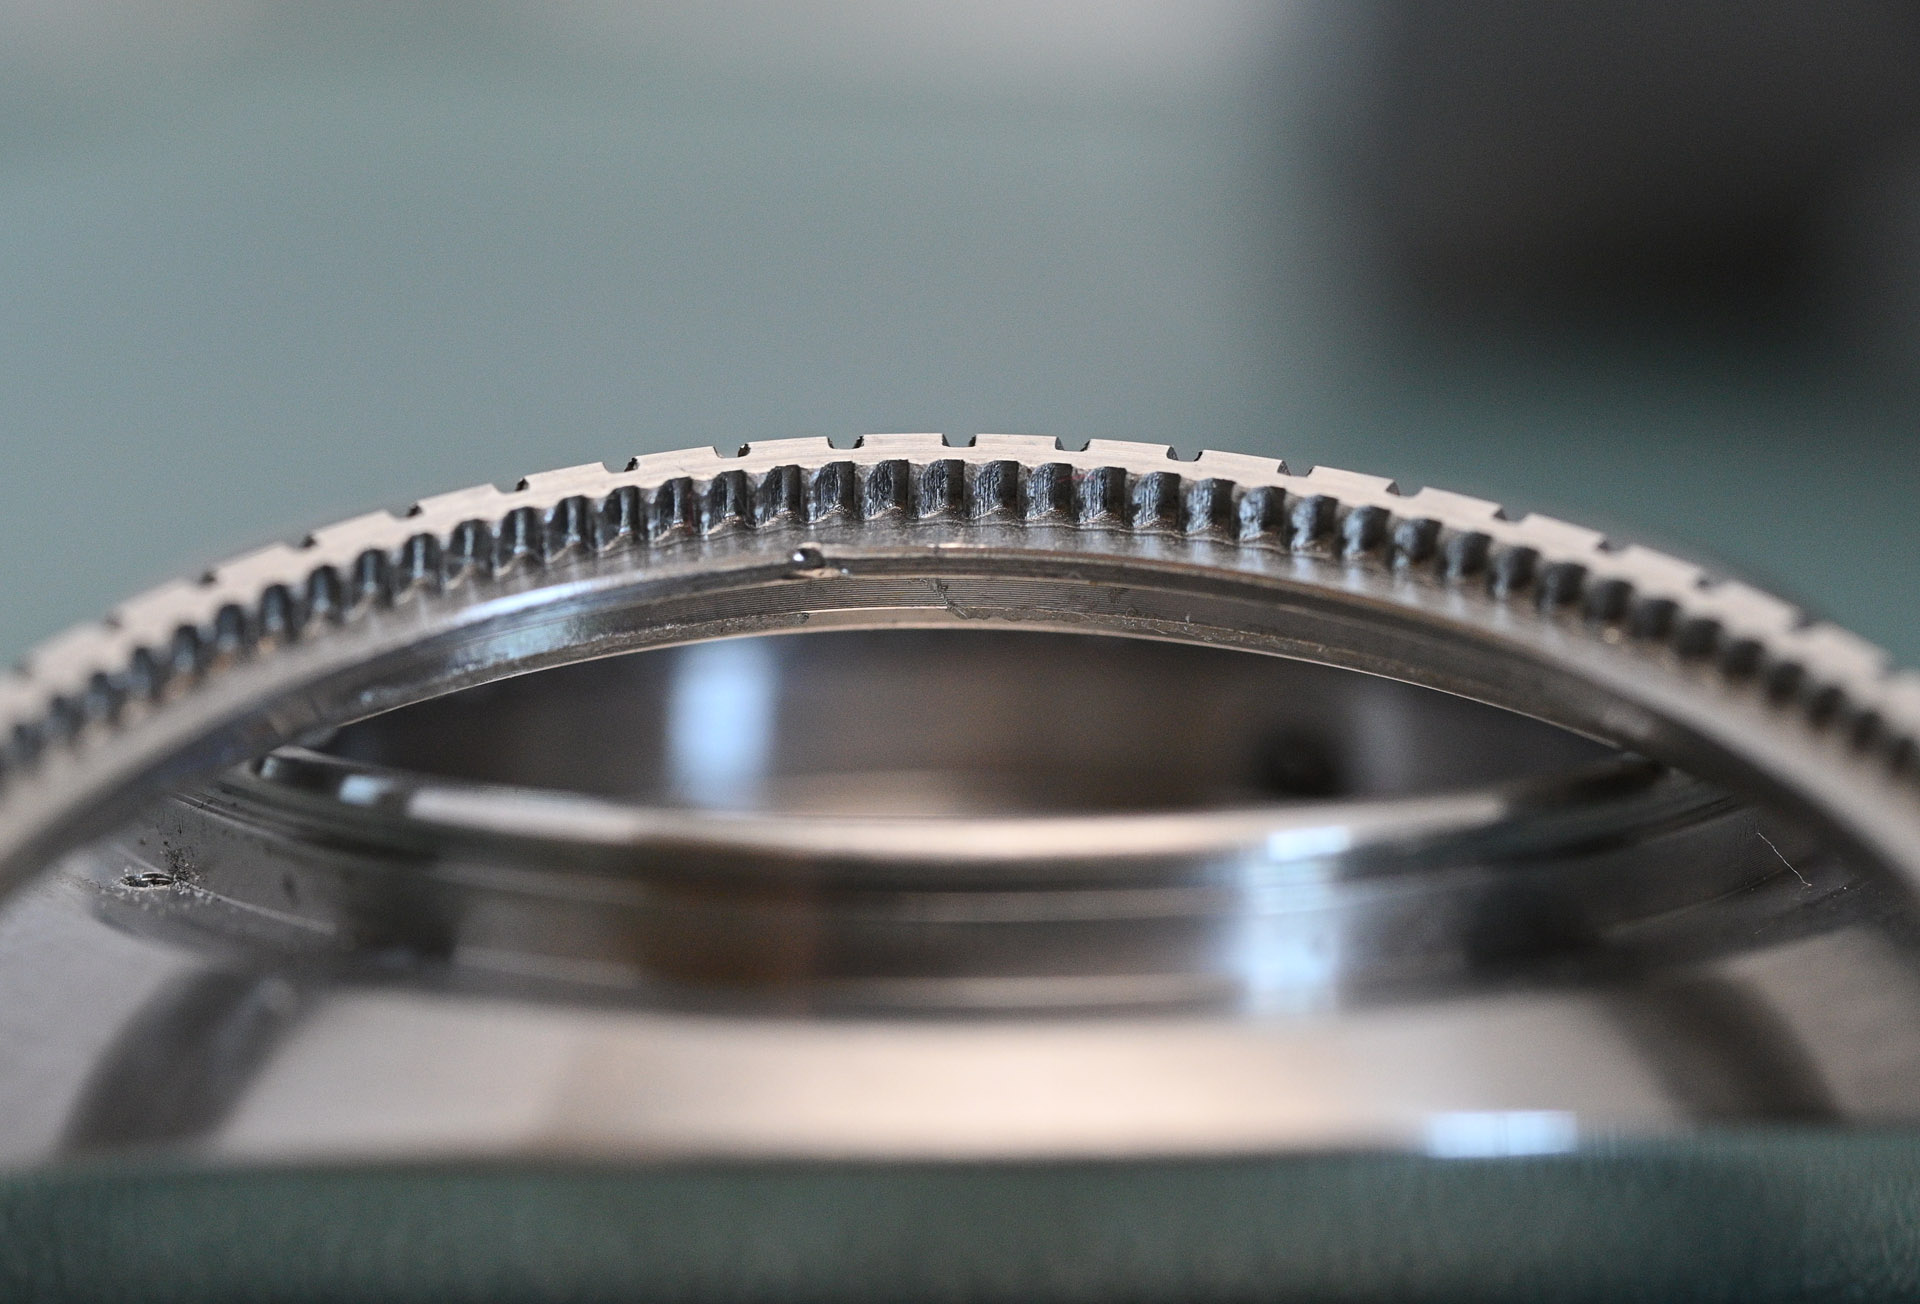
The ratcheting of the 120 click uni-directional bezel is achieved using a spring that locates into a vertical hole in the upper surface of the case, and whose end then locates into the furrow provided by one of 120 teeth machined into the inner circumference of the turning ring.
The view of the underside of the turning ring reveals those inner teeth but also that the grooves visible from the exterior of the turning ring are dummies.
You may have deduced by now that there are two cases in play here, one of which playing an unintended sacrificial role. In both, the chapter ring markings were misaligned but in one the chapter ring and crystal gasket had not been damaged during the manufacturing process and so were able to offer themselves up as replacements for the damaged parts in the second case. Here is the replacement chapter ring and crystal gasket in position as I start to re-assemble the candidate I was using for the project.
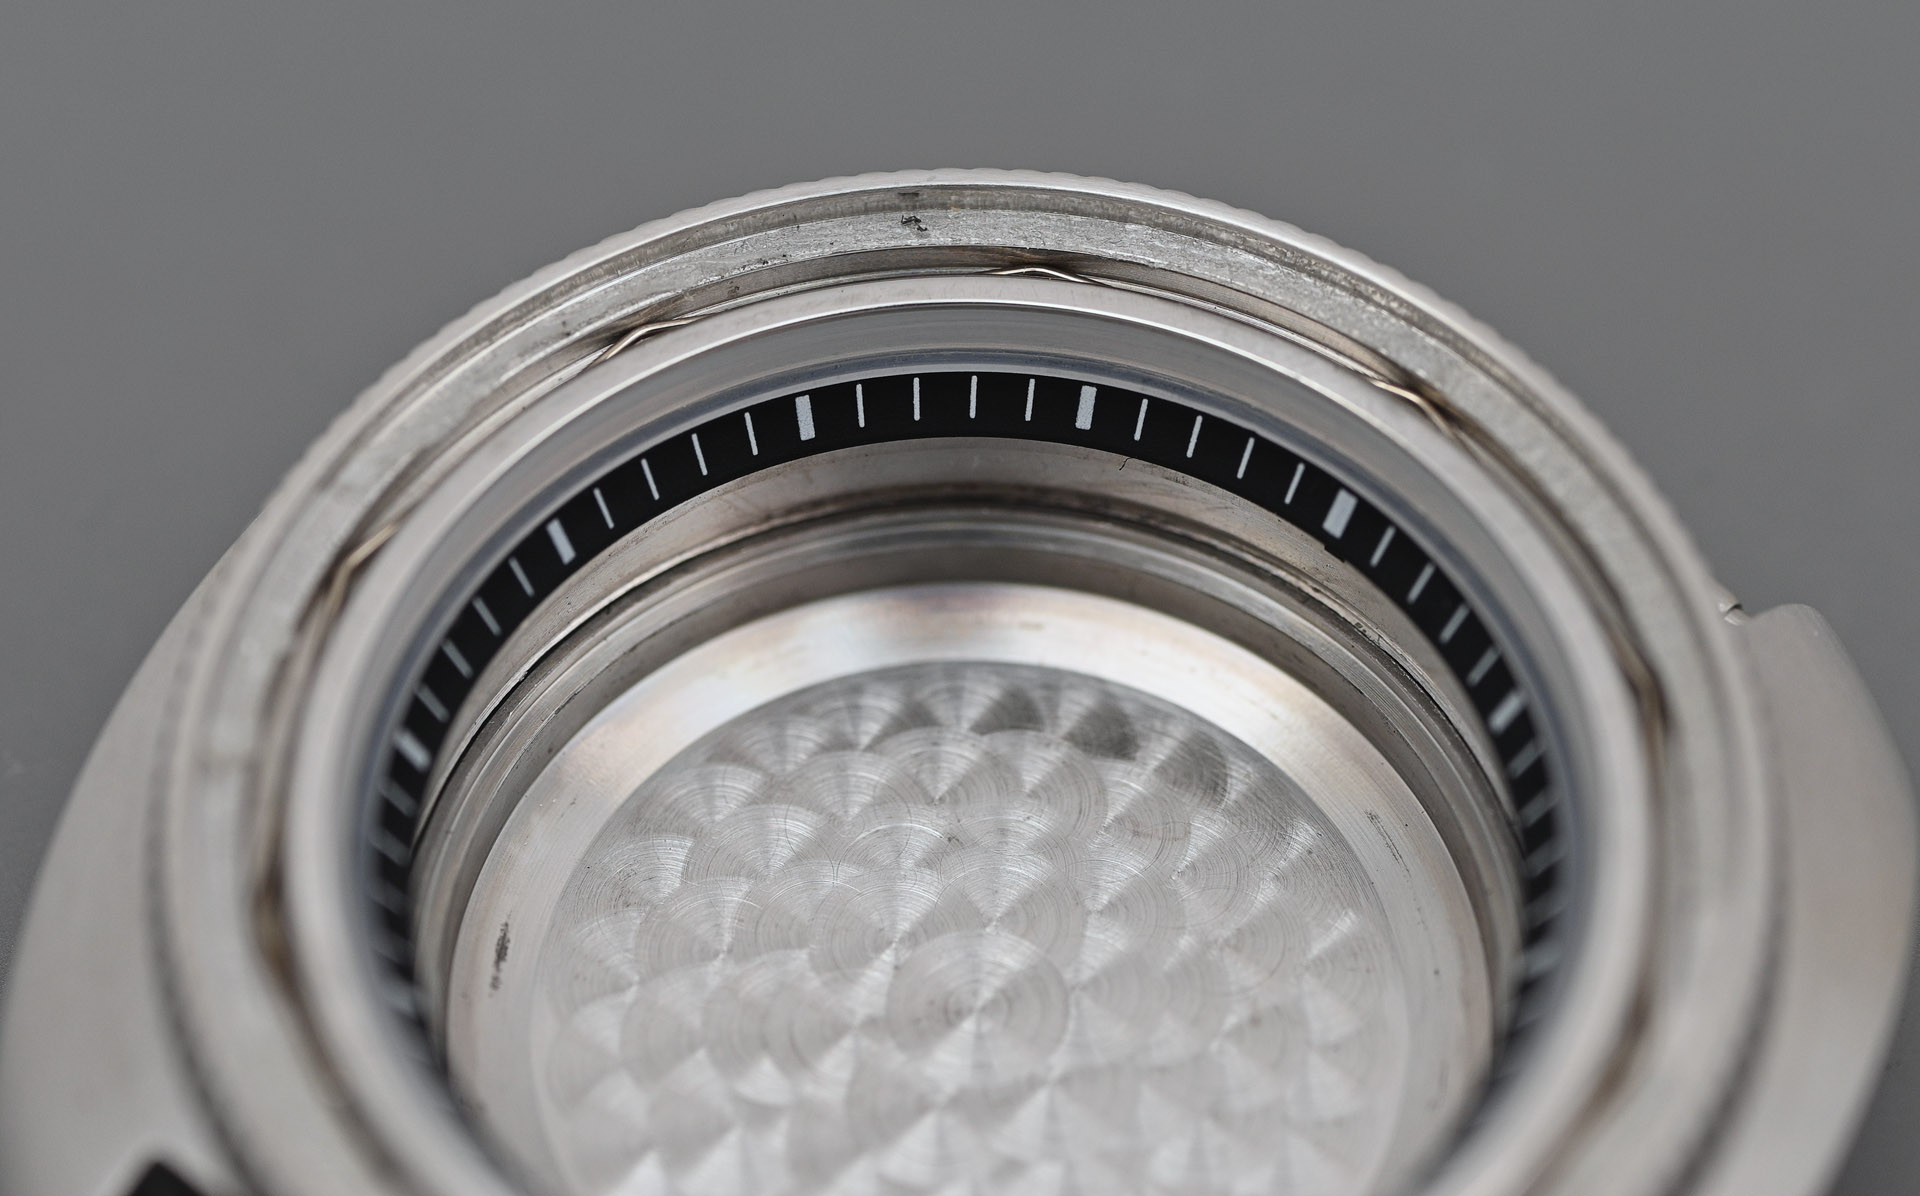
The crystal pressed back in without fuss and so we are now back to square one but a square one that is fit for purpose.

The next logistical challenge is the dial and its feet (or rather, lack of feet).
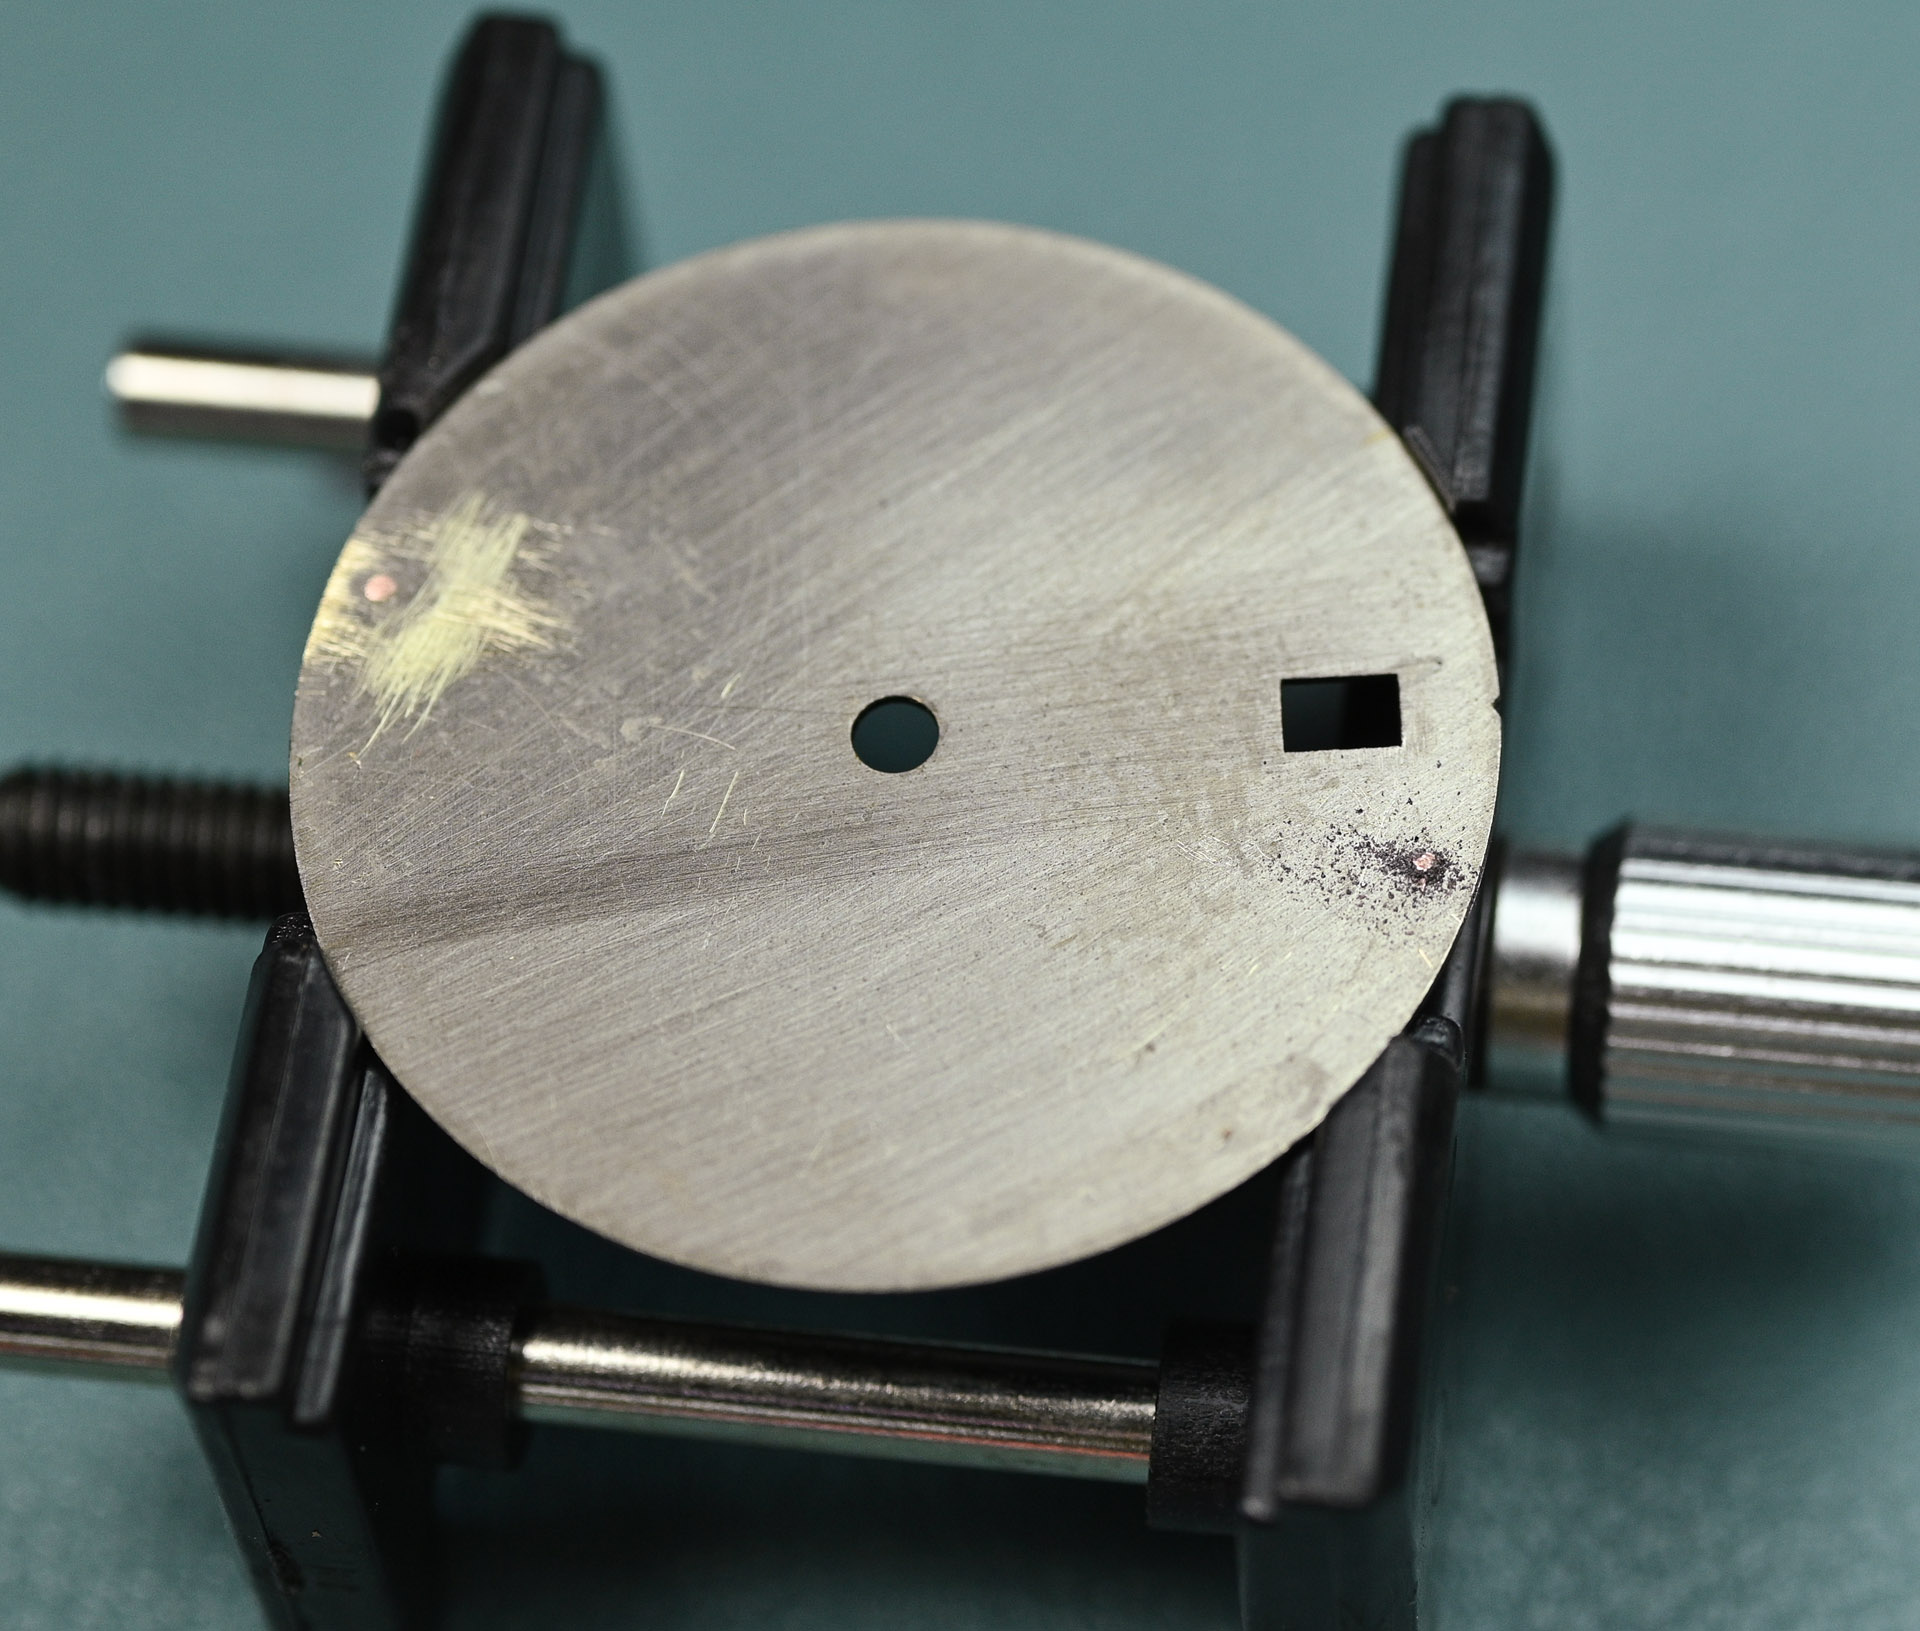
Two remnant nubbins mark the location of the original feet and need to be sanded down to provide a nice flat, virgin surface on which to create two foundations for the positioning of new feet. The case is configured with the crown at 4.1 and so the original feet would not have been in the correct positions anyway. There are a number of approaches you can take to securing new feet to the back of a watch dial, the most secure of which is to solder new feet using a dedicated watch dial foot soldering machine. This approach does carry a small risk that the front surface of the dial is marred by the heat from the soldering process but that concern is moot because I don’t have such a machine and I am not prepared to buy one just for this project. I refuse to contemplate sticky pads and so I decide to try bonding a pair of new dial feet to the rear of the dial. To that end, I bought a dial milling tool to create two rebated circular troughs into which the bases of the two feet would sit. I started by milling two rebates in the position of the original feet to get a feel for the process.
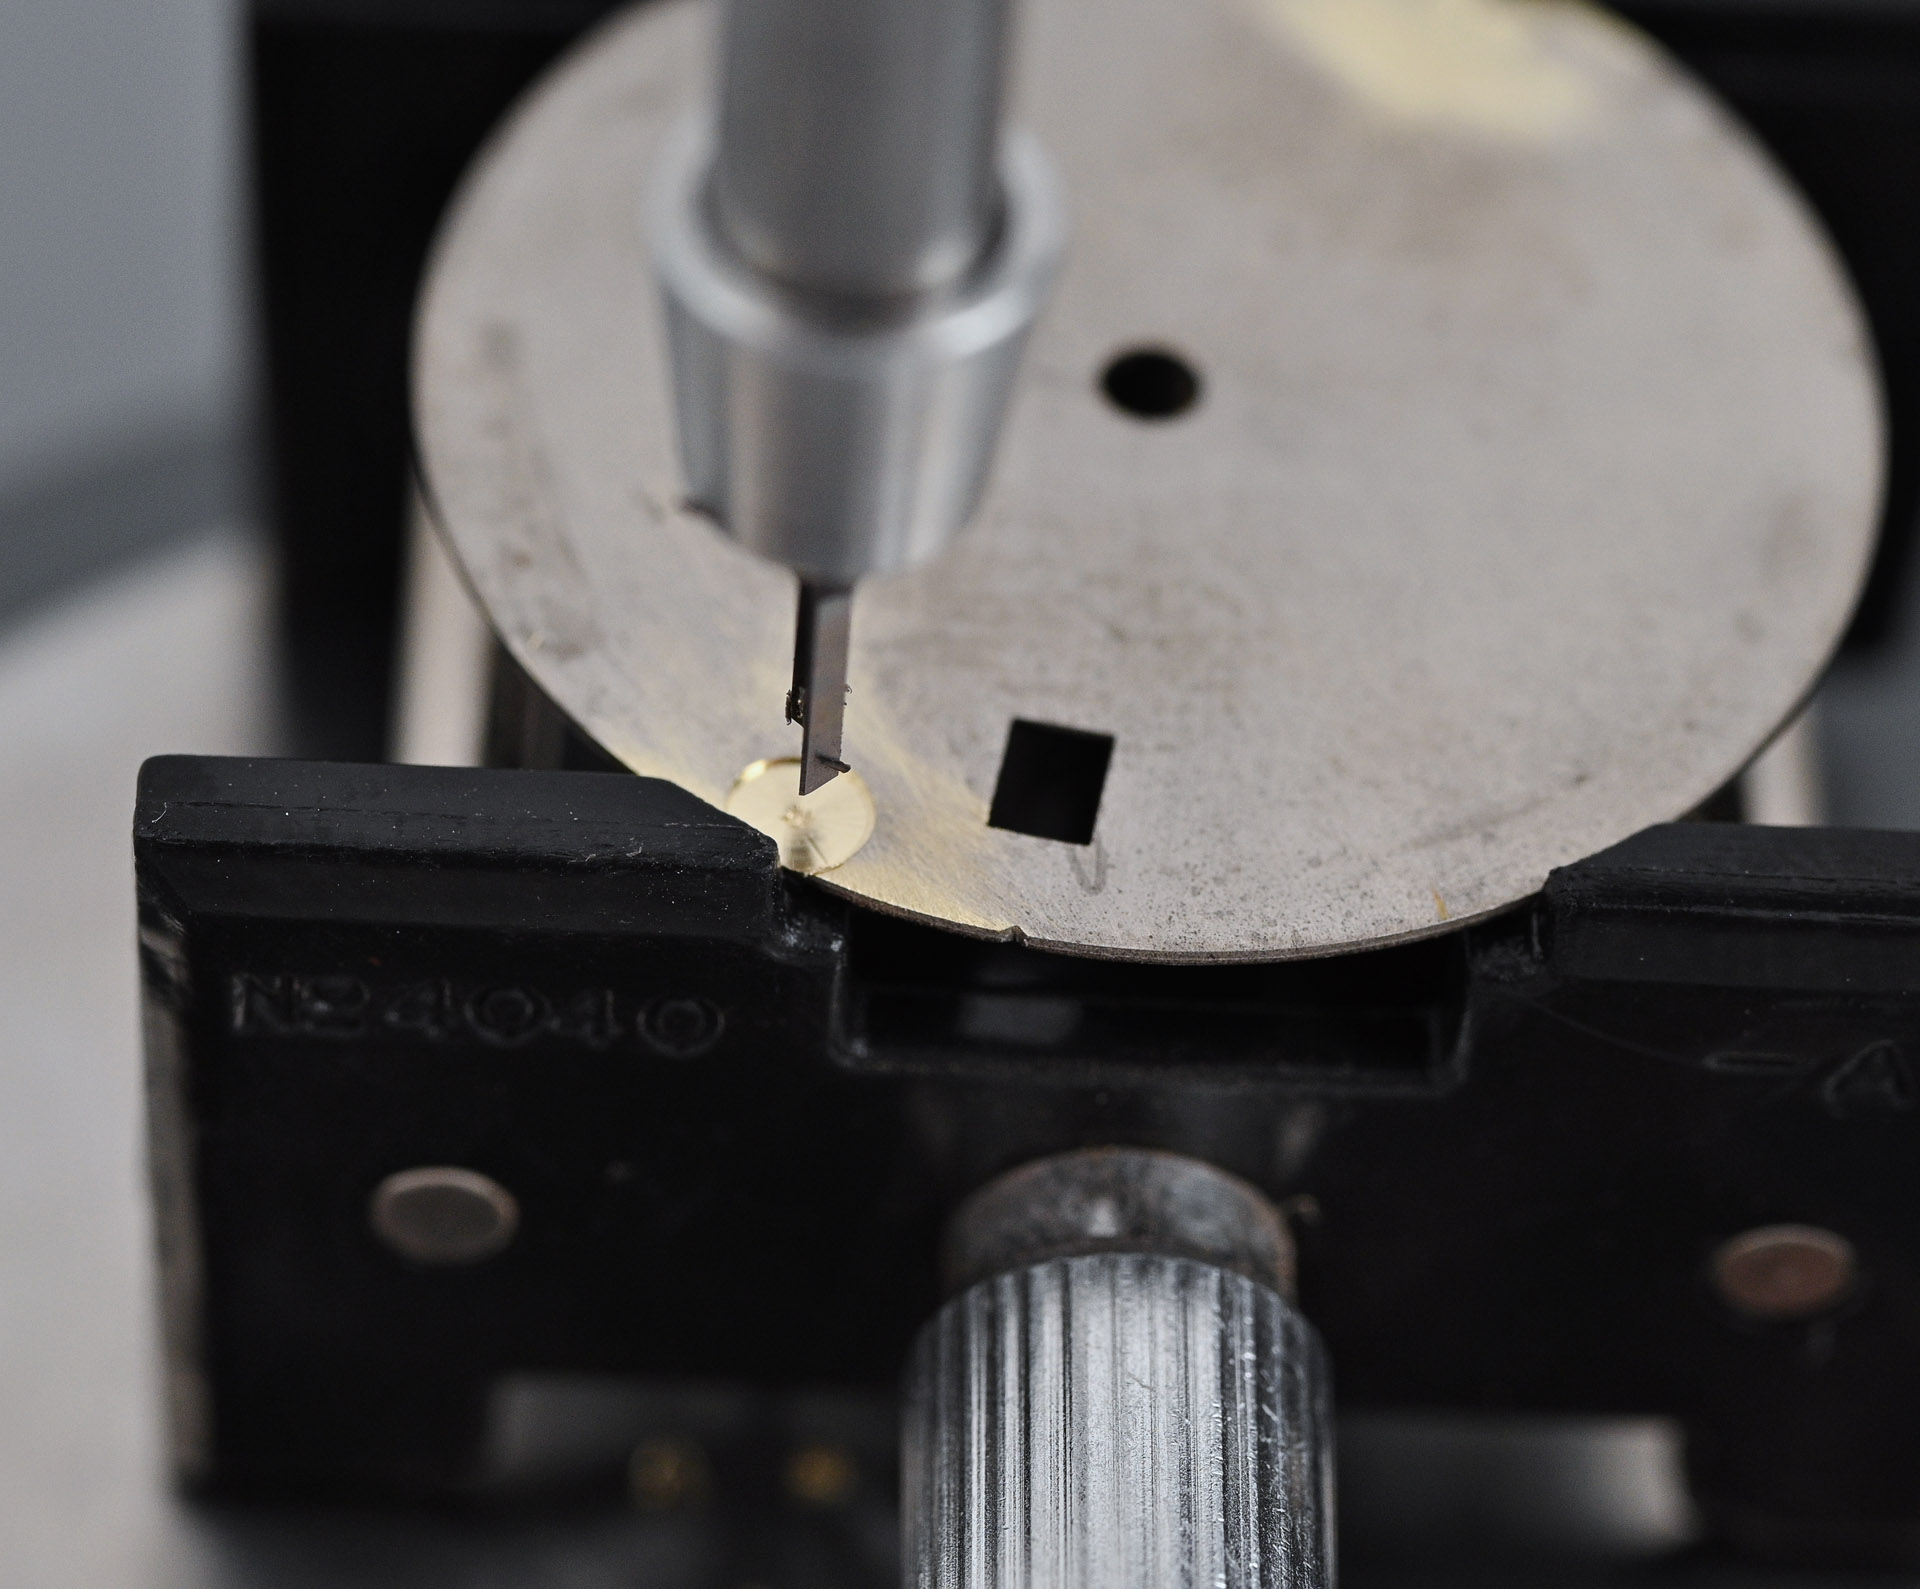
That went reasonably well but I then realised that I would need more useable surface area to position the dial feet correctly. That process was not a little fraught but the result was, if not exactly pretty, effective in creating a sufficiently expansive recessed landscape on which to position the feet. The next task was to identify a glue that would actually maintain some sort of grip on the dial feet. The dial milling tool came with some superglue but this proved to be entirely useless. Next, I tried some two-part Araldite metal-to-metal epoxy. This initially looked quite promising and so I left it to cure for a day before putting it through its paces.
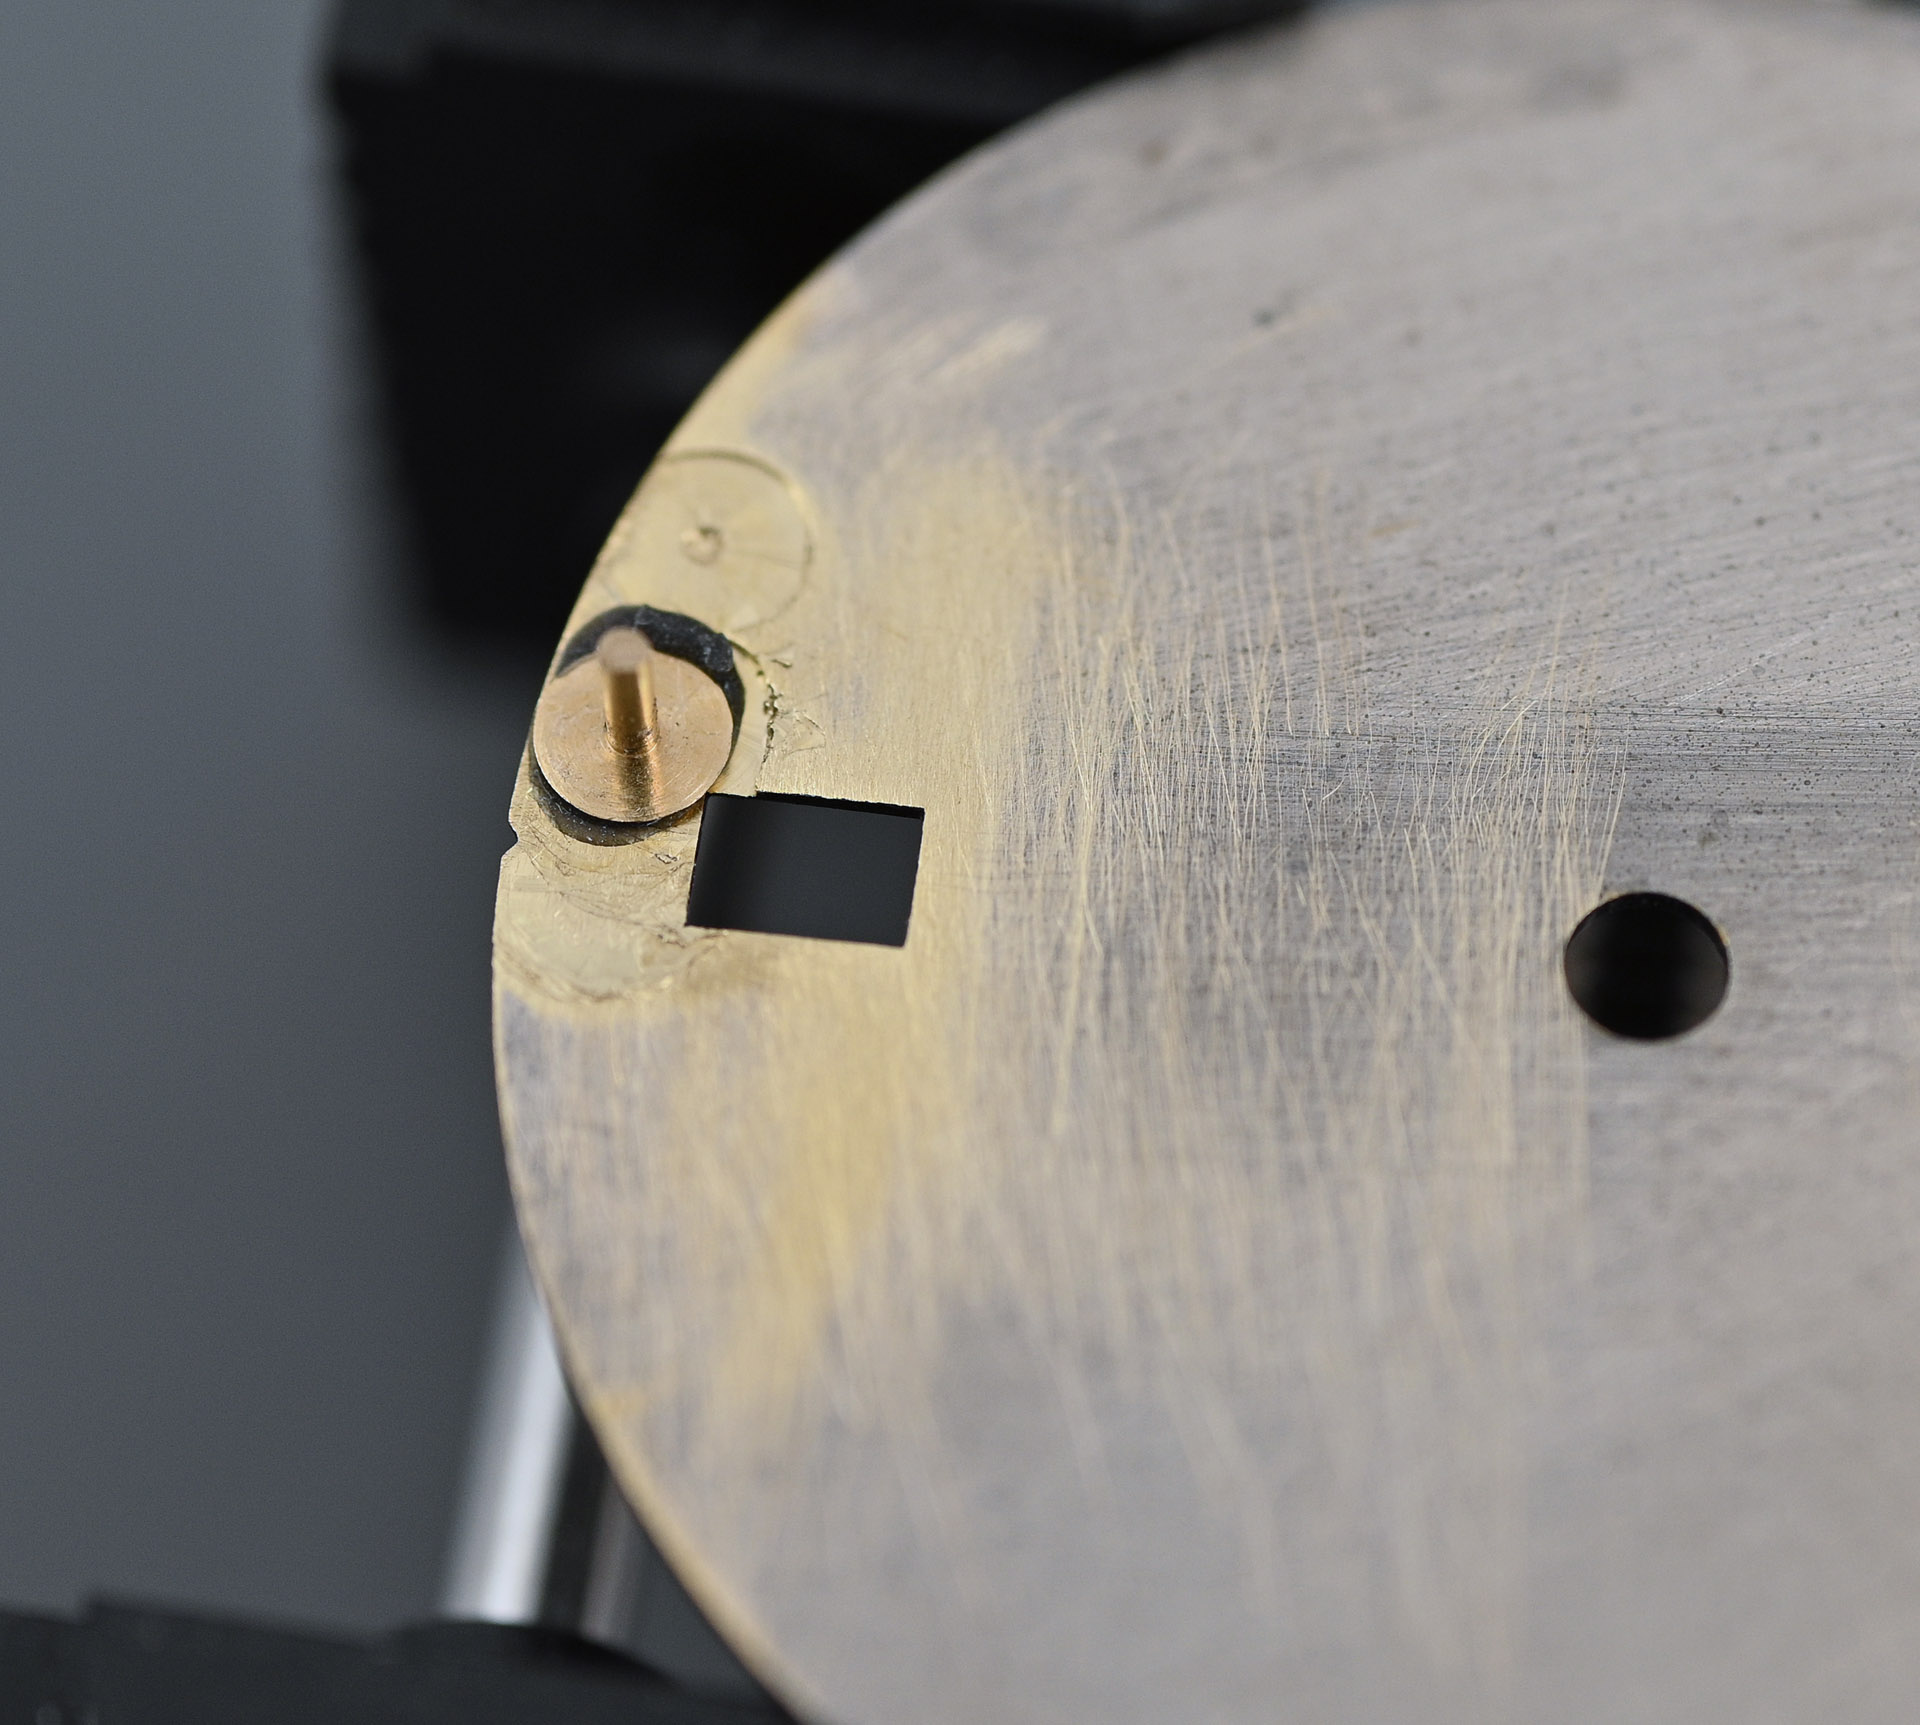
Alas, a couple of dial fitting and removal cycles later and one of the feet had become detached. Back to the drawing board. The next candidate was some Permabond Instant Adhesive 910 and this seemed to show a great deal more promise.
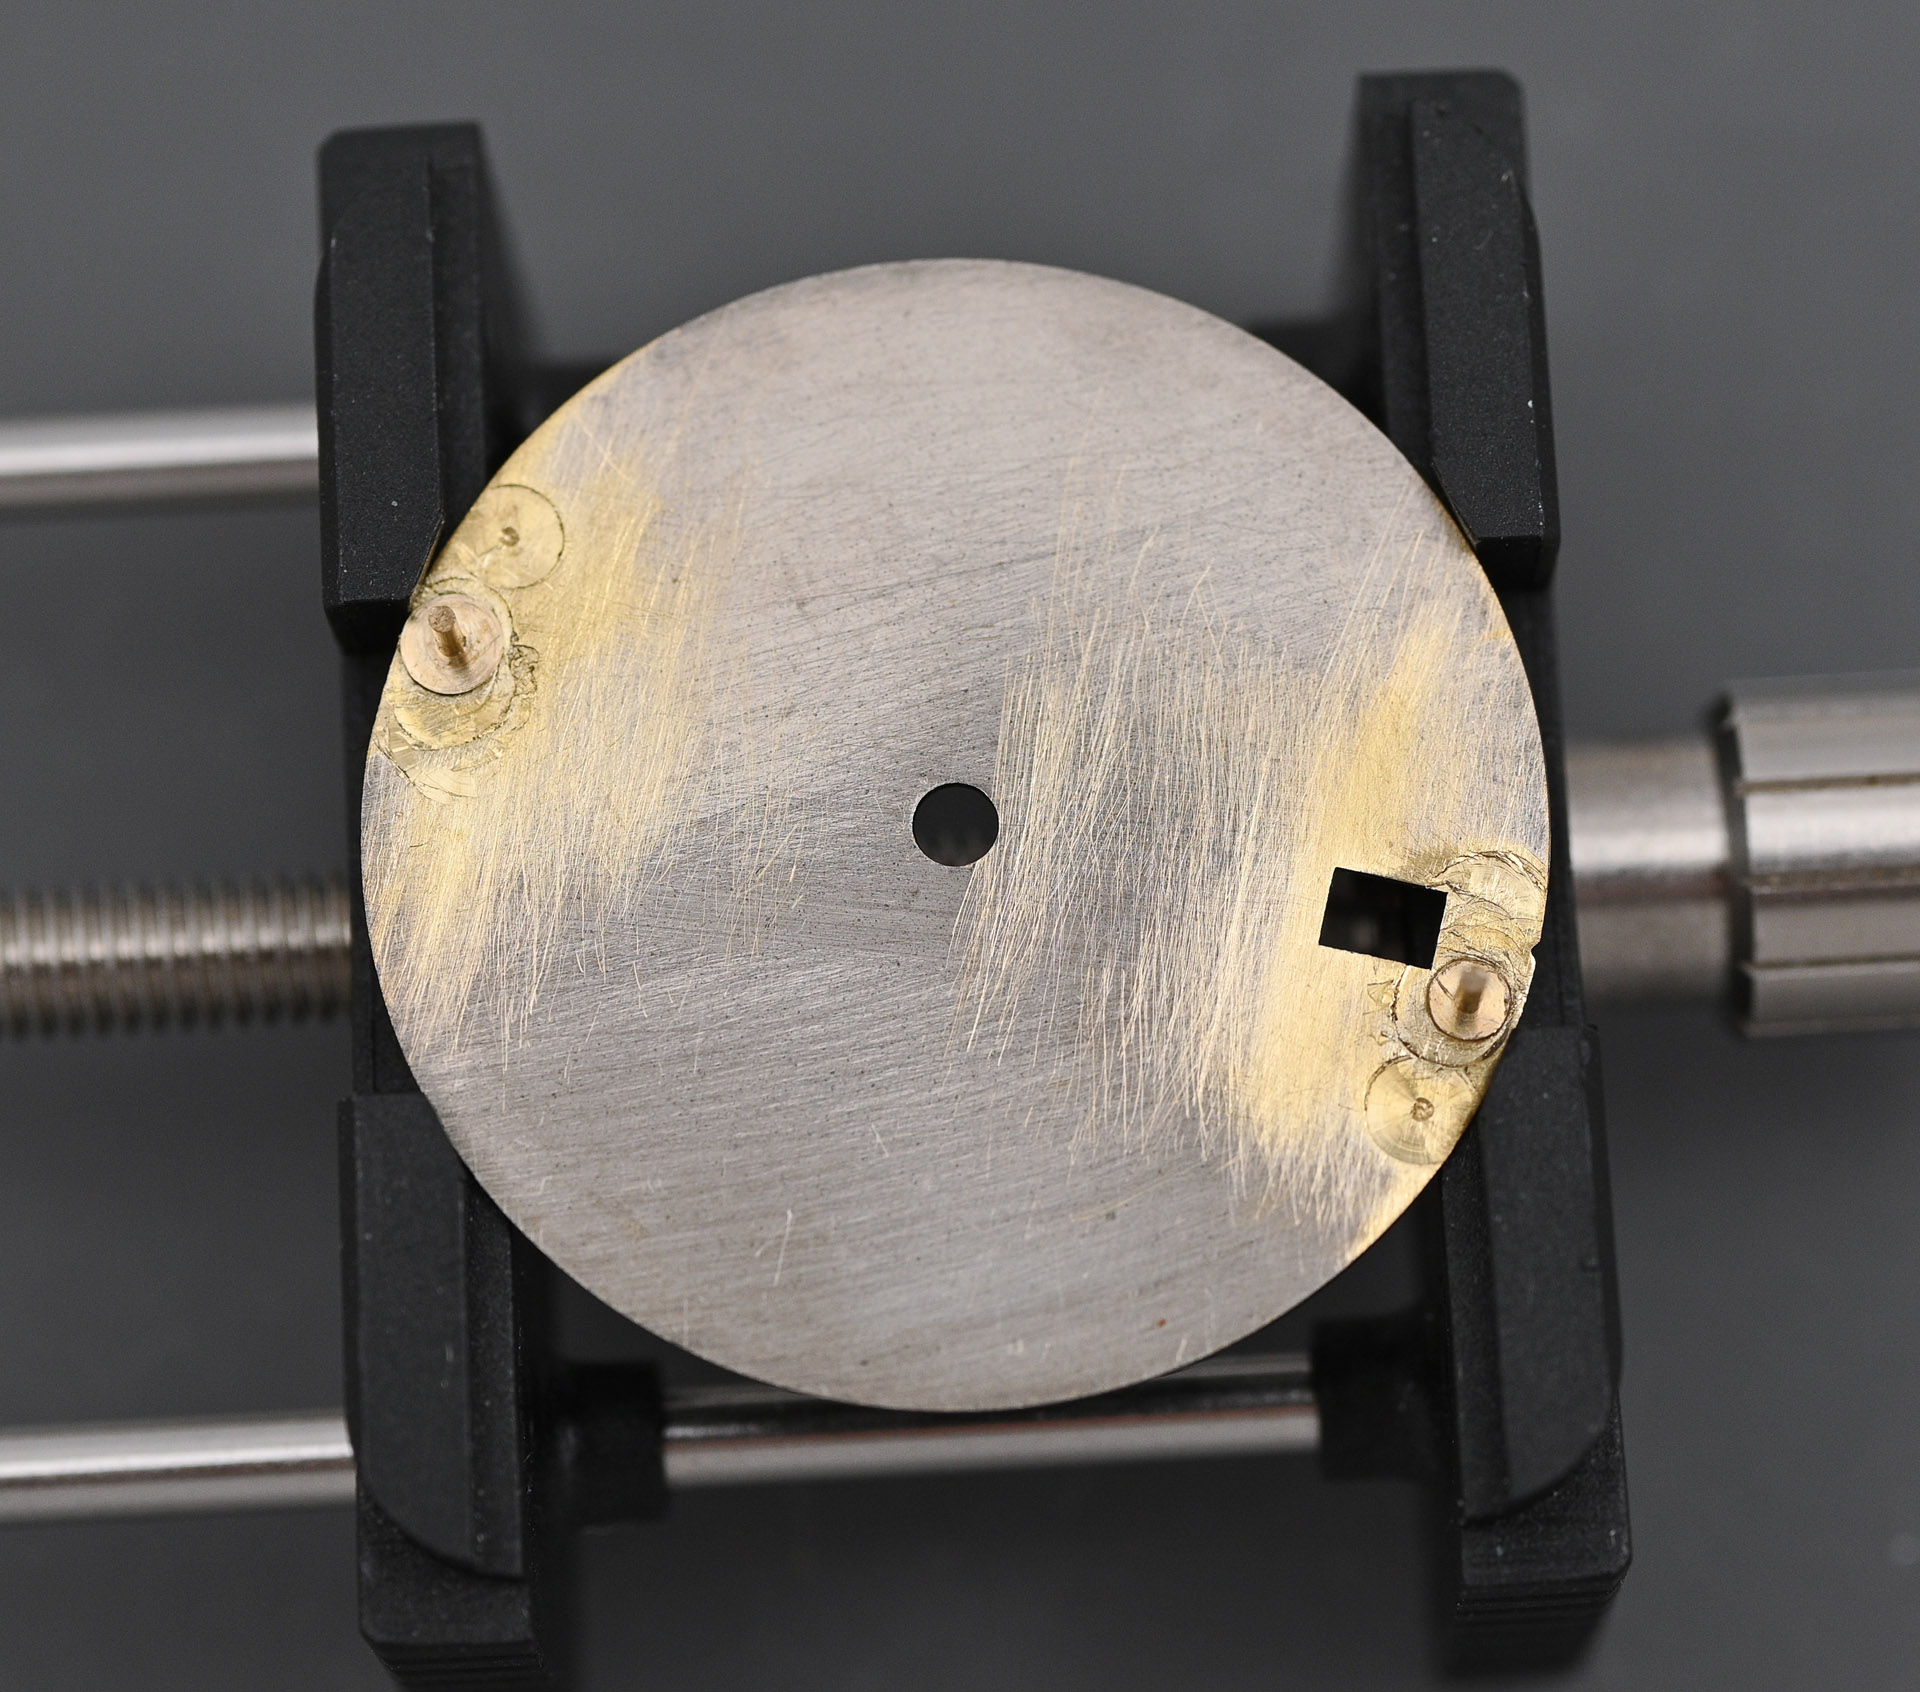
A day left to cure and the two feet appear to be secured well enough to survive the sort of rigours that might reasonably be expected. I don’t for a minute think that this solution is as good as soldering but it will more than do in this case. With that task completed, we can move onto the movement and then fit the dial and hands.
The movement selection is not so much a selection as a defaulting to the most obvious choice: a Seiko NH35, the most recent incarnation of the base Seiko automatic workhorse movement that can trace its roots back to the early 1970’s in the 7005 three-hander. In its current incarnation, it has evolved into quite a refined movement: 24 jewels running at 21600 bph, stop seconds facility, hand-winding, quickset date and a 41 hour power reserve.
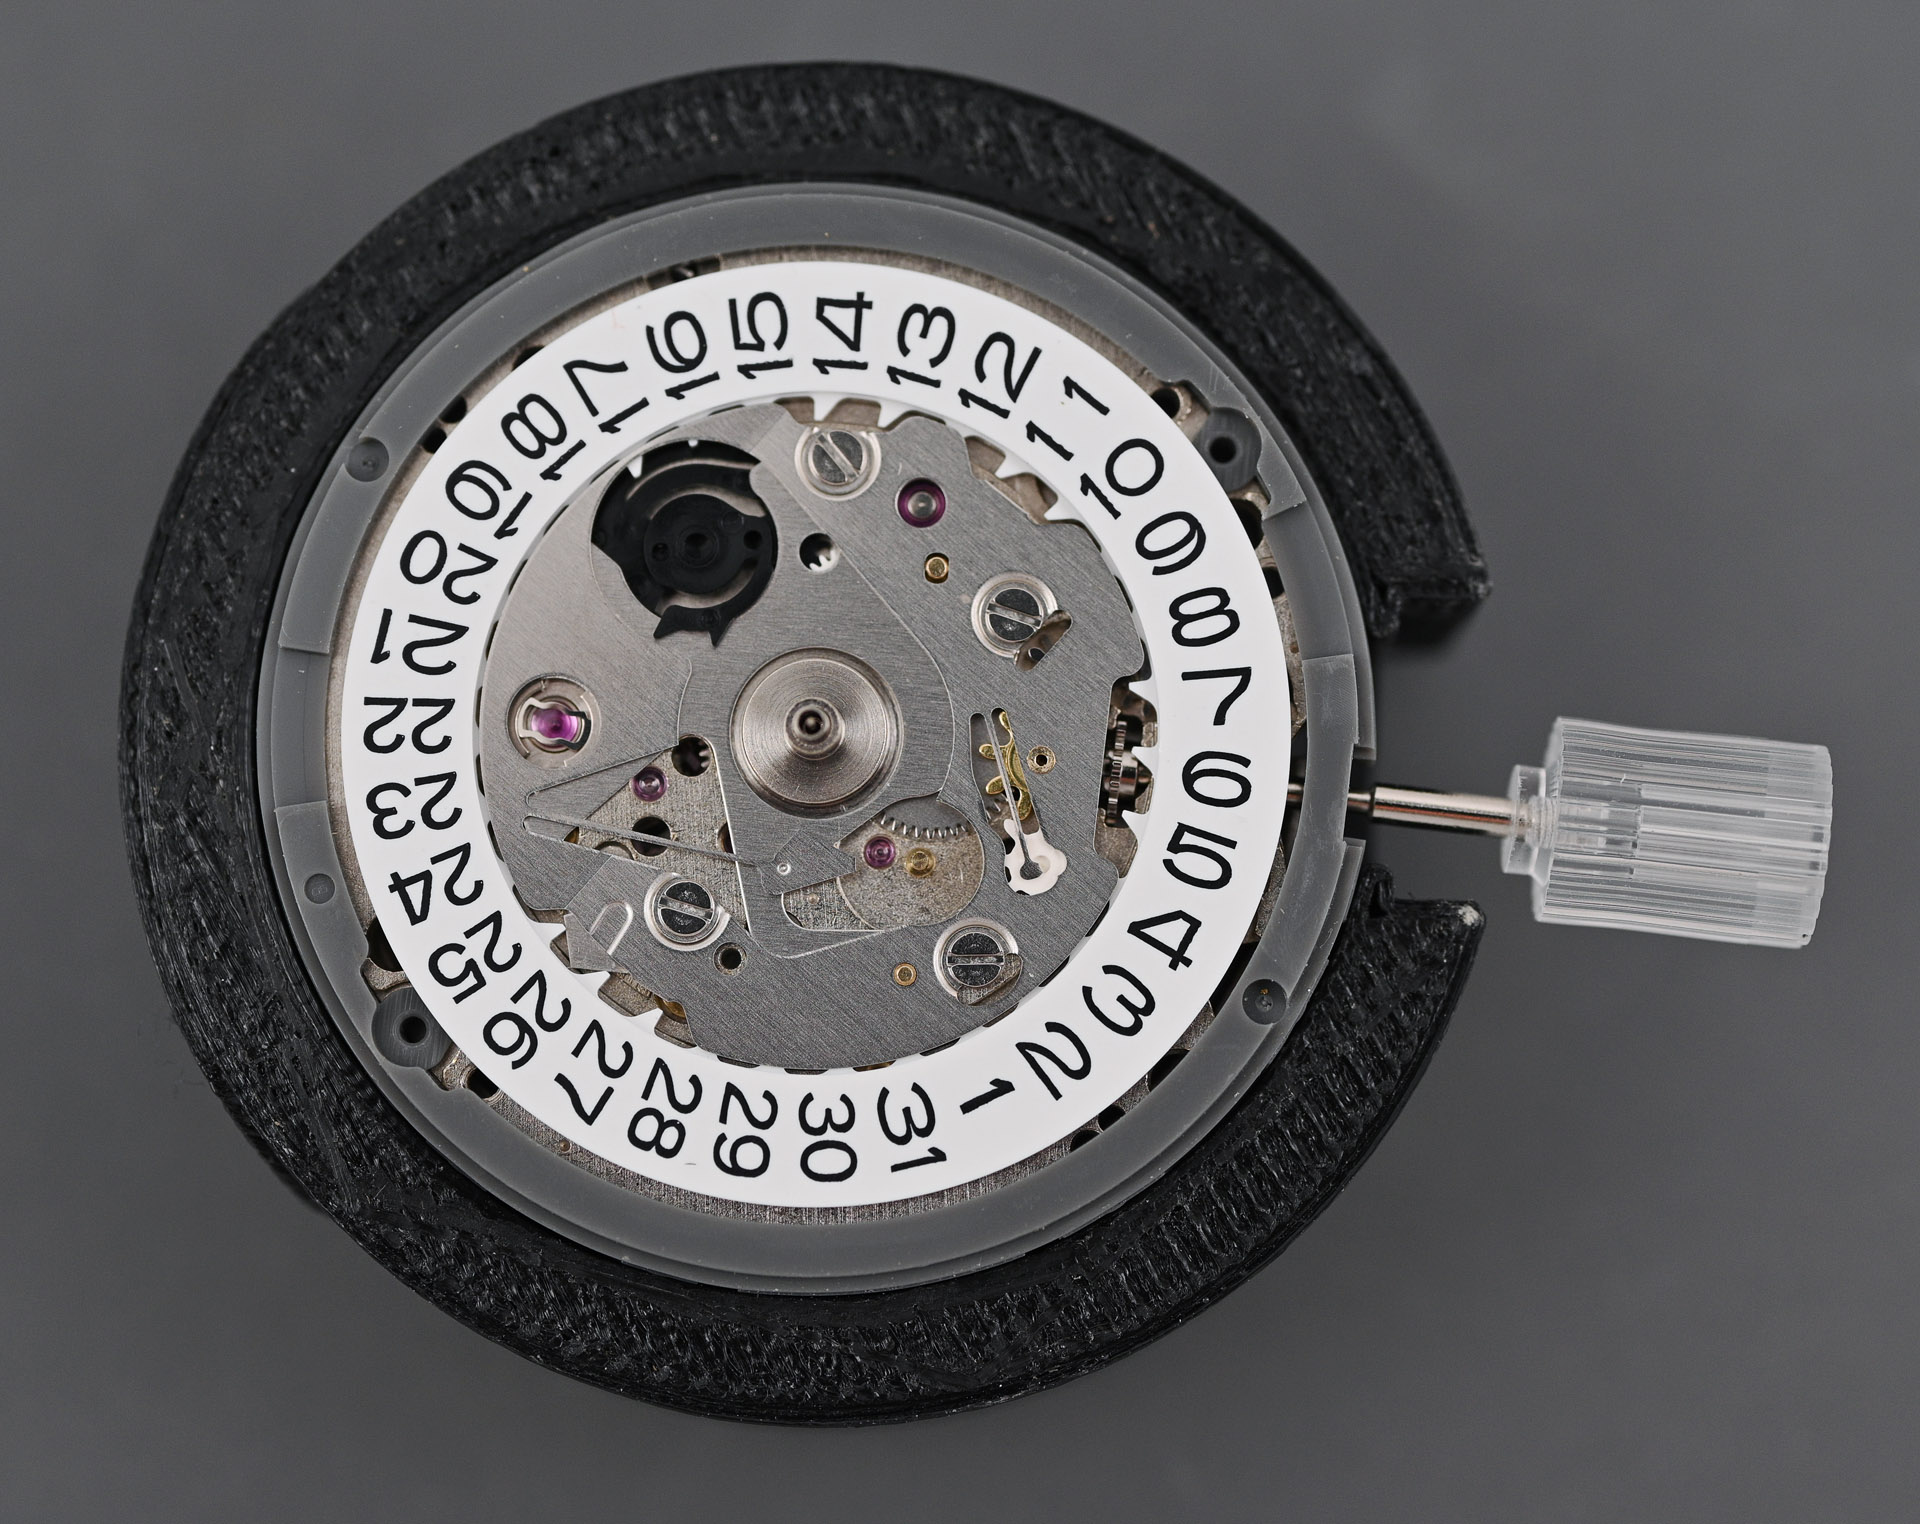
The only remedial work required with the movement is to trim a new stem to fit the case but apart from that, it’s basically plug and play. As usual, the process of transforming this collection of parts into a working watch involves fitting the dial, followed by the hands, then lowering the midcase into position, flip over and secure everything into place with the caseback.
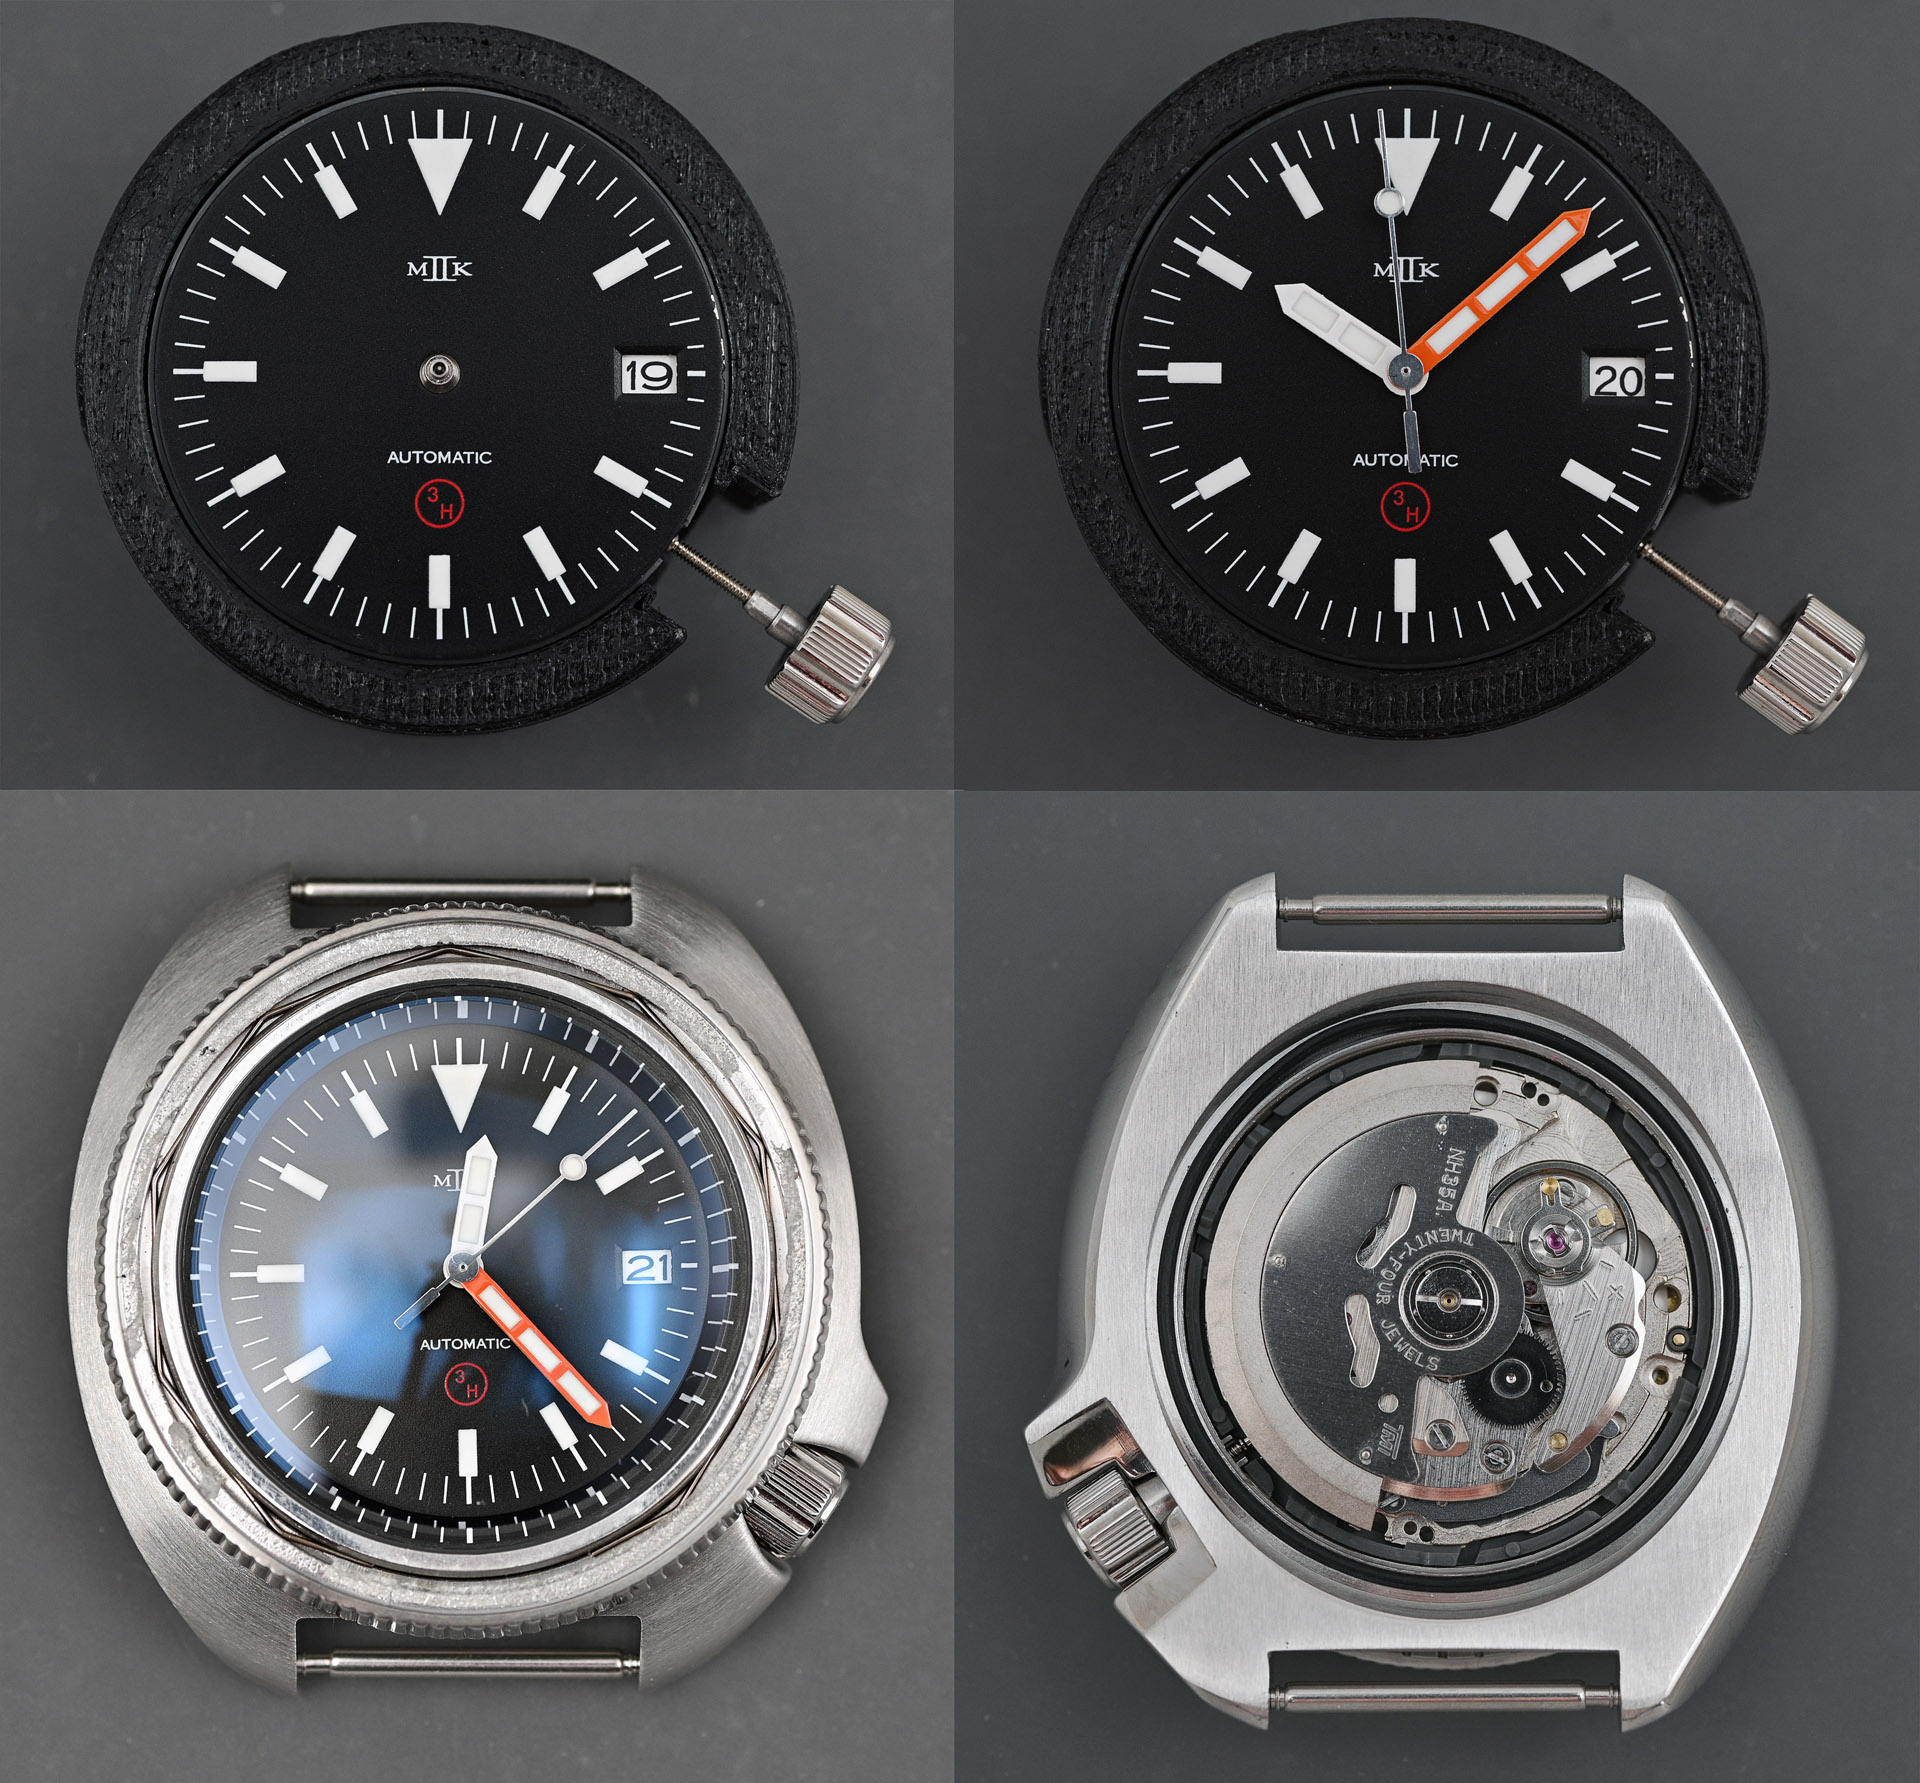
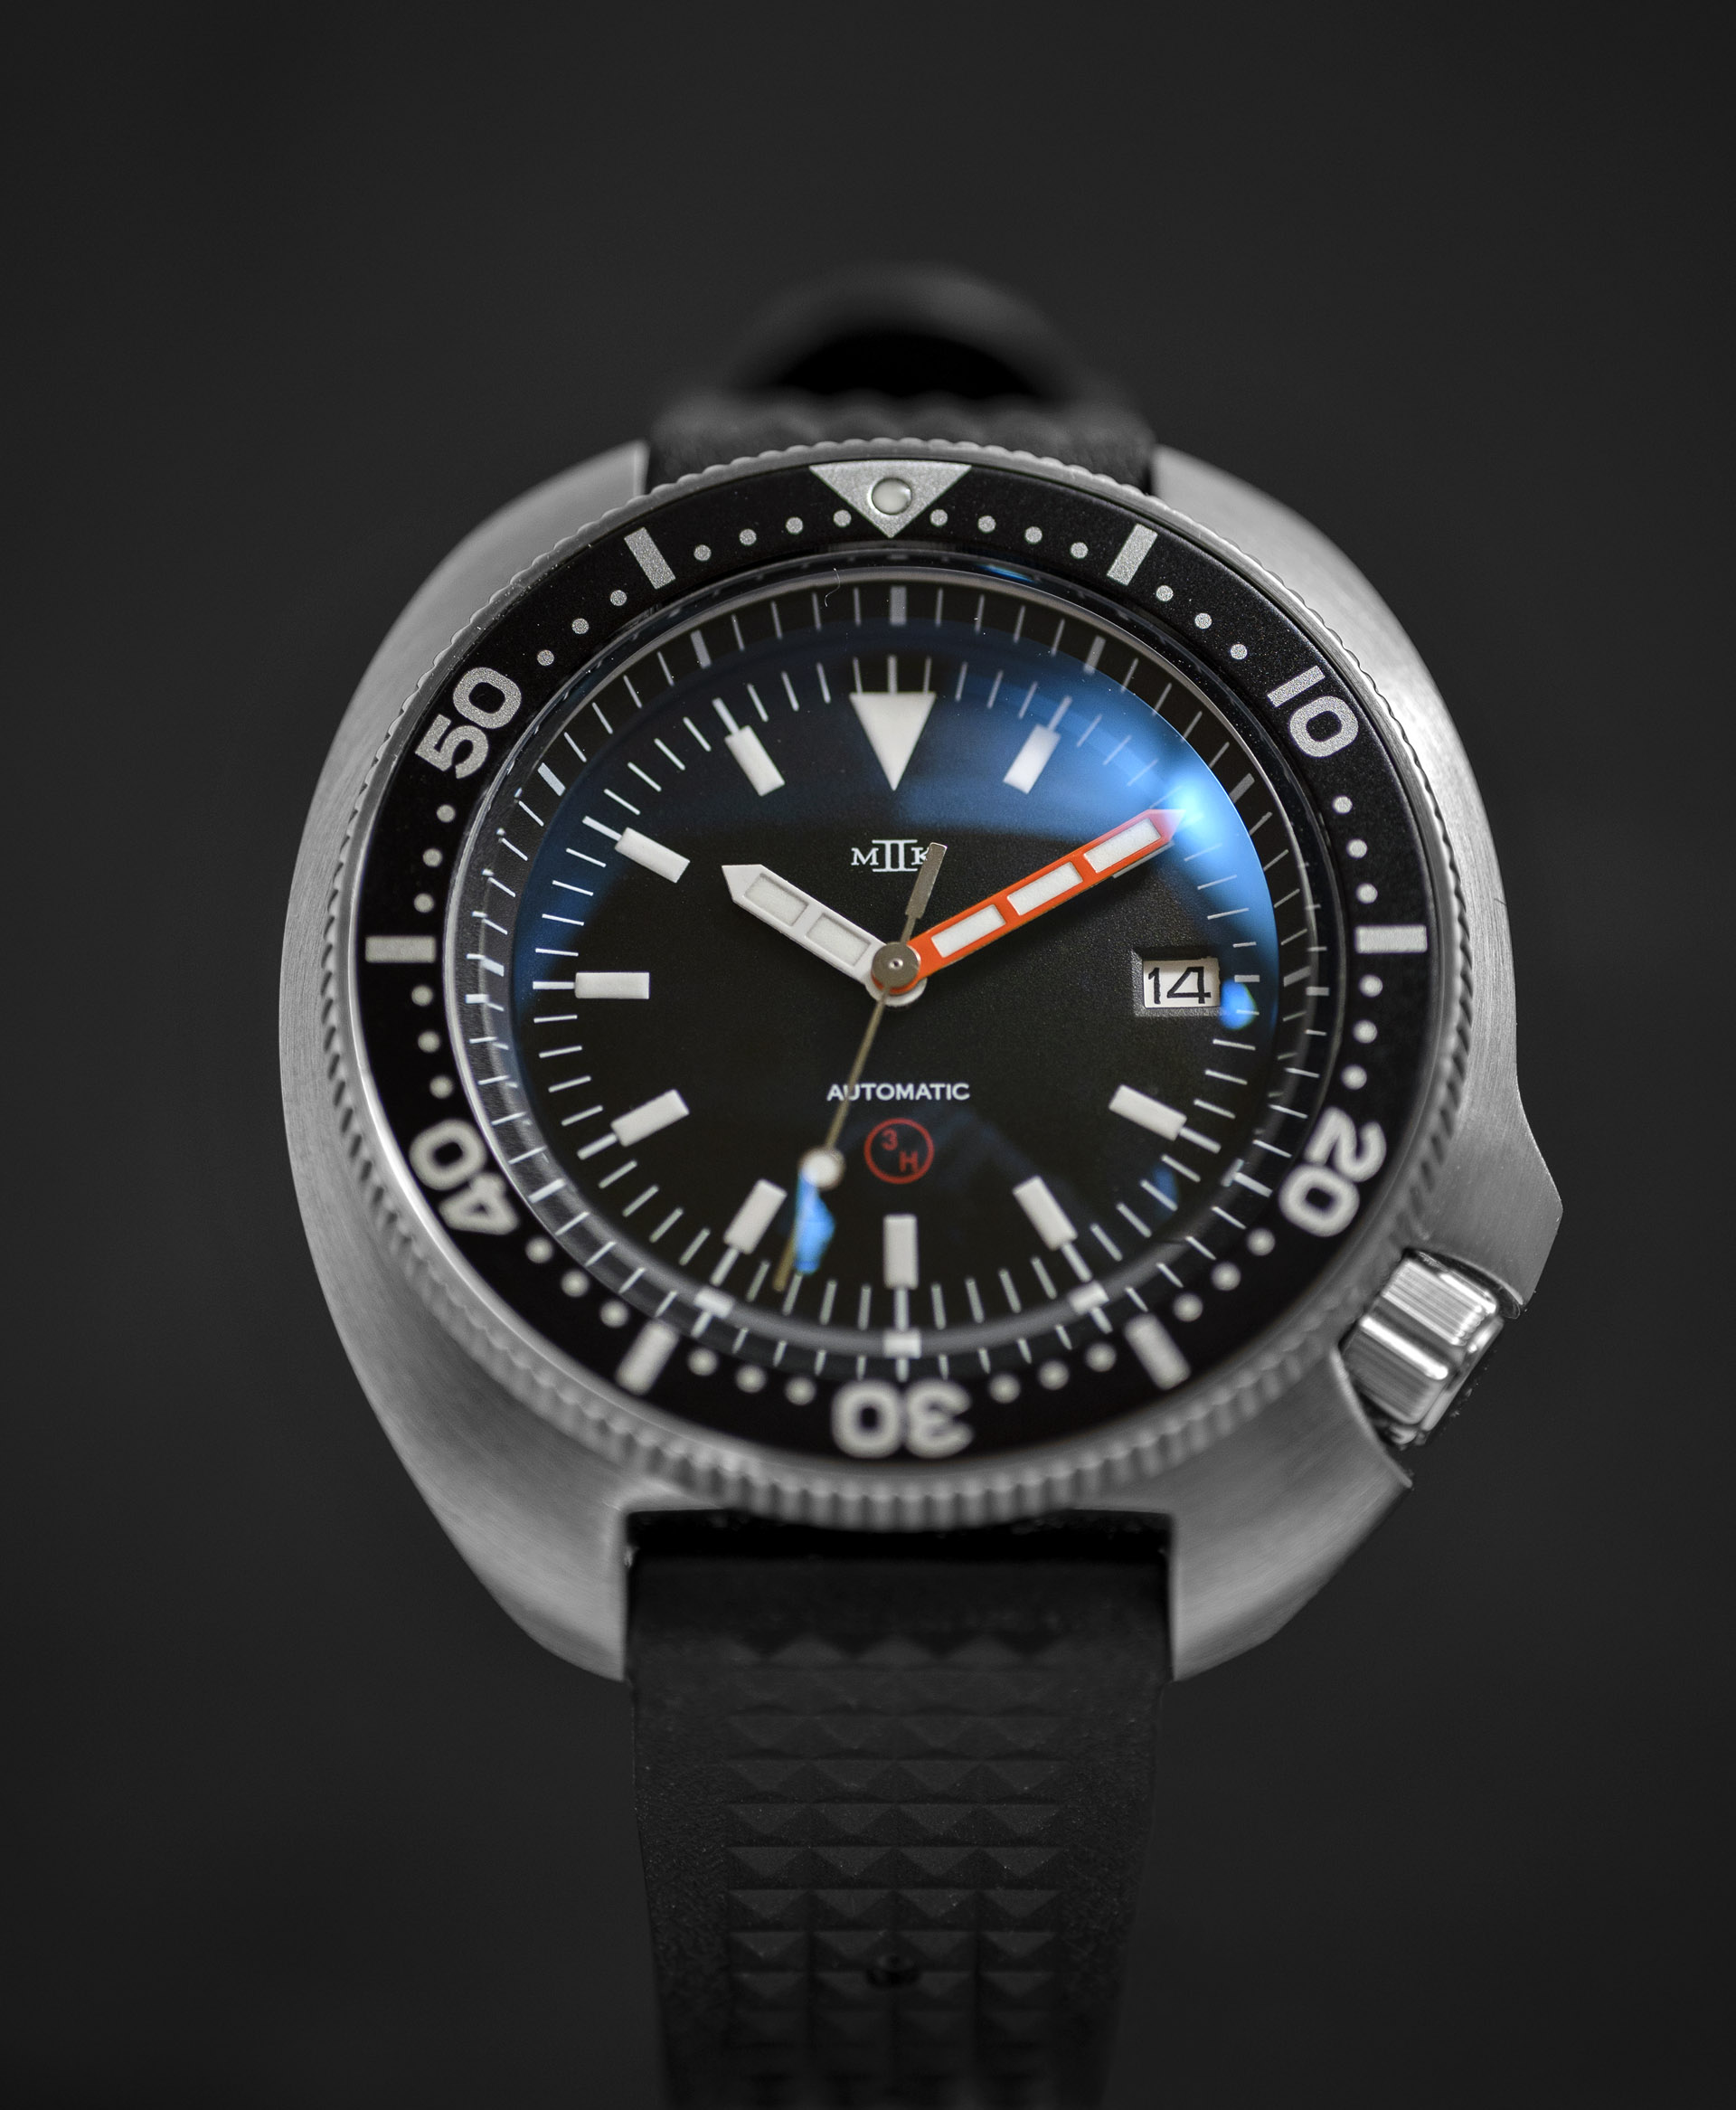
The photo showing the movement in place illustrates just how well this case mimics the lines of the original watch. It is kind of uncanny. The penultimate step is to refit the bezel insert, aligning the pip to the 12 marker on the dial rather than the slighty misaligned 12 marker on the chapter ring.

Although this is emphatically not an homage to a Seiko 6105, in spite of the appearance suggested by the case, a suitable choice of strap is irresistibly, a 19mm rubber waffle.
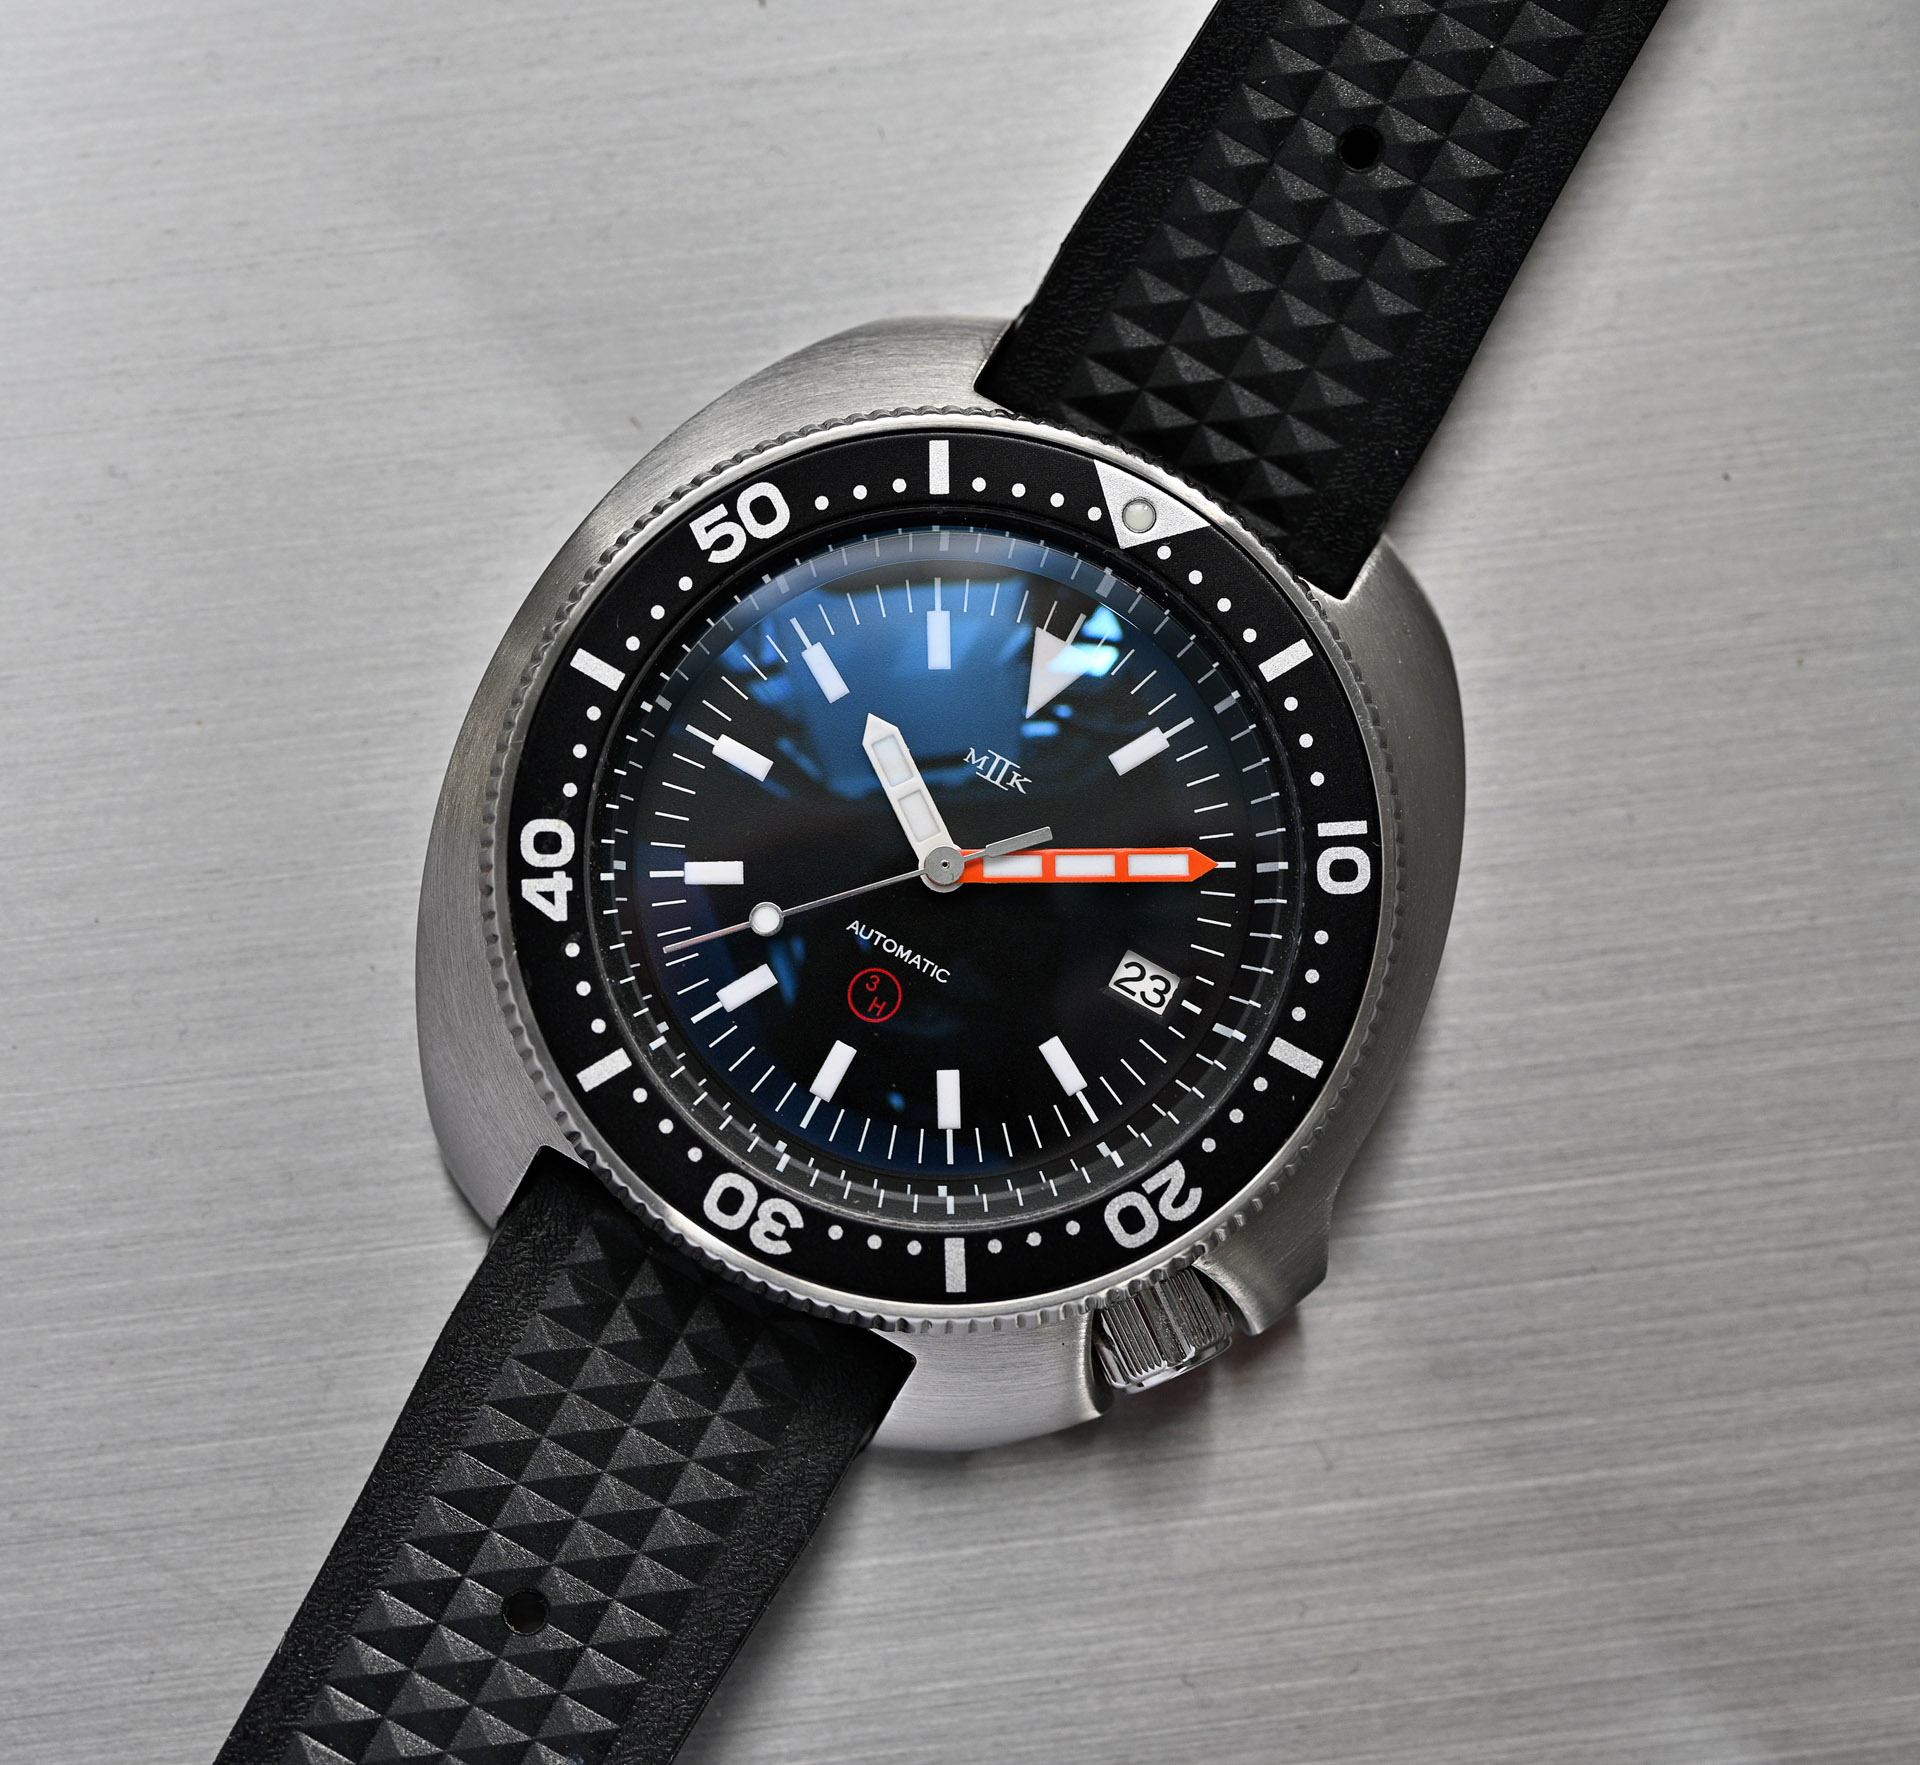
I find the end result extremely gratifying. It recalls the spirit of the original modification faithfully but with a resolution of all of the annoying imperfections in that compromised project. The dial fits the movement properly because this is the movement family it was designed for.
I was initially uncertain about the wisdom of using a case sourced from Aliexpress as the basis of this project but the shaping and overall aesthetics are just so well-judged that it is easier to accept the underlying oddities in the construction, in particular, of the bezel mechanism. This project harked back to a time when my interest in wrist watch modification was much keener than it has been for many years and in returning to flex those old modders instincts, I have put together something that is not in fact a watch mod at all, but an homage to a watch mod. Somehow, I think I will be able to enjoy this one more than I did its muse because its sense of identity is not muddled by a murky history: it simply is what it is and is all the better for it.

Excellent read and fine looking result. I have not attempted fitting dial feet yet but you give me food for thought.
Thank you.
A wonderful write up and a great exercise. I own the RDUNAE 6105-8110 and love the little details that you bring up. The crystal with it’s inner dome like the original is a nice touch. The one thing I have noticed is that your case is exact to mine except in one regard. Your crown is in the 4.1 position, mine is at 4, like the original. This fact has baffled me since I bought the watch as the watch uses a NH35 just like you have used. But a stock date wheel does not line up at 4 o’clock, which leads me to believe they have used a custom date wheel, or maybe something other technique. I have enjoyed this watch in it’s stock configuration since I bought it new, which I pre-ordered as soon as was possible. Your writings have inspired me to crack mine open and do my own modification. When I get the dial off I will be able to get a better look at the date wheel to maybe ascertain what modifications were done to get it to work at 4 o’clock. Thank you for the inspiration.
I am happy to hear that you found it enjoyable. If you are going to crack it open, take care not to attempt to lever off the bezel. That will most likely end in tears!
That’s really nice.
The aliexpress case looks it must be related to the rdunae case, but actually looks better with the 4.1 crown (which makes the top crown guard a bit wider). It also looks like the case has a bit more of a corner as it approaches the lugs near 12 o’clock where the Rdunae case seems to taper a bit more gradually.
I have been thinking of trying to put a watch together. After reading this, I think I’m going to order one of those cases, and give it a go.
Thanks for posting this!