
Tags
Lazy accusations that Japanese watch companies ape the Swiss in their design cues can be knocked into a cocked hat if you peruse the gloriously diverse, original and at times bonkers range of watches that companies such as Seiko produced in the 1970’s. Some of these have become classics, many of which from the range of automatic Seiko 6139 and 6138 chronographs made from about 1969 to the late 1970’s.
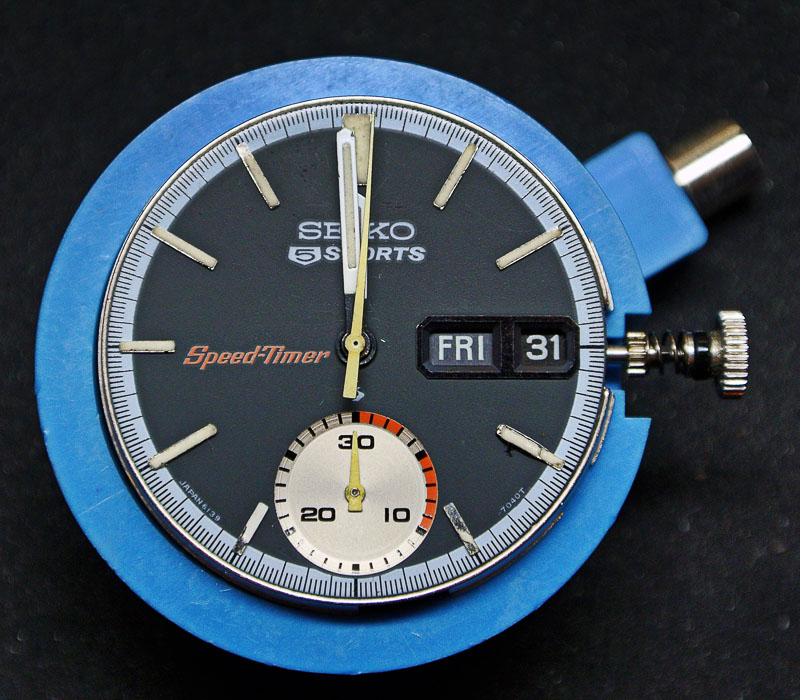
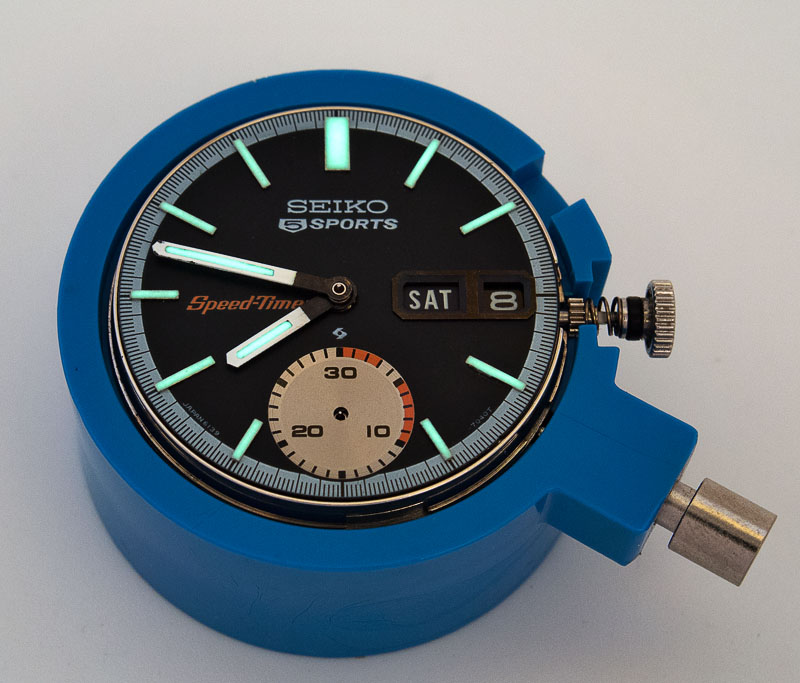
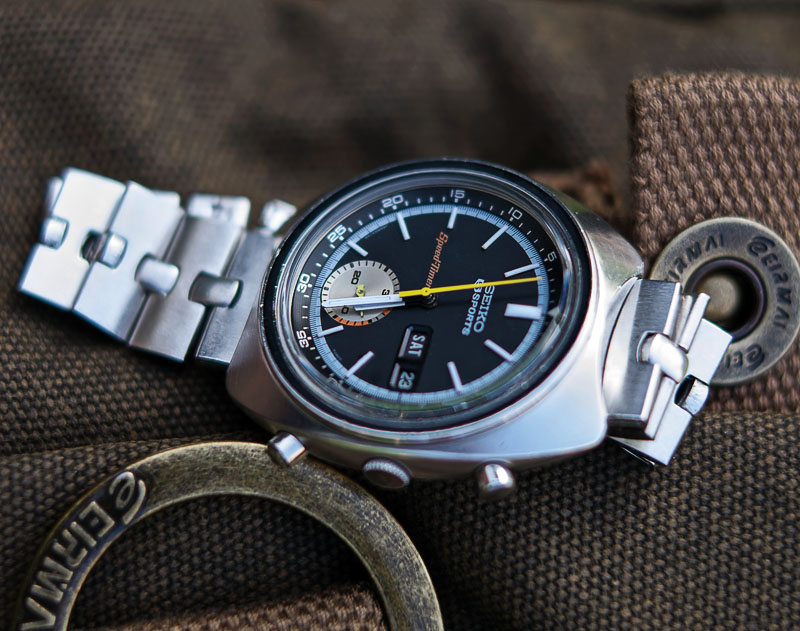
 Quite a few 6139’s have passed through my hands over the years, most of which have featured here, but I’ve tended to approach them with a little caution, not because of their complexity but because of the difficulty in finding key spare parts. The perceived Achilles heel is the chronograph wheel whose sprung clutch can fail and when that happens the only option is replacement of the part. However, the supply of new old stock chrono wheels is essentially exhausted and on the rare occasions they pop up on eBay, the price can threaten the economic case for repair. Nevertheless, of the 6 or 7 I’ve owned, only one had a failed chrono wheel so perhaps this weakness is not something to be so weary of after all. With that all in mind then, I find myself having recently sourced three of the blighters, the first of which, a 6139-7020 from September 1971, whose dial is the same as that of the 7020 top right in the catalogue image above.
The condition of the watch on receipt was superficially what you might expect of a well-used watch of this vintage, a little ragged around the edges and with a slightly weary looking dial but not at all bad. In fact a quick try-on, and it’s definitely got a spot of star quality, something a little bit special in the shape of the case and the presence the watch on the wrist.

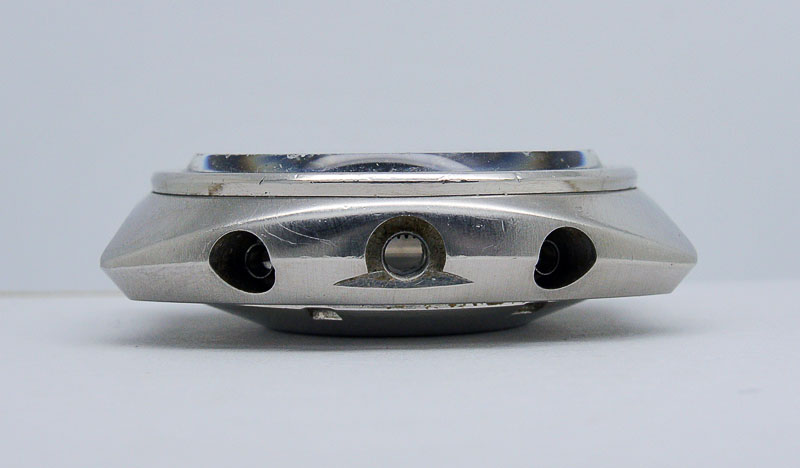
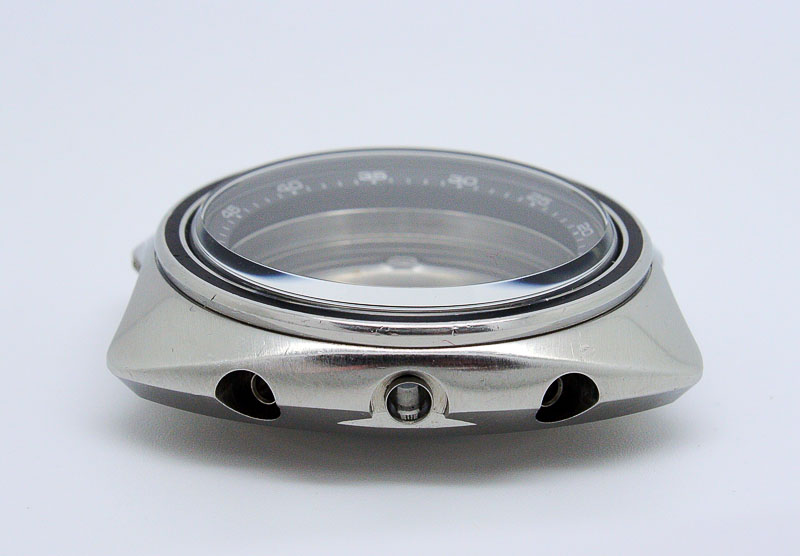
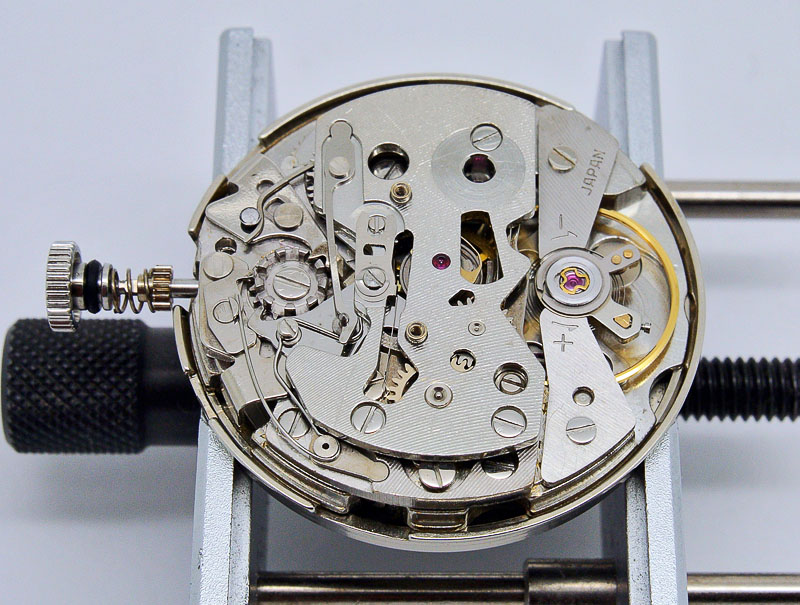
Just look at those wonderful crescent-shaped scoops at the lugs and the flying saucer aspect to the side view. Plenty of motivation to dive in to see what challenges await. Initial impressions of the exposed movement are good

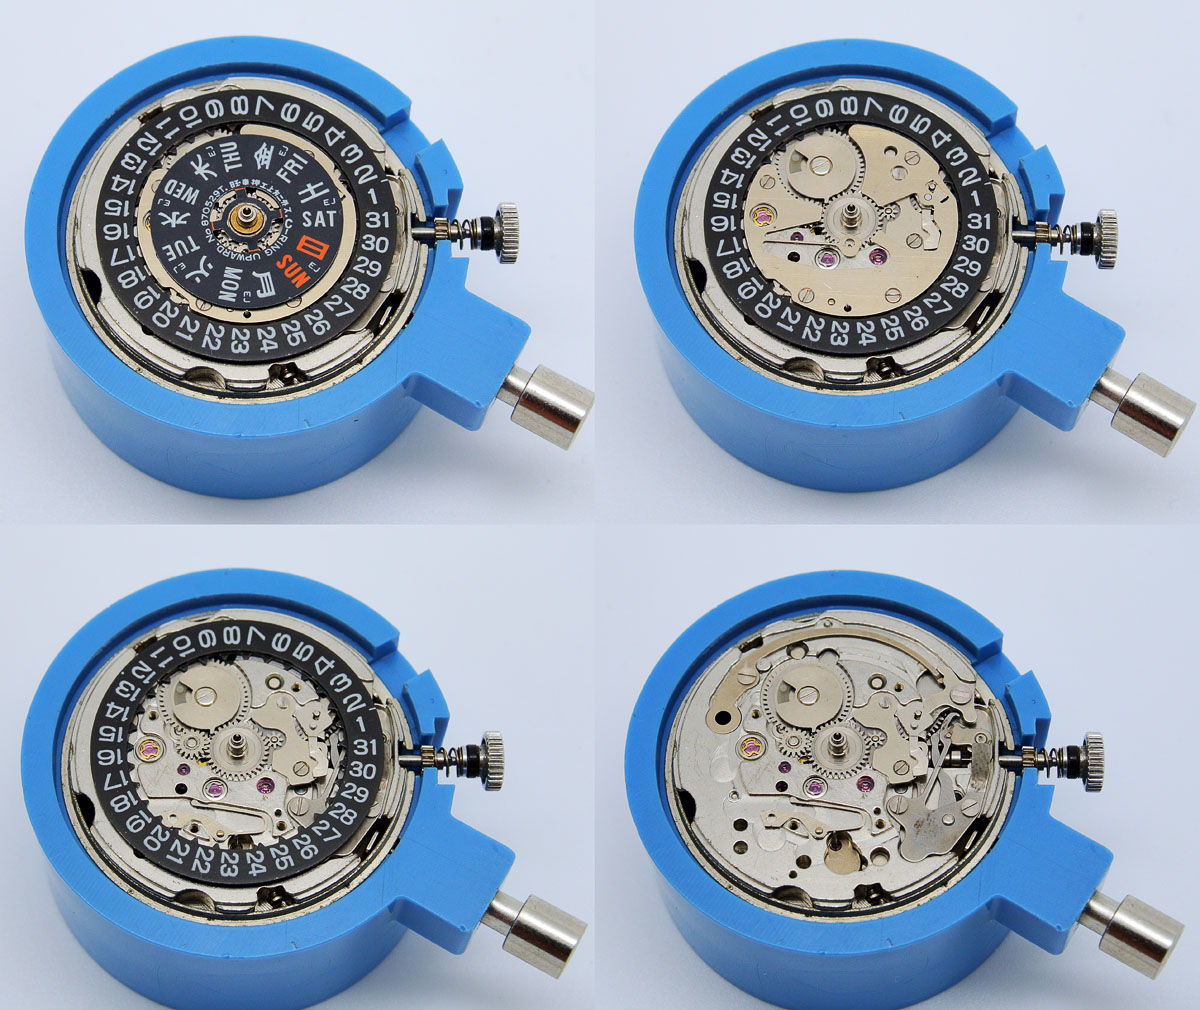
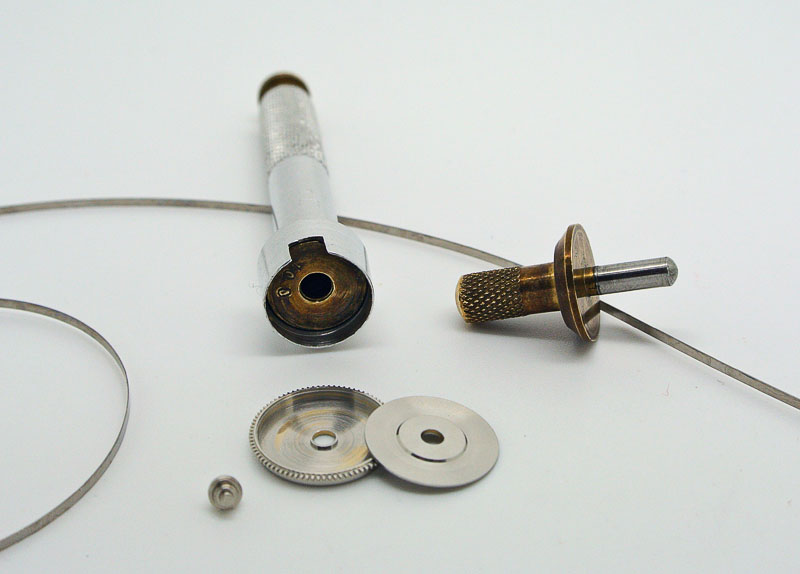
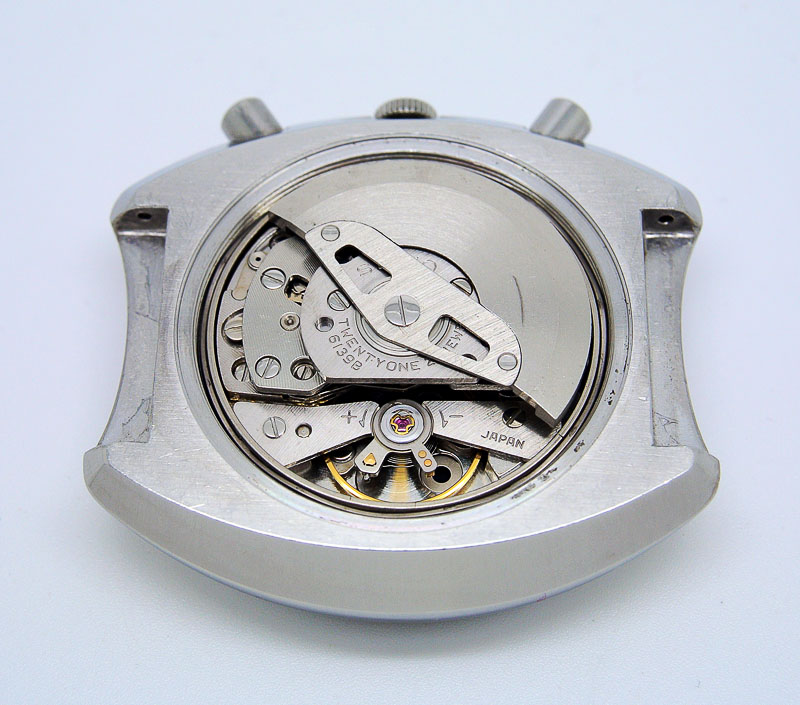
with the automatic framework reporting that this is the 21 jewel version of the 6139B. We’ll see in due course where those extra jewels are located compared to the more common or garden 17 jewel version. Extracting the movement requires the movement spacer to be removed first, followed by the chrono pushers, crown and stem. The movement then drops out as usual when you invert the case onto a movement cushion.
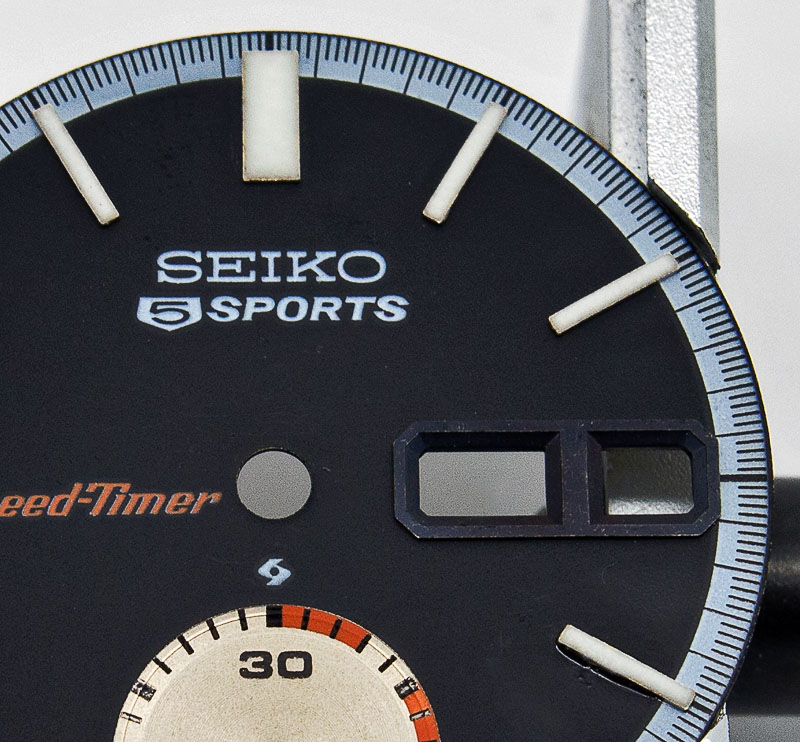
Two significant problems become apparent in viewing the watch from this perspective: The first was obvious with the movement still cased and that is that the condition of the lume on the hour markers ranges from absent to fair via poor.
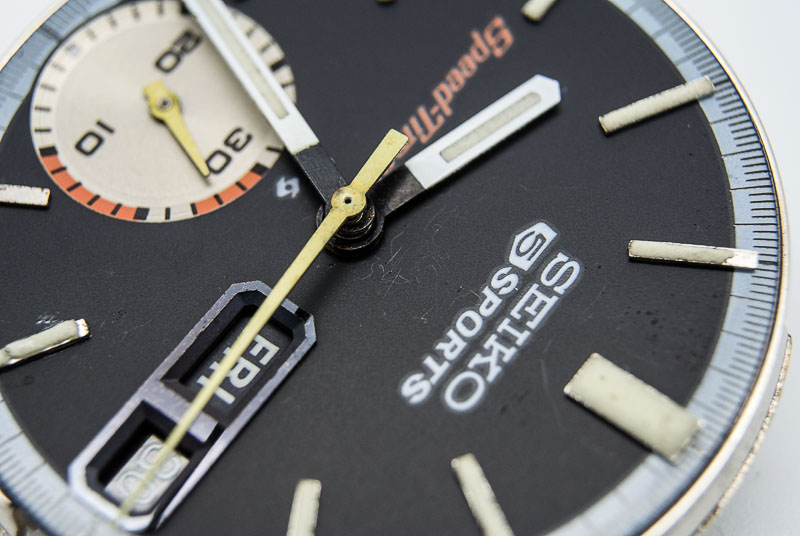
One particularly disastrous marker (at 4) even features lume that has broken off and then been badly glued back on.

You can see the gloss of glue overflow to one side of the marker (it’s worse on the other side) and the incompetently aligned slice of lume mounting its former other half, the two parts resembling a pair of amorous caterpillas.
The second problem is suggested by the skew seconds hand in the photo further up the page but is confirmed with a couple of chrono resets. Each attempt resulted in the seconds hand finding a different resting place, overshooting the 12 marker one side or the other depending on where it had got to on its journey around the dial before the reset button was pushed. The fault in this case is a worn and damaged seconds hand tube
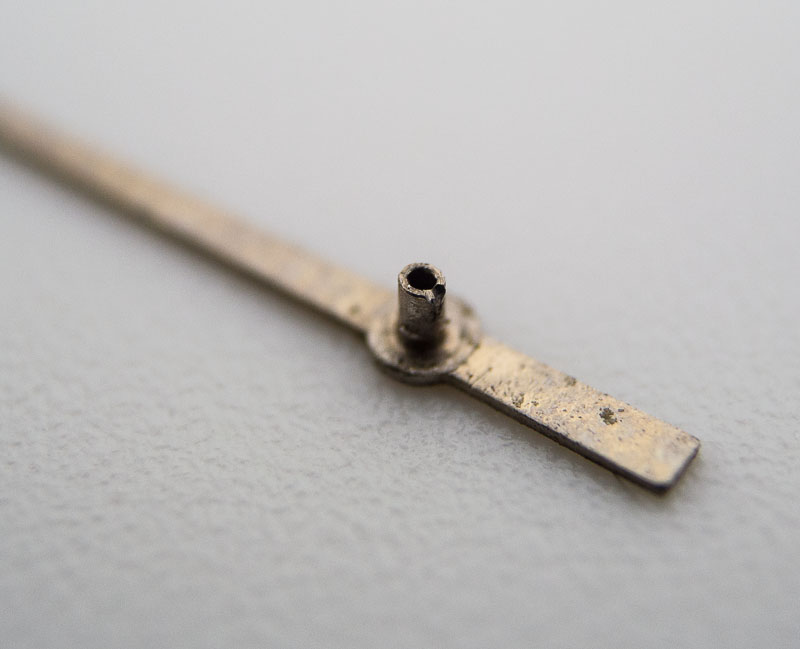
whose grip on the chrono wheel shaft had relaxed to the point that it could no longer sustain the forces involved during the reset operation. The condition of the dial and the obvious prospect of having to relume it held up proceedings for some considerable time. Eventually, I steeled myself for the challenge of the dial and hand relume, starting by removing all traces of lume from the hour markers
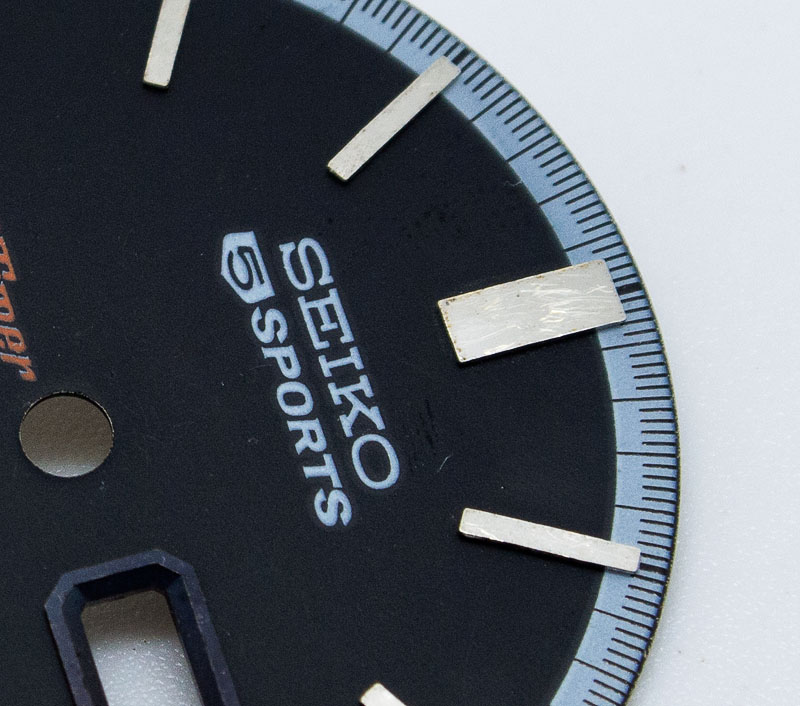
as well as from the hands.
The dial relume went without a hitch but the hands required two or three attempts to get the thickness right and the finish free from obvious flaws. We’ll see how that all comes together later on but for the moment here’s the dial, with its fresh lume plots.
With that done, I can get on with the movement service. We’ve covered the construction and operation of the 6139 before and so I’ll just zip through the key parts of the disassembly, pausing when something noteworthy presents itself. So, starting with the winder side, off comes the autowinder framework (notable for the presence of a jewel supporting the transmission wheel, missing on the 17 jewel version), pawl winder seat, followed by the chronograph bridge.
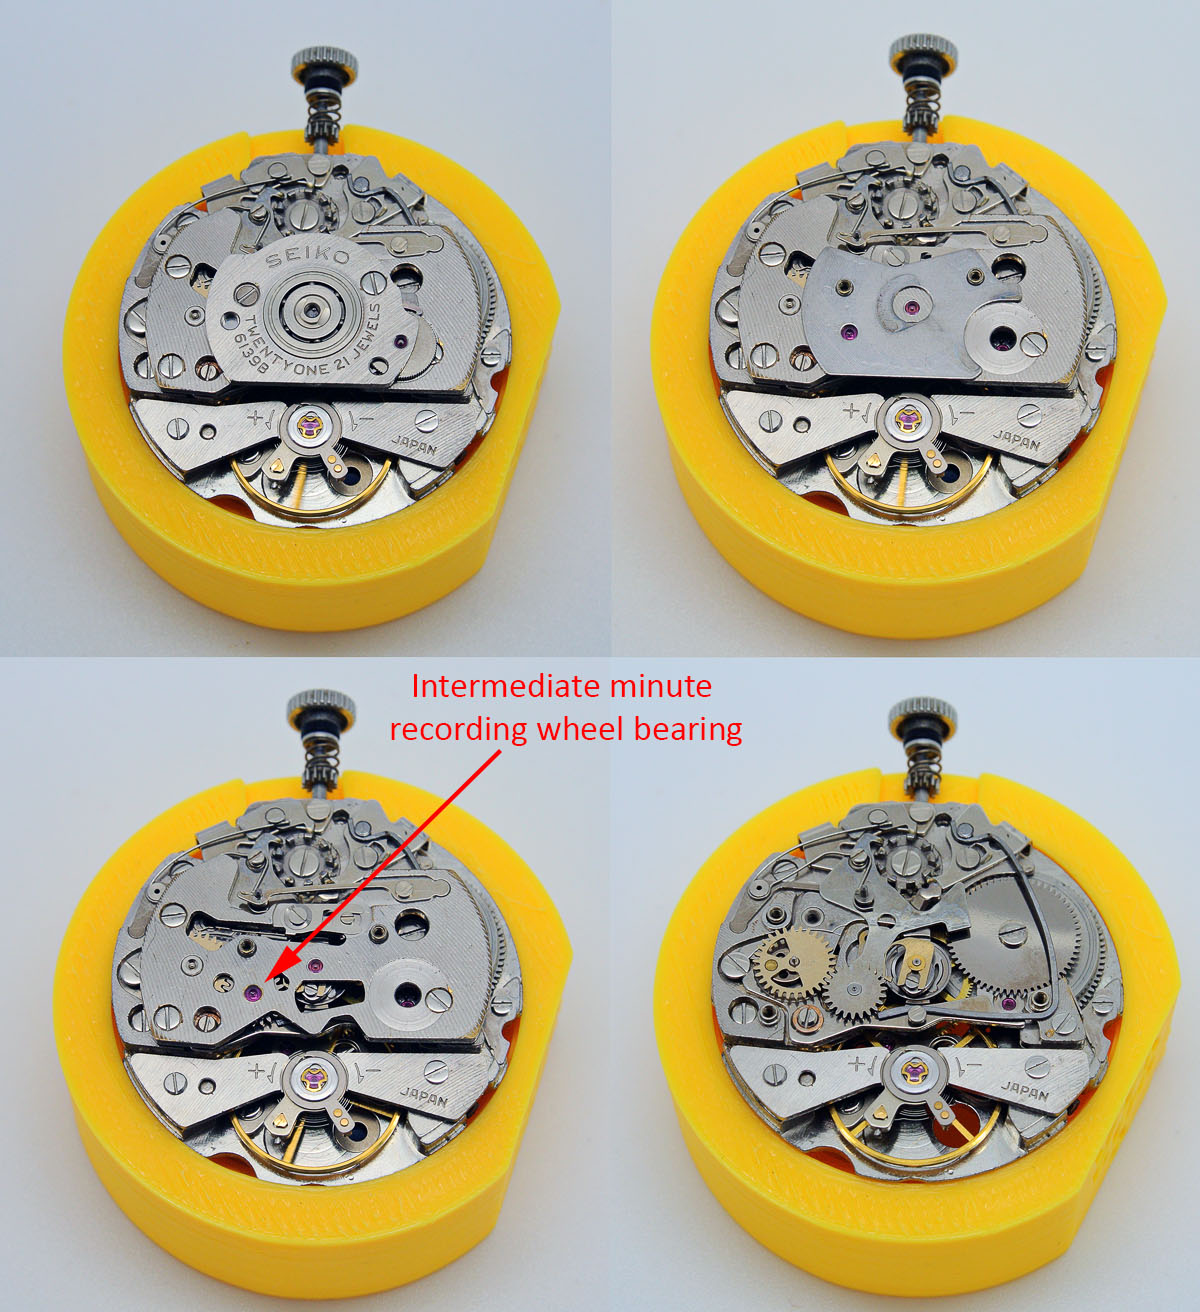
One slightly odd feature of the latter is the presence of a jeweled bearing for the intermediate minute recording wheel. None of the 6139 variants is jeweled at this position but the 23 jewel version of the 6138 is. The watch parts interchangeability list suggests that the bridge designed for the 23 jewel 6138 is not compatible with the other versions of 6138 and 6139 but this particular watch seems to have been working with it in position and so we’ll go with it for the moment.
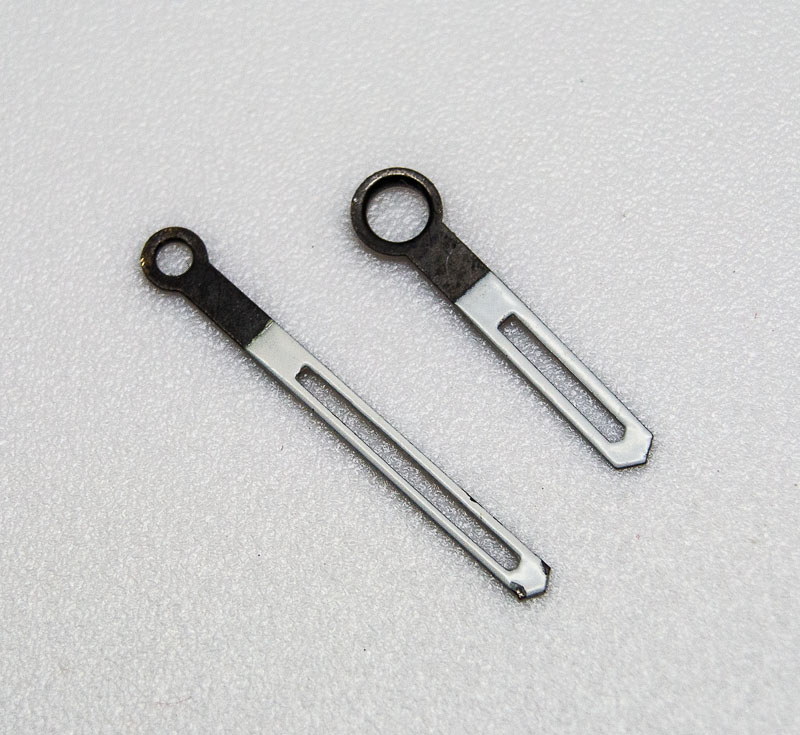
The next steps start with the removal of the operating lever spring, whose shape looks distinctly fishy. With it removed and sitting next to a spare, it’s pretty obvious that the one fitted has been improvised from a paper clip or something similar:
Next come the hammer spring, the intermediate minute recording wheel, the minute recording wheel and the hammer, followed by the coupling levers and chronograph bridge. At this point, we are into the familiar territory of the 61xx series movements on which these automatic chronographs are based.

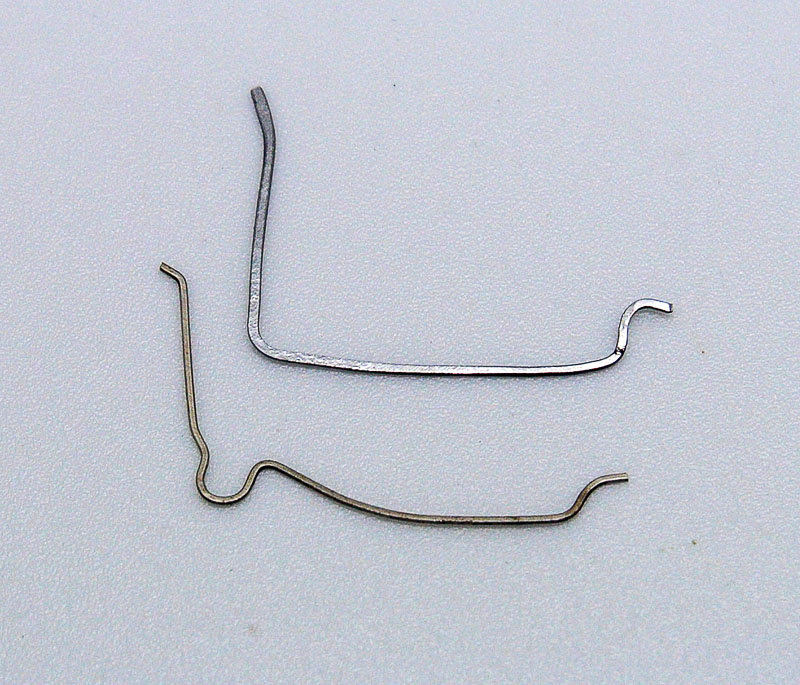
You may have spotted in the image top right that the chrono bridge has been badly handled with the surface of the bridge scored by numerous scratches.

Initially, this was one of those oddities you encounter from time to time with movements that have previously been ‘serviced’ and which cause a bit of head-scratching. But I think I’ve figured out what might have prompted this vandalism: at some point, oil has congealed and solidified onto the bridge (perhaps a diy burst of WD40 from a previous owner, or simply over oiling of the autowinder migrating down onto the bridge). Whatever the reason, I think the scratches must have been caused by a watchmaker trying to scrape off whatever had bespoiled the movement. The damage though appears largely cosmetic and so I’ll stick with this bridge (with its extra jewel) but replace the L-shaped piece that contains the lower bearing for the intermediate minute recording wheel.
No such unpleasant surprises emerge on the calendar side, the dismantling of which proceeds smoothly:
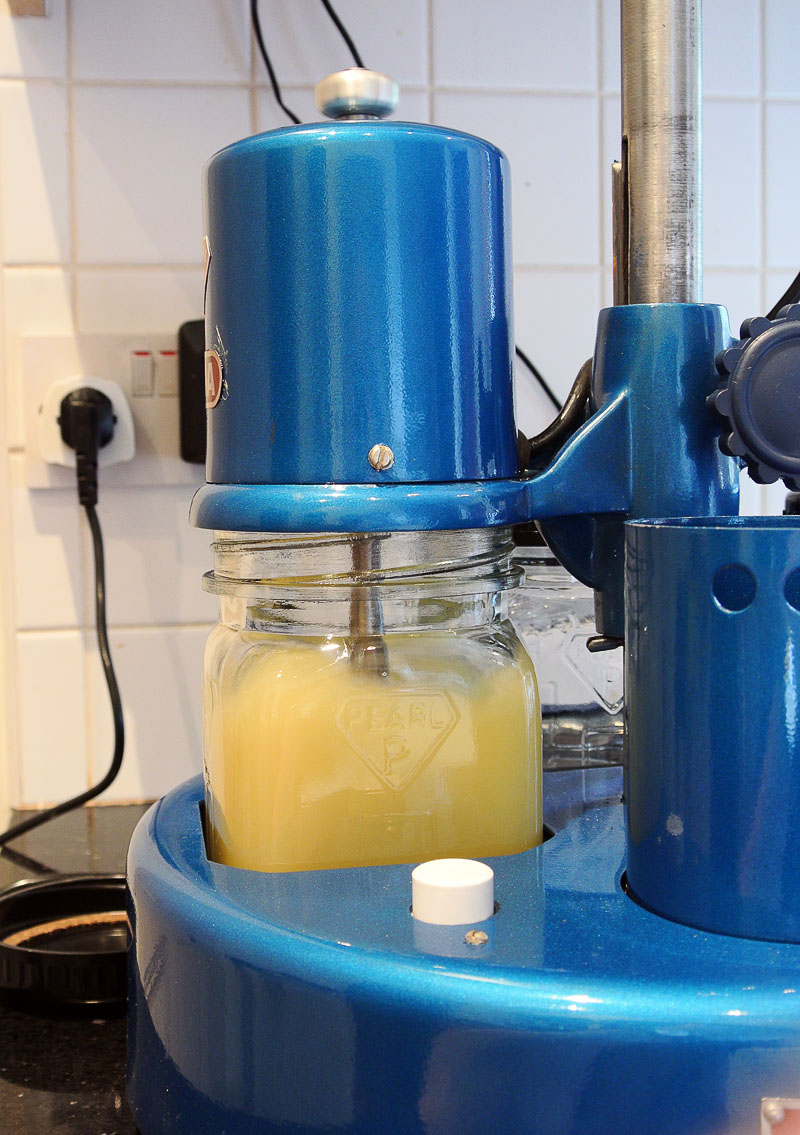
With the movement completely stripped down, it’s time to try out a new toy: Previously I have been cleaning all of the parts in an ultrasonic cleaner, using sharpened pegwood to ensure all pivots are properly clean and then drying the components piece by piece. This is a rather long-winded and somewhat tedious process that I’ve been wanting to simplify for some time. A proper watch cleaning machine should be capable of producing immaculately cleaned components and to boot will thoroughly dry everything so that the parts emerge, once cooled, ready for reassembly. Here’s the first part of the process, 15 minutes in ammoniated watchmakers cleaning solution
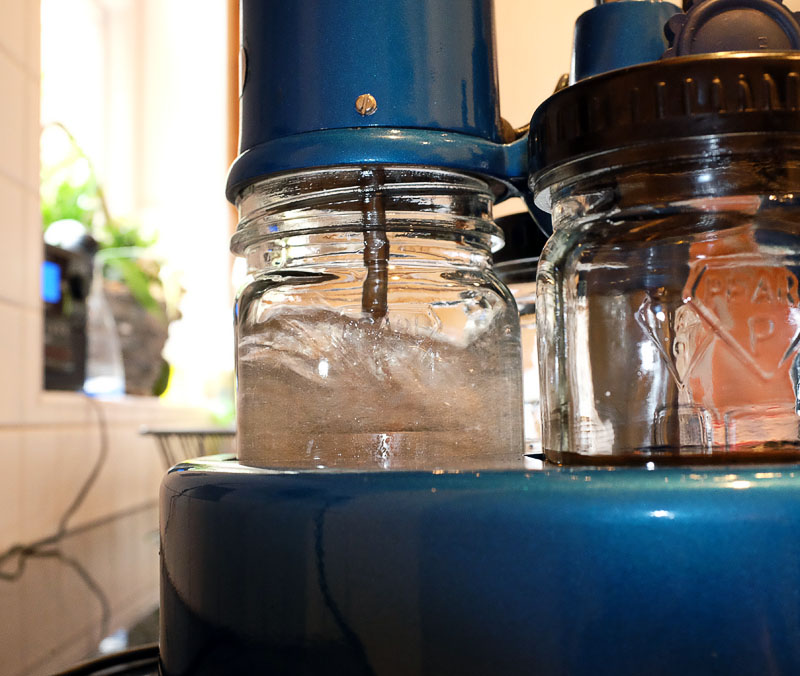
followed by the first of two rinsing steps, each about 12 to 15 minutes in duration
before about 5 minutes in the heating chamber to dry off the parts

I have to say I was slightly nervous at including the balance with the rest of the parts (albeit fastened to the main plate), fearing that the centrifugal forces at play with the spinning of the holder might distort the centring of the spring. But I need not have worried. Everything emerged looking fantastically clean and the balance no worse for the experience.
The first step in reassembling the movement starts with the mainspring
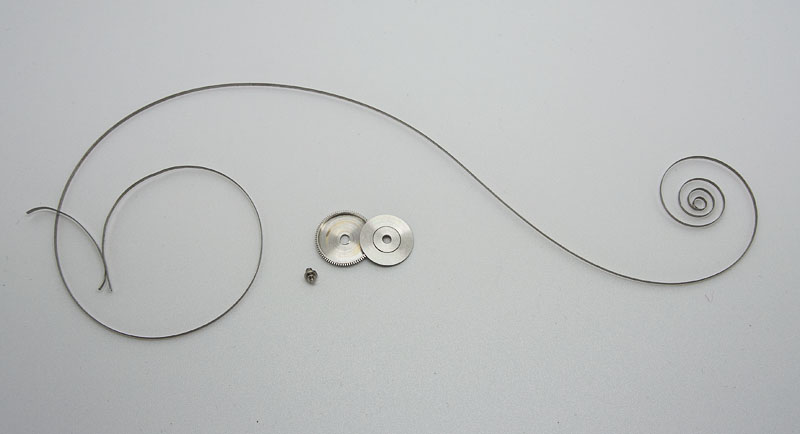
the refitting of which into the barrel can either be accomplished by hand, which risks distorting the spring, damaging the lip of the barrel and makes lubrication of the barrel walls a bit problematic, or by using a mainspring winder. I’ve got a set of antique Watch-Craft winders,
the largest of which is perhaps a smidge too small for the 6139 mainspring but I managed to wind in the spring without too much drama
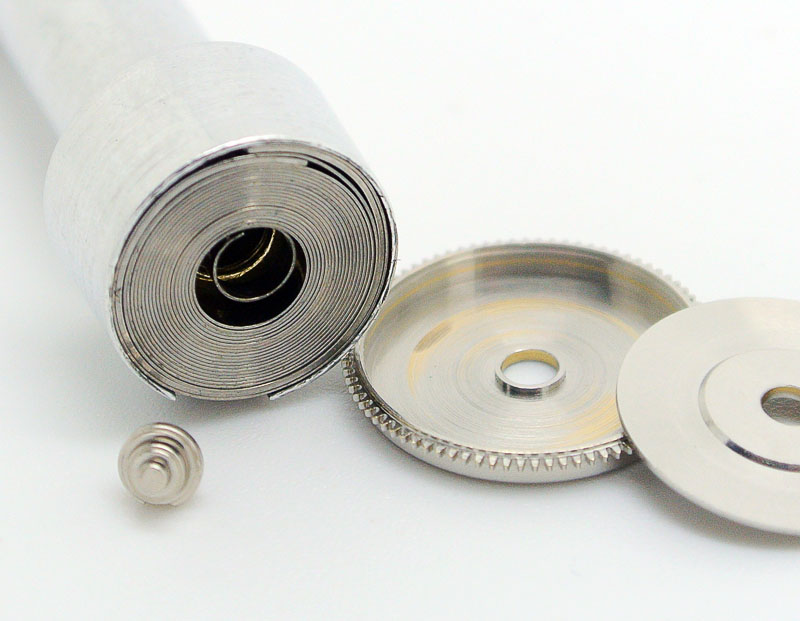
before refitting to the lubricated barrel
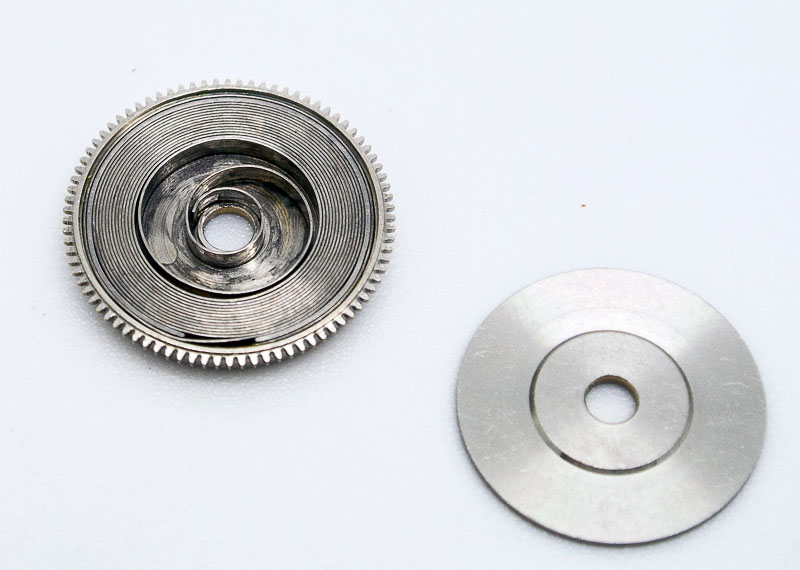
I’ve used breaking grease on the barrel wall and molybdenum grease for bottom and top of the mainspring.
Next, we refit the Diafix jewel on the escape wheel bearing, the second of the 4 additional jewels over the 17 jewel variant of the movement (the first, remember, supporting the transmission wheel on the auto framework):

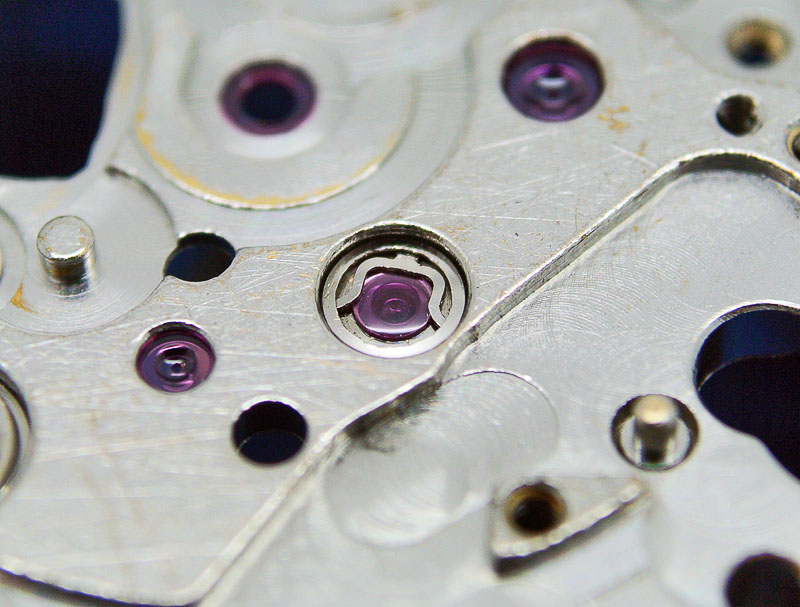
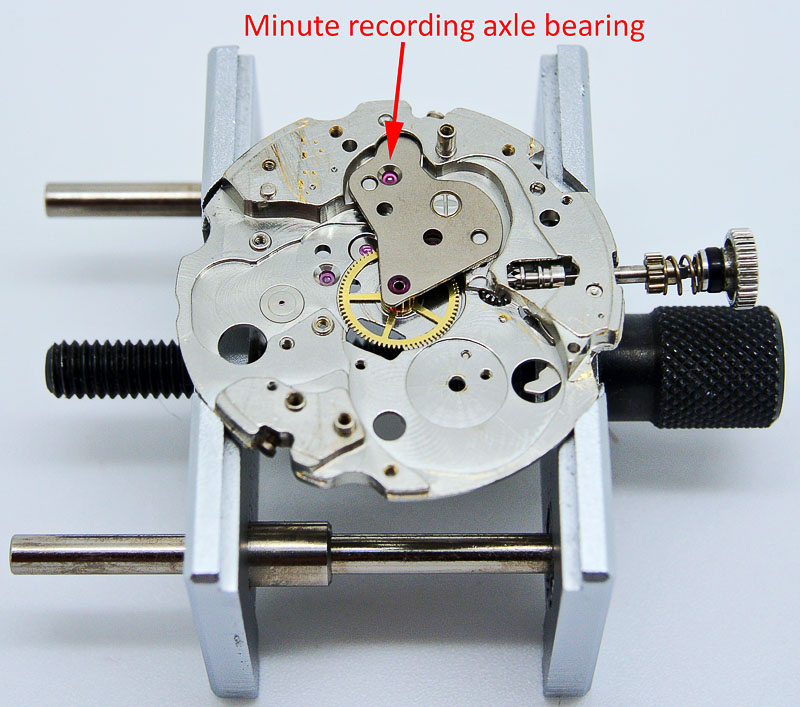
The third and fourth additional jewels appear at the minute recording axle bearing on the centre wheel bridge
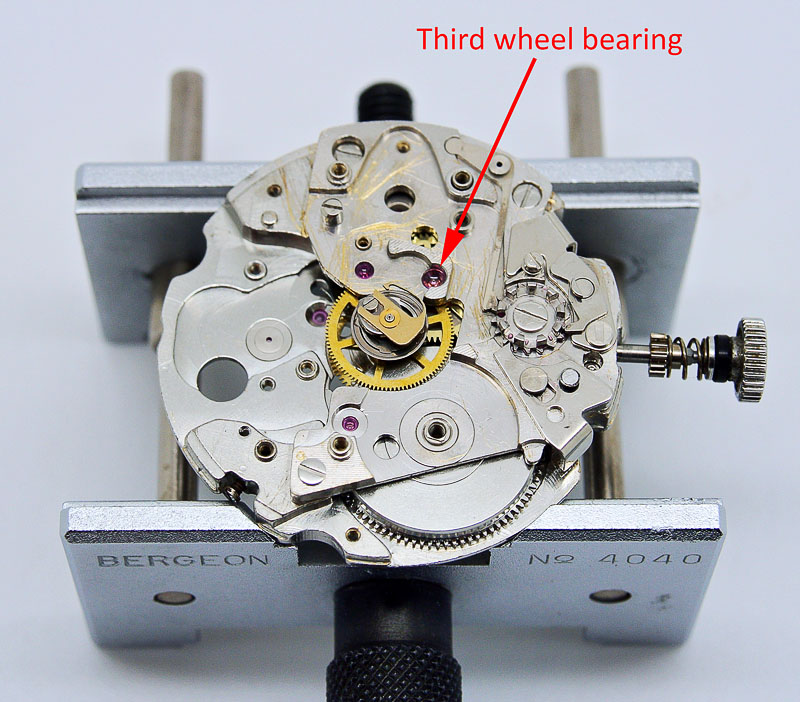
and the third wheel bearing on the train wheel bridge.
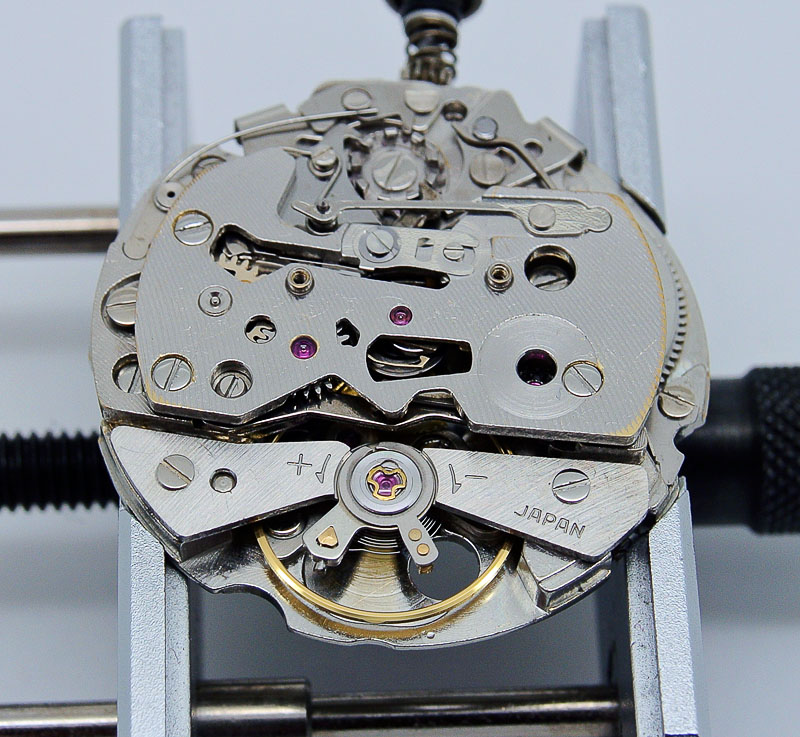
The rest of the reassembly on the balance side goes smoothly enough, and with the calendar side still waiting, we can wind in some power and see if she runs:
Not only does the movement run, but with a quick correction to beat error and a tweak to the timing, the movement displays a flat timing curve, showing amplitude up at about 245 degrees. I take this as license to refit the calendar parts, taking care to avoid knocking the vulnerable minute recording axle
before fitting the relumed dial, hour and minute hands
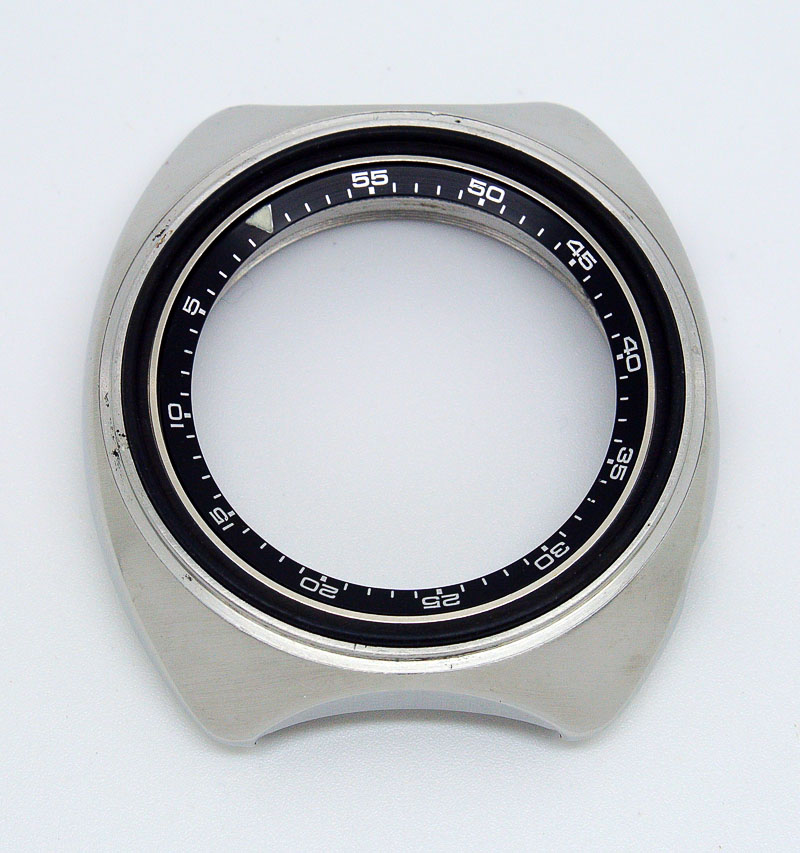
Leaving the movement to run for a day or so, I turned my attention to the case. It is worth just taking a proper look at that saucer-esque side profile
before locating the notch on the underside of the bezel
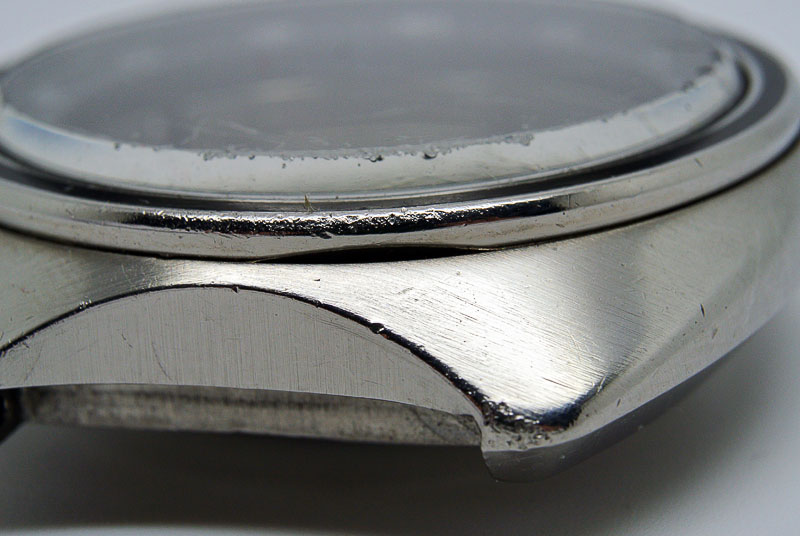
there to facilitate its removal.
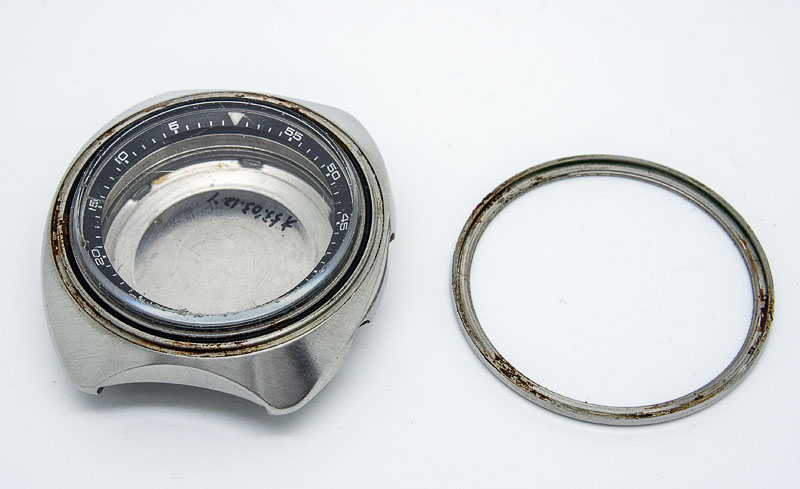
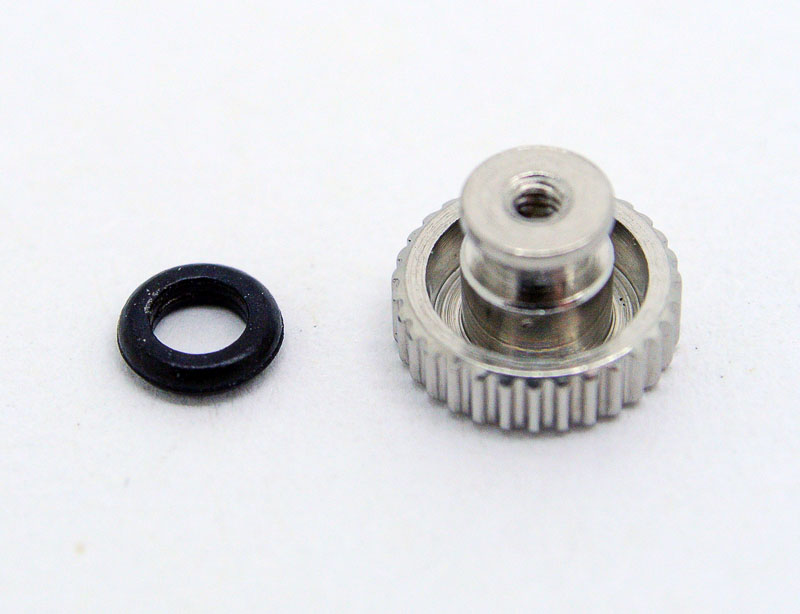
With the bezel removed, the crystal can be pushed out from beneath, followed by the crystal L-shaped gasket, gasket ring, compression spring and inner rotating bezel.
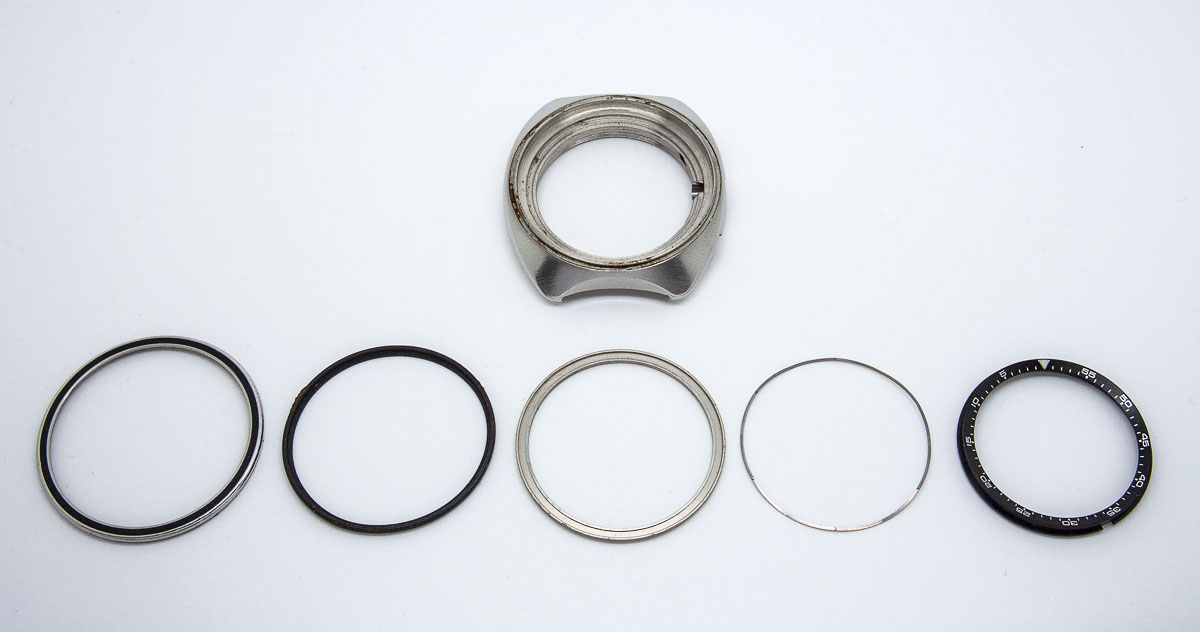
The case is in pretty decent condition, tarnished only by some light surface rust where the bezel seats and with some scuffs and scrapes from 44 years of use. A thorough clean, and a light buff to the edges of the bezel and the reverse process brings us closer to the point of being able to reassemble this lot back into a working watch. First up, the inner parts are re-fitted
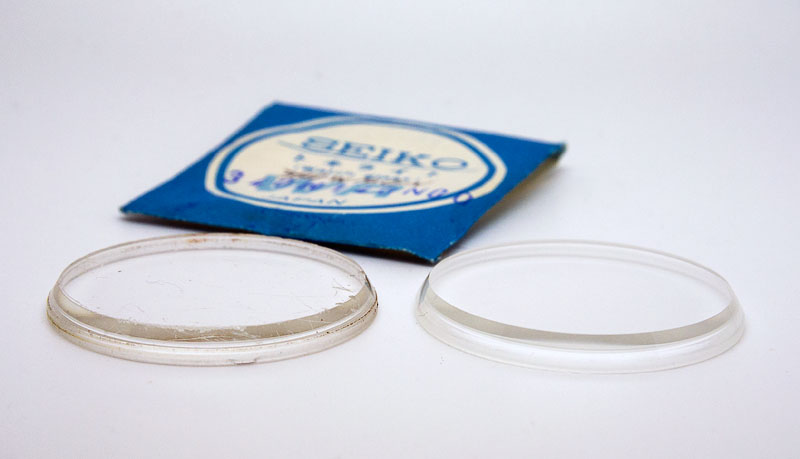
ready for a new crystal
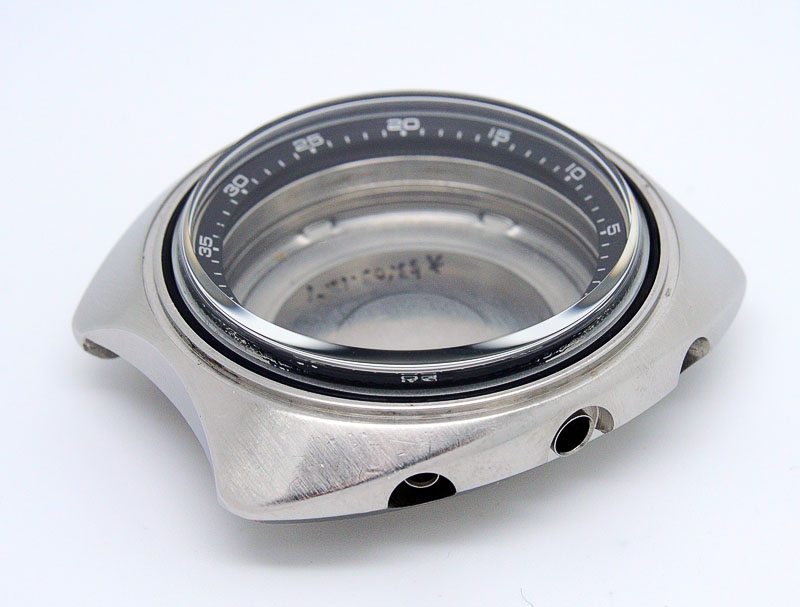
held in place by the bezel.
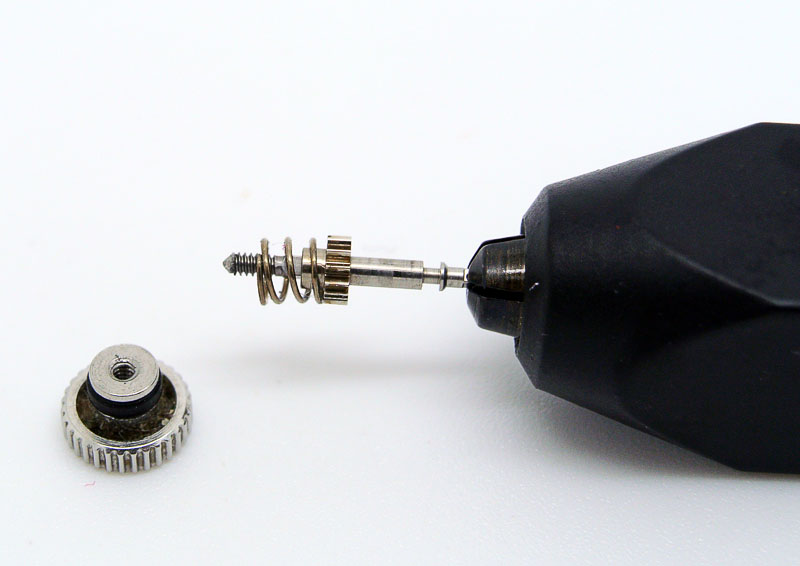
The role of the compression spring is to prevent the pressure of the crystal seated in its gasket from impeding the rotation of the inner bezel. If we peer through the crown tube, we can see the teeth on the underside of the bezel
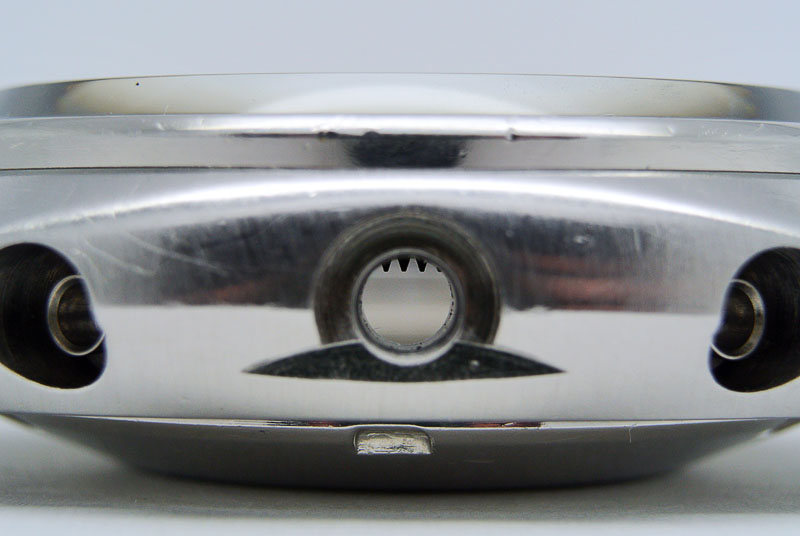
ready to mesh with the gear on the crown stem once it’s back in position (see below).
While the case has been coming back together, the movement has not been playing ball. With the chronograph function running, and the mainspring power the equivalent of two to three turns, the movement gets into the habit of stopping when the minute recording wheel attempts to tick over another minute. The technical manual assures that this is normal behaviour with only a turn or so of power in the mainspring but with more, there should be sufficient oomph to push through the resistance of the minute recording jumper.
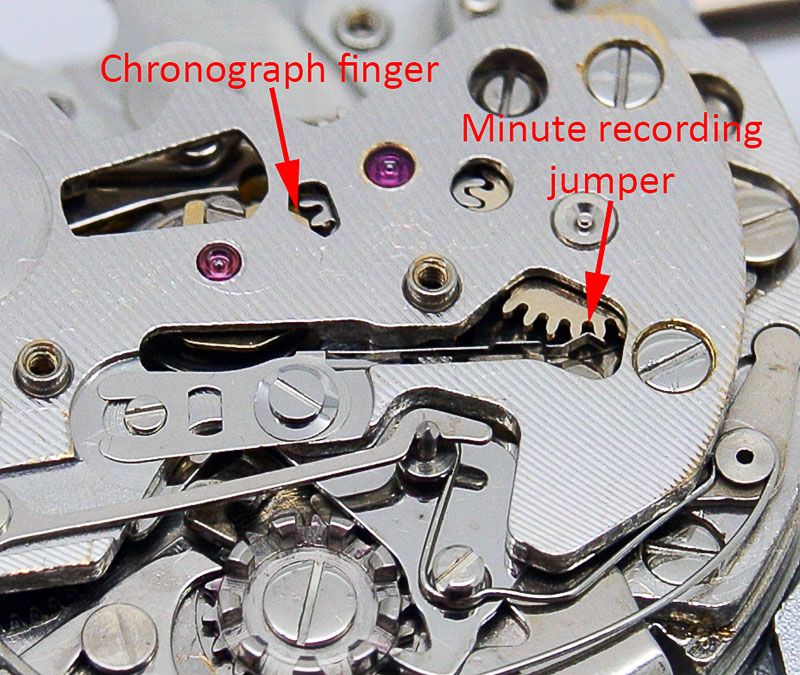
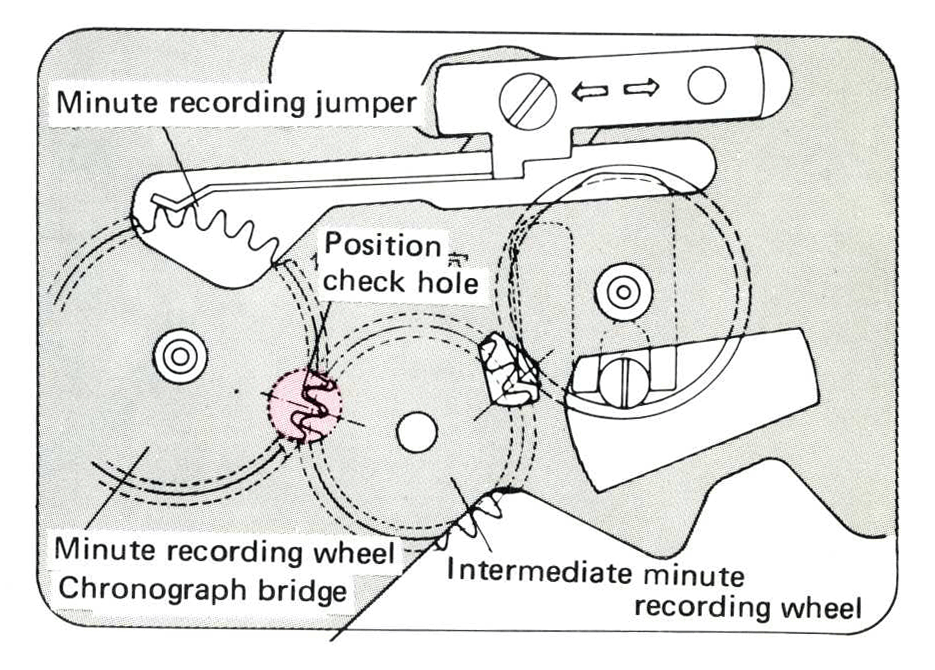
The way this works is that once per minute, the chronograph finger pushes against one of the teeth on the intermediate minute recording wheel, moving the wheel one 60th of a turn, its position precisely regulated by the minute recording jumper acting upon the teeth of the minute recording wheel.
I tried all of the usual troubleshooting solutions to the problem but the movement kept stubbornly stopping. Given the apparent incompatibility between the 23 jewel 6138 chronograph bridge and this, a 21 jewel 6139B, I thought it worth substituting the bridge with a freshly cleaned donor from a spare 6139B movement together with a replacement intermediate minute recording wheel. This seems to have done the trick, the movement now pushing cheerfully through the tickover resistance.
I should add that I don’t really understand why that extra jewel in the 6138 bridge should have caused a problem with the intermediate wheel: the bridges look otherwise identical
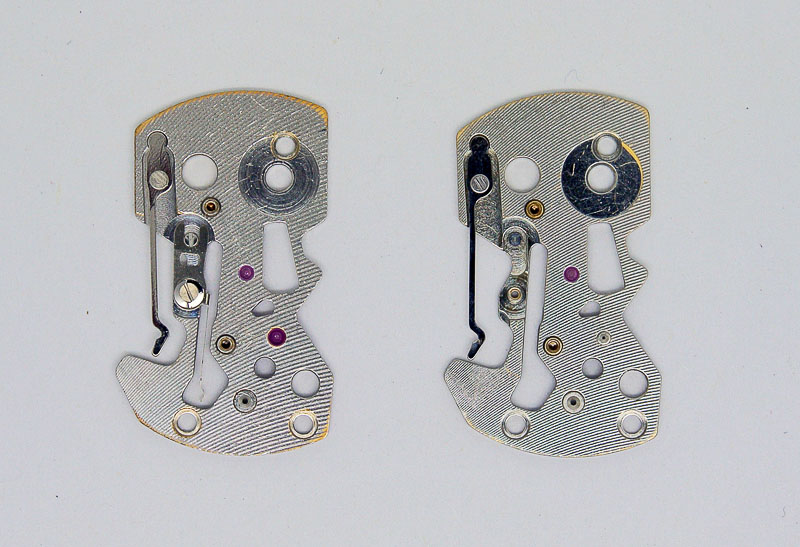
and the part numbers of the intermediate recording wheels are the same and so probably the problem derived from some other flaw with the bridge or intermediate wheel.
We are nearly there then, just needing the minute register and seconds hands fitting, the latter of course not fit for purpose, with its knackered tube. Fortunately, I have a small stash of new seconds hands, a couple in the correct yellow, and so with one selected, all I need to do is size it to the correct length
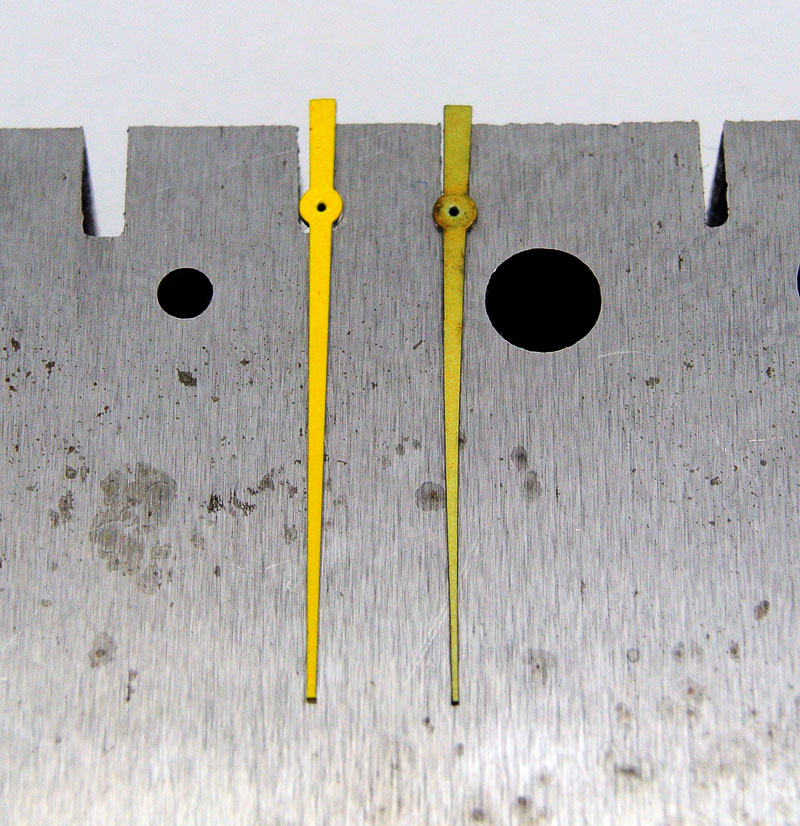
and refit
always a slightly nervy business because if you get the alignment wrong then there are no second chances with the profiled end of the seconds hand shaft.
The final job is to replace the gaskets on the crown and pushers, the former requiring the stem and gear to be separated from the crown
before cleaning the crown and fitting the correct D-profiled gasket
With that done, it’s time to recase the movement
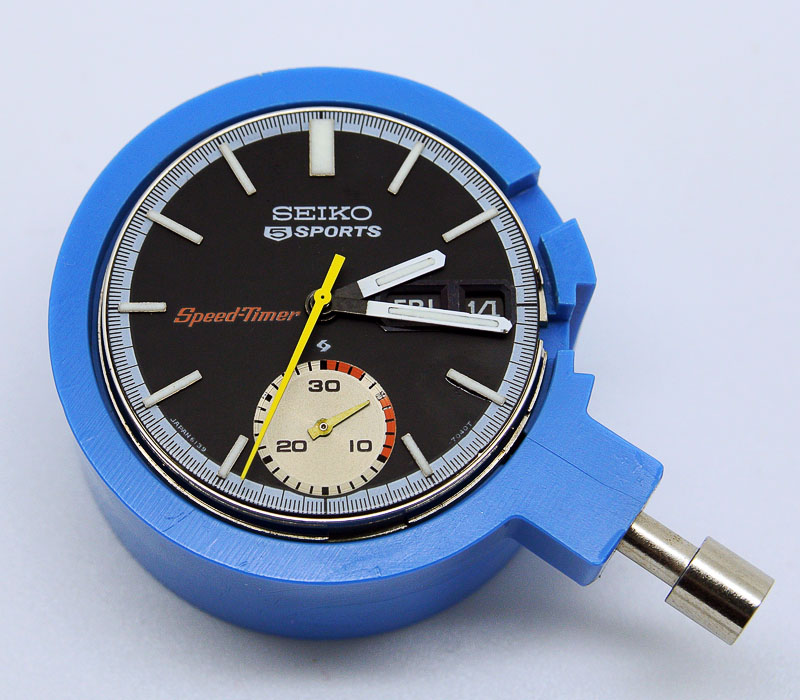
fit a new caseback gasket and admire the end result.


The icing on the cake would be a new bezel (anyone?) but for the moment I am very happy with the way it looks and with the way it is running.

Another fantastic job on a classic piece.
Great work as always! Can you give a little more info on the new parts cleaning machine as to source and price? Thanks!
The cleaner is made in India and is essentially a copy of a now obsolete Elma design. It cost about £350 from a seller on Ebay – and seems pretty well put together. There are a few rough edges but it works as advertised and is a hell of a lot less laborious than my previous method. Again, money well spent, even with my relatively low turnover of projects.
Thanks Martin!
well done service to a beautiful piece! if i may – the bridge that did not work appears to have it’s minute recording jumper putting too much tension on the minute recording wheel. looking at them side by side, the part on the right seems to have a larger gap between the jumper and the recording wheel thereby producing a bit less tension to overcome. this, coming from a total novice, mind. what do you think, martin? is it possible?
The bridge on the right in that photo has had the jumper removed altogether. Before refitting the bridge, I fitted a new jumper and then adjusted it once in position. With the bridge that was causing problems (the one on the left), the watch was stopping regardless of the force applied by the jumper. In fact, I adjusted it to the point where it was no longer making contact at all with the minute recording wheel and it was still stopping.
I am about to restore a friend’s UFO and I have just got into this hobby. I may need some help from you experts.
Hi I’m from Singapore, can I send my watch to you and get it overhaul and fix it back like what you did?
How much would this cost? Any rough estimation?
Regards
Kelvin
Hi Kevin,
I’m afraid that I do not take on work for others, preferring instead to concentrate on the slow and steady approach on my own watches. However, if your watch is a 6139 chronograph, then you might give Duncan Hewitt a try – he is a UK based hobbyist turned professional watch smith. If you Google his name and/or his forum tag Cannop, then you should be able to find his contact details easily. His pricing is on his web site.
Martin
Awesome and details work, Martin! Quick Q, any pointers on how to remove the bezel via the notch without damaging the case of bezel? I’ve been suggested to heat up the bezel prior to removal…
You can use some protective tape to mask off the mid case but I find that some gentle pressure with a Seiko case knife usually does the trick and the bezel pops off without too much trouble. You can also try working a thin blade around the underside first but there is a danger you might then inadvertently mark the case with the sharp edge of the blade.
Hi, I will contact you through IG but I can still order a new bezel for this watch 😉
paul_watchmaker
Hi Paul,
I’ve been looking for a new bezel for one of mine for at least 18 months with no joy. I finally solved the problem by locating a complete NOS case on Yahoo.jp. Good luck with your search!
Martin
Hi Martin,
I think you have misread my post.
I said I can still order a new bezel for you if you like, but apparently you don’t need one anymore.
Cheers,
Paul
Apologies. I read your comment on my phone while out and about and clearly wasn’t paying close enough attention. It is very kind of you to offer to source a bezel for me. In fact the watch featured in this post is now sold but I have another waiting and that is the one I bought the old stock case for. Perhaps I can ask in the future should I find myself struggling again with case parts. Thanks again
Martin
Yes sure, you can always ask. Best through IG.
I have a Seiko account here in the Netherlands and often parts like the bezel are still available.
Thank you – will do.
Hi, lovely work as always. I recently purchased my first 6139 and while performing a crystal replacement I have encountered the dreaded stem button/clutch gear stuck issue. I am hoping to recover by way of the probing through the stem hole technique as I am not yet confident enough to feel comfortable removing the hands, dial & day/date wheels to reset the clutch gear. Any tips on how to get the clutch gear back in place without further disassembly?
I’ve not been conscious of the 6139 being any more prone to the yoke becoming misplaced than other Seikos – in fact the only time I’ve had repeated problems with this issue was with the ETA 2824. But in your case, the problem is obviously particularly problematic because of the headache in accessing the setting works, dial side. Unfortunately, I cannot offer much in the way of useful advice on how to resolve the problem without removing the dial and hands. The only thing I would suggest would be to try re-seating the stem whilst rotating the crown; try it with the watch oriented dial down and dial up (making sure the movement doesb’t drop out!) and generally indulging in a bit of gentle jiggling. If all of that fails, then I am afraid that the only surefire solution is to remove the dial and hands; calendar parts and then dissemble, reset and reassemble the setting parts. Sorry not to be of more help. Good luck!
Thank you for taking the time to respond. I will try what you suggested.
Los relojes cronografos automáticos Seiko son extraordinarios.
going time lurker of your awesome blog Martin. Have helped me more times than I care to admit!
would you happen to bébé the reference of the crystal handy? Working on the exact same model at the moment and I have a nasty chip on the crystal
Hi Benjamin, the crystal reference number is 340W14GN. I’m happy to hear you’ve found the blog useful. Good luck with your watch!