
Tags
The King Seiko line was conceived and developed originally by the Daini Seikosha division as a luxury hand-wind watch to compete with the Suwa-developed Grand Seiko line. Any aspiration on the part of Daini Seikosha that it should be regarded as the equal of Grand Seiko was never realised, with Grand Seiko consistently presented in all of Seiko’s catalogues and marketing as the zenith of the Seiko Universe from 1960 until its demise in 1975. For the first seven years of its existence, the King Seiko evolved slowly but steadily through a series of beautiful hand-wind models, all of which powered by variations of the 44-series movement, itself a refined development of the Cronos 54A movement, dating from the late 1950s. In 1968, Daini replaced the 44 family with the thoroughly modern high-beat hand-wind 45 calibre, undoubtedly one of Seiko’s finest hours. That movement would go on to serve both King Seiko and Grand Seiko watches until 1973.
Curiously though, the first automatic King Seiko was developed not by Daini but by Suwa Seikosha. The high-beat 56 series calibre would go on to power an enormously diverse range of King and Grand Seiko models (as well as a myriad of Lord Matics in low-beat form) and would become arguably Seiko’s most successful automatic movement. Stung into action, Daini developed its own automatic high-beat King Seiko calibre in the form of the 52 series but that movement would have a relatively short life, its birth in 1971 coming just as the quartz revolution was starting to flex its muscles.

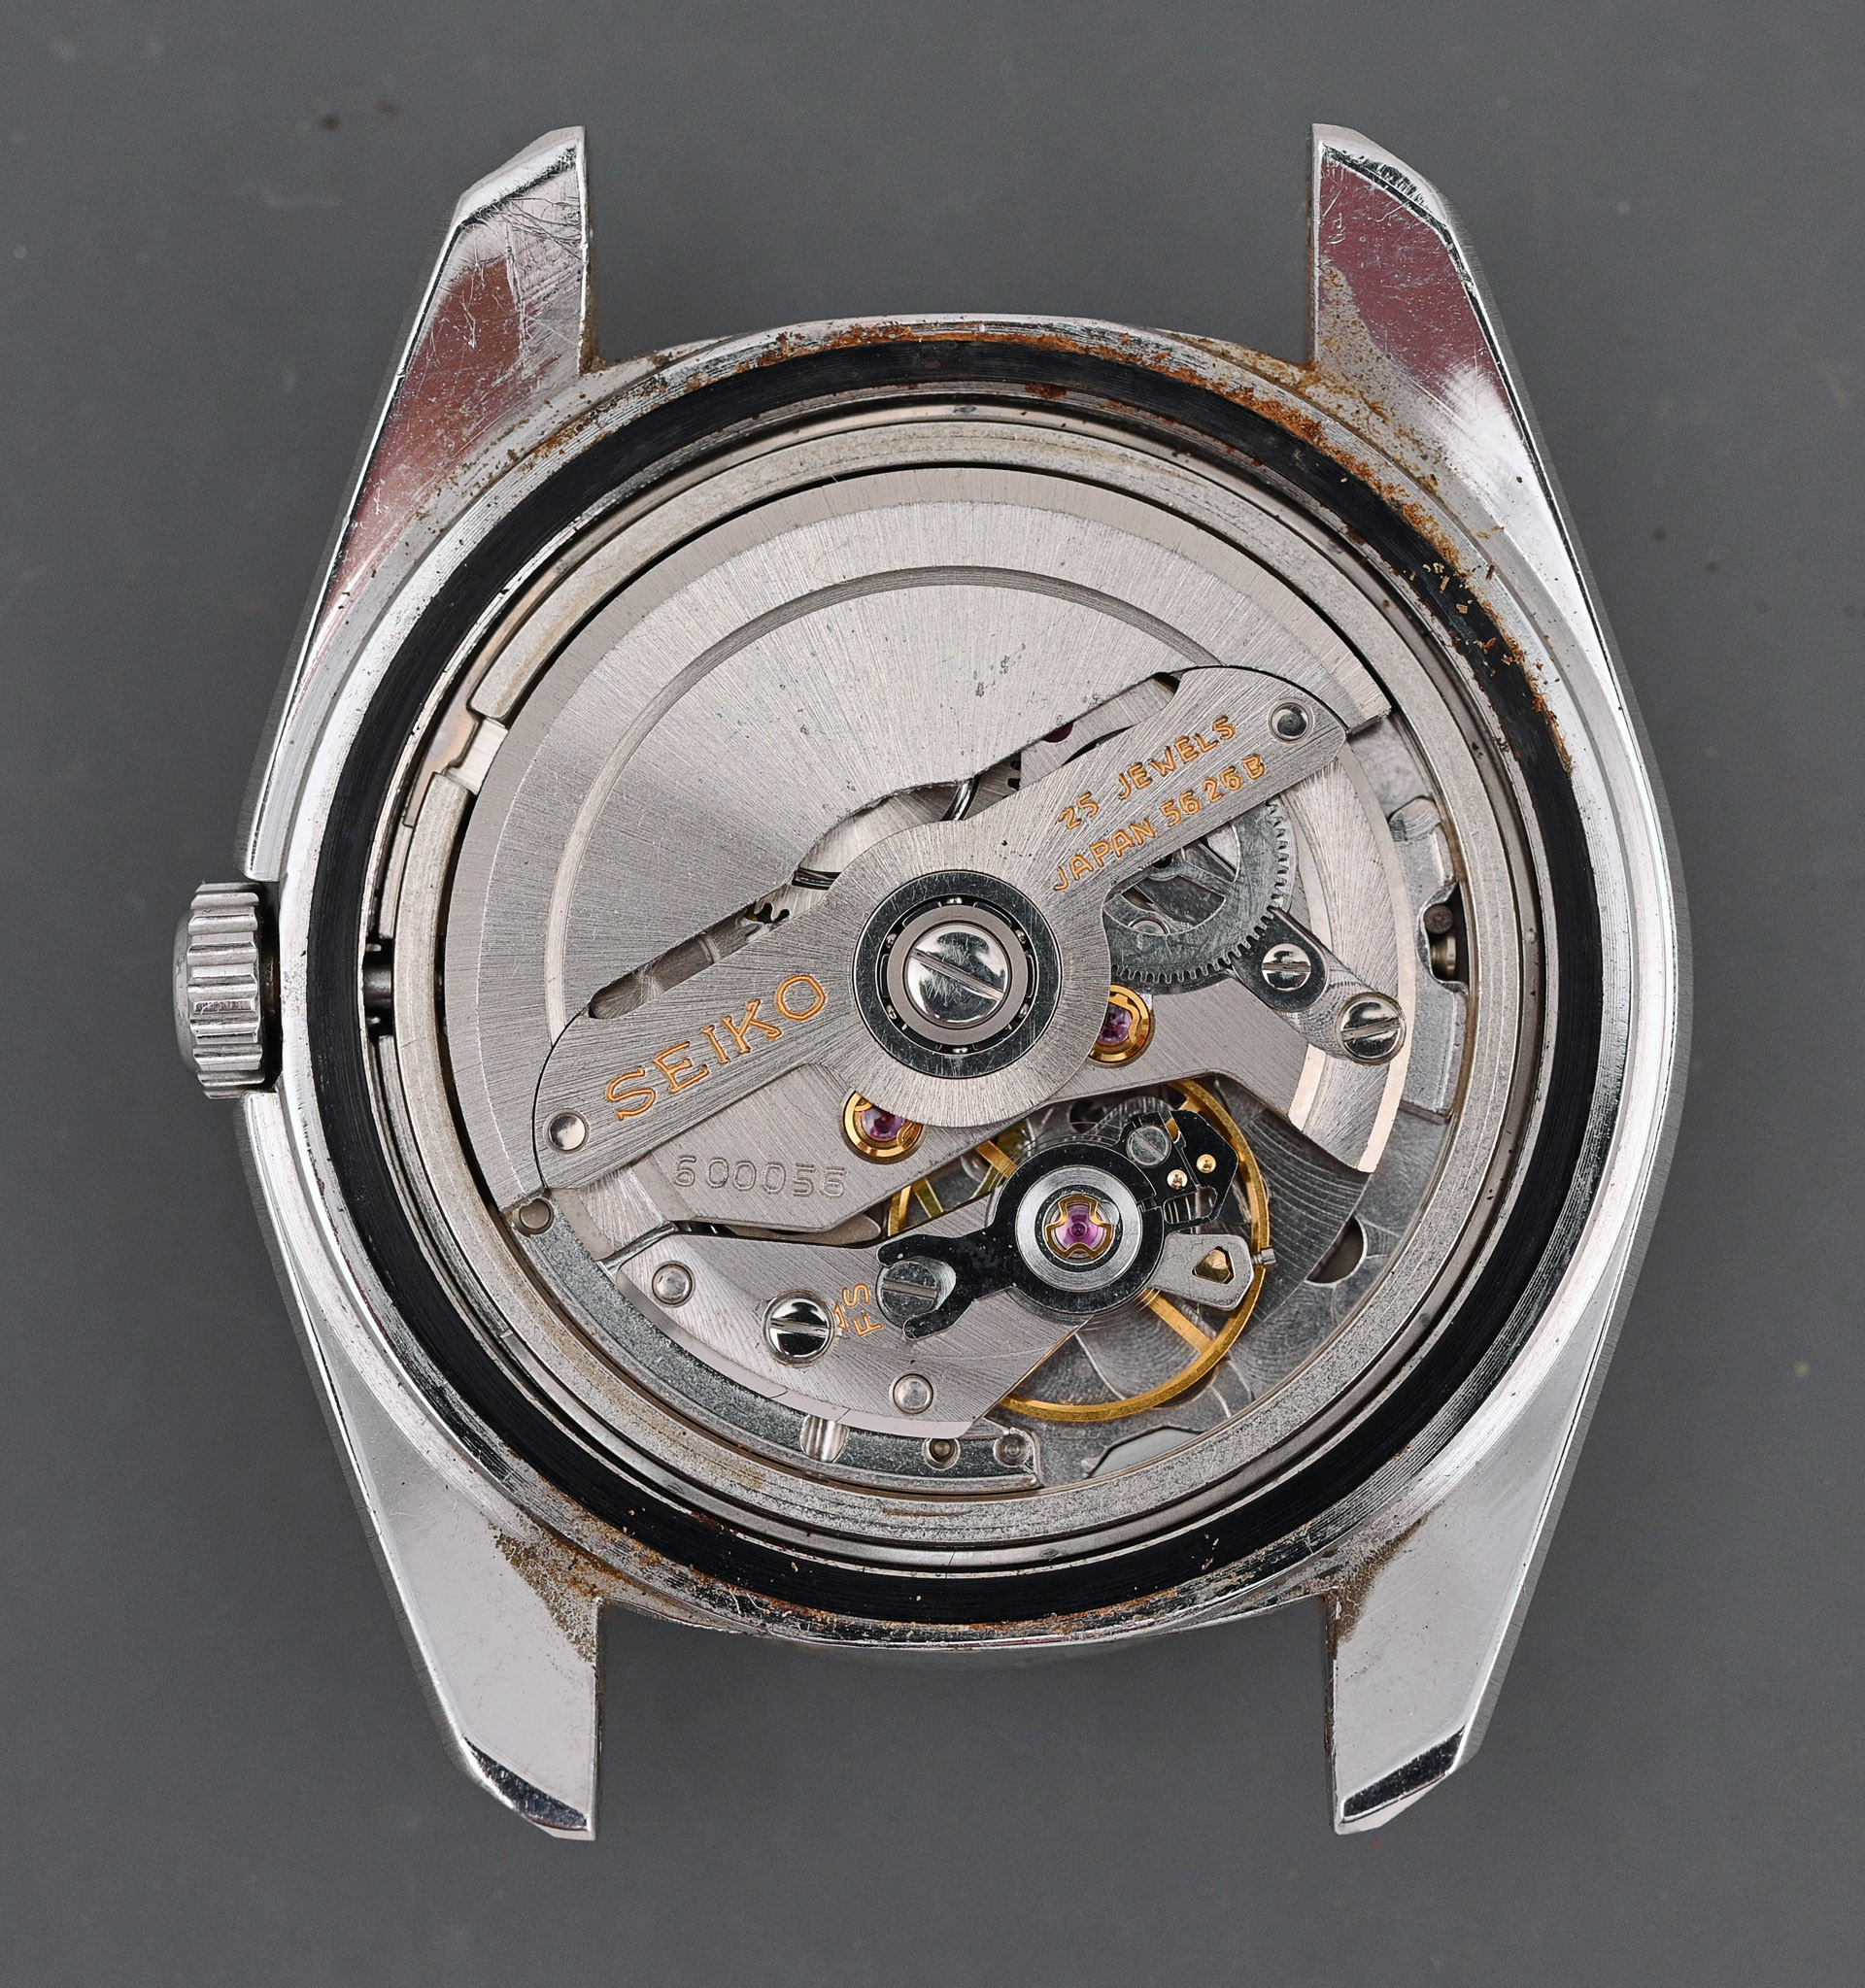
The first wave of automatic King Seikos started conservatively in 1968 with just a single model, the 5626-7000 (featured elsewhere in this blog), joined in 1969 by a second model, the 5626-7010 and broadened with additional dial options. In 1970, six additional models were introduced, three of which Superior Chronometers, officially certified by the Japan Chronometer Inspection Institute which had been founded two years previously. One of these King Seiko chronometers was the 5626-7040, a very handsome and well-proportioned watch that would go on to become, in both its incarnations (see below), the longest-lived of all automatic King Seikos. It is also the joint longest-lived of any King Seiko, neck and neck with the 4502-7000).

The 5626-7040, in common with the 5626-7000, featured a monocoque case design, with the movement accessed via the dial aperture in the case rather than the more conventional approach via a removable screw-down case back. These unibody cases featured a removable hatch between the lower lugs to allow external fine regulation adjustment. However, in 1973, the 5626-7040 design was updated, with the unibody case changed to a conventional screw-down caseback design and the external fine adjustment feature was lost. This evolution of the 7040 was recognised in a change to the model number to 5626-7041. In all other respects, the external appearance on the wrist was identical.
The stainless steel 5626-7040 and 7041 were available in three dial colours, one silver, one grey/blue and one green, although the green option only appeared for a short period in 1973 (in 7040 form). The blue-dialed variant was available continuously from 1970 to 1975 when the King Seiko (and Grand Seiko) brands were retired, and it is an example of this model that forms the basis of the current entry.
I own two examples of the 5646-7041, both with blue dials and both with serial numbers dating them to 1974. The slightly older of the two I have owned for several years, the younger, just a couple of months. For reasons that don’t pay much heed to logic, I have chosen to lavish my attention on the newer watch, possibly influenced by the fact that it is the sharper of the two and that it came complete with a classic KS-branded bracelet, if not one that would have been fitted to the watch originally. It is also worth noting that the decision to select a blue-dialed King Seiko Hi-Beat as the subject of the next project was the result of a democratic process, solicited through this blog and my Instagram account. Here is the watch in question:

The external aspect is noteworthy for the very sharp case, an immaculate dial and handset, a somewhat tatty crystal and some evident areas of funk encrustment and surface corrosion.

The 5626B variant of this classic Hi-Beat movement looked in excellent fettle and importantly, free from obvious signs of watchmaker abuse. The later B variant of the 5626 is consistent with this being a relatively late watch, produced just a year or so before the King Seiko line stopped production.
However, I noted two flaws before starting the deconstruction. Firstly, the oscillating weight bearing was quite badly worn and as a result, the lower edge of the periphery of the rotor was making intermittent contact with one of the bridges when agitated into rotation. Secondly, and to be honest, not unexpectedly, was the discovery that the day/date quickset was inoperable. Regular readers of this blog, as well as those of you who are familiar with the notorious reputation of the 56 series, will know of the vulnerability of the day-date corrector wheel rocker to cracking and consequent failure. In spite of the strong likelihood that any 56 series watch purchased now will have suffered from such a failure, this is the first example of a 56xx calibre featured here to have this fault.
The initial impression of the condition of the dial and hands was confirmed with the movement removed from the case.

If not quite flawless, not far off. The imprinting on the rear of the dial dated it to June 1974, one month later than the date suggested by the case serial number – providing an interesting insight into the timeline of the manufacturing process.

The deconstruction of the movement begins with the calendar components. I note in passing the dual language English/Kanji day wheel as well as the slightly corroded edge to the date disk. But otherwise, everything is straightforward and familiar.

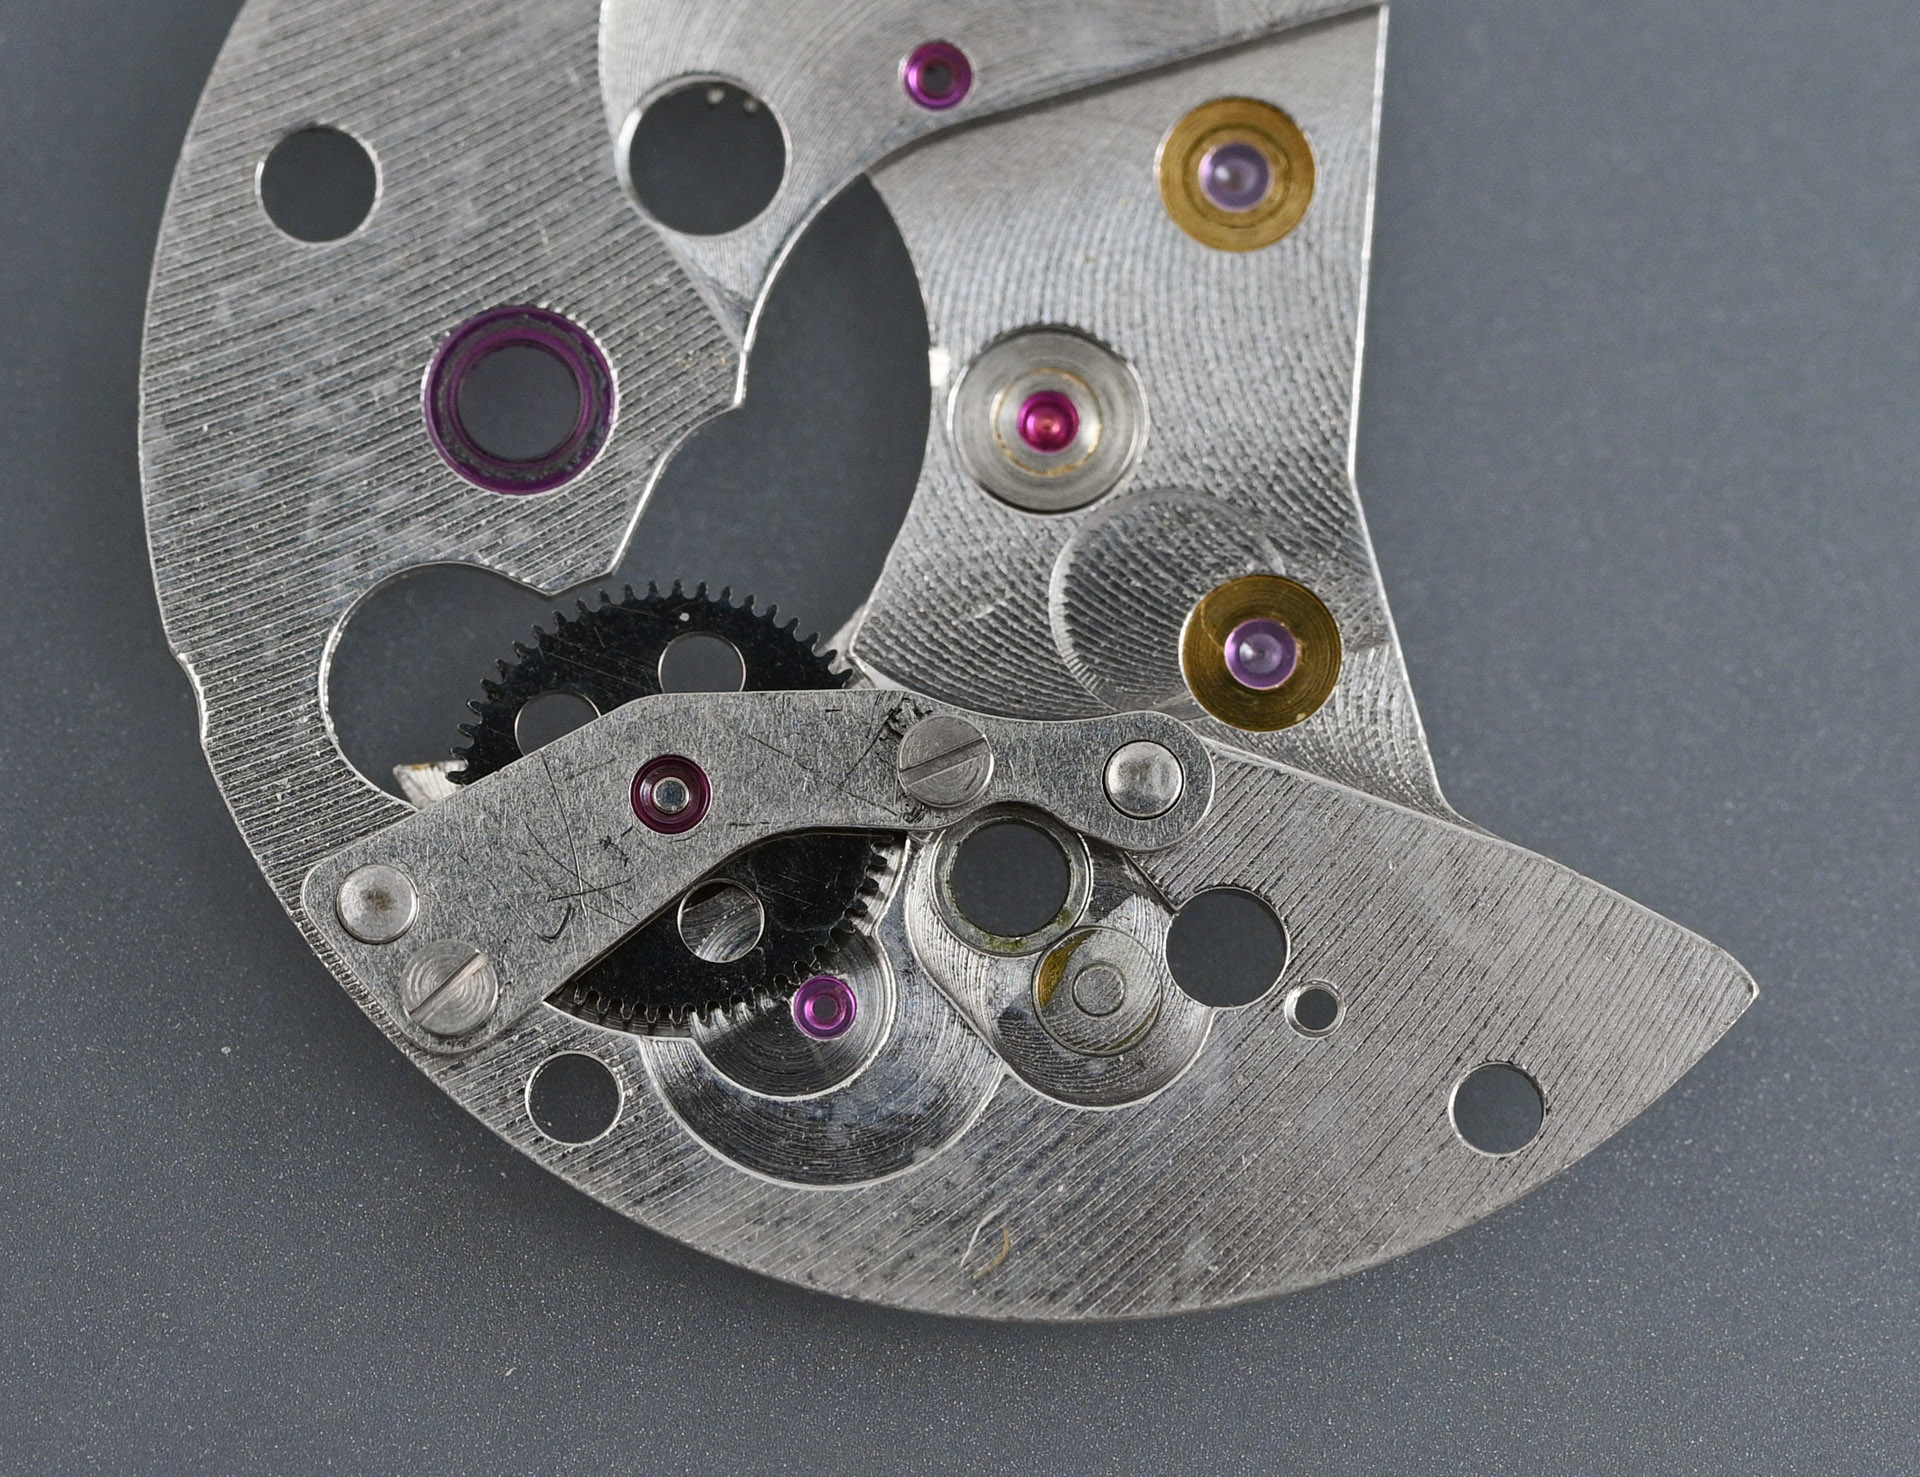
The process continued on the train side, firstly with the removal of the first reverser idler bolt (top left, below), followed by the progressive dismantling of the train bridge addenda, the bridge and finally the gear train.

The train bridge itself is festooned with jewellery and significantly, two moving parts, one, the crown wheel, a permanent attachment (off-stage, upper, below), and the other, the autowinding mechanism transmission wheel which is held in place by its own bridge.
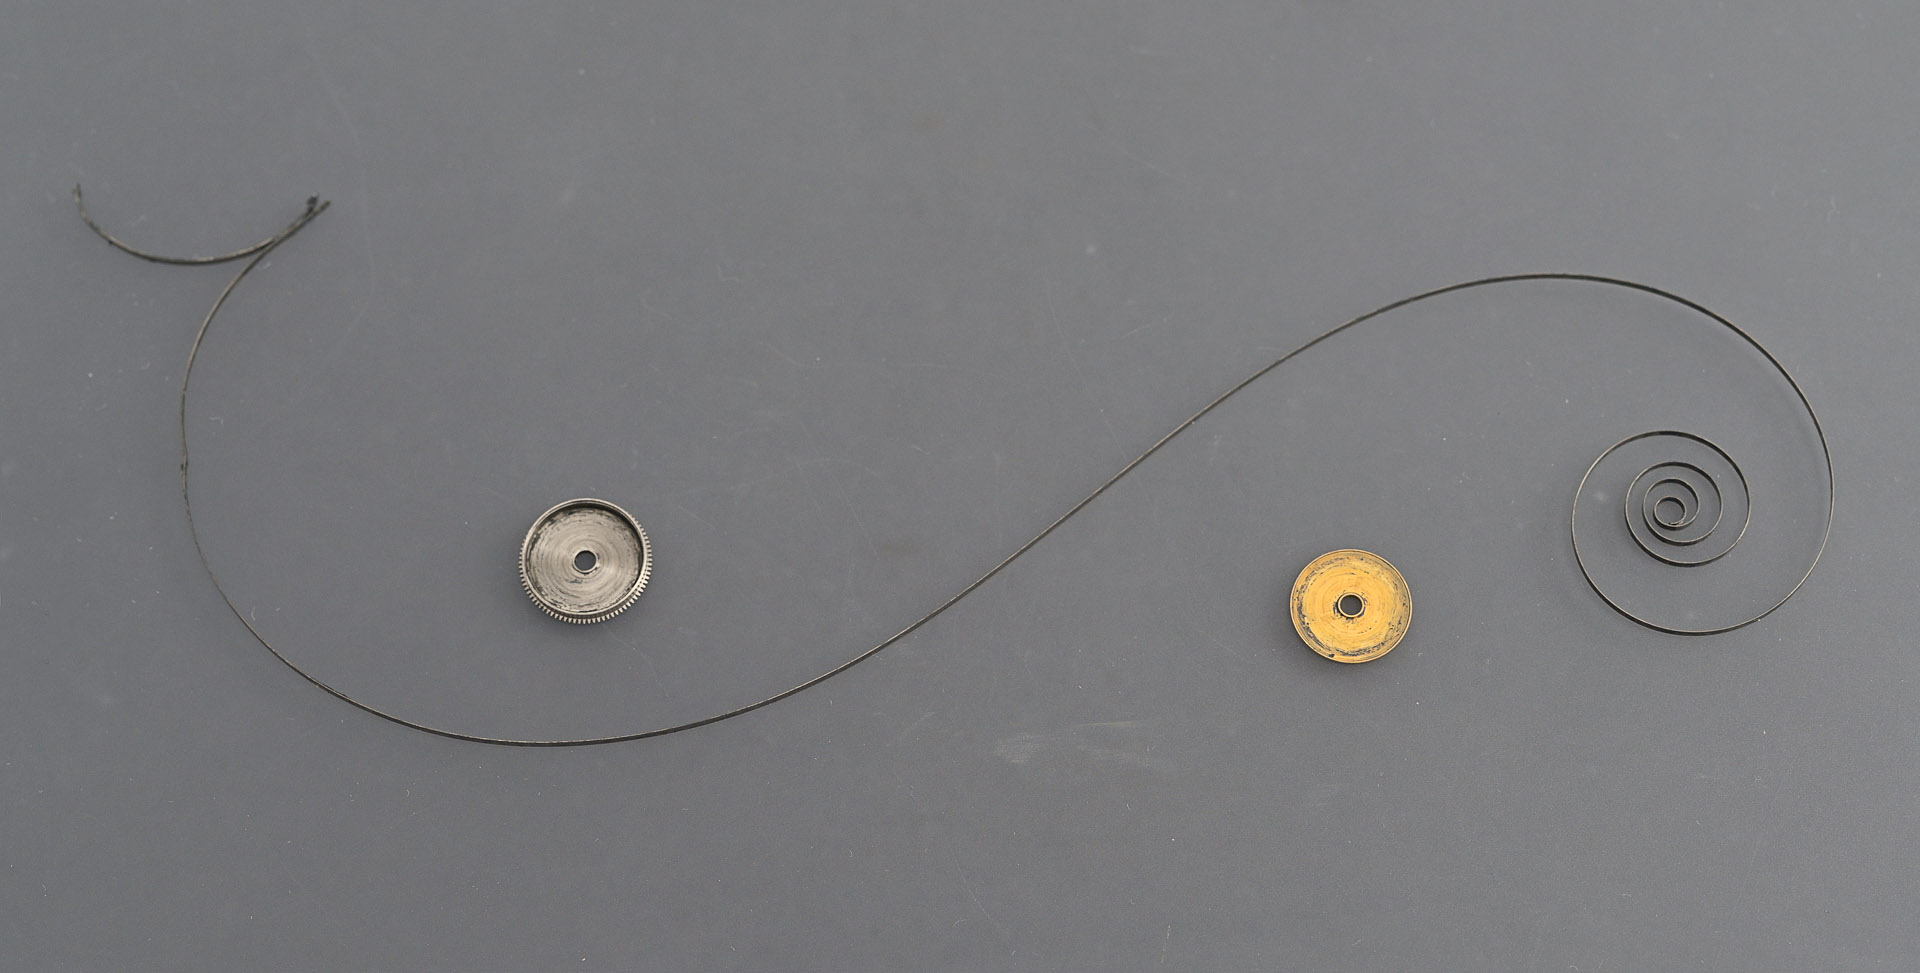
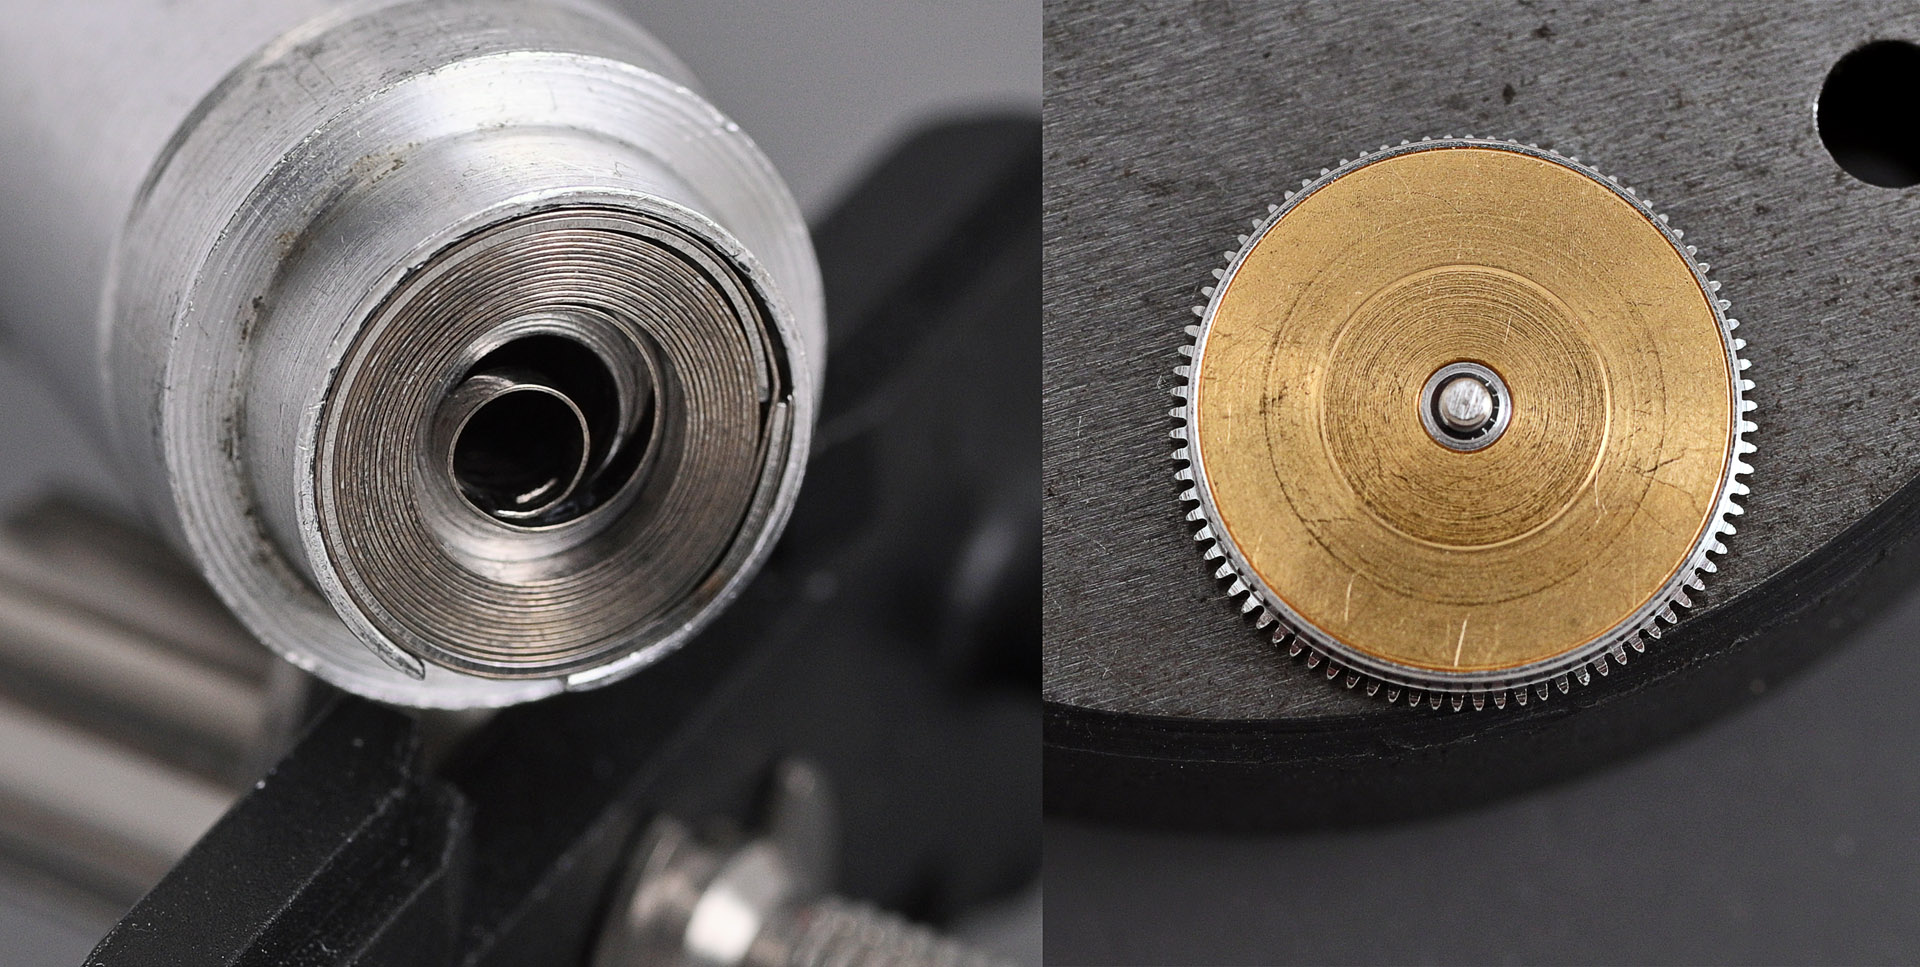
Rather than labouring a description of the disassembly process detailed elsewhere (here, here and here), I will pause only to make three observations or notes: firstly, the mainspring emerged unscathed from its barrel and with an uncoiled shape consistent with what I have seen previously with mainsprings from 56 series movements.
Secondly, a close-up of the day-date corrector wheel rocker reveals the extent of the injury inflicted upon it and may provide some insight into why it is now incapable of performing its intended original function.

And finally, I will note that the minute wheel spring can be left in situ during the cleaning process, as suggested in the technical guide.

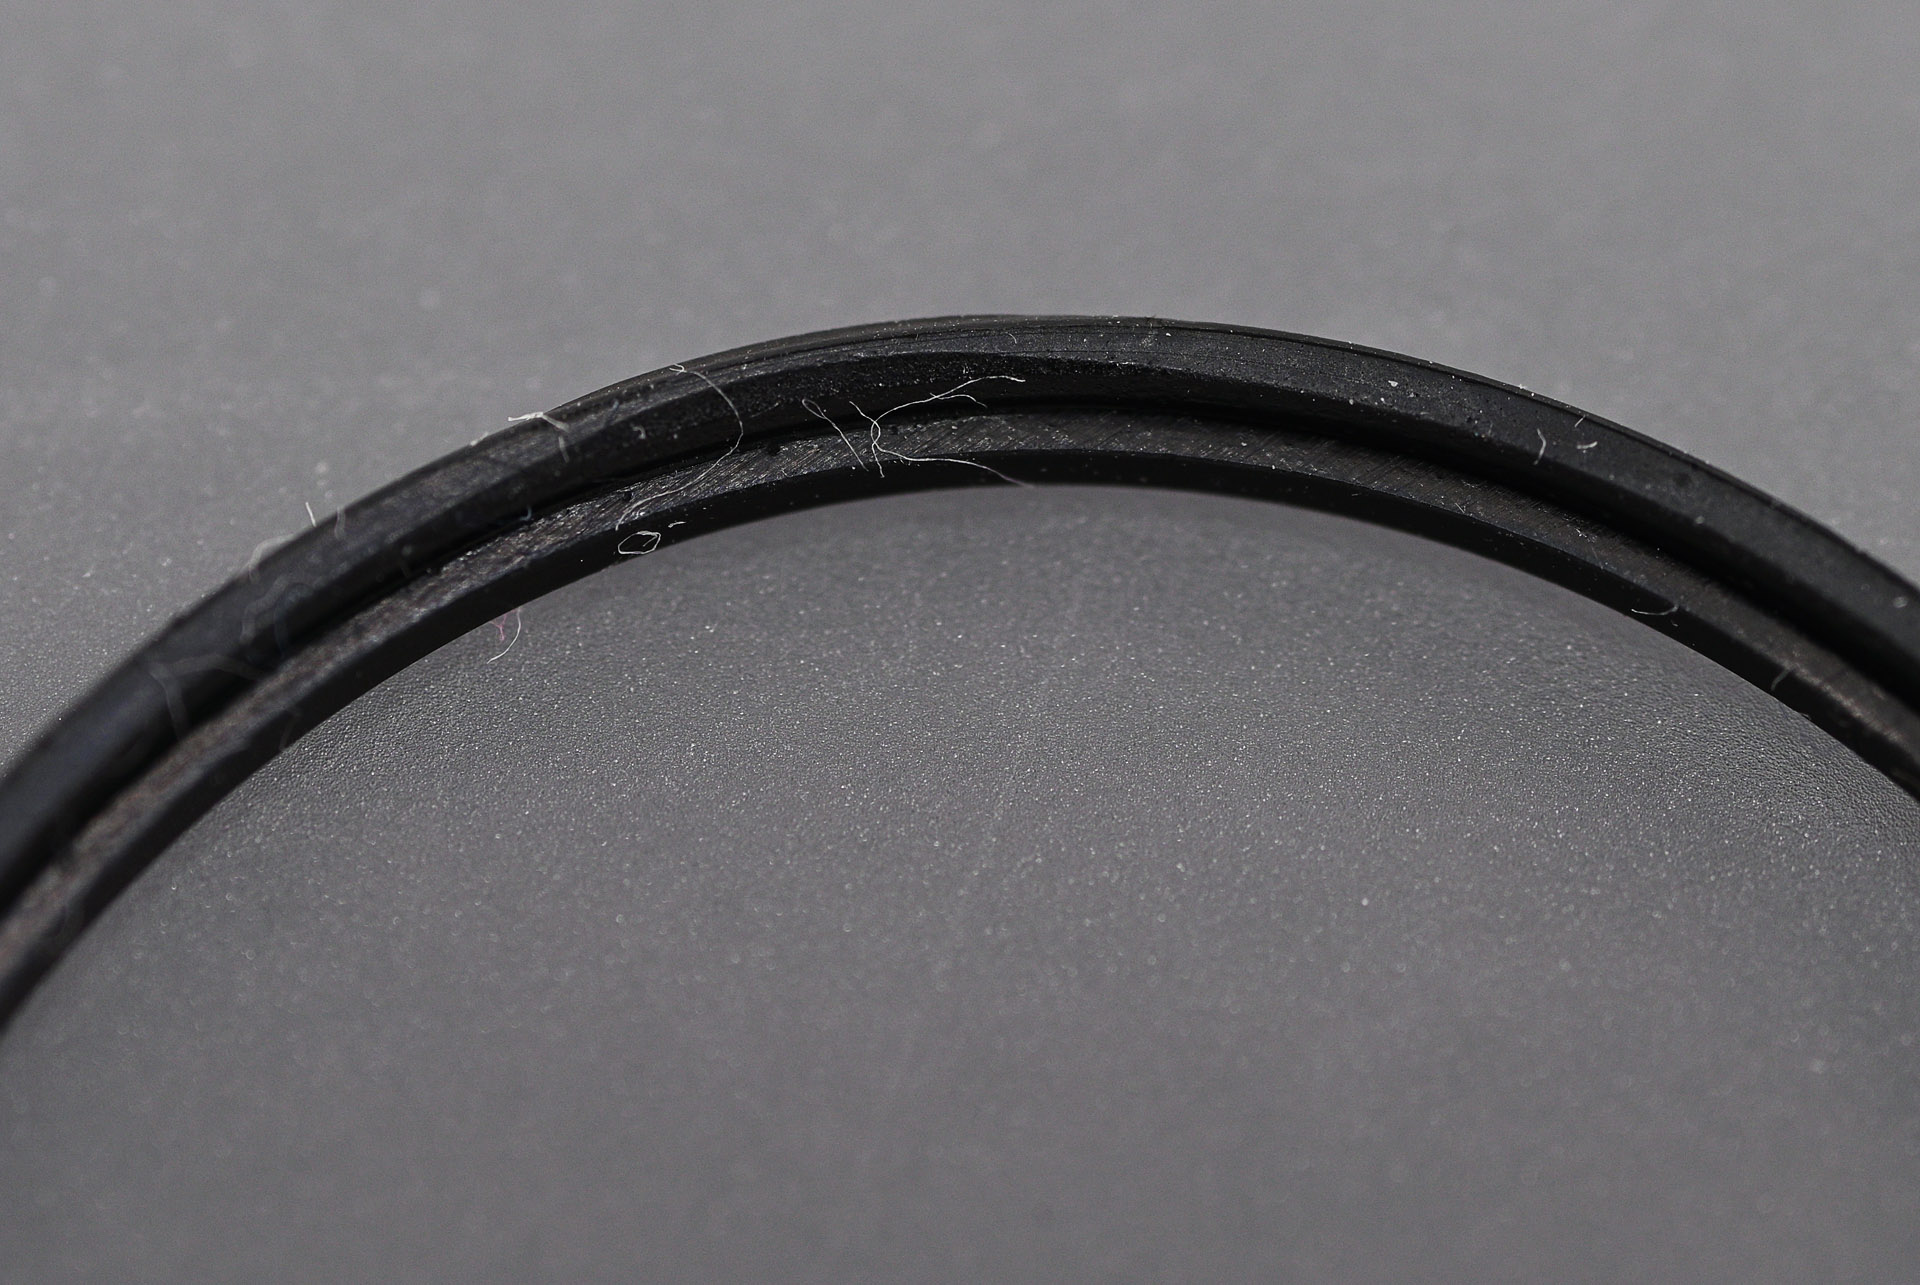
With the movement parts arranged into baskets and dispatched to the cleaning machine, I turned my attention to the case. The bezel serves as the crystal retaining ring but also as an impediment to egress of any moisture that finds its way into the moat surrounding the crystal. It is not unusual therefore to encounter corrosion once the bezel is levered away.
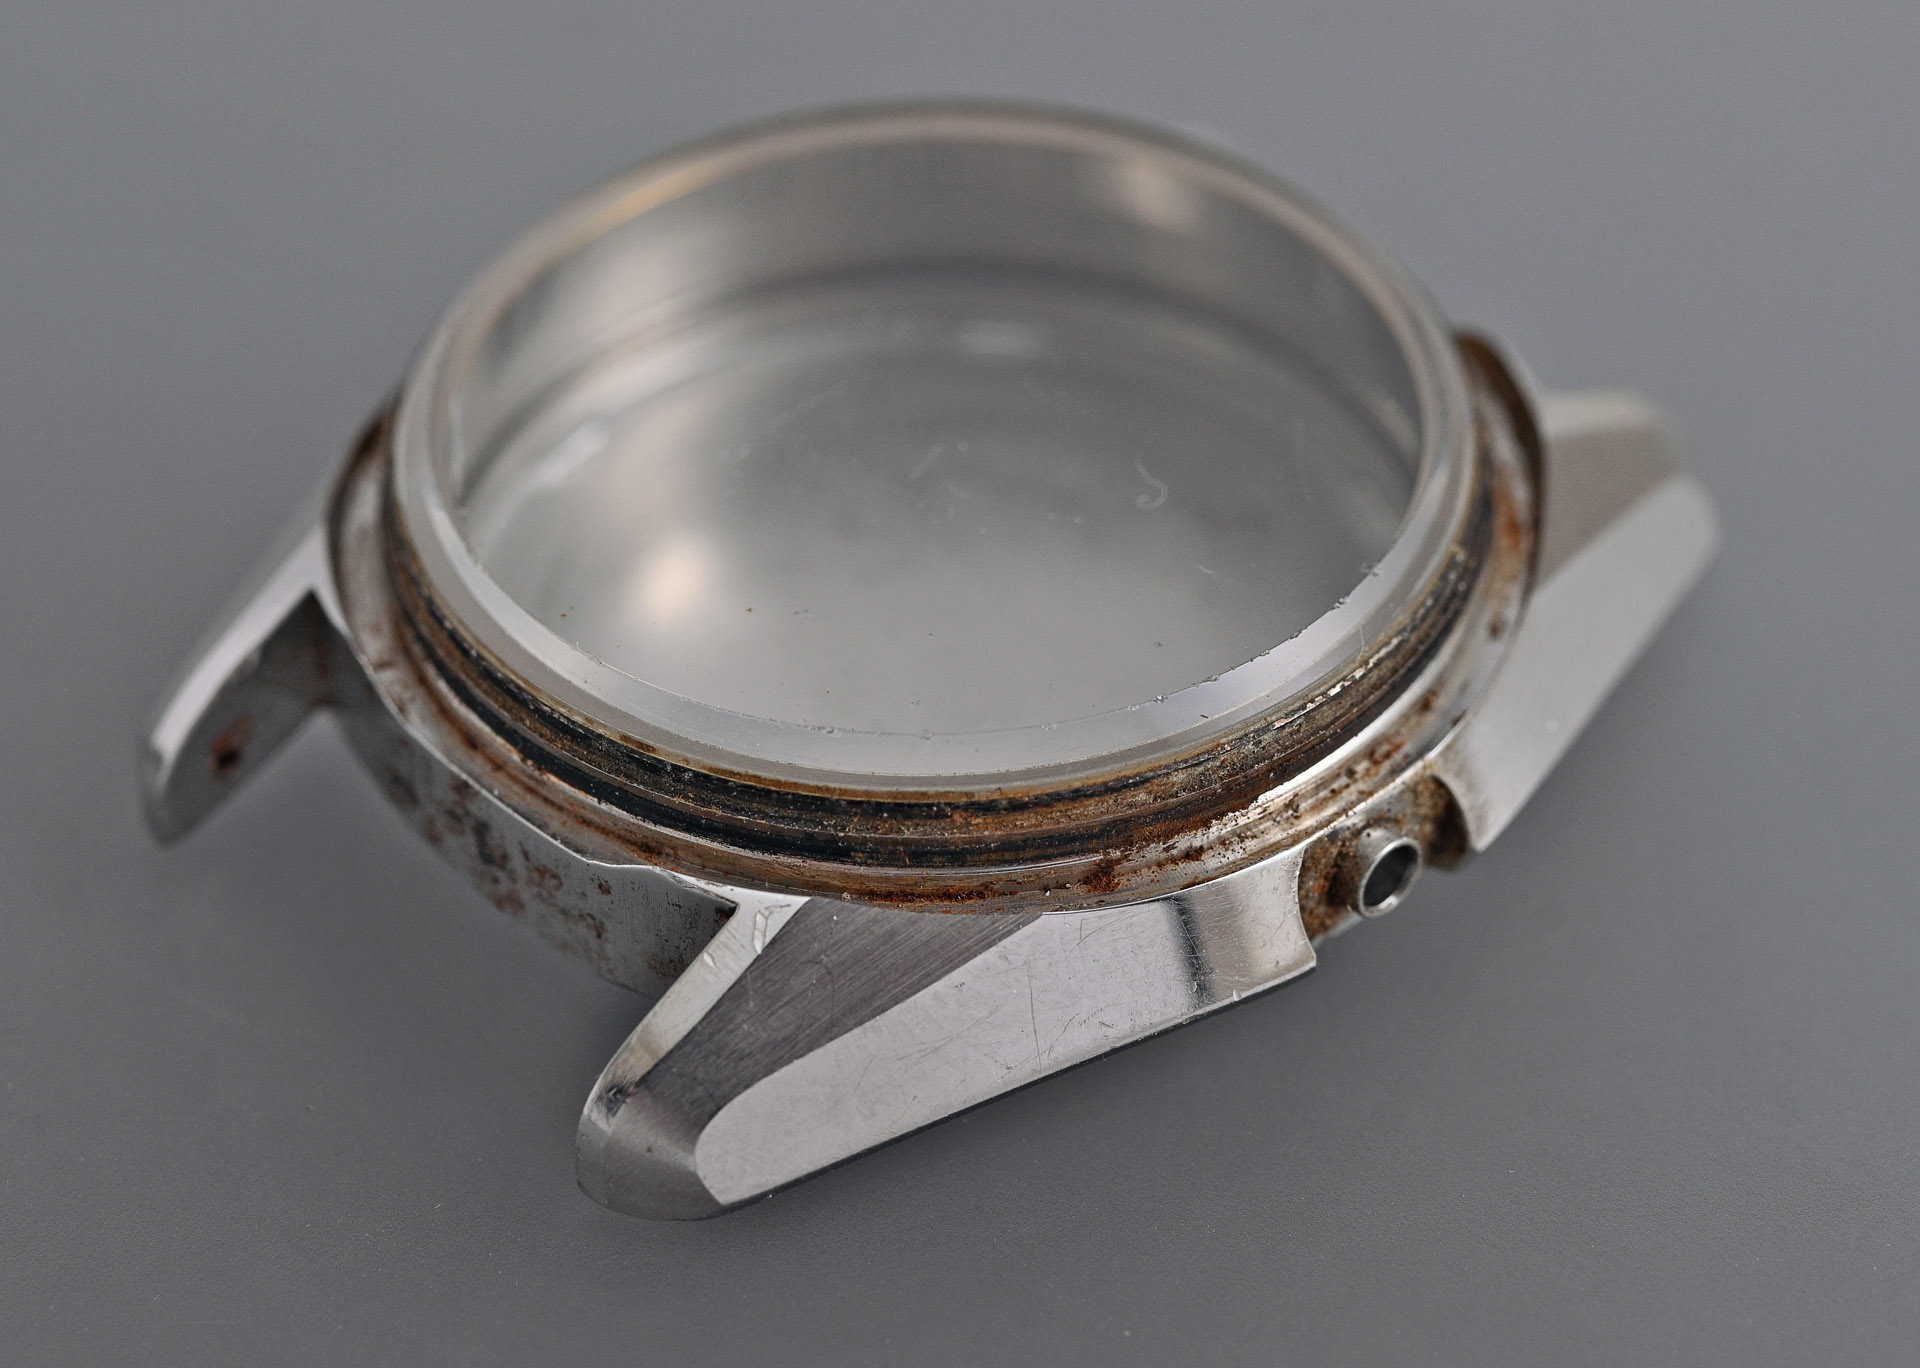
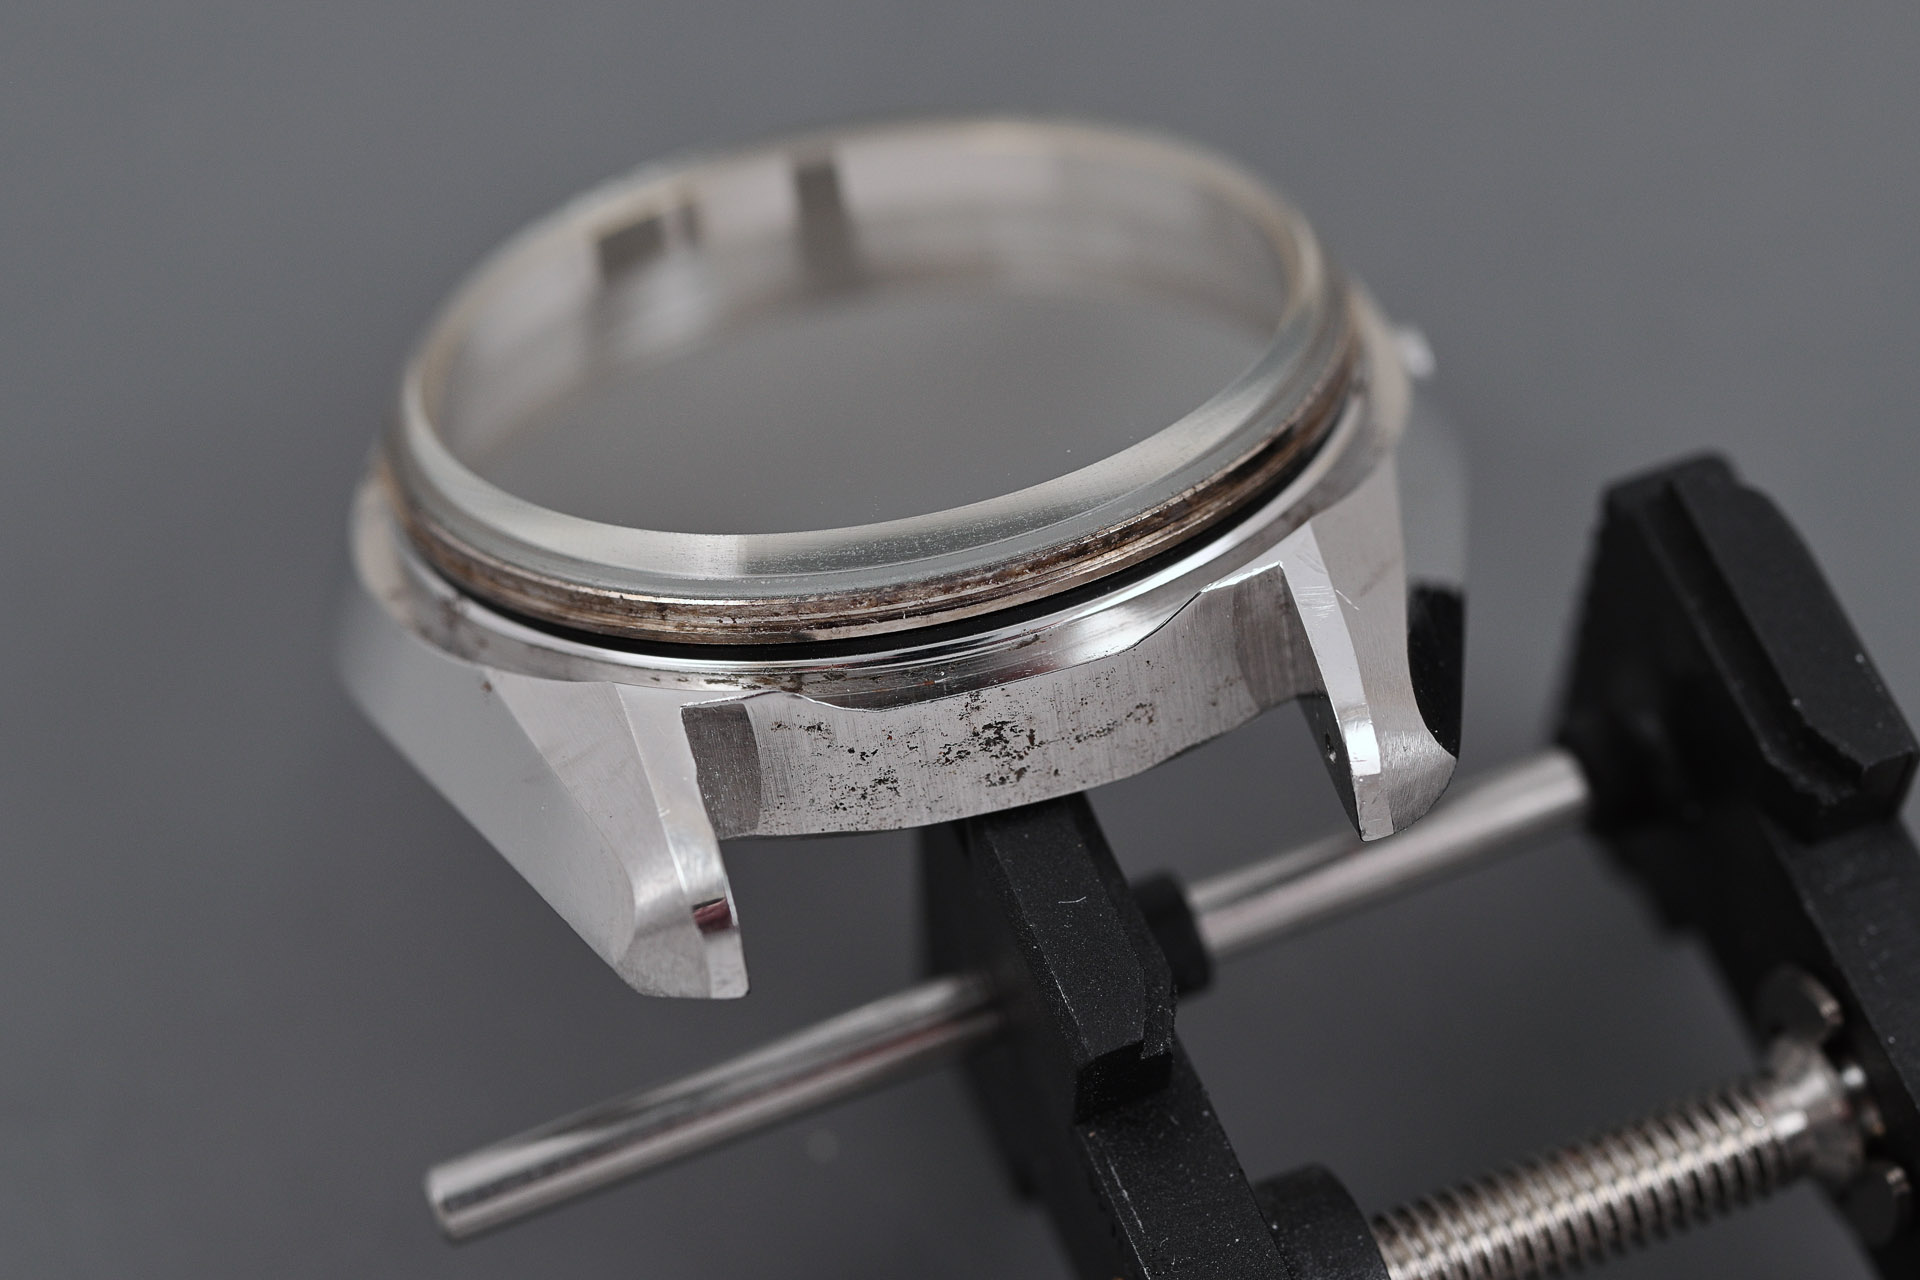
Quite a bit of the unpleasantness you can see in the photo above is just good old-fashioned grime but there is also a fair amount of surface corrosion. The V-type crystal fitted to this watch comprises a 30 mm tempered mineral glass flat Hardlex crystal bonded to a metal frame. The water resistance of the case is provided by an L-shaped rubber gasket that sits between the metal frame and the aperture in the case.

The crystal gasket was in reasonable condition in that it retained some suppleness, but it was very dirty and in one or two places distorted from having been incorrectly seated and then pinched in the past.
The glass crystal itself sported plenty of surface scratches and numerous chips around its edge and would need replacing. Seiko’s intention at service would have been for the whole assembly to be replaced with a new part but the more commonly used V-type crystals are now in very short supply – by which I mean almost impossible to find and certainly not at a sensible price. It has also been my experience that even if you can find new old stock, the glue securing the crystal to the frame may have become cloudy, spoiling the aesthetic benefit of replacing old with ‘new’. So my default approach is to replace the glass only and reuse the metal frame. This requires first that the old glass is detached from the frame and that is not an especially easy task. The recipe that works for me is to sonicate the crystal in a hot water bath (around 90 °C) for an hour or more.

Sometimes the crystal will let go quite easily after its bath, sometimes it requires some reasonably robust encouragement. This one required the latter. The original crystal part number for the 5626-7041 is 300V16GNS and the glass itself is flat, top and bottom. Some of the 300V crystals have a slight inner and outer dome but not this one. Once the crystal is detached, the next job is to remove any glue residue. This can be a time-consuming job and is achieved best by repeatedly immersing the frame in boiling water as you work your way around the circumference. It is important to remove every last remnant of the old glue because otherwise it will mar the appearance of the metal surface beneath the new crystal. Having cleaned the frame, we need to select a suitable replacement crystal. The best option in my opinion, if you want to retain the flat upper and lower surfaces, is a Sternkreuz XMF 300.863, a replacement for the Seiko 300W96GN. This is almost identical to the original.

The next step is arguably the most difficult to do well: apply a thin layer of Seiko S-314 UV curable glue to the metal frame, making sure not to apply so much that any excess will squeeze out and mar the polished inner bevel when the crystal is fitted. Once you’ve applied the glue, lower the glass into place, rotating back and forth a little to smooth out any bubbles and spread the glue more evenly. Place the combined glass and frame under a UV lamp and leave for an hour or so, turning occasionally.

Once the glue has cured, the crystal is ready to be installed into the freshly-cleaned case. A new gasket is fitted first to the crystal frame to ensure a snug fit and reduce the chances of pinching the gasket when the crystal is pressed home.

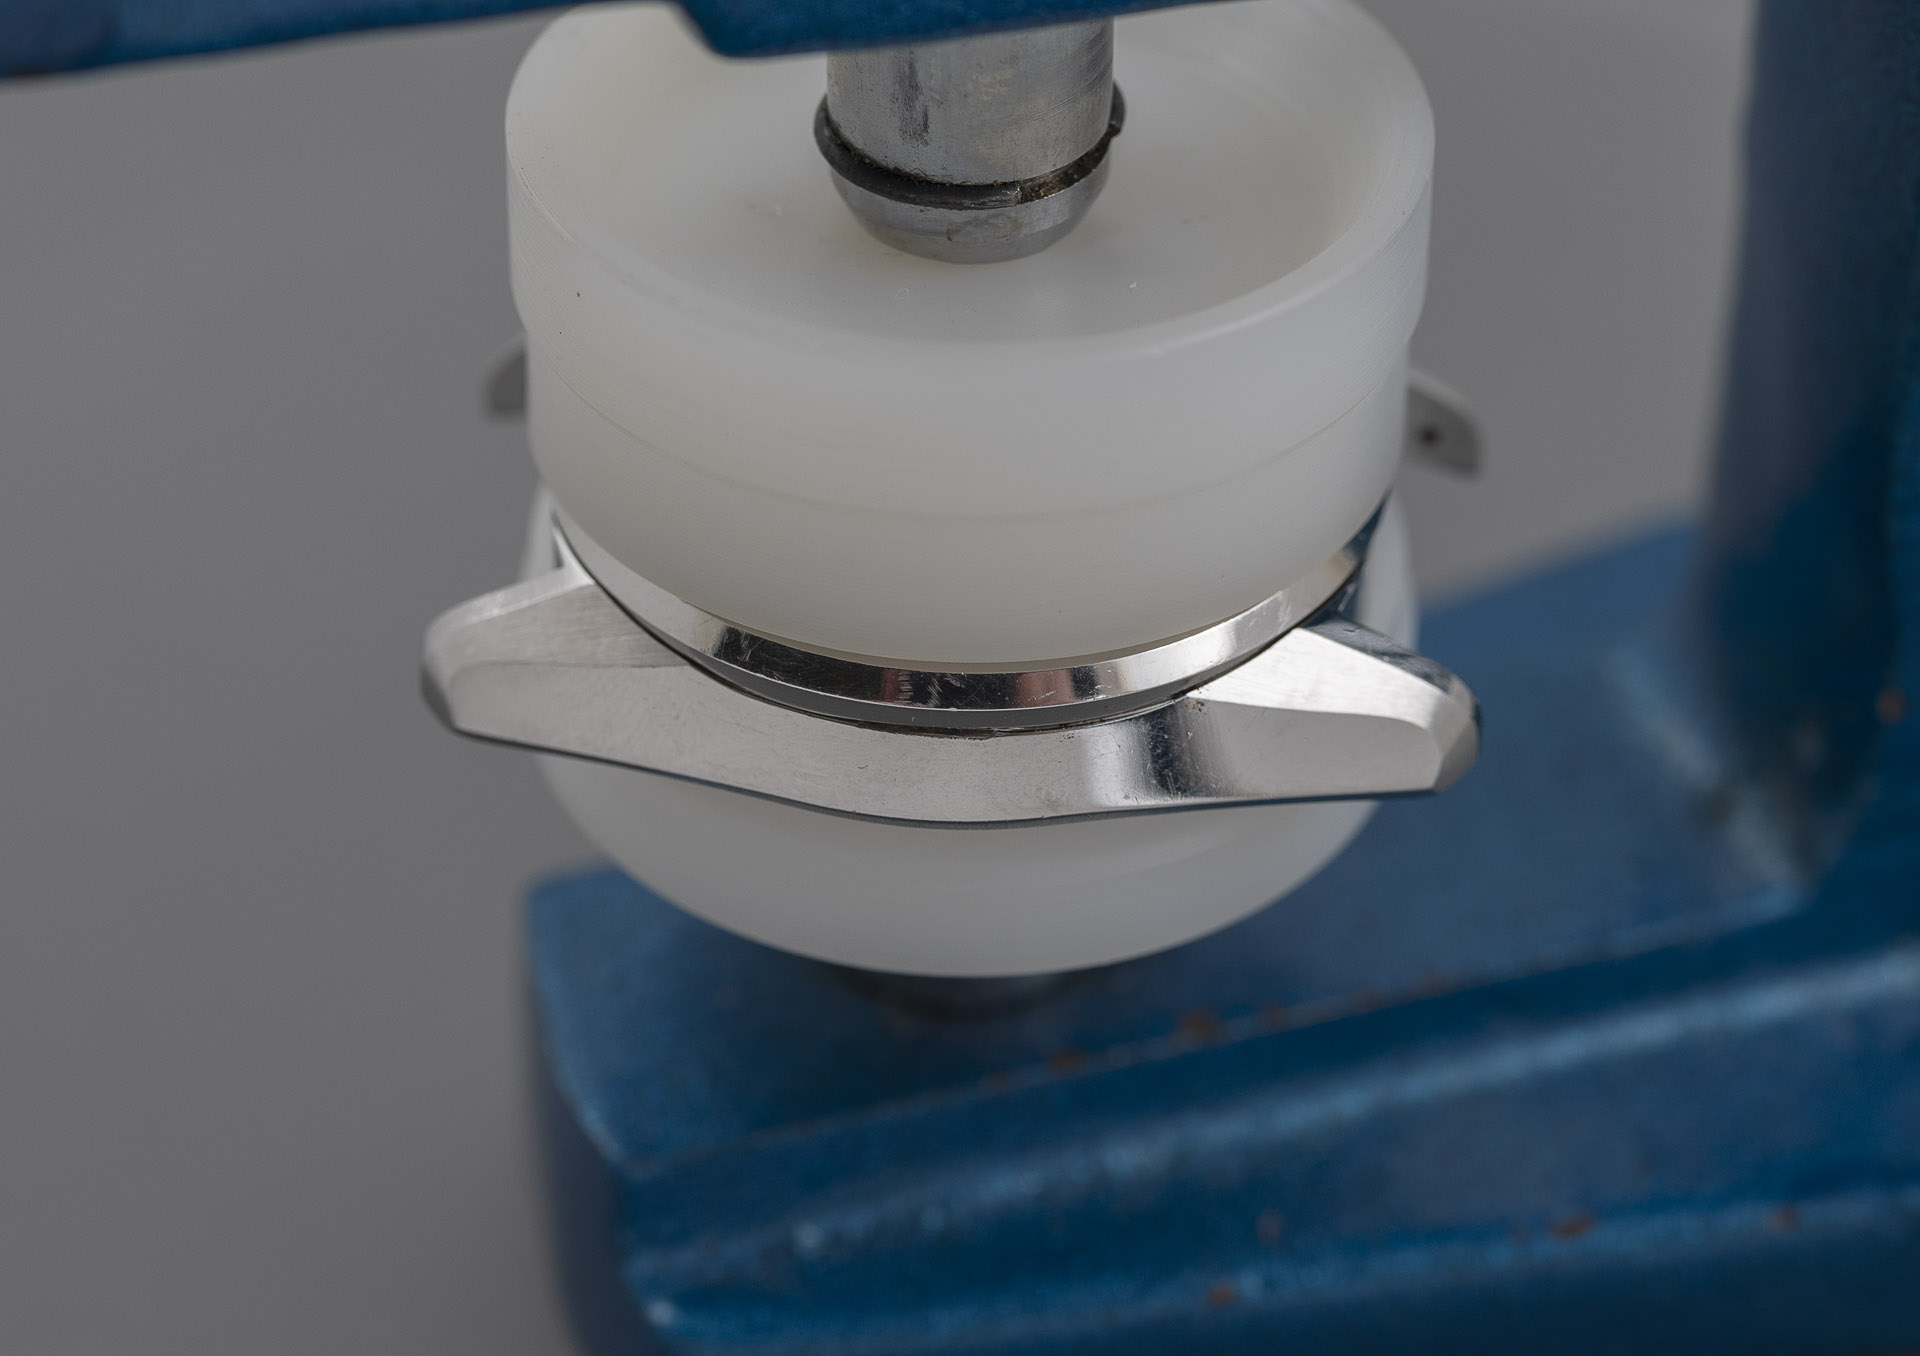
The complete crystal assembly and gasket are then placed into position into the mid-case aperture and seated snugly using finger pressure.
We complete this operation by placing the bezel/crystal retaining ring around the crystal and pressing home with the crystal press.
We’ll set that to one side for the moment and return to the freshly cleaned movement parts to begin the process of reassembly. As usual, I start with the Diafix settings, just two this time on the barrel and train wheel bridge, followed by the mainspring.
The setting parts come next, arguably the most complicated part of the whole process because of the very large number of parts that need to be fitted before you can take a pause. We start with the stem, clutch and winding pinion, followed by the yoke and yoke spring (top left, below). The setting wheel lever complete, setting lever axle, setting lever and the setting wheel lever spring come next (top right, below). Then the setting lever spring and the day-date corrector wheel rocking lever, followed by the date jumper and the day-date corrector rocking lever spring (!) (bottom left, below). At this point we can survey our work and take the setting functions through their paces (bottom right, below).

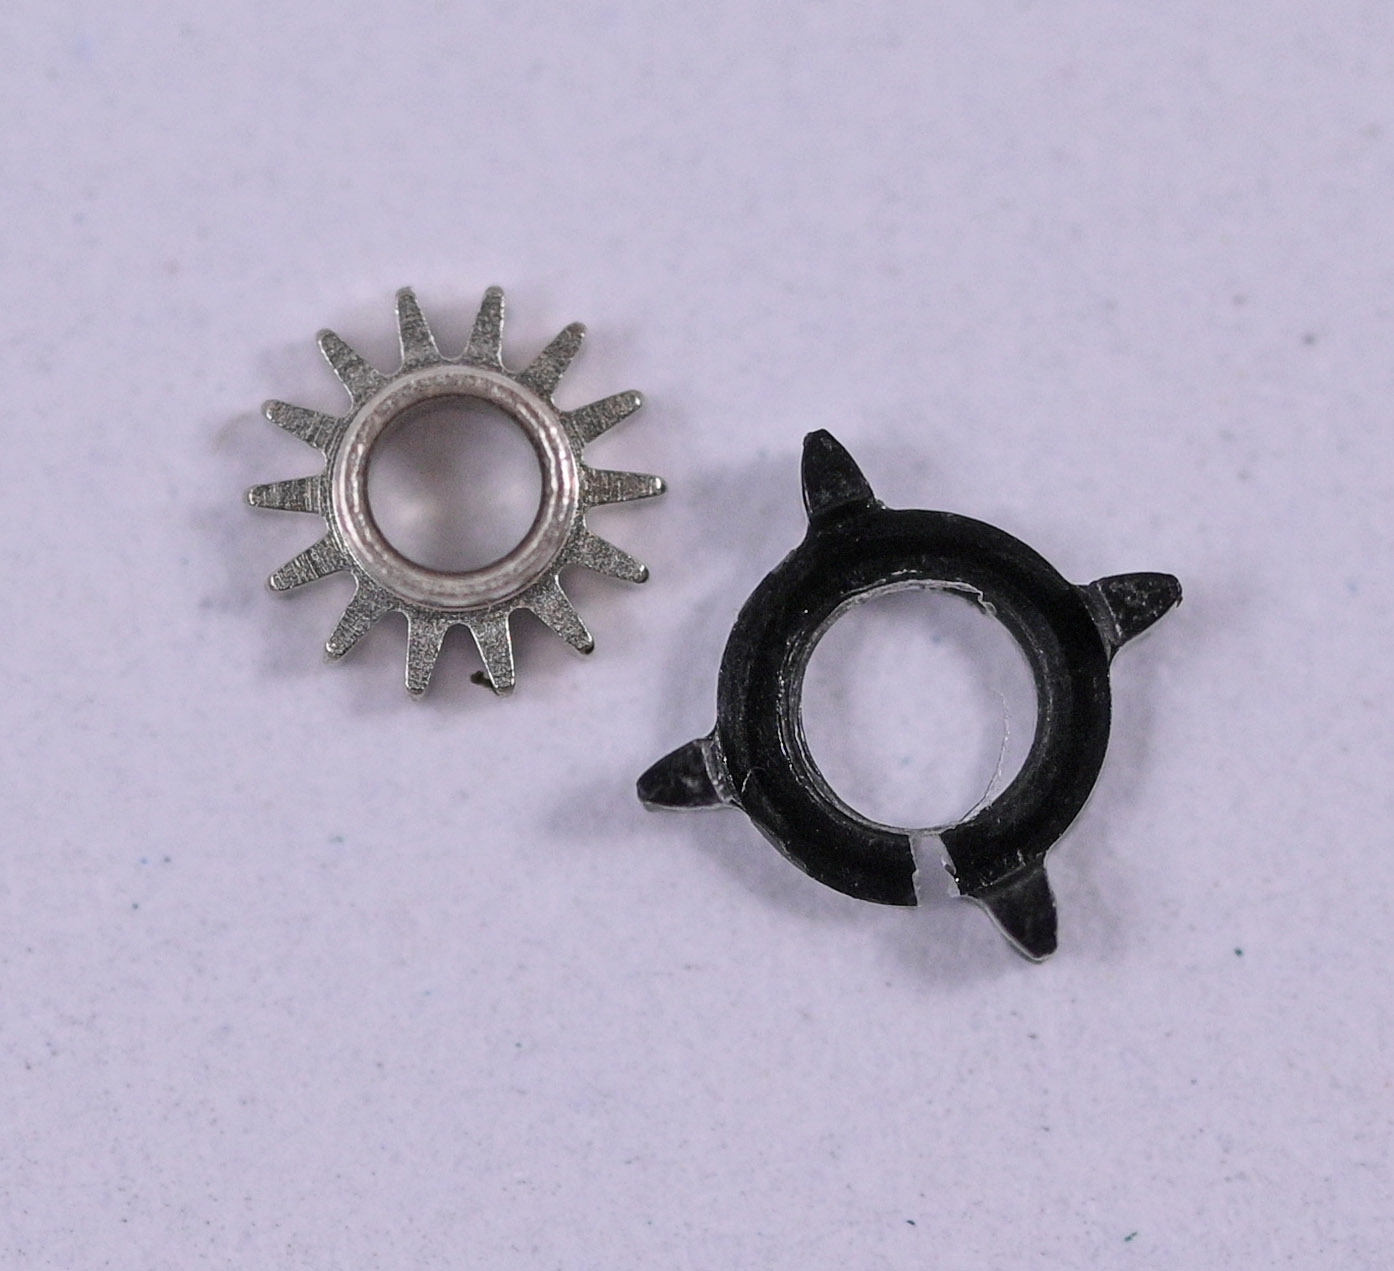
Everything you see in the bottom right image above is now secured into position and we can breathe easy. We need to take stock at this point because the next stage requires a functioning day-date corrector wheel rocker and the one this watch came with is broken. I do have a couple of spares, but I wanted to take this opportunity to see if I could repair the broken part rather than replace it.
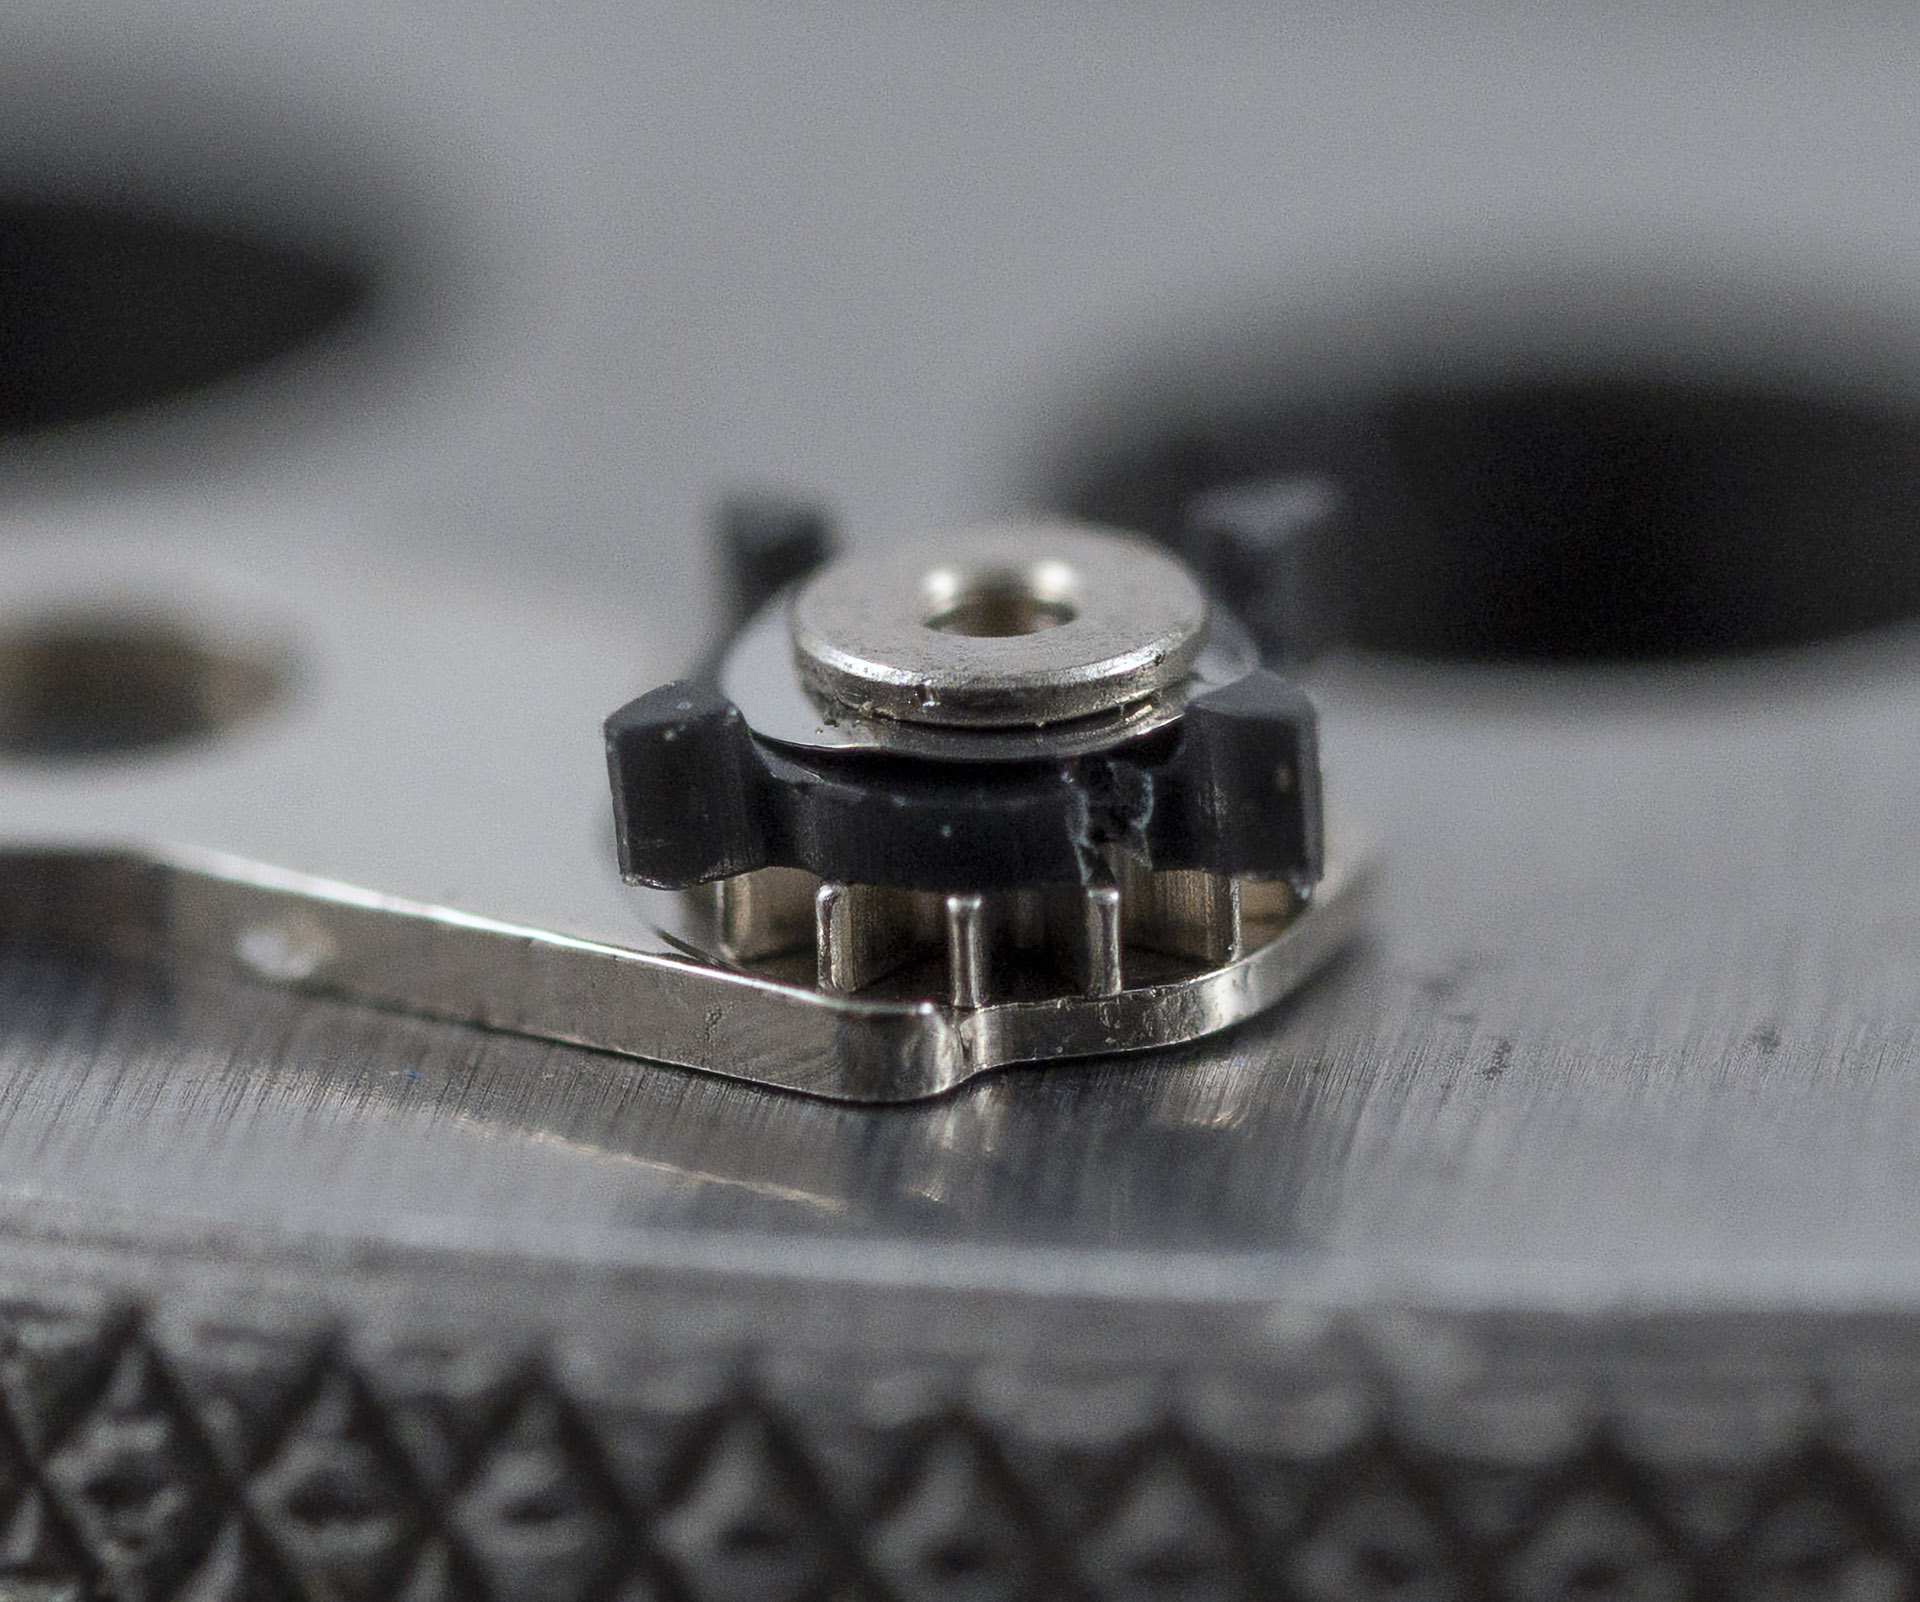
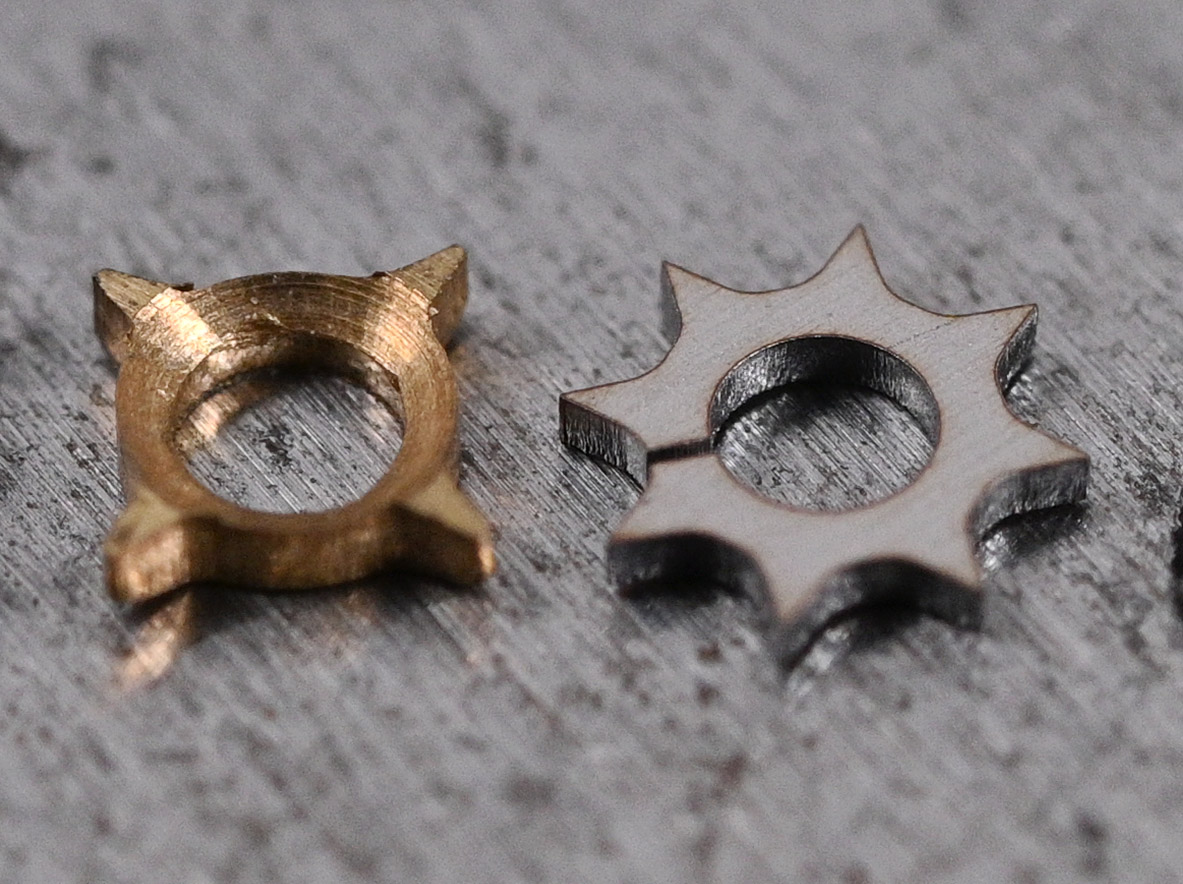
The key to being able to repair these parts is two-fold: 1) You need to locate a replacement part for the broken plastic star and 2) you need to have the means to disassemble the whole lever assembly and then to put it back together in a functional state. Fortunately, a seller in Australia (Vintage Time Australia) has been manufacturing replacement quickset stars and selling them through his eBay account. His design is quite different in appearance to the original part but importantly it works and is made of metal and should therefore not suffer the same fate as the plastic original. I also found a seller on Yahoo Japan of a brass replacement star in the same design as the original and so I bought one of those and three of the Australian stars.
Extraction of the broken star requires a staking set, preferably one with a separate detachable base to allow the use of a stake as a punch. I have an ancient Swiss staking set, more or less complete, but with many of the stakes in poor condition. Last year, I also acquired a Chinese clone of a Bergeon 5285, complete with a large selection of stakes and punches. The problem with the Chinese tool is that it is entirely incompatible with the stakes in my old Swiss set as well as well the Bergeon stakes. And it doesn’t have a separate base. So I bought a Bergeon 5285S staking tool base to go with my Chinese knock-off staking tool and needless to say, the threaded bolt to secure the base to the stake was of the wrong tap size. The solution to that conundrum was to buy a tap and die set and re-tap the hole in the Chinese staking tool to accept the Bergeon bolt. With that done, I now have a base that I can attach to my staking tool.
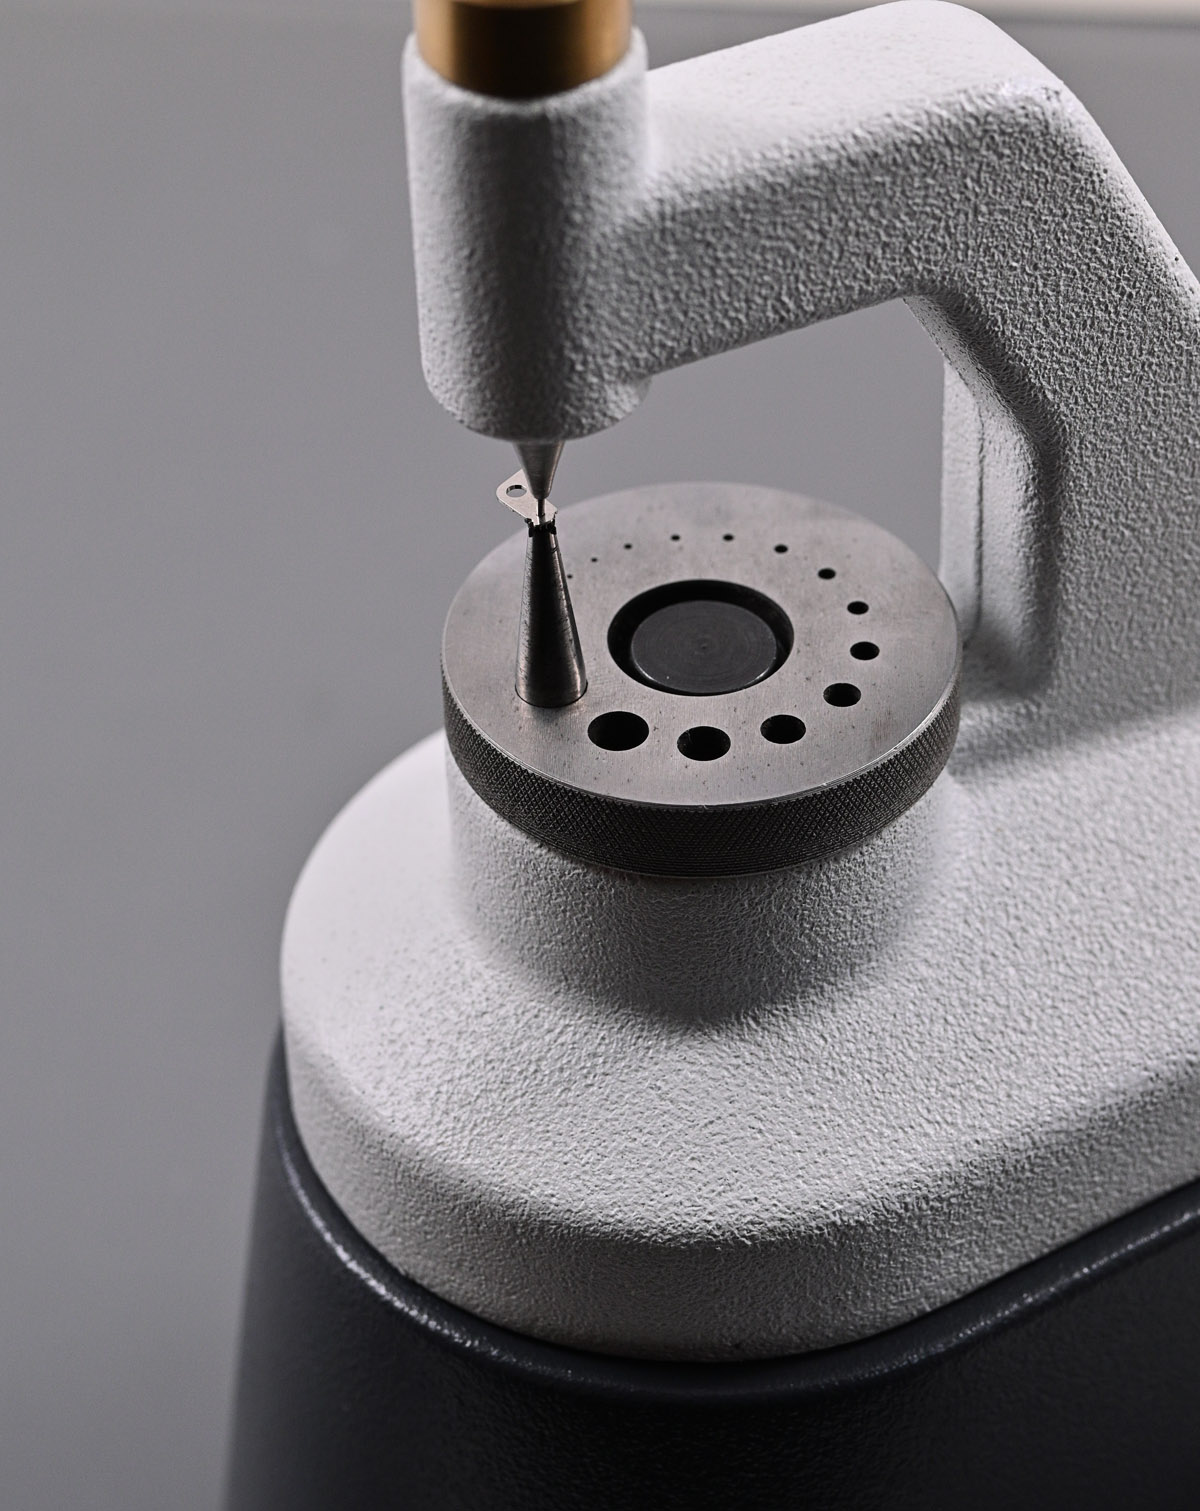
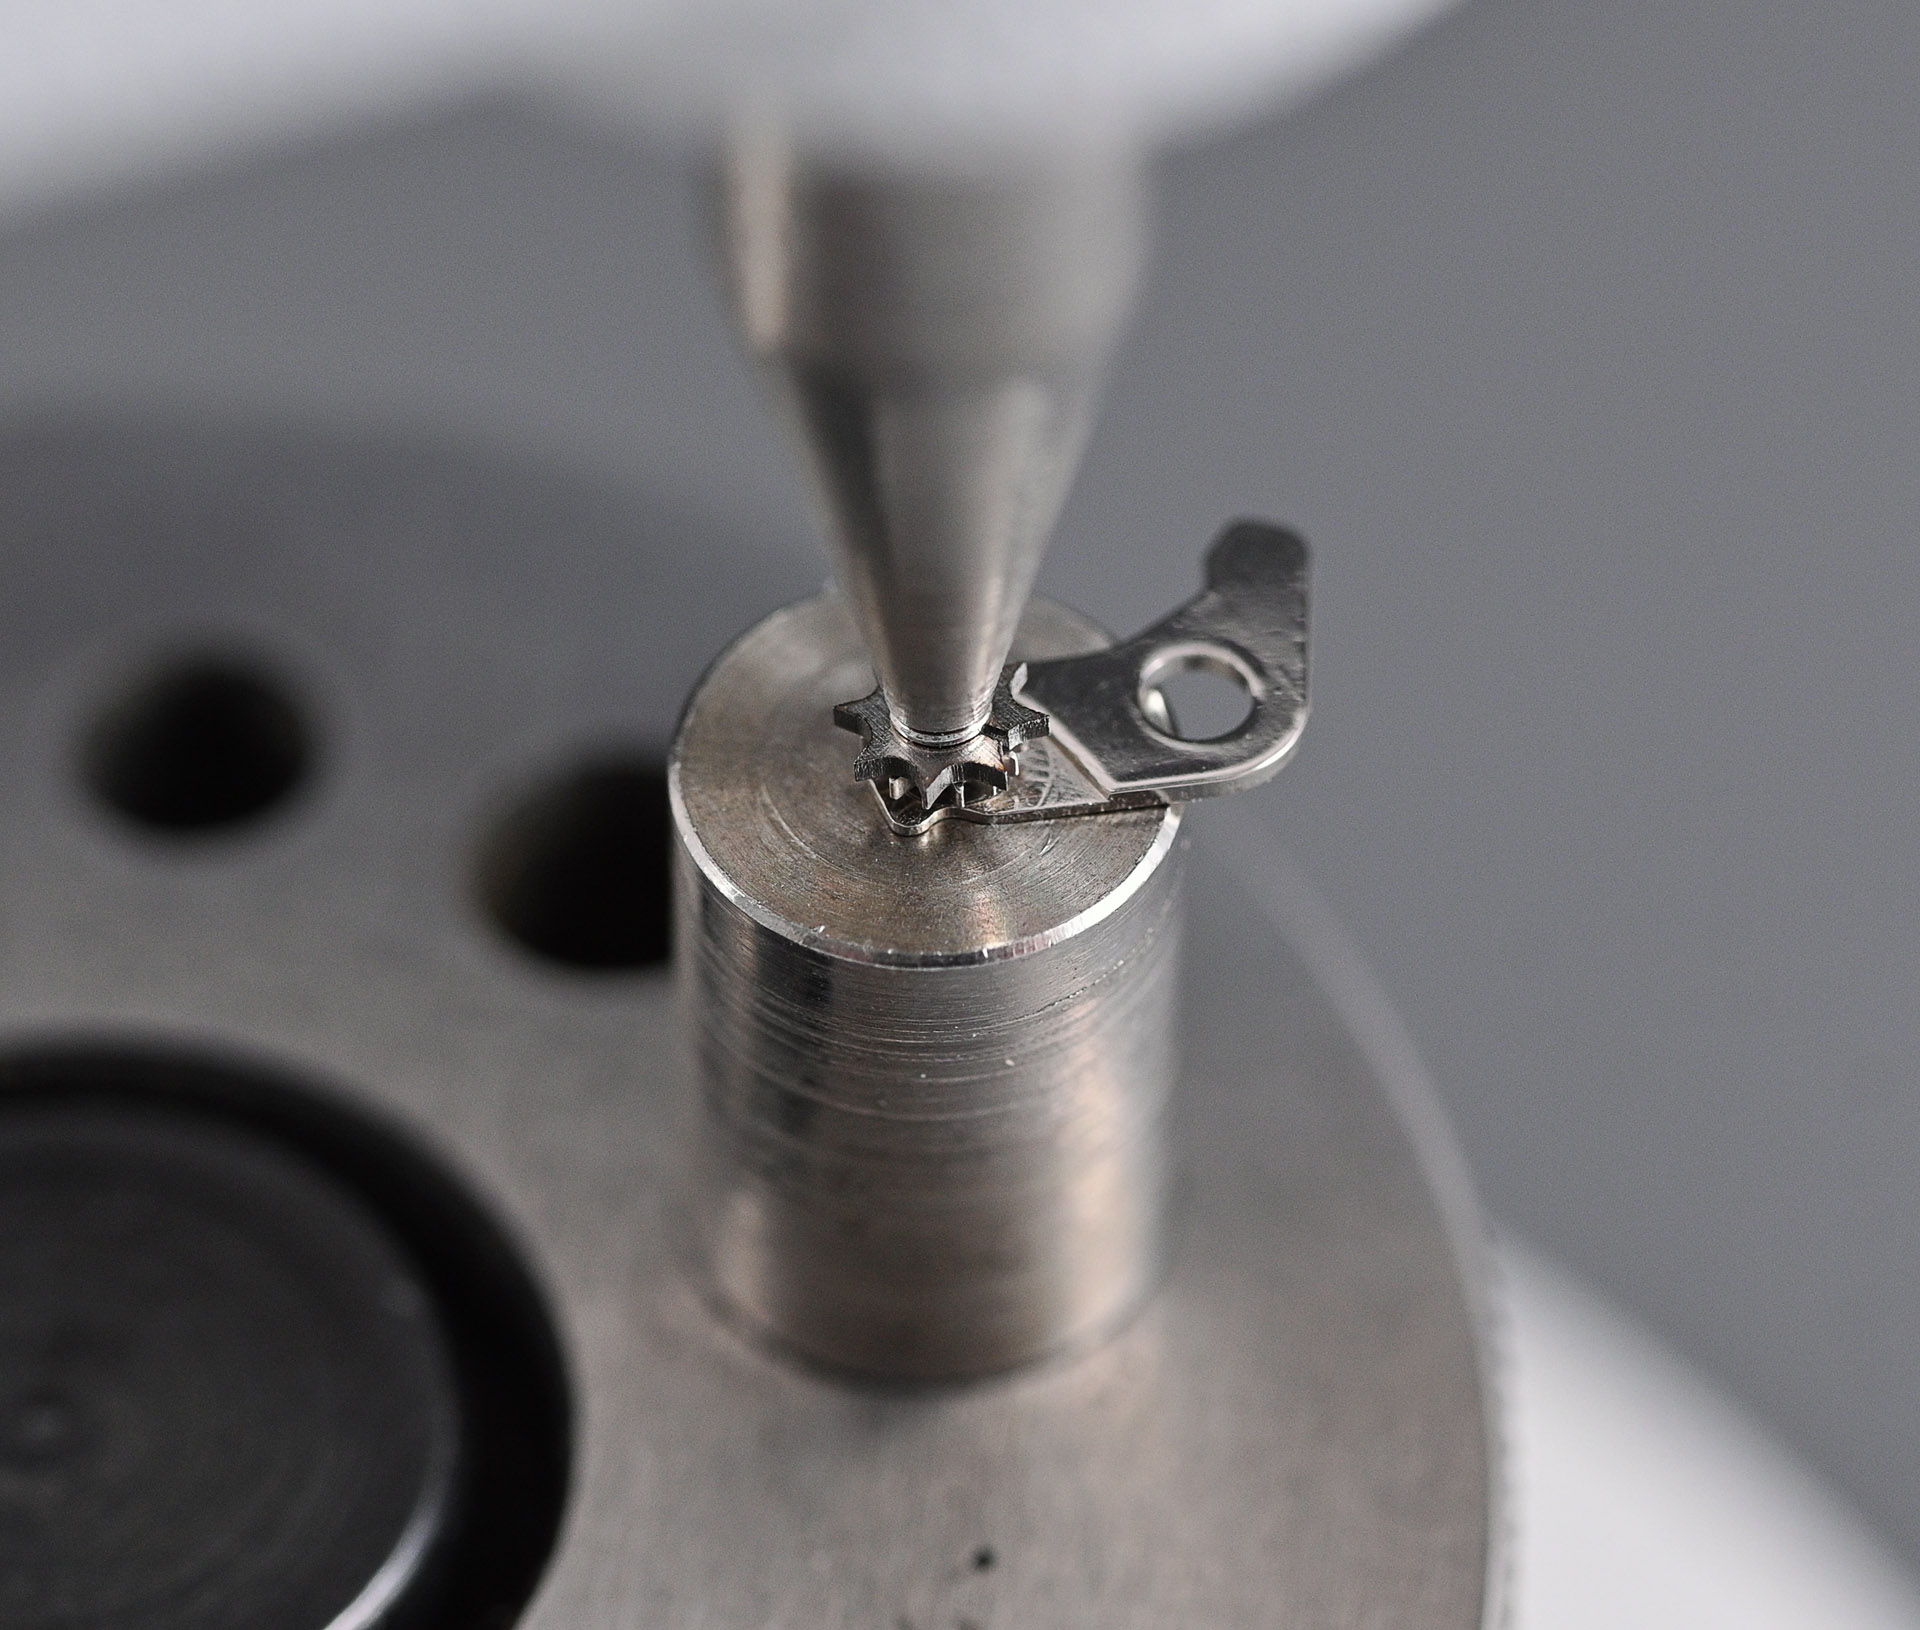
The next task is to select a suitably-sized stake to support the lever assembly while tapping out the central pin. The trick here is to choose a stake whose diameter is large enough to support the old star but not so large as to swallow the whole thing. It must also not be so small that is sits against the washer because the likelihood is that you will damage the washer during the removal process (ask me how I know).
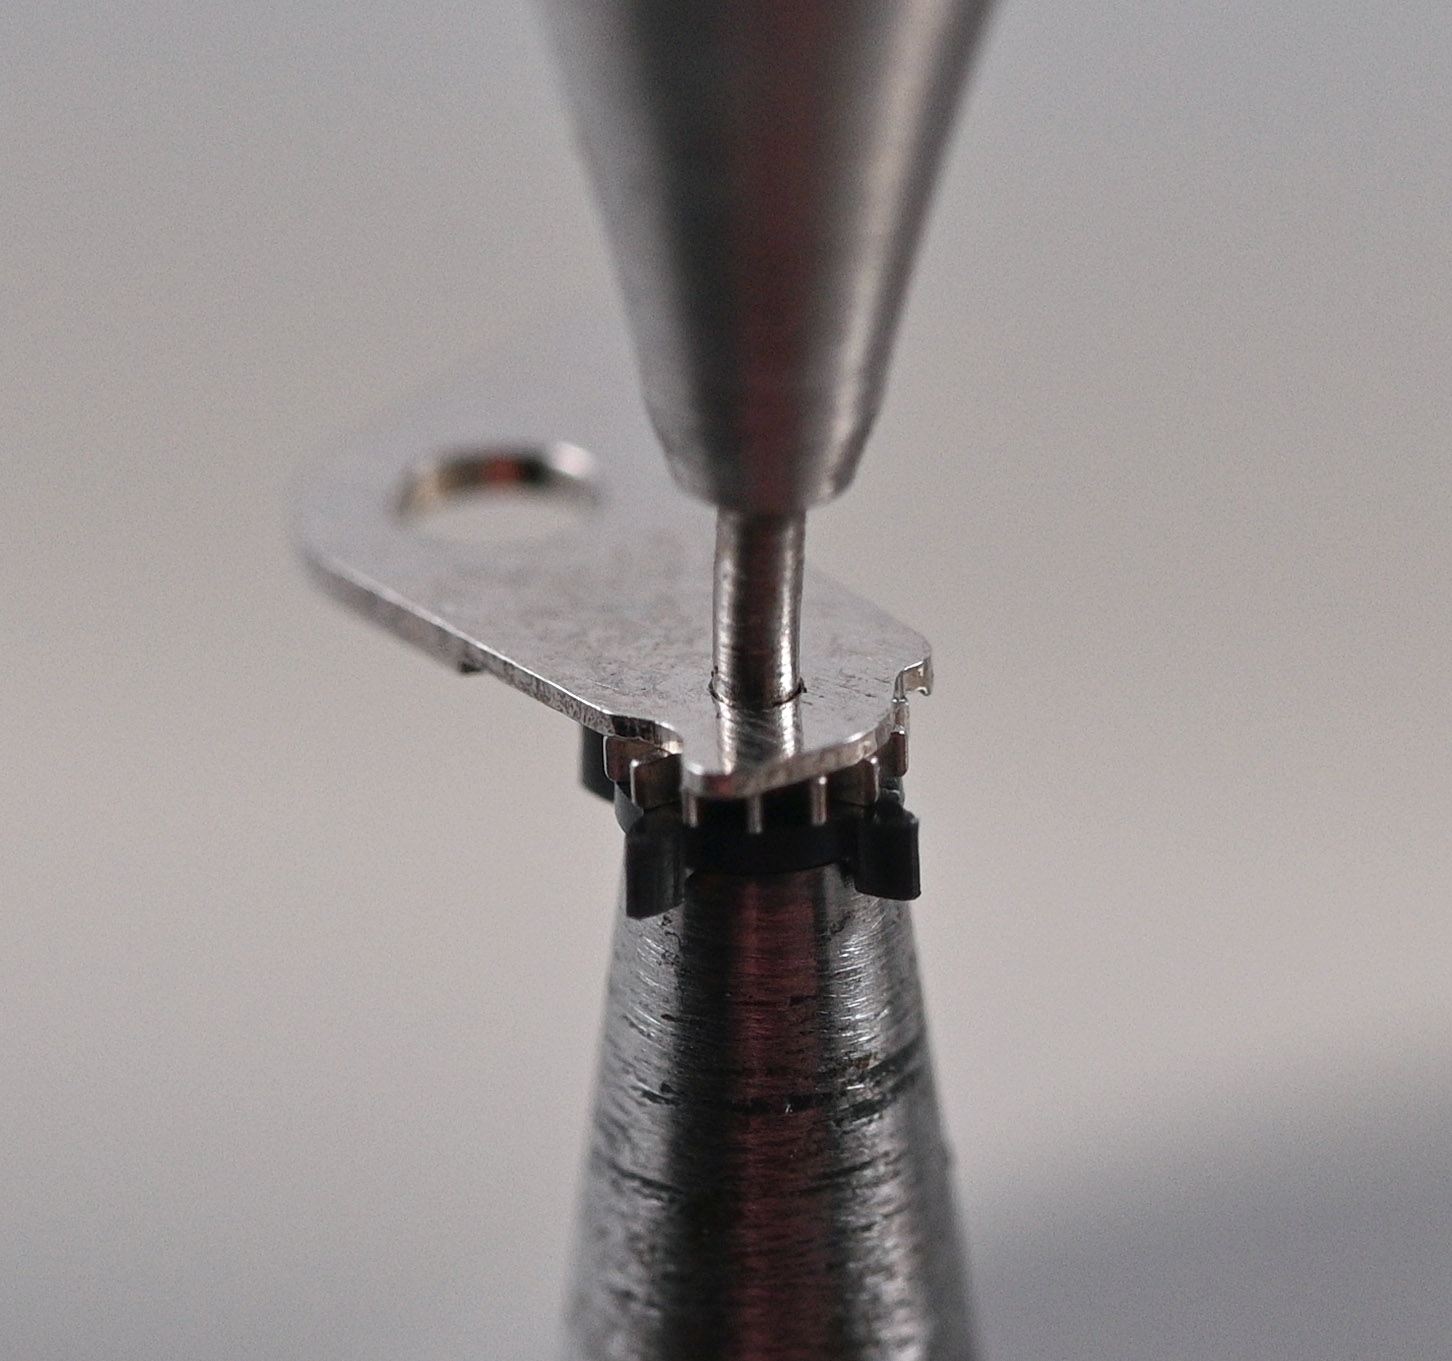
In the photo above, the stake that is supporting the lever is too small and I am in the process of partially flattening the washer as I tap out the central pin. But at least the operation has been successful in other respects, the pin and washer drops into the hollow in the inverted stake.

You can get a better view of the broken star, now separated from its partner gear, in the photo below.
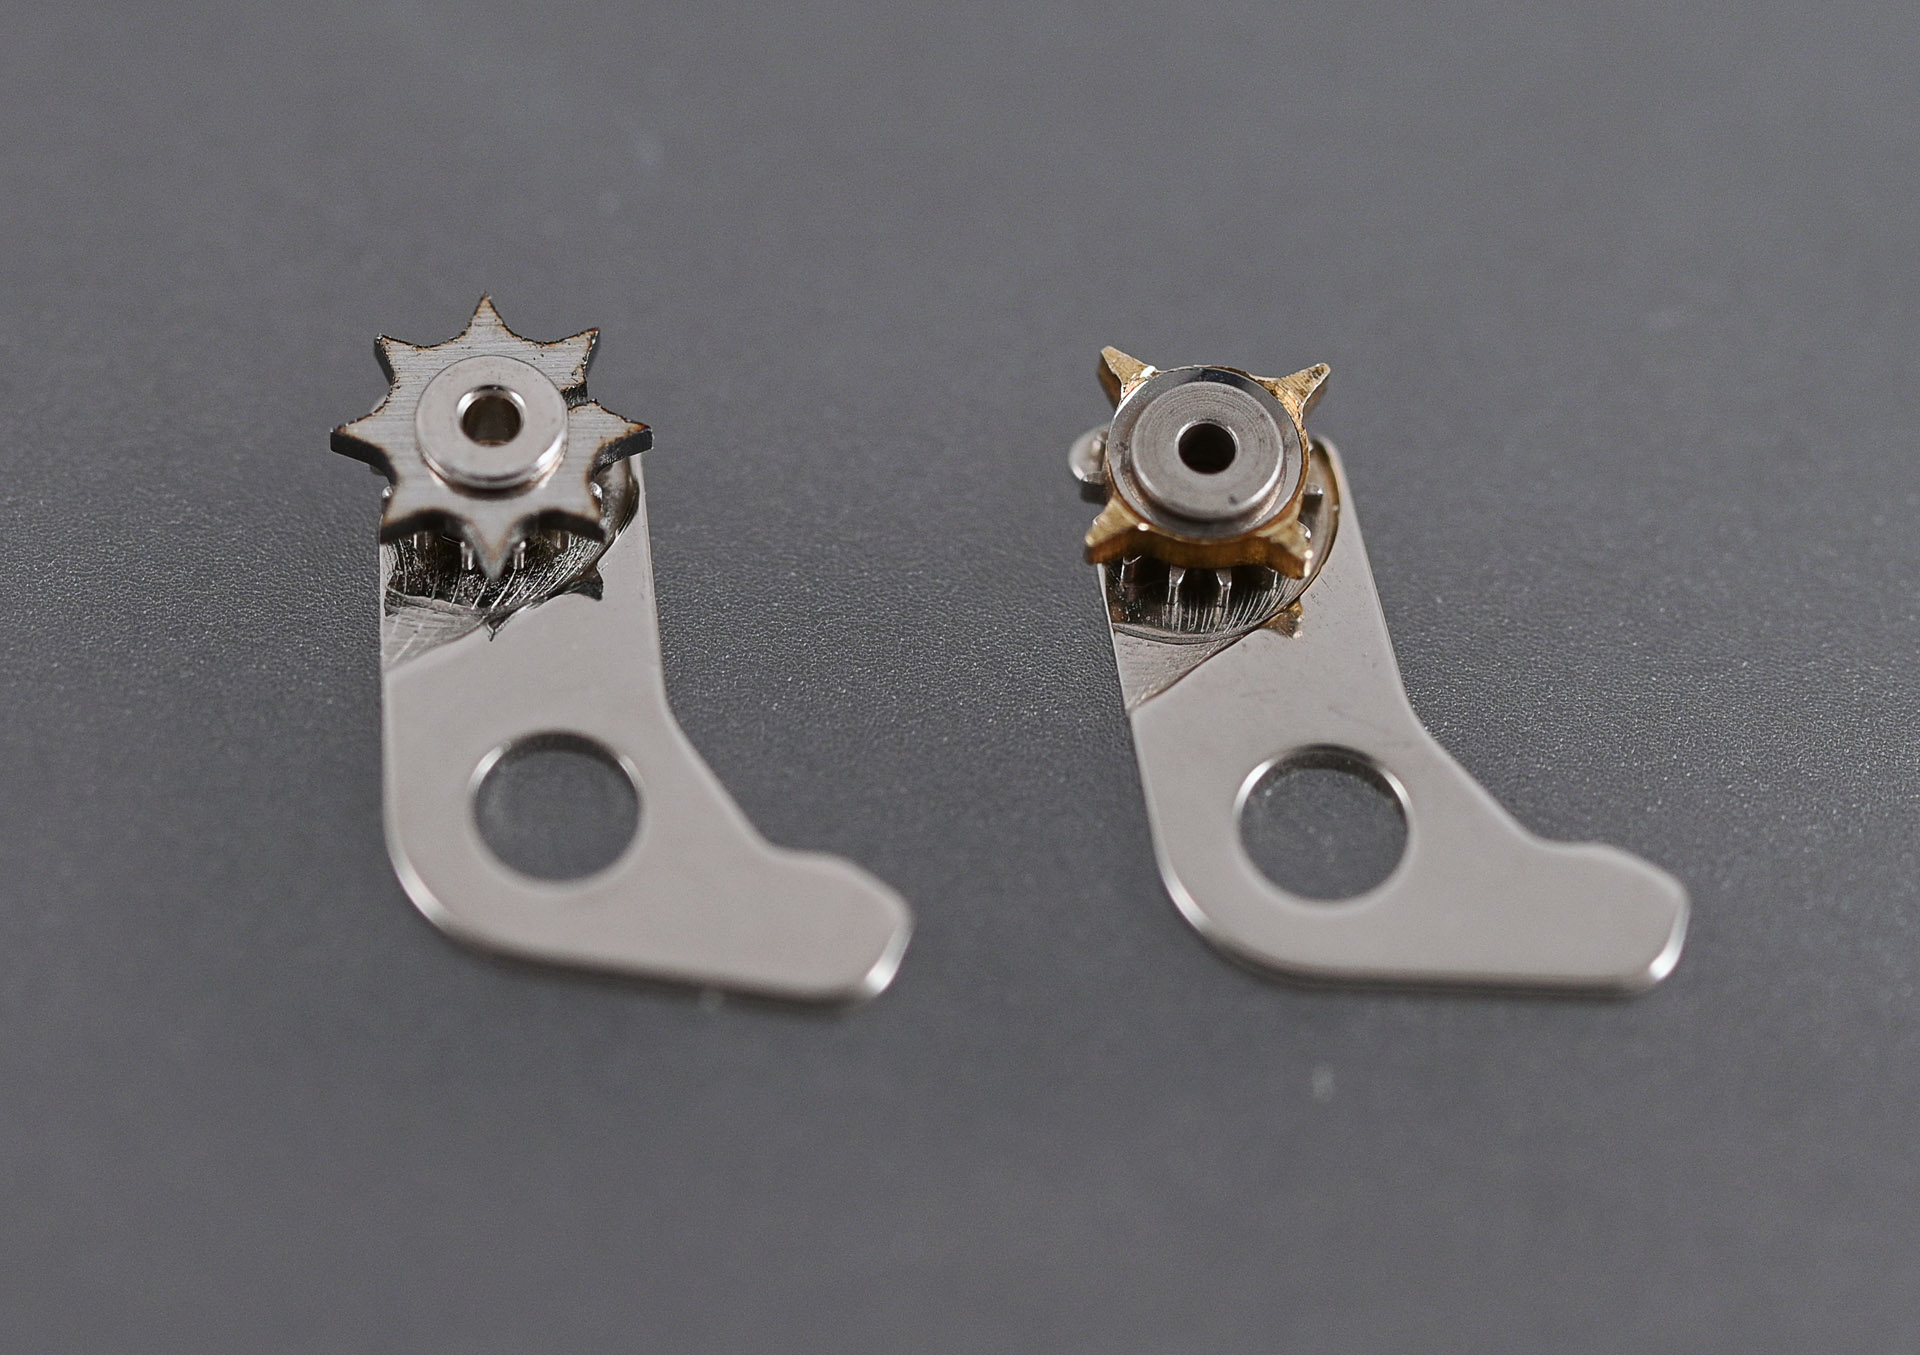
I decided to make up two complete repaired levers, one with the VTA part and one with the brass part, but with the intention of using the former in this watch. I cleaned all the parts before gathering them together ready to reassemble.
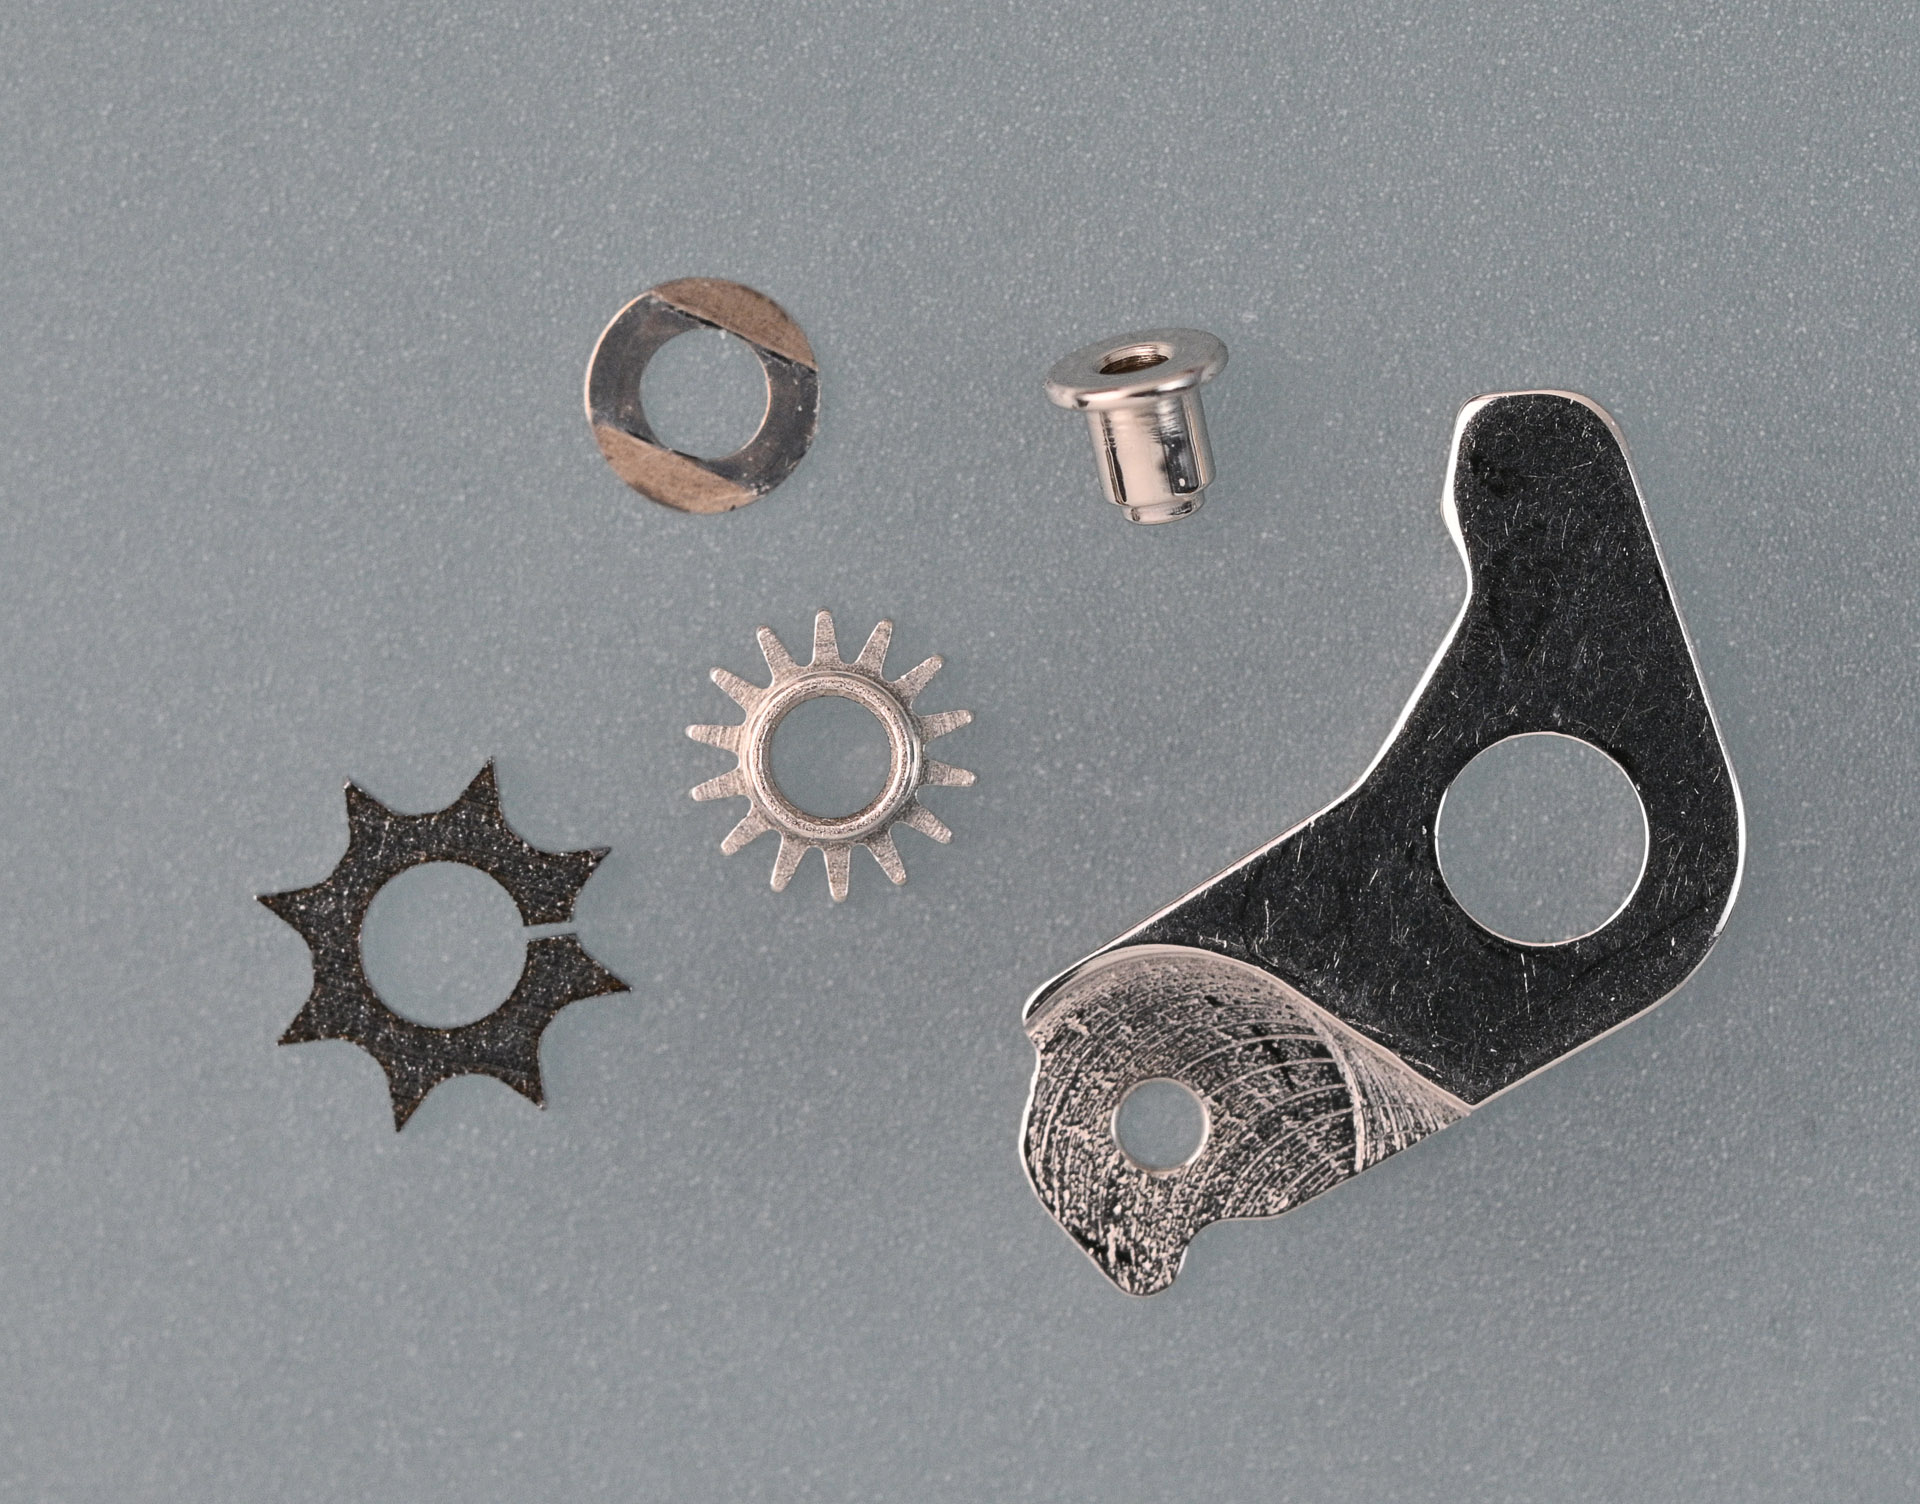
The washer you see here is a spare sourced from another broken lever in my parts drawers but extracted using a larger diameter stake as base. The order of assembly when using this design of star is different to that employed in the original construction: the star and gear are pressed together first (top left, below); the washer is placed over the hole in the lever (top right); followed by the gear and star (bottom right); and the pin placed loosely into position (bottom left, below).

The lever is placed carefully onto a punch on the staking tool and the pin tapped back into position using an appropriately chosen stake.
To aid smooth operation of the reassembled lever, I applied a small amount of 9010 between the pin and the star. I repeated this process with the brass replacement part, but with the washer fitted in its original location, and will use that part in another project at some point in the future (assuming that it functions).
The repaired day-date corrector wheel rocker can now be placed into position …

… and secured by fitting and fastening down the minute wheel bridge.

At this point in proceedings, the setting parts are complete, with no danger of any of the components making a bid for freedom when the movement is inverted. Before moving on to the train side, it is probably sensible to put the operation of the repaired rocker through its paces, admittedly at this stage without the calendar wheels in position.
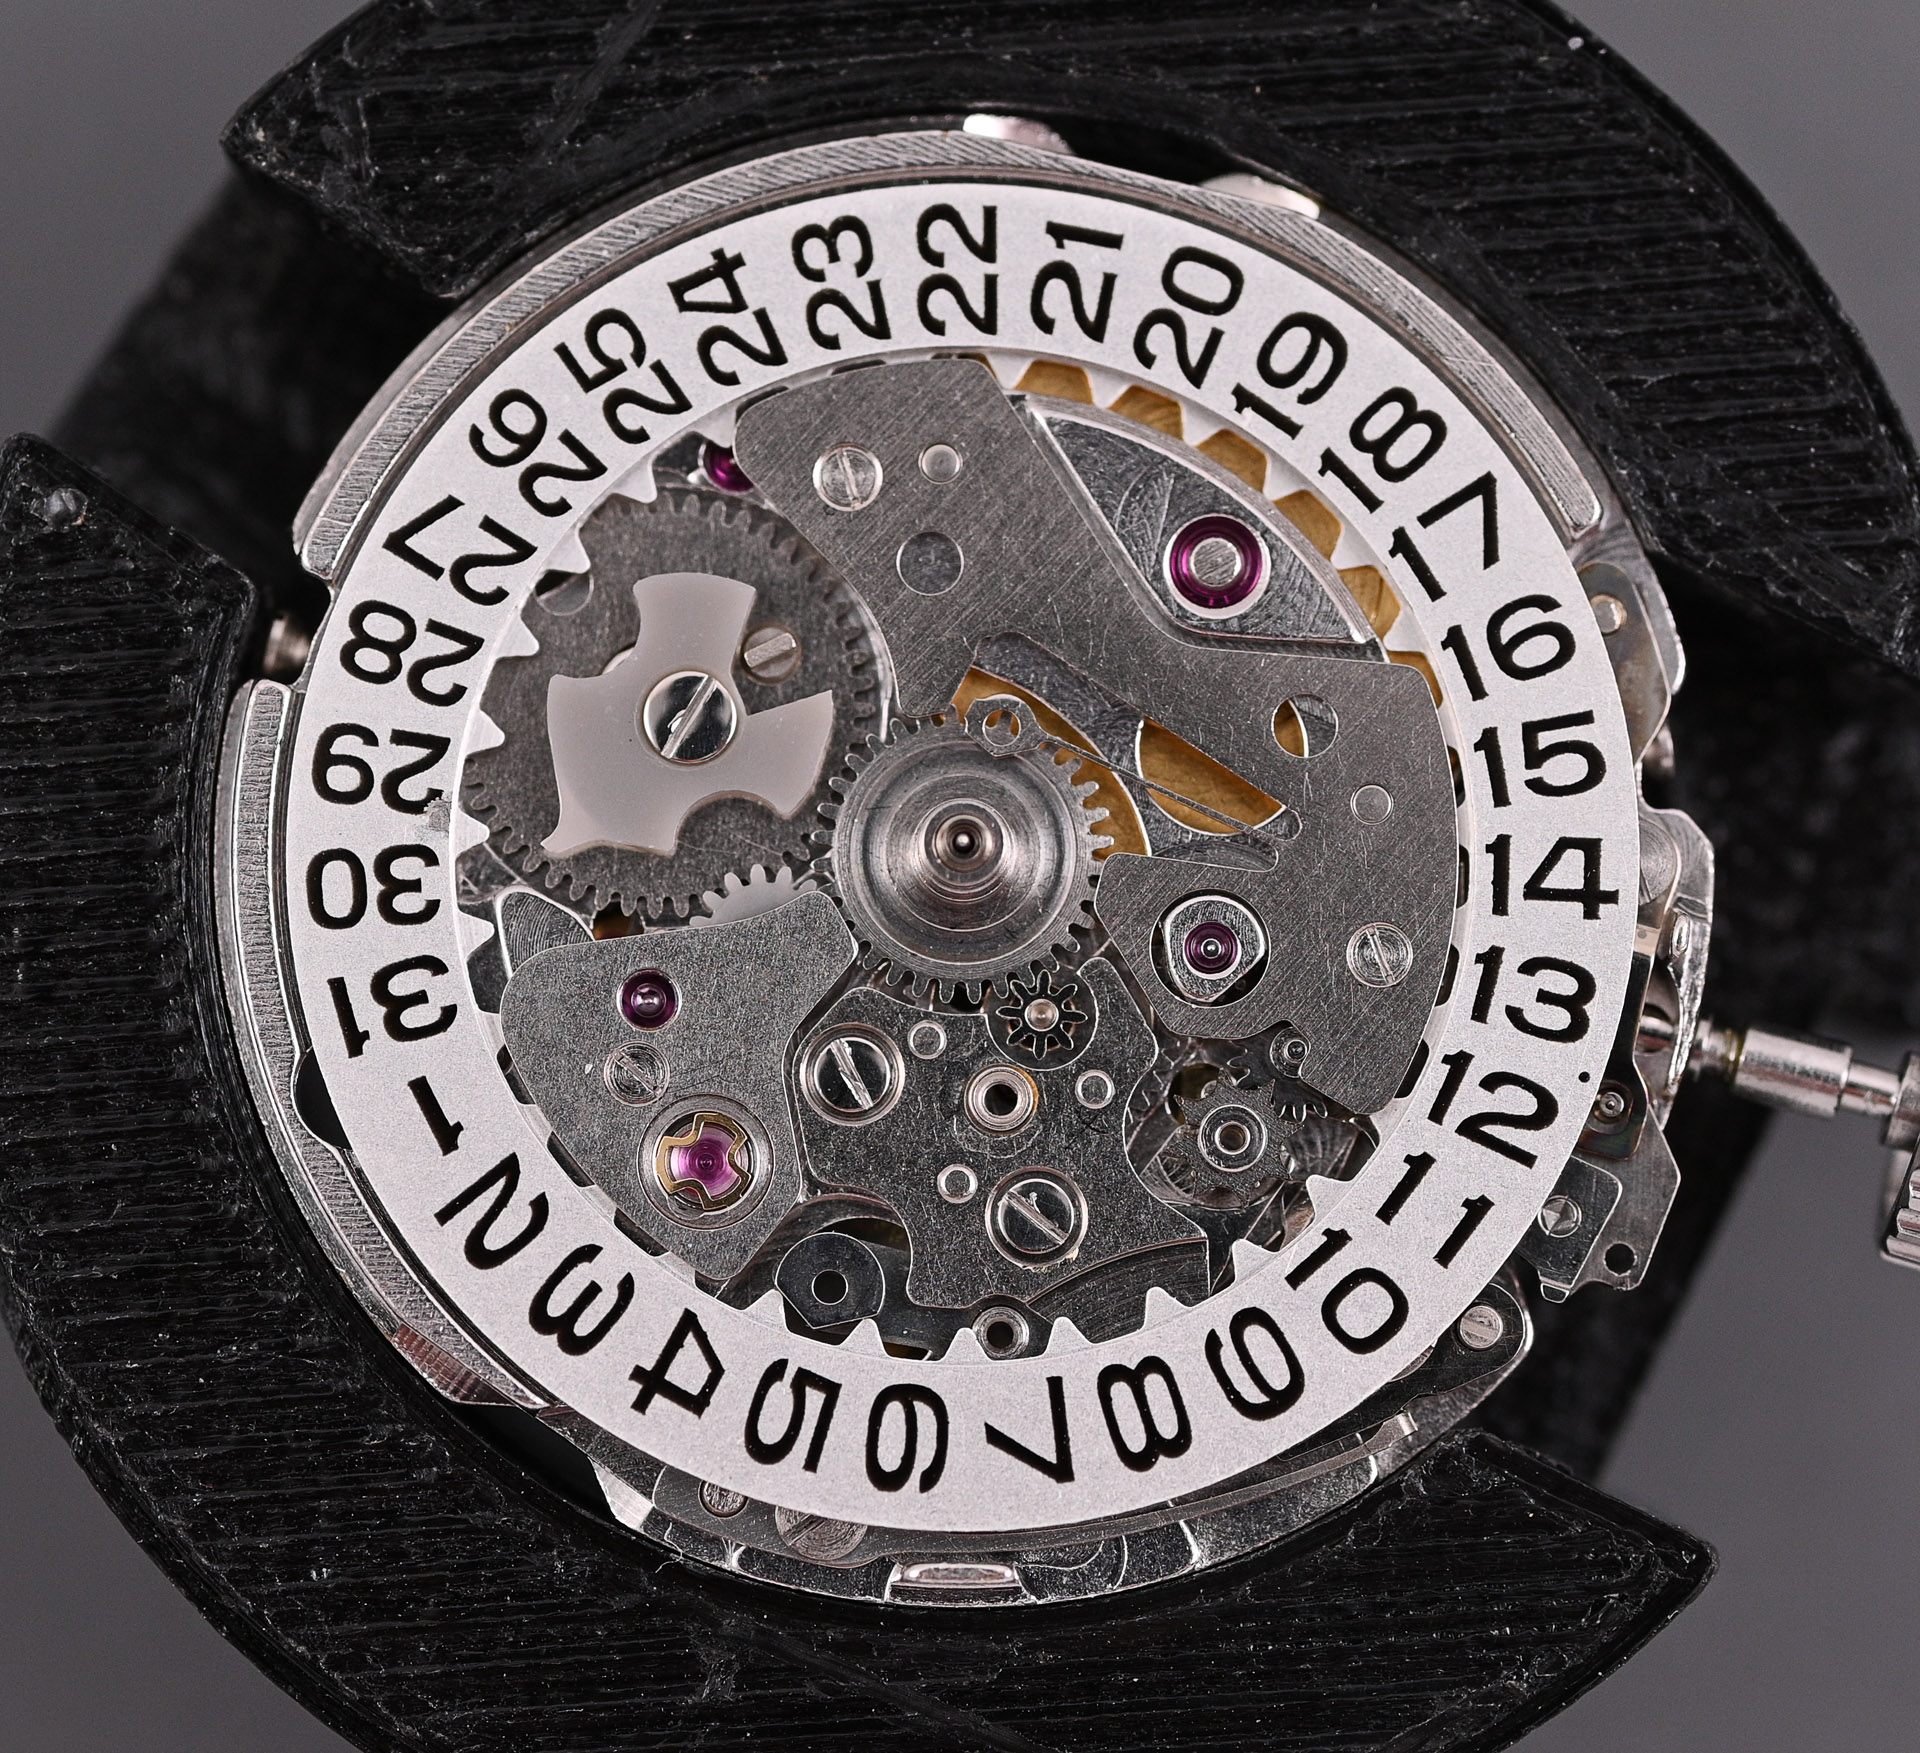
With that done, we can turn our attention to the gear train. This includes not just the usual suspects (the barrel, third wheel, escape wheel and sweep second wheel and pinion) but also the large driving wheel, which incorporates the cannon pinion (another potential weak point of this movement), and the differential wheel and second reverser idler, both part of the autowinding mechanism.
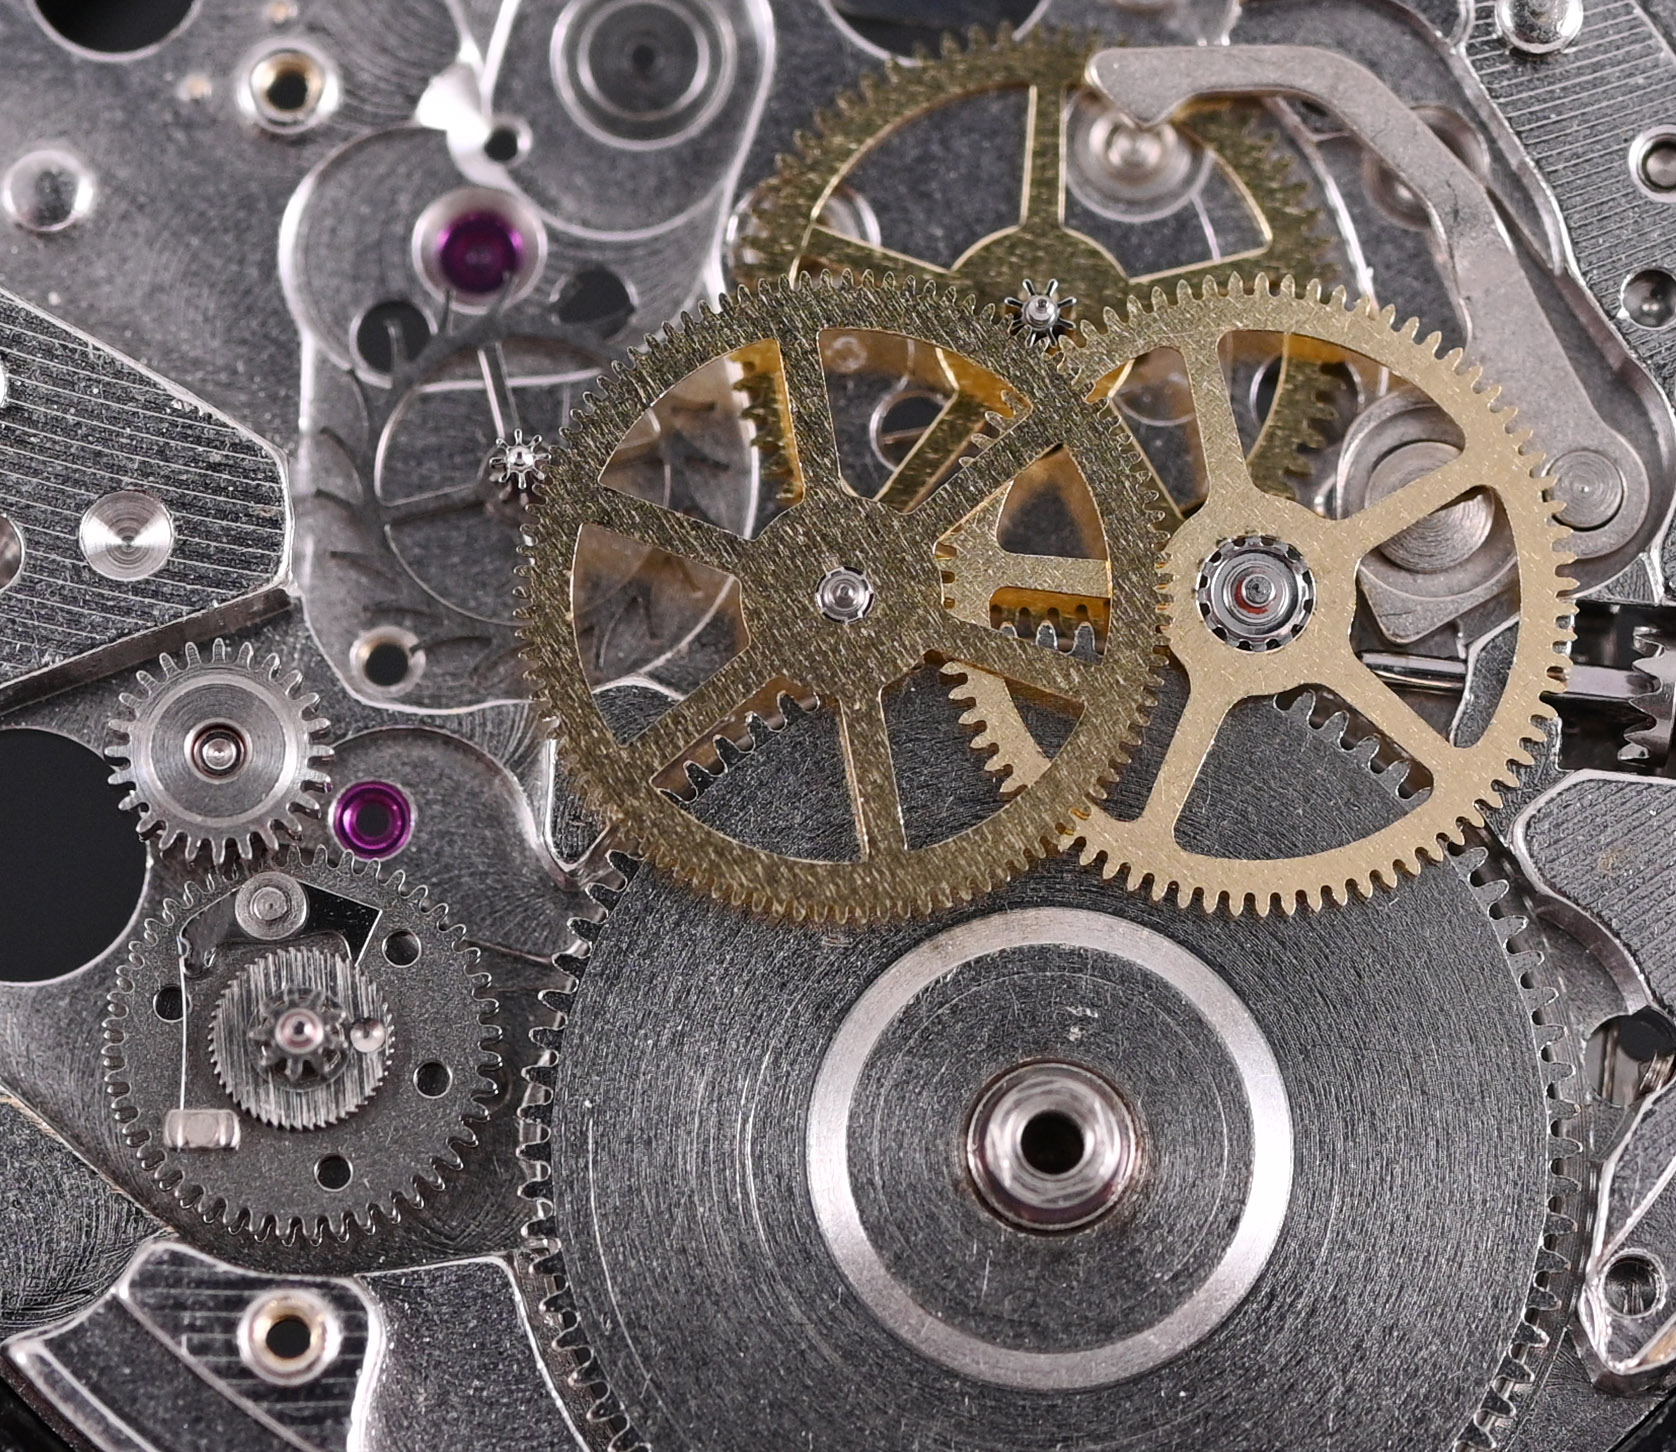
The reassembled barrel and train wheel bridge secures the gear train (top left, below) and we can then head off down the path that takes us to a ticking movement: second setting lever spring (top right, below); pallet fork and bridge (bottom left, below); and finally the balance, capped with Diashock protection top and bottom (bottom right, below).

You may have noticed that the regulator on the balance has a rather complicated looking design. In contrast to the regulator on the 5626A, which features a micro-adjuster, the 5626B variant employs a different regulator that includes a second adjustment screw.

This feature is present on all 5626B movements, not just those fitted to the Officially Certified Chronometers and its purpose was not immediately obvious to me. A closer look though should provide some answers. The photographs that follow are of a balance from a second 5626-7041 yet to suffer my attentions and so still in a rather grubby state but they will serve a useful illustrative purpose. First of all, a bird’s eye view of the balance cock with micro-adjuster, the regulator adjusting device and the regulator.
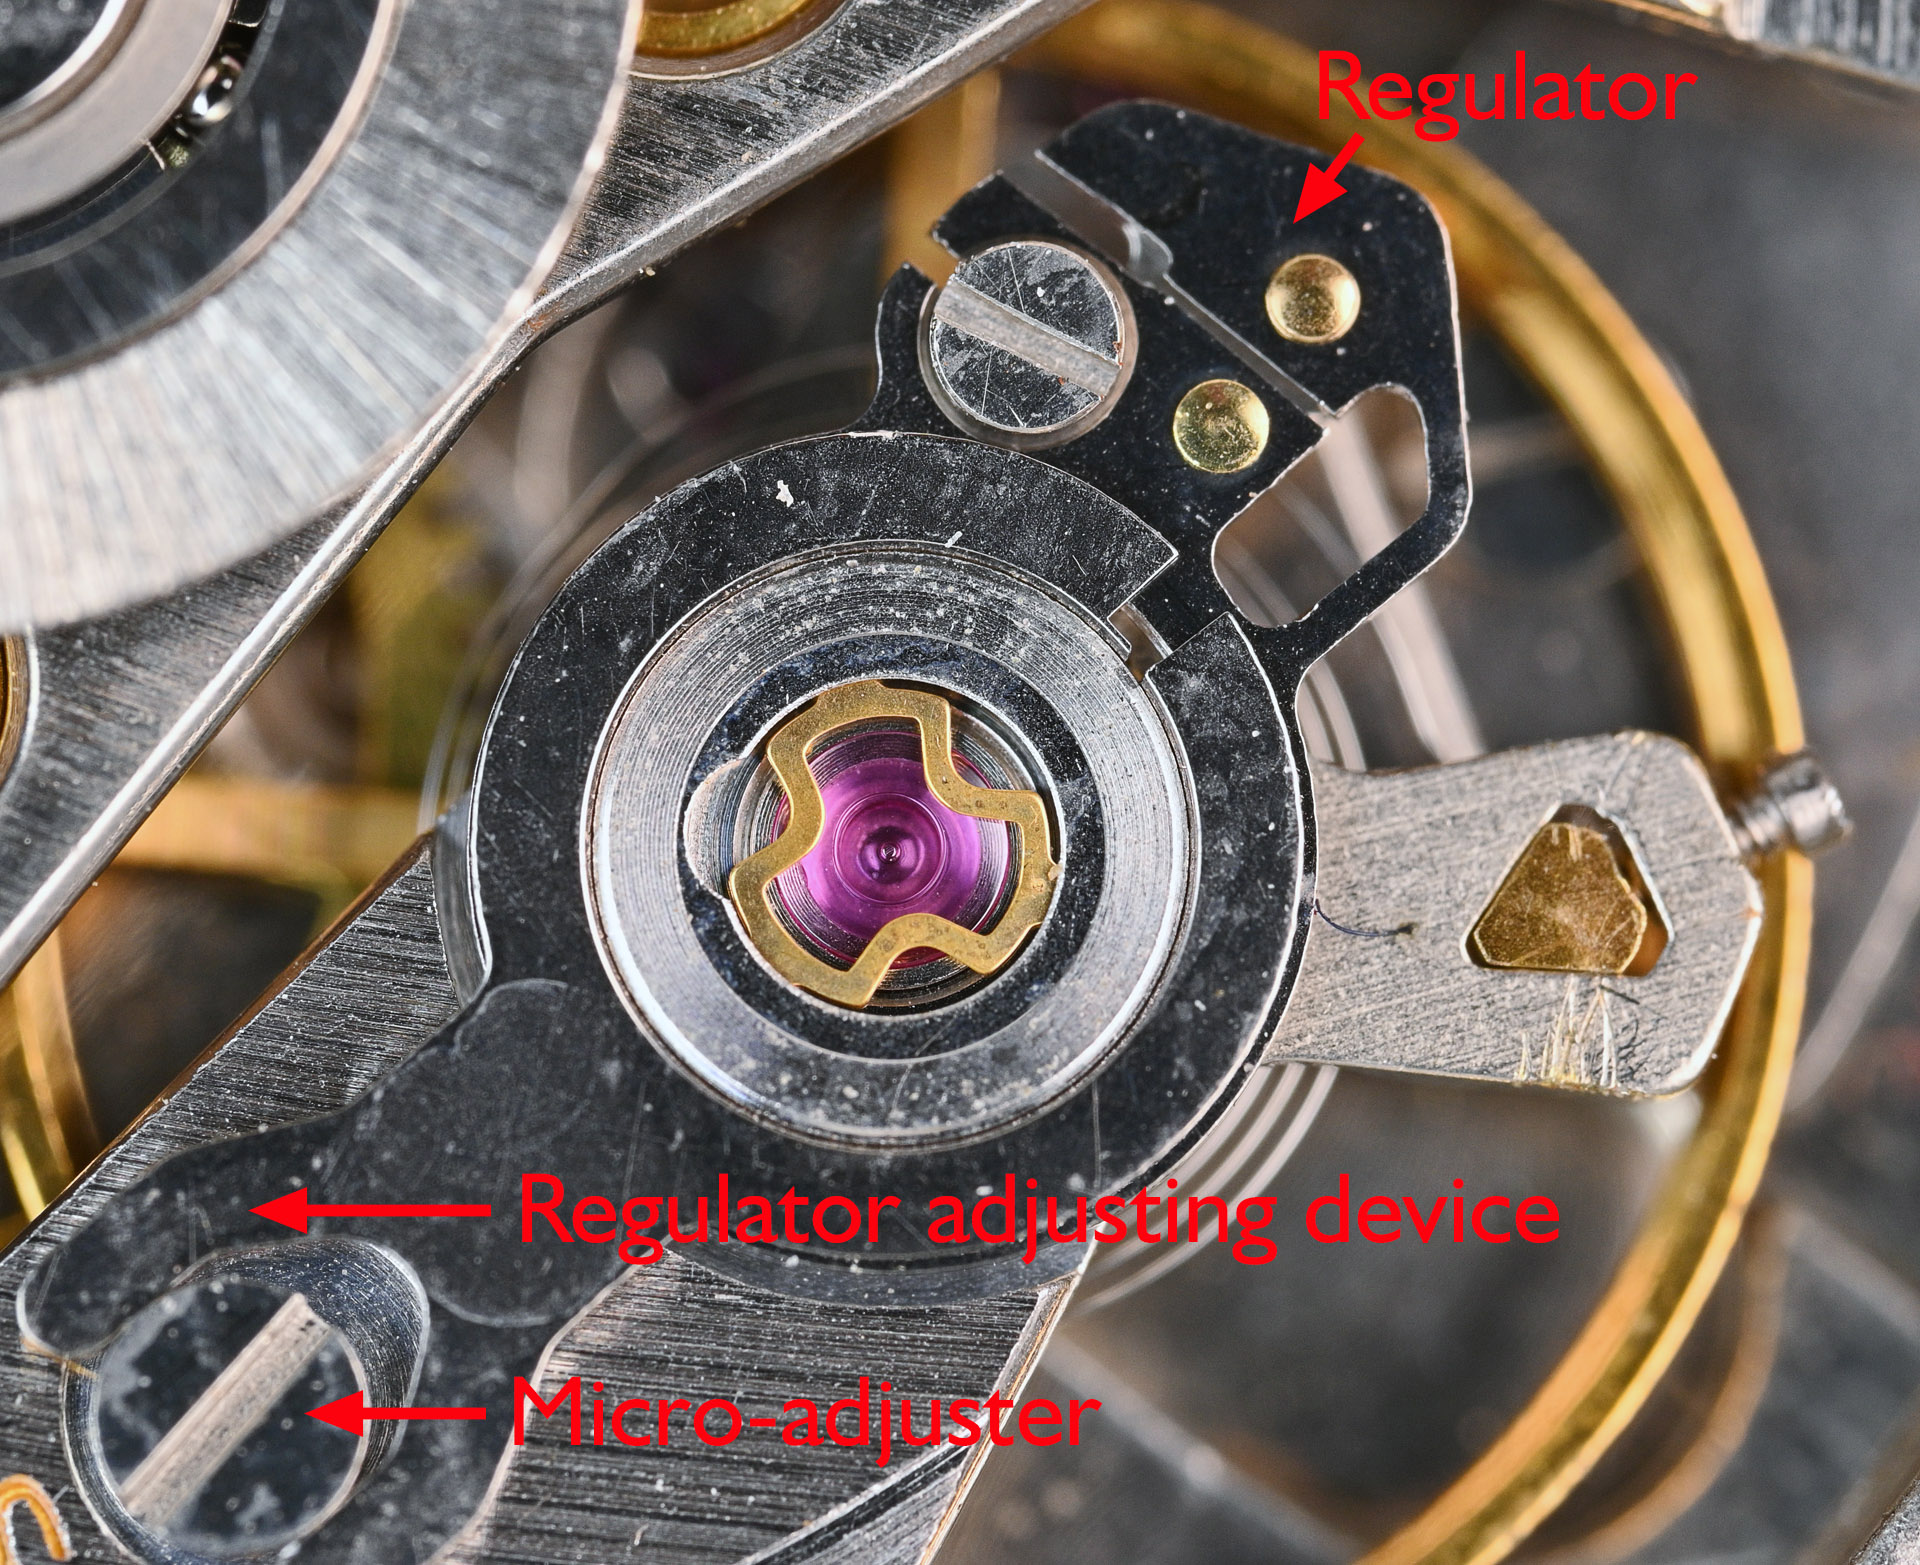
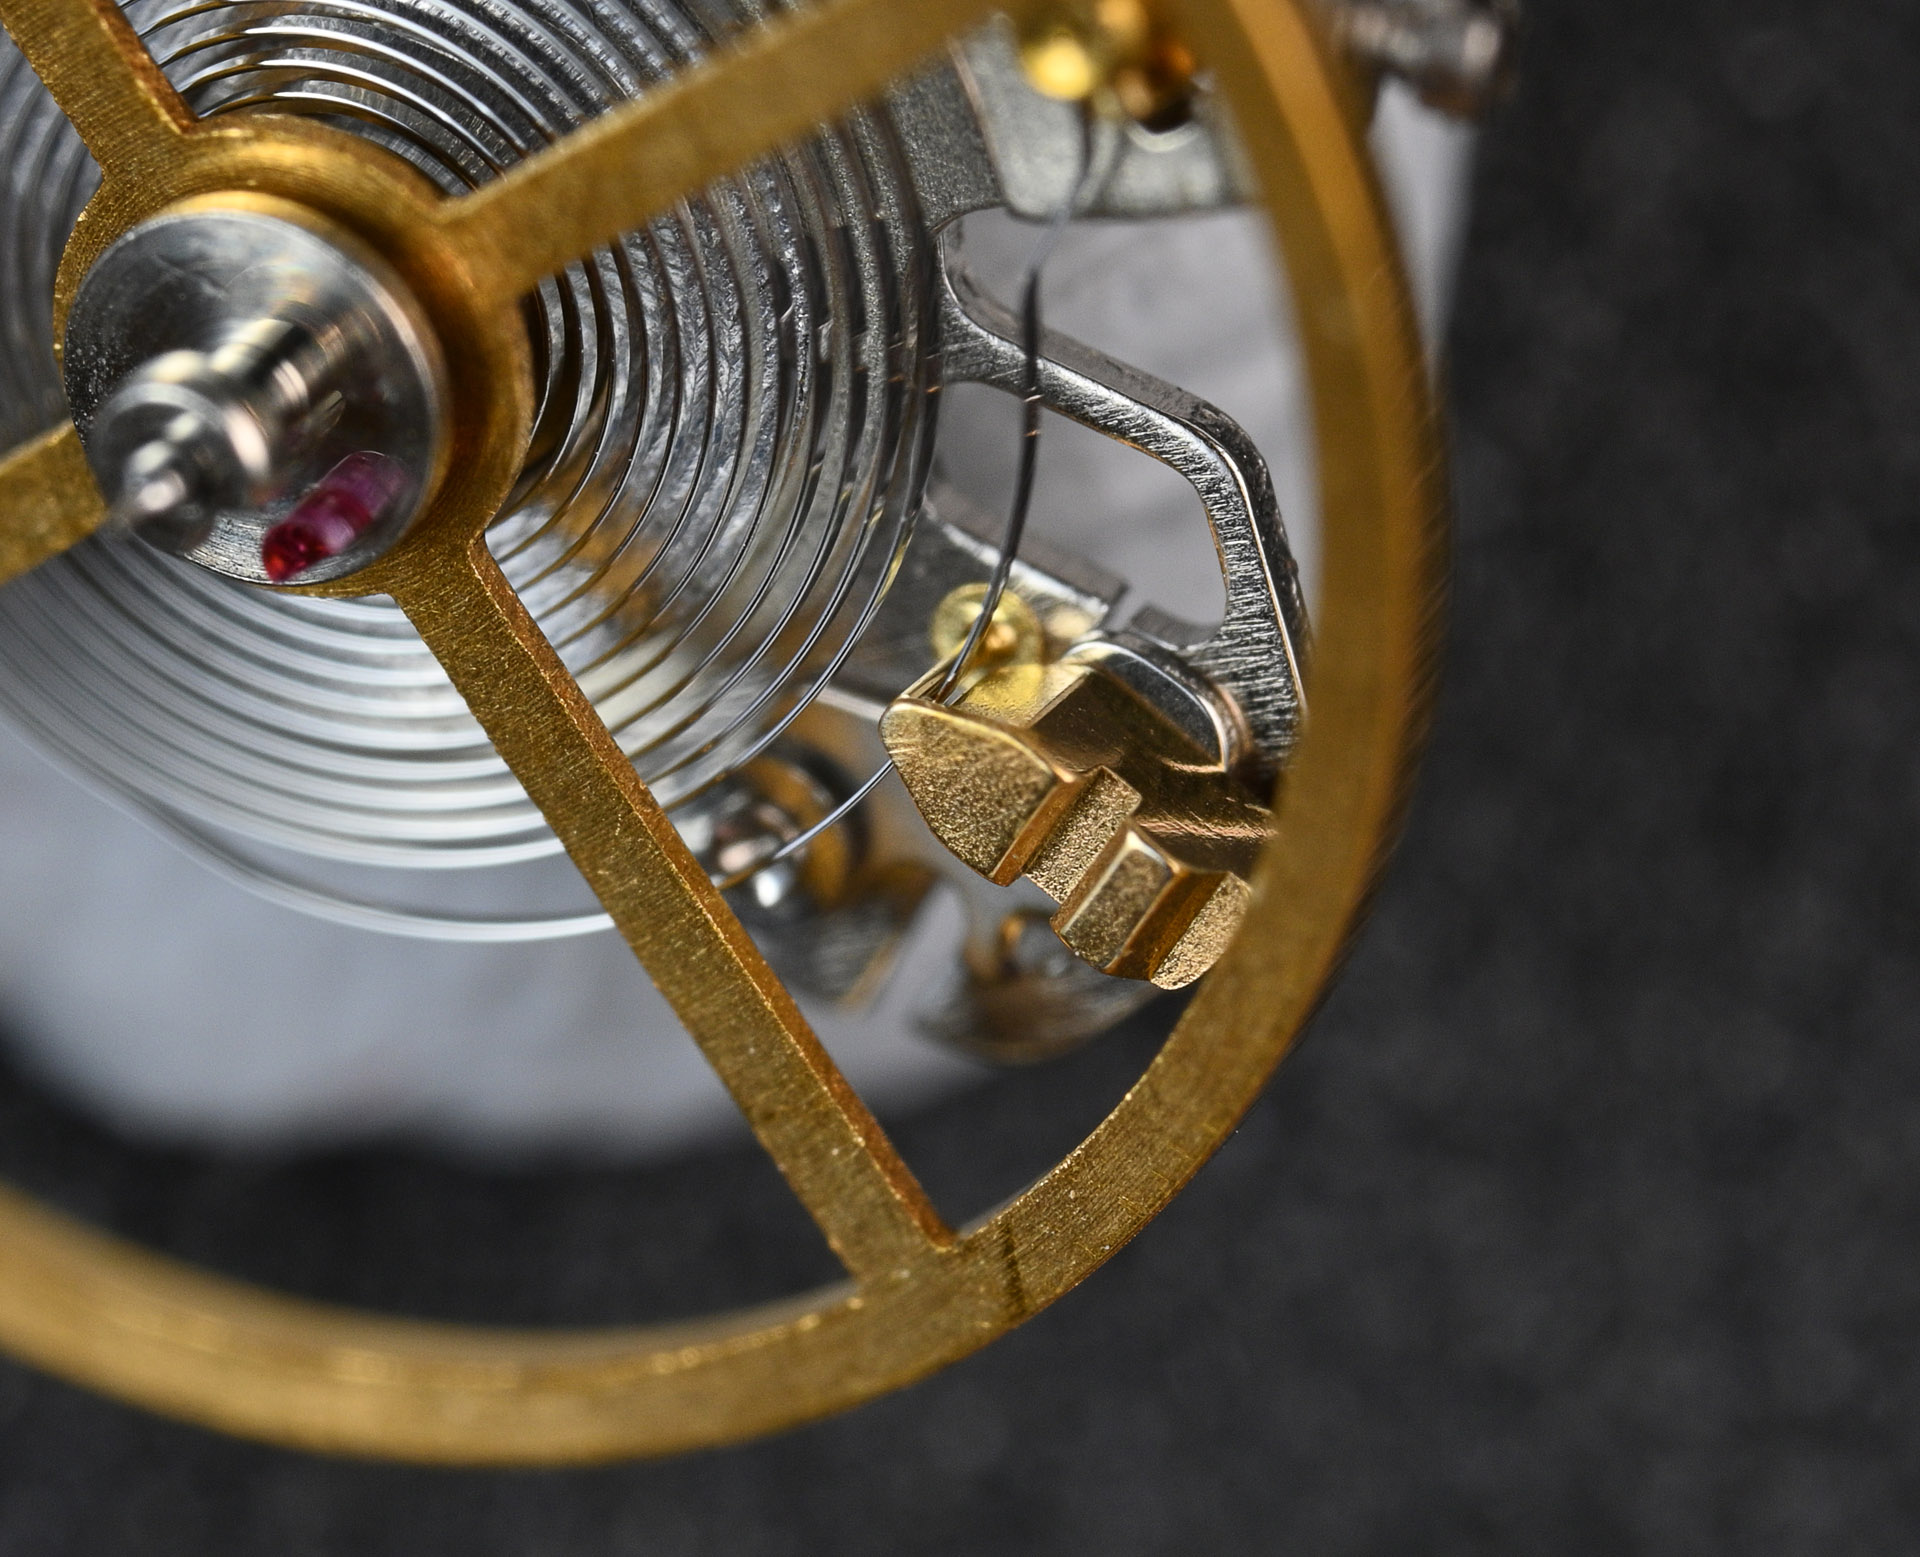
My first thought was that the additional screw adjuster on the regulator may allow adjustment of the terminal curve of the hairspring somehow. It turns out that this is not quite right but not that far off. If we remove the balance and turn it over, we can take a closer look at what that screw is doing.

You will have noticed the gap along most of the width of the regulator. The view from beneath reveals that this gap is bridged by an arm that is connected to what I presume is an eccentric screw. Adjusting that screw will close or open up the gap thereby adjusting the gap between the index pin and the boot.
Completing the dial side is first a matter of fitting the cannon pinion, ensuring that the teeth mesh nicely with the sprung minute wheel, followed by the intermediate date wheel and the date driving wheel, complete with day finger.
Next, the date dial, the date dial guard, and the day jumper (which also serves as a date dial guard).
You will notice that I’ve substituted a cleaner date dial, free from the nibbles of degradation around its edge but its alignment with the date aperture of the dial was not as good as the original and so I subsequently switched it back. This is a good point to put that repaired quickset lever through its paces, having first attached the day correction intermediate wheel.
That all works beautifully and so we can now top off the whole shebang with the day disk.

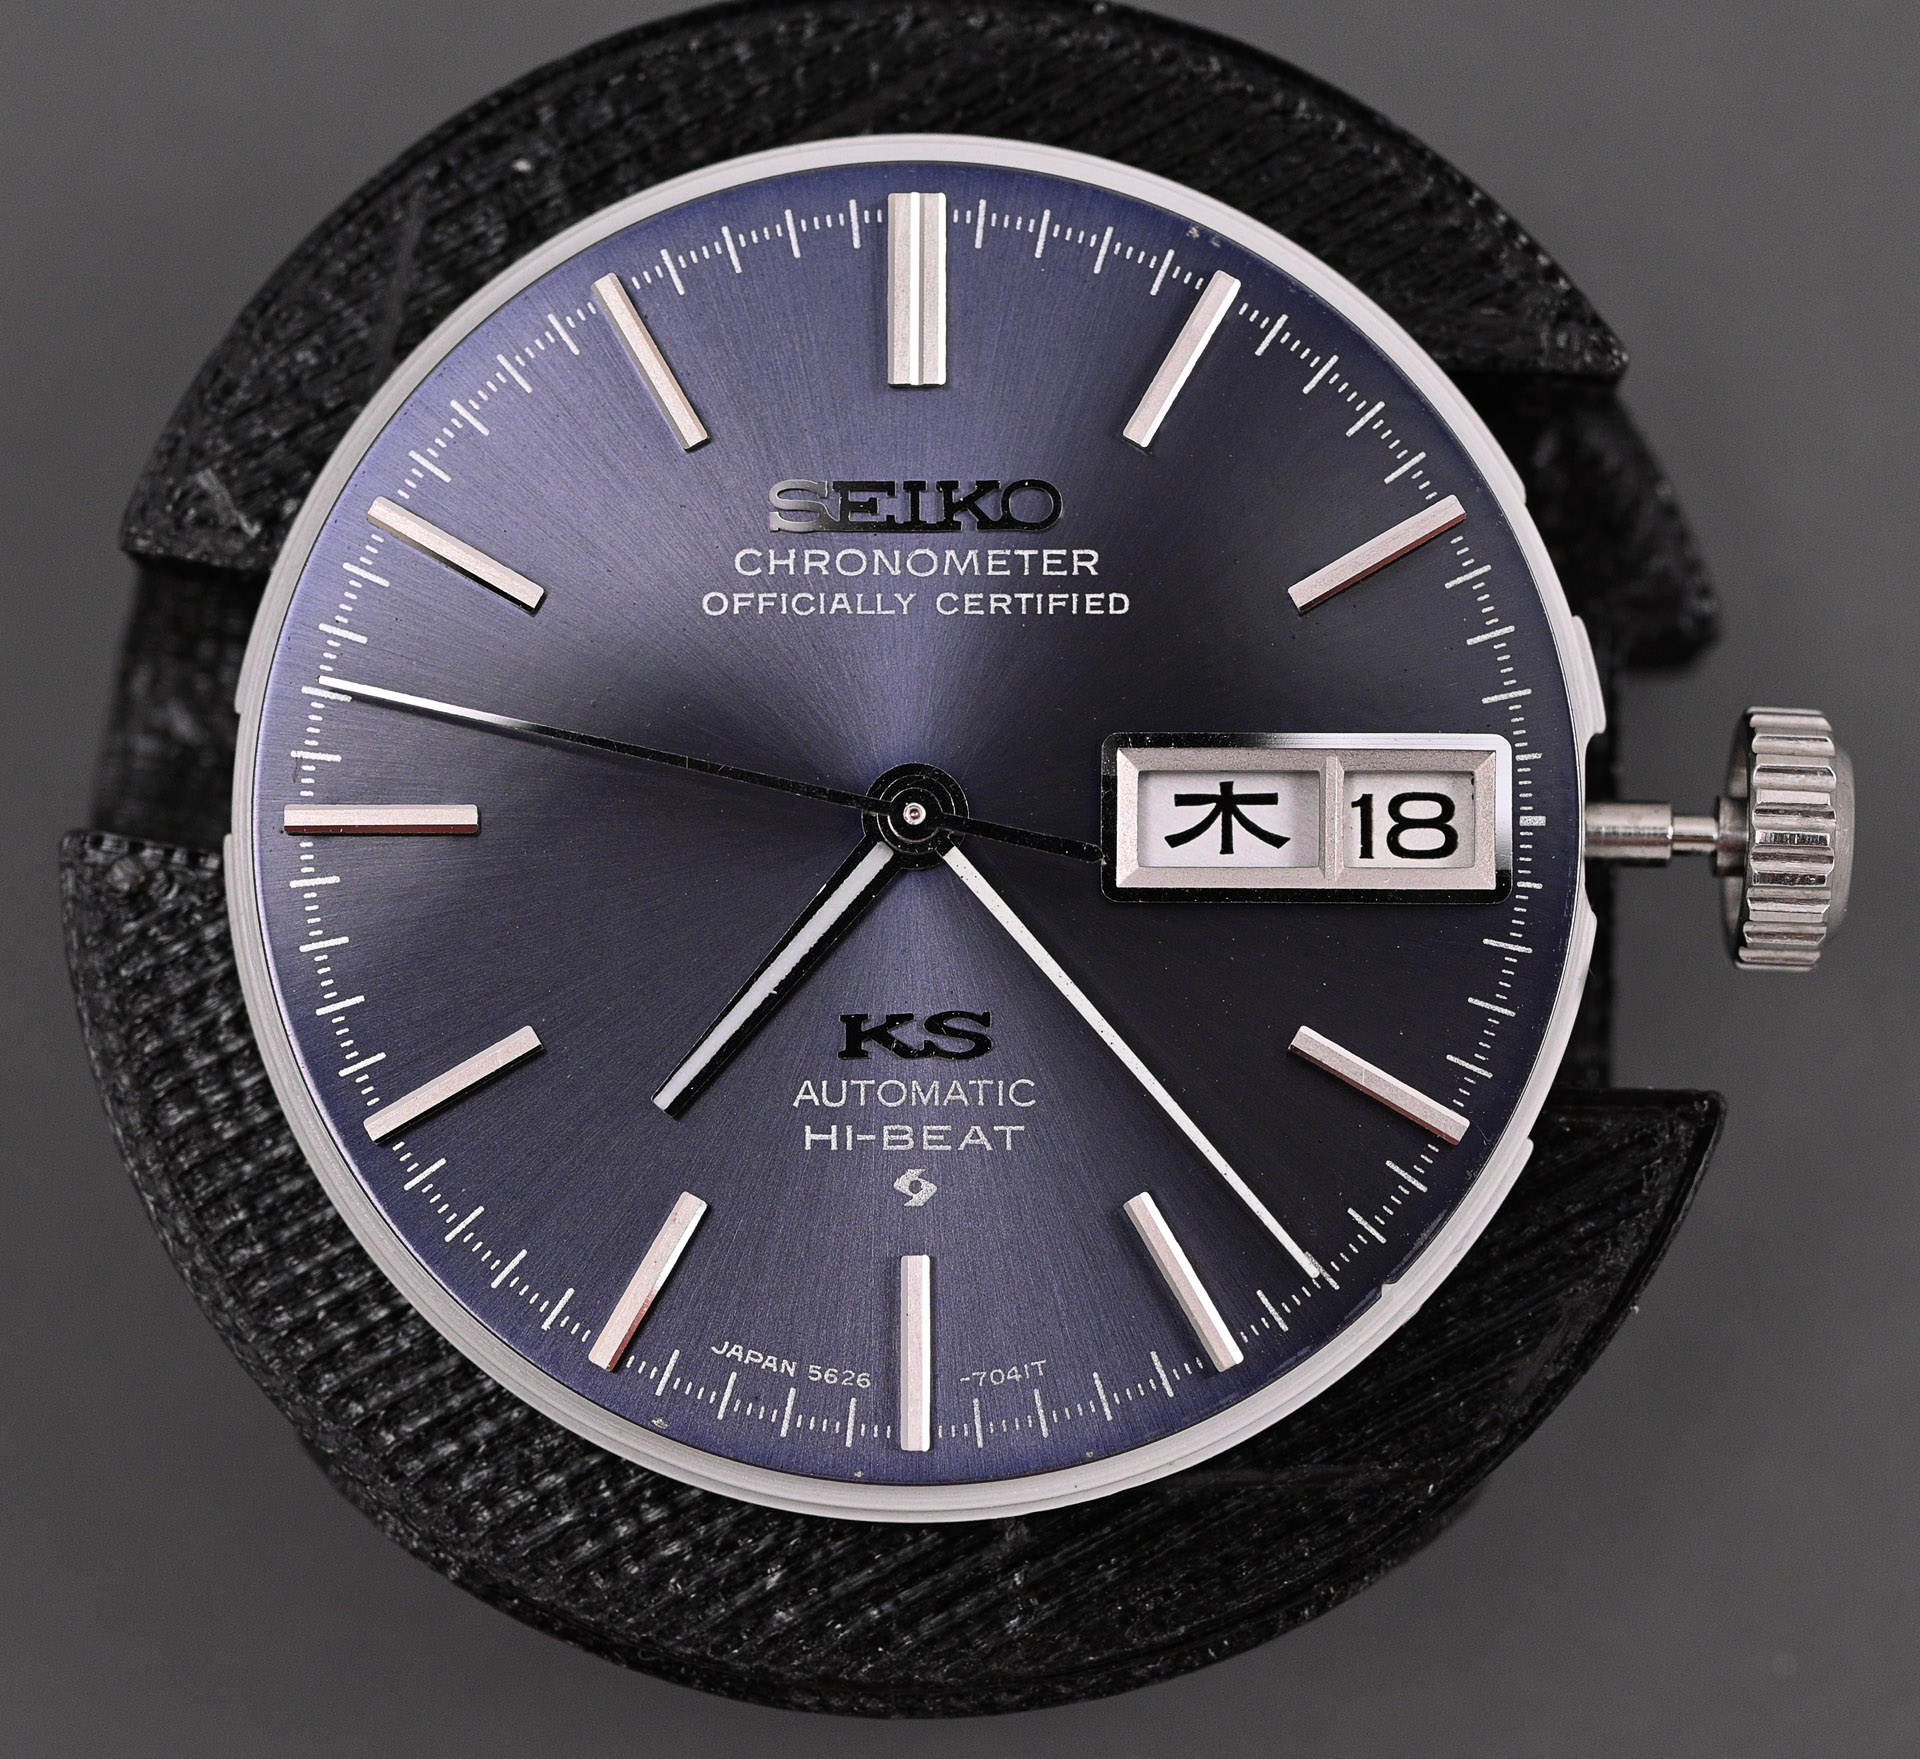
Satisfied that the movement is running well and that all other operations are performing as they should, we can fit the dial and hands.
Time to reunite the case with movement, first placing the case over the movement …
…before inverting the whole assembly, fitting the crown and stem and case ring and surveying the freshly serviced and regulated movement in situ.

The original winding rotor, in spite of its very nice cosmetic condition, was unusable because of the worn-out bearing. It was dragging and consequently not able to generate a full wind as the torque required increases as the state of wind increases. And that’s taking no account of the wear that it would have been inflicting on the train wheel bridge. I decided therefore to substitute it for a rotor in poorer cosmetic condition but whose central bearing was in excellent shape.

Before fitting the case back, I regulated the movement again, it having been through two or three wind-up, wind-down cycles. Here are the results at three positions:
Dial up: +7 s/d, 251 degrees amplitude, 0.0 ms beat error
Crown down: +4 s/d 237 degrees amplitude, 0.3 ms beat error
Dial down: +4 s/d, 242 degrees, 0.0 ms beat error.
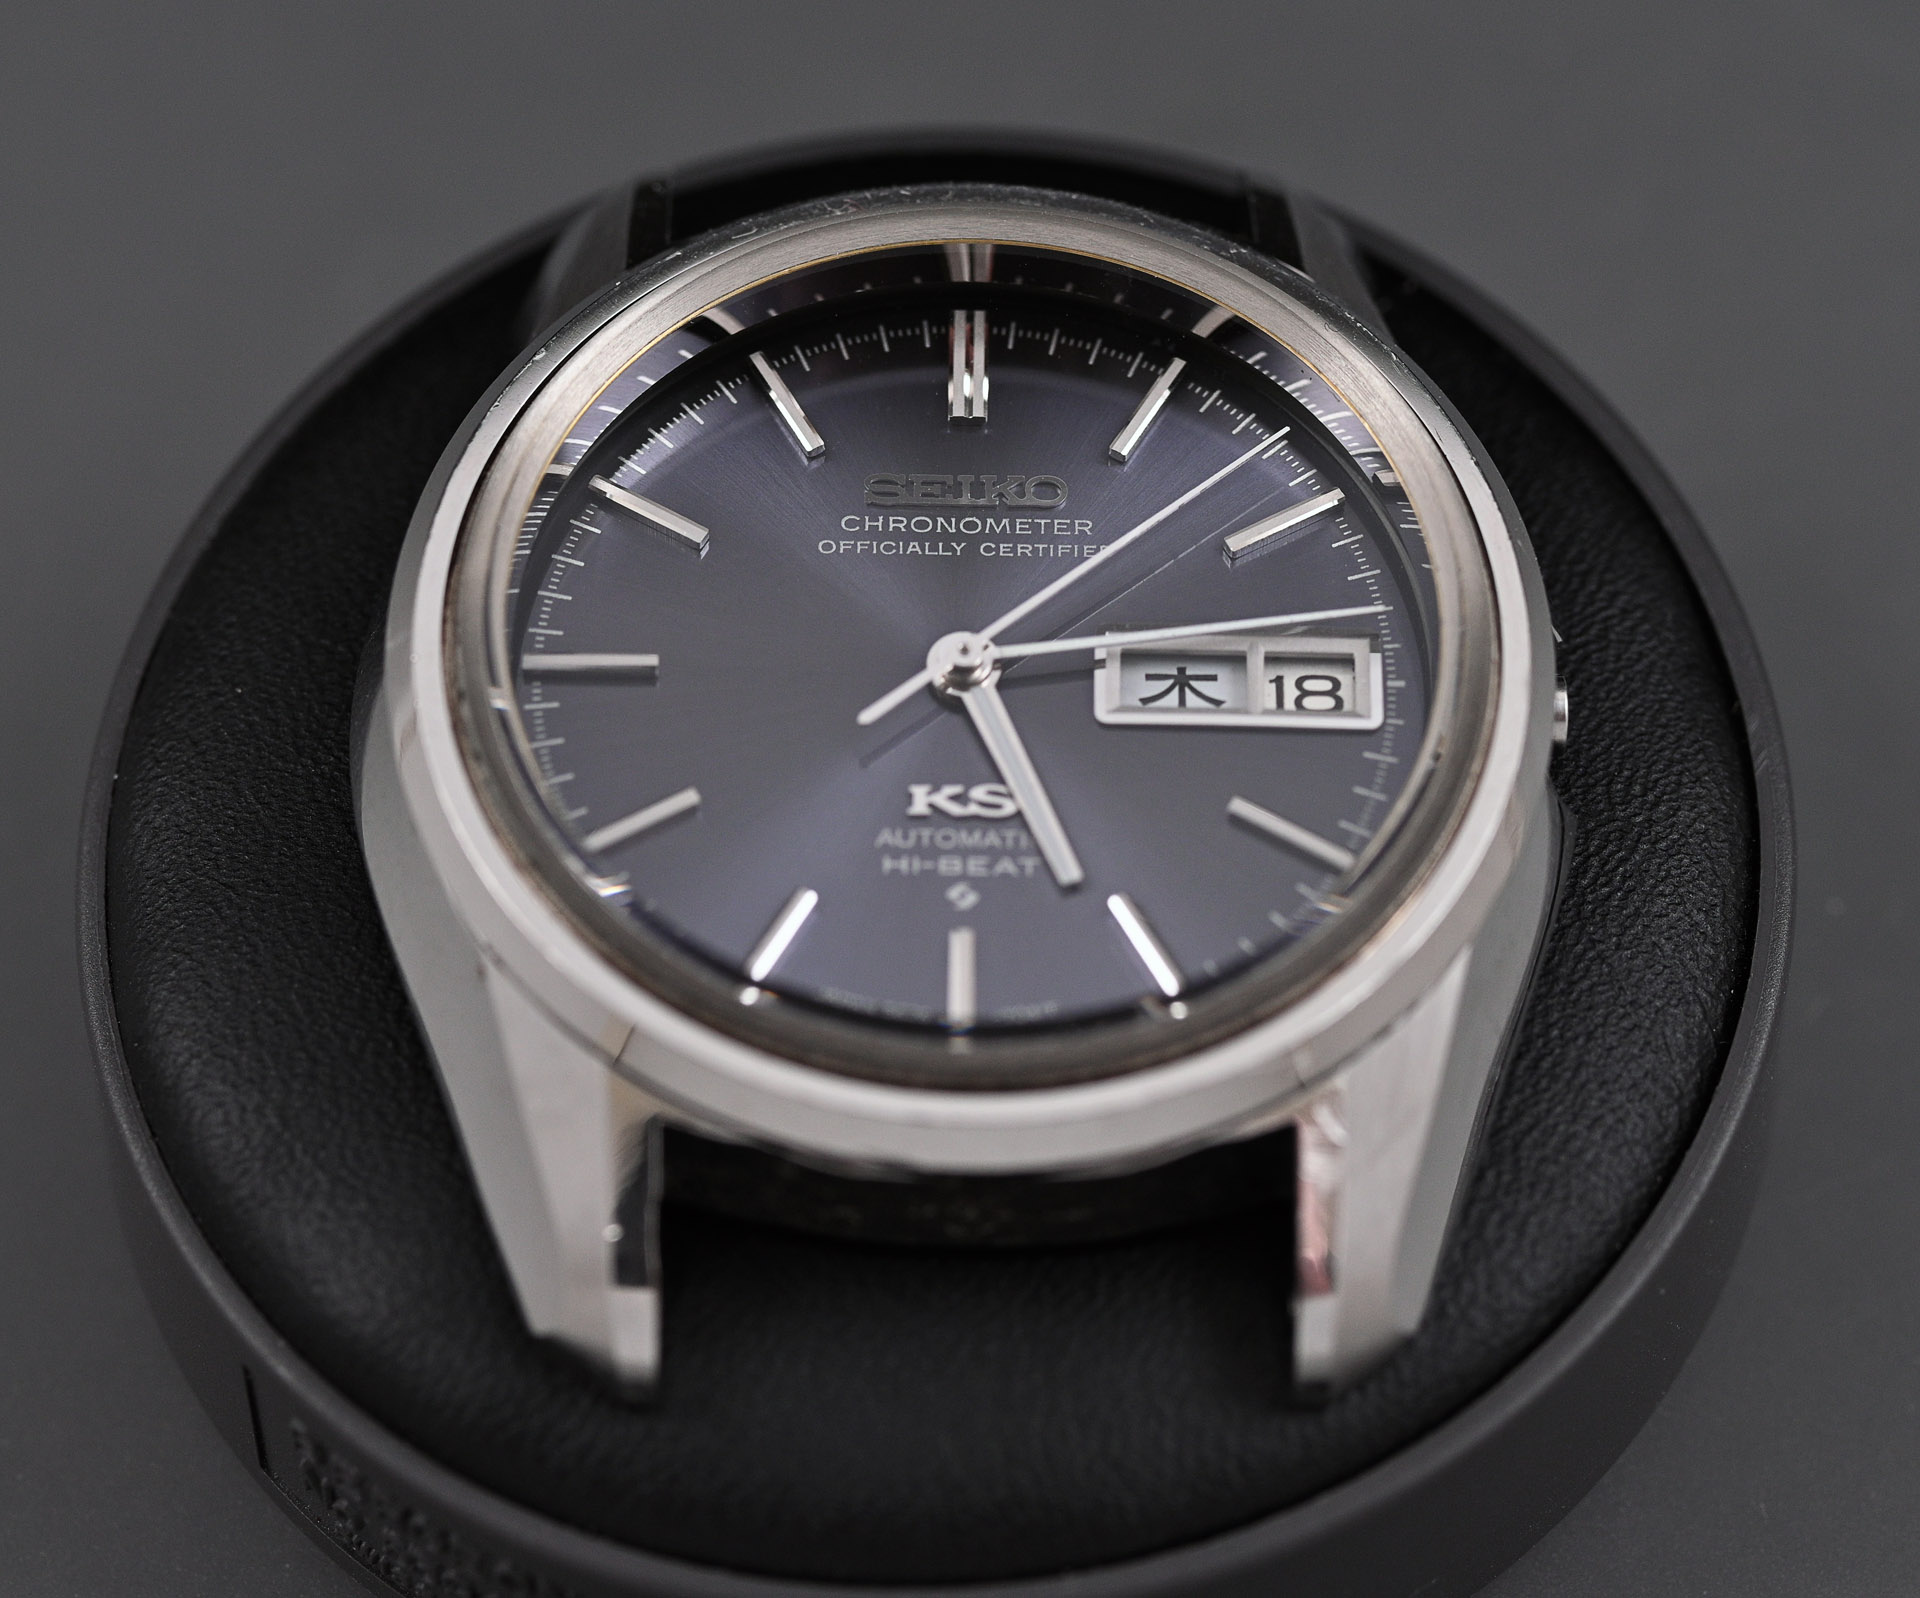
Not bad, I reckon. I could probably nudge it back a touch but that will do for the moment. The final order of business is to clean and fit the bracelet and we are home dry.

The King Seiko 5626-7041 is in many ways the archetypal classic vintage Seiko. There is a wonderful balance to pretty much everything, from the appealing 12 to 6 top-heavy symmetry in the distribution of the dial text, to the gorgeous interleaving of brushed and polished facets on the case. The rightness of the case design appears to have served as inspiration in Seiko’s design of the new mechanical Grand Seiko when it was reborn at the turn of the new millennium.
This being an Officially Certified Chronometer, the choice of slender minute hand is apt, although I have to say it doesn’t contribute particularly well to ‘at a glance’ legibility. But it’s all part of the personality of the watch. The sunburst blue dial is a fascinating enigma, at times a smokey blue, sometimes grey and sometimes approaching violet. And its engine room is occupied by a flawed jewel – a wonderful, sophisticated automatic movement undermined by two or three design flaws that have the potential to condemn many of these watches to abandonment at the backs of drawers. However, with a little bit of application, and patience, and with the help of industrious friends in the vintage Seiko community, these lovely watches can be resuscitated, revived, and enjoyed anew.

Martin, I’m not sure if I ever asked you for guidance on this or if you could or would!? Way back in the early 1980’s, I purchased a beautiful Omega Seamaster Professional 200m. On the second or third “battery service” my watch lost its 1441 movement as it was deemed unsuitable by the Omega repair center. It was strange to me how the 1441 thermocompensating movement was removed and my entire watch replaced, minus the stainless steel bracelet. To me, someone really wanted that movement and was going through a whole lot of expense getting it. Funny how everything BUT the supposed bad movement was returned to me. They replaced my 1441 movement with a me a 1438 movement, apparently it couldn’t fit the body of the 1441 Omega watch.(???) Well, after boring you with those details, would you know what movement would fit into the old Omega watch body as I would like to get it going again? Is it even worth doing something like this? I’ve attached photos of the new movement and some of the returned parts. Thank you very much, James
On Tue, Feb 22, 2022, 1:44 PM Adventures in Amateur Watch Fettling wrote:
> Martin posted: ” The King Seiko line was conceived and developed > originally by the Daini Seikosha division as a luxury hand-wind watch to > compete with the Suwa-developed Grand Seiko line. Any aspiration on the > part of Daini Seikosha that it should be regarded as th” >
Hi James, you did ask this question of me a while back under The Common Denominator post. I would refer you to the comments from that post for my answer 🙂
Amazing post as always, so much pleasure to read it. And great job with the rocker wheel, this was exciting! I’m now wondering, from what you’ve seen so far, do you think we could make the assumption that 5626B always have this plastic star while unregulated 5626A are all metal made?
Best,
Hi Adrien, I’m glad you enjoyed it – thank you. I don’t think you can assume anything about which levers would originally have been fitted to which variants. I’ve got A variant 5626s with plastic stars too so suspect that the metal one fitted to my old 5626-7000 may have been a service part.
Excellent watch, work and pictures as always, Martin! Did you consider swapping just the ball bearing assembly between the two rotors? I’ve found that the whole thing comes off very easily in one piece by pushing down on the outer ring, and also easily friction-fits back in.
I had considered it, but was worried that in doing so I’d irreversibly damage the rotor. The bearing is not listed as a separate part and that further cautioned against attempting that. However, your experience prompts me to give it a try – thank you!
A few years ago I bought a 5245-6010 from Japan. It wasn’t working and when my watchmaker got into it, discovered it had the same flaws as the 56 series. Fortunately, he was able to find NOS parts and repair the watch. I love the monocoque case (Very similar to the Omega Seamaster Cosmic) and the Officially Certified Chronometer on the dial. Keep up the good work.
There is a post here featuring the more common 5245-6000, also in a monocoque case. And thank you!
Martin, I’ve been anxiously awaiting this article and it did not disappoint! Thank you!
I am pleased to hear you enjoyed it. Thank you for taking the time to say so!
Bravo Martin another tour de force, great work with brocken date quick set star and lever, necessity sure is a mother of invention and so elegantly implemented by yourself.
What a wonderful time piece, what a dial, I enjoyed your description how appearance changes in diferant conditions.
Chrono 24 had an example for sale 6 days ago, I hesitated, failed to pull the trigger and it was gone when I returned to website in a matter of hours) – :
I have been trying to curb my enthusiasm in relation to new acquisitions and this was the reason for my initial indecision, your post makes up for ‘the one that got away’.
I don’t need to own all examples, to enjoy my humble collection and satisfy my ‘affliction’ viewing content such as yours is more than enough……. I have to repeat this mantra thrice daily….. Chuckle¡
Keep on keeping on
Gil (-:
What a wonderful comment! Thanks Gilmour. I’ve often felt it unnecessary to actually buy a watch that you hanker after. The whole ownership cycle can be completed virtually. Thanks for the contribution!
Thanks for another enjoyable and informative post Martin. I conserved a KS 5626a a while ago, inspired by your earlier post on this movement. It was probably just beginners luck, but this watch has proved phenomenally accurate in use. Start wearing it, and 2 weeks later it’s only 4 seconds adrift! Have you had any further thoughts on that extra regulator screw on the 5626b movement? It seems that just making the gap between the pin and the boot bigger or smaller doesn’t achieve much if the issue is to get the index curve centred. If the spring were, for example, pulling on the pin side, and not ‘breathing’, moving the boot further out wouldn’t help. It looks like it would be more usefull if the screw moved both the pin and the boot together. I expect I’m missing something??
Hi Michael,
I thought exactly the same as you. I have not actually tried adjusting that screw but in any case I don’t see how it could move the pin and I don’t really see what advantage comes from being able to adjust the gap to the boot. Further investigation required I think.
Another fantastic article and piece of work. I really enjoy your web pages and the story of your restorations. But at the same time, they bring me a timely reminder that buying elderly mechanical watches can bring heartbreak and expense, and it’s a hobby I should enjoy in moderation. This particular article would make me very hesitant about ever buying a 56 series Seiko myself, and I’m full of admiration for your skill and perseverance in fixing these.
For myself, I feel much safer around buying vintage Quartz- so long as they tick showing the circuit board and chip is running ok, then the low torque and fewer moving parts means that generally there are far fewer and less complex problems looming…..I have a very nice vintage Seiko King Quartz watch with the grammar of design case, and it’s a no-fuss or worry watch which just brings pleasure.
Andrew, thank you. I would say that any vintage watch purchase can only be made with the expectation that some sort of intervention will be required, at the very least a service. To my mine, vintage quartz carries its own risks, not least scarcity of parts and worries over the black box that is the circuitry, and in the older calibres, very considerable complexity of design and challenges in setting up. But yes, a healthy quartz should present fewer ongoing concerns other than regular battery changes.
Once again fascinating and in-depth, you are getting better all the time. Such a wit! Bravo!
Thank you!
Hi Martin,
First off, just wanted to say what a great article you have written here. Very informative, and you did terrific work with this Seiko here. I did however have a bit of a peculiar question for you, and it has to do with your staking set and base solution. I too stumbled across this idea, since the clones are so much cheaper and seem to be essentially identical (aside from the base and screw unfortunately). Would you by any chance still remember the tap size that’s needed, so the Bergeon base can be used on the Chinese clone staking tool? I’d really like to do the same thing.
Hi Mike, I am very glad to hear that you enjoy the blog and find the content useful. To answer your question, the tap size that I used was M6 1.0. Good luck!
Thank you very much for the prompt reply Martin! That’s so helpful, and I am incredibly grateful not only for this information, but also to have found your blog. I went ahead and subscribed to your YouTube channel as well — your photo/videography is stellar! Lastly, regarding the staking set & screw tap topic: do you have tips for someone that’s never used a tap before? 😄 I am a bit nervous I will just mess it up.
I’m hardly the most qualified person to offer tips on tapping because that was my first time! I would just say though to take your time and feel your way when turning in the tap. Thanks for the very nice comments on the blog and YT channel. Always welcome!
Haha, well that gives me some reassurance! I appreciate your honesty, and the tapping tips, and look forward to seeing more of your content. Cheers!
I’ve been searching for a functioning 5626-7041 in good condition for about 5 years now, and I’m in Japan! You wouldn’t consider selling this one would you?
Hi Jacob, I’m afraid that this one sold last year but I have a second identical watch that I’ll get to at some point. Maybe ask again in a few months!
All the best
Martin
I will, thanks!
Maybe I can Help @Jacob
How does the yYahoo.jp day/date star compare with the Austrailian ones, as it’s about 1/3 of the price? Does the split in the Austrailian star help with restaking any, or is it designed to ease slipping should the user try to reset the day/date during midnight updates?
The Yahoo date star was a waste of money. It slipped from the get go. The Australian one worked fine initially but eventually failed. I ended up replacing it with a metal original. It may be that my execution was flawed and so I will likely give it another try next time I’m working on a 56.
I’ve not seen that. I’ll take a look. Thanks!
Good to know.Adrian at Vintage Time Australia has a video on youtube with advice on dealing with issues, (a separate video from his staking how-to), and it does seem quite sensitive, although not the kind of issues that would take time to develop.
The Yahoo date star has to be staked on – (concave stake, just like for a balance staff).Mine’s holding out fine so far!
That is probably also the case for the third party stars from Oz. I have been planning on trying just that with both. Thanks for sharing your experience!
Aren’t those Oz stars made from inox (stainless steel) – that’s not going to stake easily!But they are split, so perhaps they can be bent in slightly to improve traction.
Yes, you’re right but I was conflating the two because the assembly in my experience does not hold together in the longer term. I have been wanting to use a staking tool to close up the hole to prevent it falling apart when subject to the slightest stress. As for the Yahoo part, I’ll give your suggestion a try, assuming I haven’t thrown it away!