
Tags
6105, 6217, Diver's Watches, Seiko, Seiko 6105, Seiko 6217, Seiko 62MAS
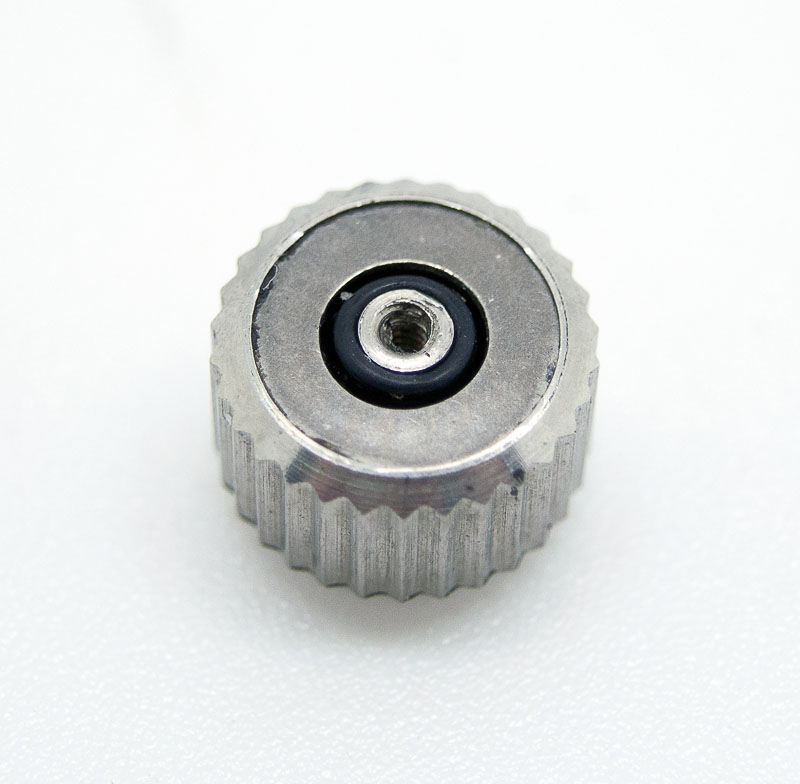
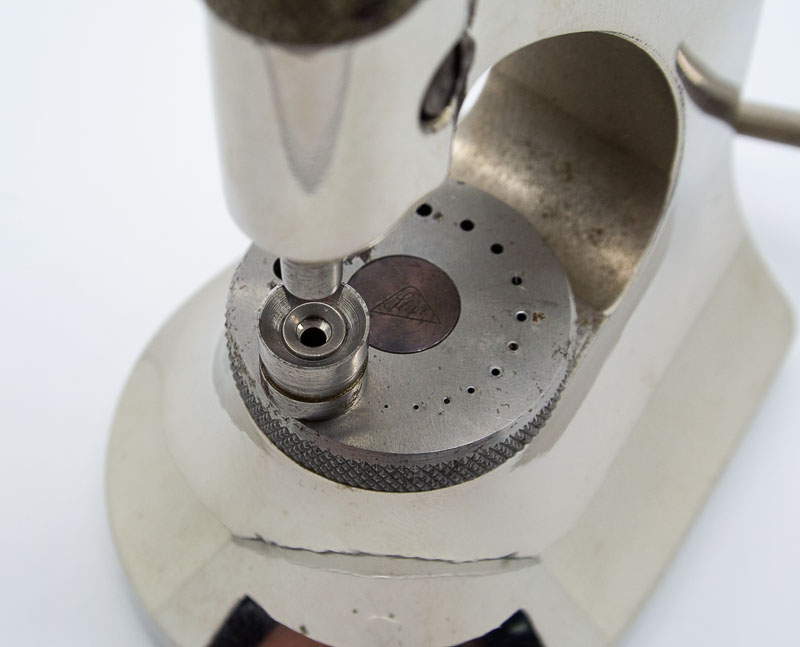
It is a truth universally acknowledged, that a Seiko man (or woman) in possession of a good pre-1976 150m divers watch, must be in want of a crown gasket that does not leak.* But let’s face it: anything pre-1976 is pretty ancient and crown gaskets do not age well, gradually losing their suppleness, hardening and eventually cracking. This would not normally be a problem were it not for the fact that the gaskets in the crowns of the 62MAS and both generations of the 6105 are encapsulated, trapped behind a permanently fixed washer, thus rendering the crown a non-serviceable item as far as Seiko were concerned. The technical documents issued at the time recommend replacement of the whole crown when the gasket becomes ineffective.
So, the choice presented to the owner of a leaky Seiko 6217-8001, 6105-8000 or 6105-8110 is somewhat stark: locate an original old stock Seiko replacement crown with a supple gasket ; buy an aftermarket facsimile part from eBay (if such exist) or find an expert with experience in servicing this non-serviceable part. Option 1 is not to be ruled out entirely as old service stock is still available but more often than not the gaskets have hardened from age (the subject of this post is in fact one such example). For me option 2 is a non-starter: I’d rather have a leaky crown than fit a part of dubious character and so we come to option 3: I’ve seen one or two quite successfully-executed examples of gasket-transplanted crowns and one or two which look somewhat the worse for wear following the experience. The main challenge in conducting this operation is to remove the washer without damaging either the washer or the crown itself or the threaded tube into which the stem fits.
In the example shown below, the washer has been extracted by prising it out but in the process it has been mangled and the outer face of the crown shows a dimple caused most probably by the threaded tube having been bent to one side during the process of levering out the washer.

For years then, this has been the status quo, no one having come up with a neater method for replacing the original gasket. However, back in July, a member of the Seiko and Citizen watch forum and UK-based Seiko parts trader announced that he’d found a way to remove the washer from a 6105 crown without damage. He did not reveal his method at the time but a couple of months later did just that, and I have to say, his method is rather ingenious. As I have a growing collection of useless Seiko 6105 and 62MAS crowns with rock hard gaskets, I thought it about time I give this method a try, but this time on the earlier crown fitted to the 6217-8001 and 6105-8000 watches.
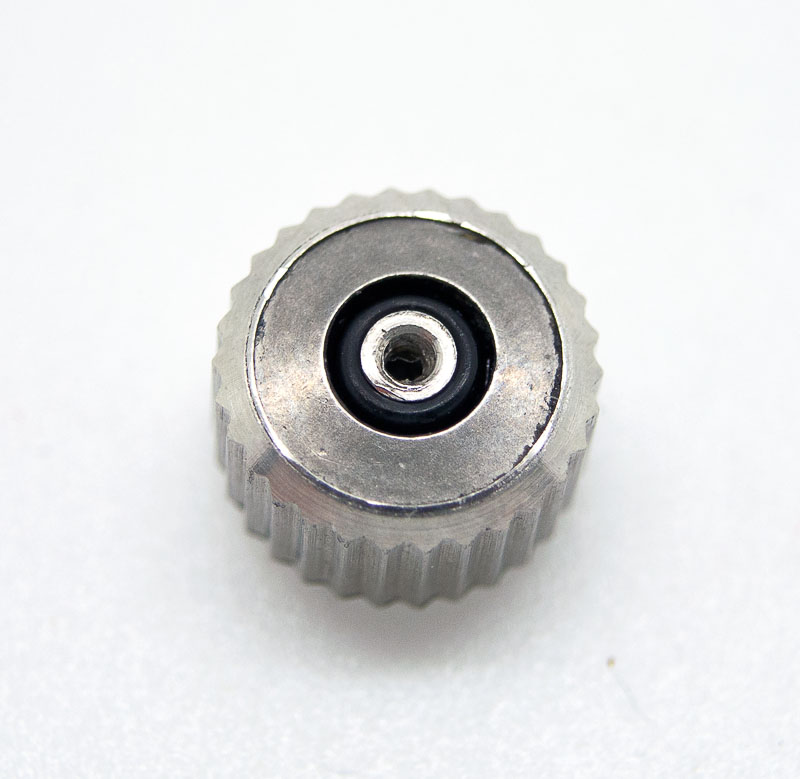
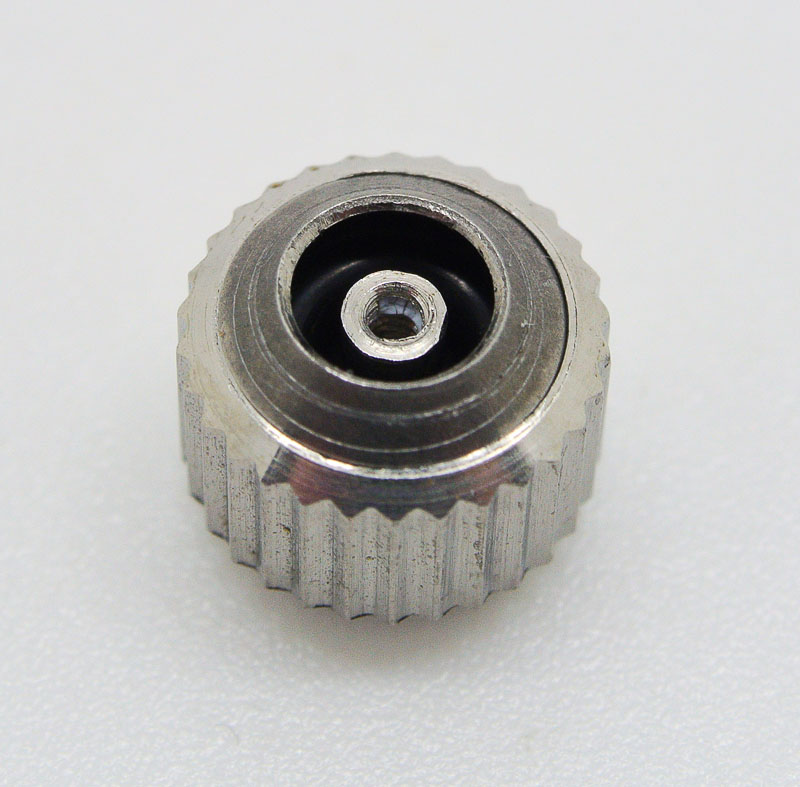
The crown I selected for my first attempt was a NOS crown bought from Yahoo Japan a couple of years back but when I received it, I discovered that the gasket was so hard I could not even get the crown to sit on the pendant tube of the watch I had in mind for it. Here it is, blissfully ignorant of the indignities about to be inflicted upon it.

This view nicely presents the dilemma we are faced with: how do we remove the washer sitting over the gasket without it ending up looking like that of the crown in the opening photo? Any ‘pull me’ approach would seem inevitably to involve leverage and the likely damage to the washer. But what about somehow pushing the washer out from the rear? How could that be accomplished? The proposed method is not completely dissimilar to the approach used to remove crystals from some designs of one piece watch case: a pump is attached to the pendant tube and air pumped in until the interior pressure is sufficient to pop out the crystal. We can’t do that here but we can exert pressure from within through the method of gasket stuffing. The process goes something like this:
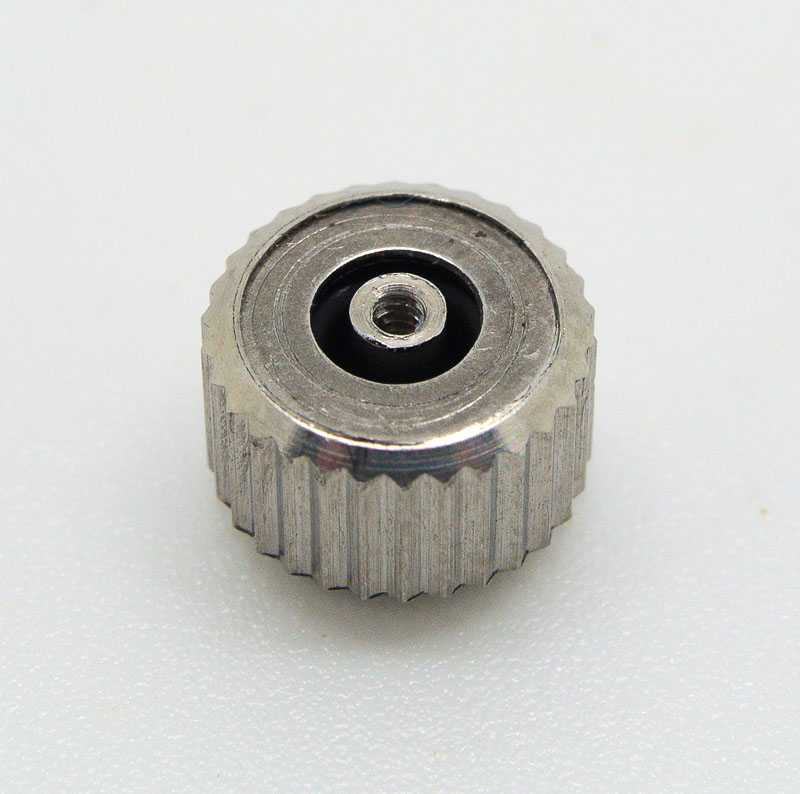
Step one: Assemble a small collection of rubber gaskets whose inner diameter clears the inner tube on the crown and whose outer diameter clears the aperture in the washer. Insert the first gasket
and then, using a spot of brute force as required, work the crown onto the pendant tube of any spare watch case whose tube is of the correct diameter. Repeat with a second gasket, and then again with a third and so on until you start to see evidence of doming of the washer.
Continue the process and eventually the washer lifts clear of the edge of the crown.
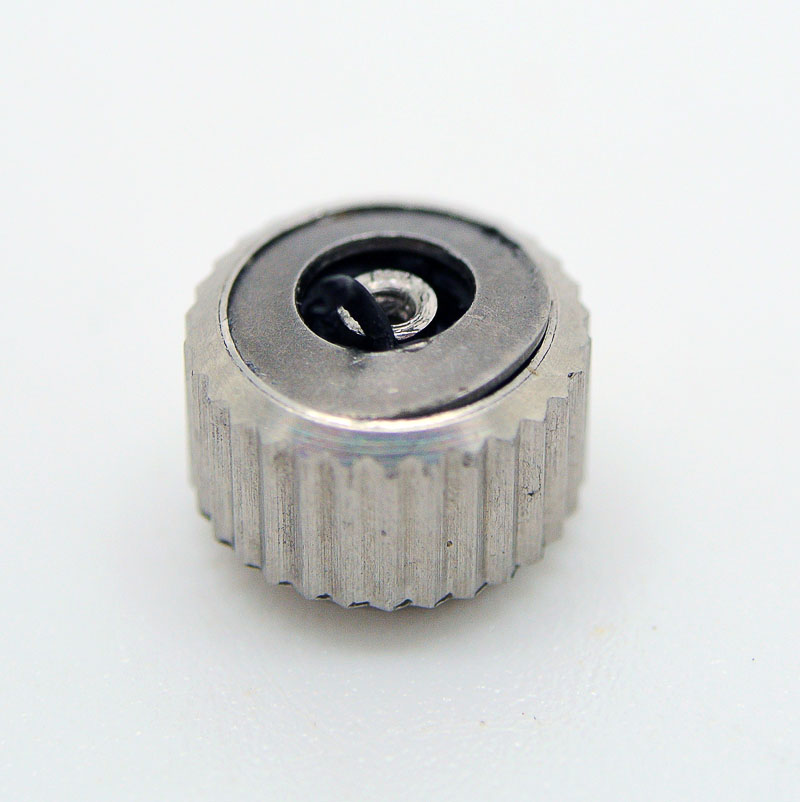
One or two more gaskets (numbering 15 in total at this point) and the washer can be removed.

Extracting the original gasket then reveals the nest of vipers responsible for its liberation.
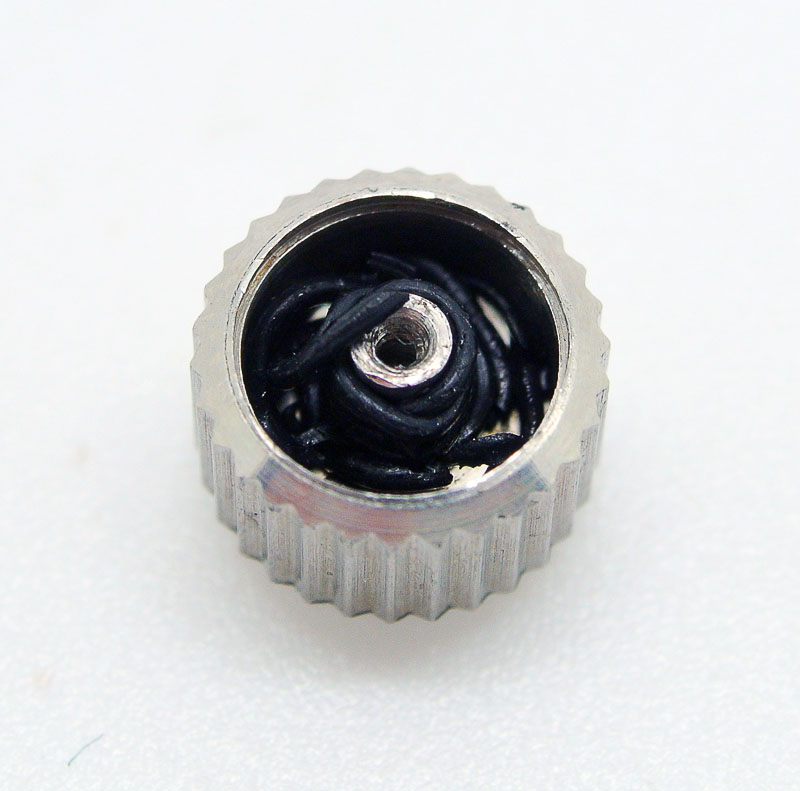
Beneath this mangled pile lies a spacer whose removal allows all of the rubber remnants to be cleared out.

A closer look at the gasket illustrates the folly of hoping for the best with these old crowns, even those advertised as new old stock.

As I was in the process of servicing another movement at the time (to feature in the post after this one), I took advantage of the opportunity and popped the crown and spacer into the watch cleaning machine with the movement parts for a spruce up.

We now are ready for a fresh gasket of the correct size. Locating such is not as straightforward as would normally be the case because the gasket is not of a common size available from watch materials houses. Seiko do not list the gasket as a separate part either and so I had to measure the old gasket and see if I could locate something suitable. Fortunately, I found a supply of nitrile o-rings of the correct size from a seller on Ebay for a couple of pounds. The new o-ring fits snuggly into its new home.

Aside from the initial extraction, the next most challenging step follows: how to re-seat the washer. In a sense, refitting simply requires the reverse of the removal process: the pressure from the gasket stuffing had domed the washer out to a cone shape and to I thought the best way to refit it without the need to resort to glue, was to shape it into a more symmetric cone shape whose outer diameter was slightly smaller than that described by the lip around the inner edge of the aperture in the crown. To accomplish this I used my staking set with a dome-ended punch combined with a bowl-shaped stump.
Inevitably, as this was my first attempt, the washer did not emerge entirely unscathed, but only marred in a minor cosmetic sense. Here it is sitting back in position ready to be flattened back into position.
I then used a flat ended punch with a hole in its centre together with a flat stump to support the crown to tap the washer back into position.
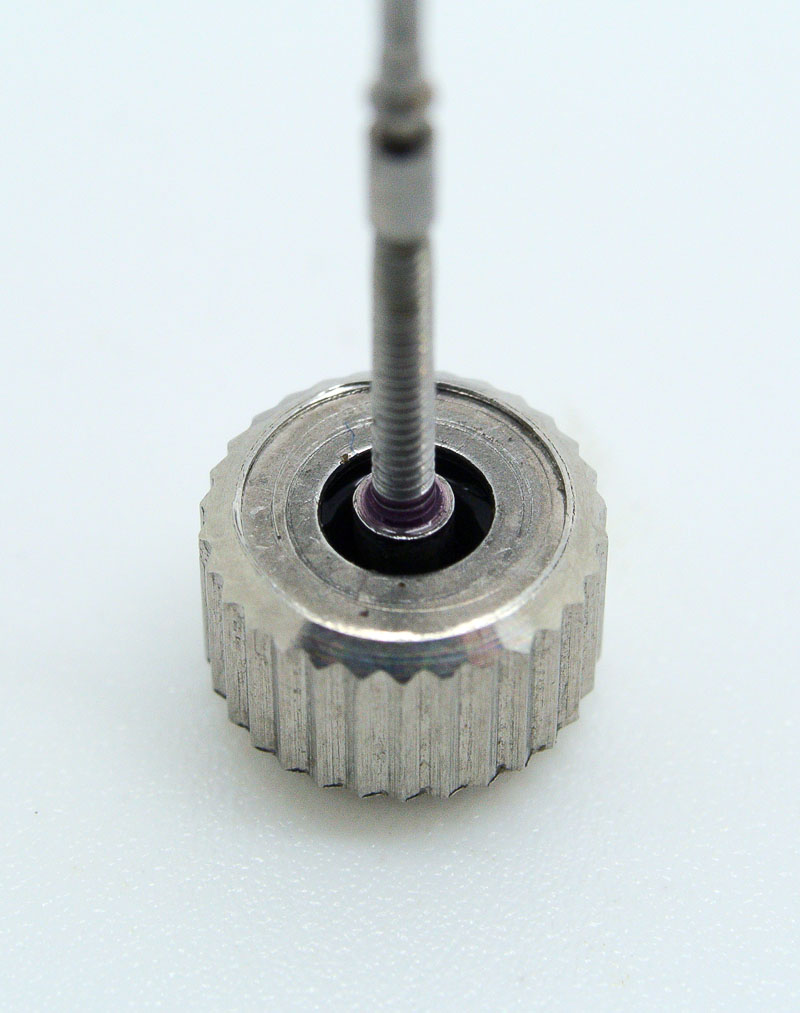
The flattening of the washer increases its outer diameter again so that it now sits snuggly and securely once more within the groove in the crown. All that is left is to transplant the stem from the watch to which I wish to fit this particular crown (the ‘basket case’ whose story can be found here).
The proof of the pudding, and the whole point of the exercise after all, is to check that the new crown gasket is capable of providing sufficient water resistance. I decided to take a slightly prudent approach in this case, and removed the movement prior to the test, with the crown then held in position solely by the friction of the new o-ring gasket against the watch case pendant tube. Here is that old 1970 vintage 6105 case, poised above the water level at 6 bar, waiting for a period sufficient for any leaks to equalize the pressure within and without the watch case.
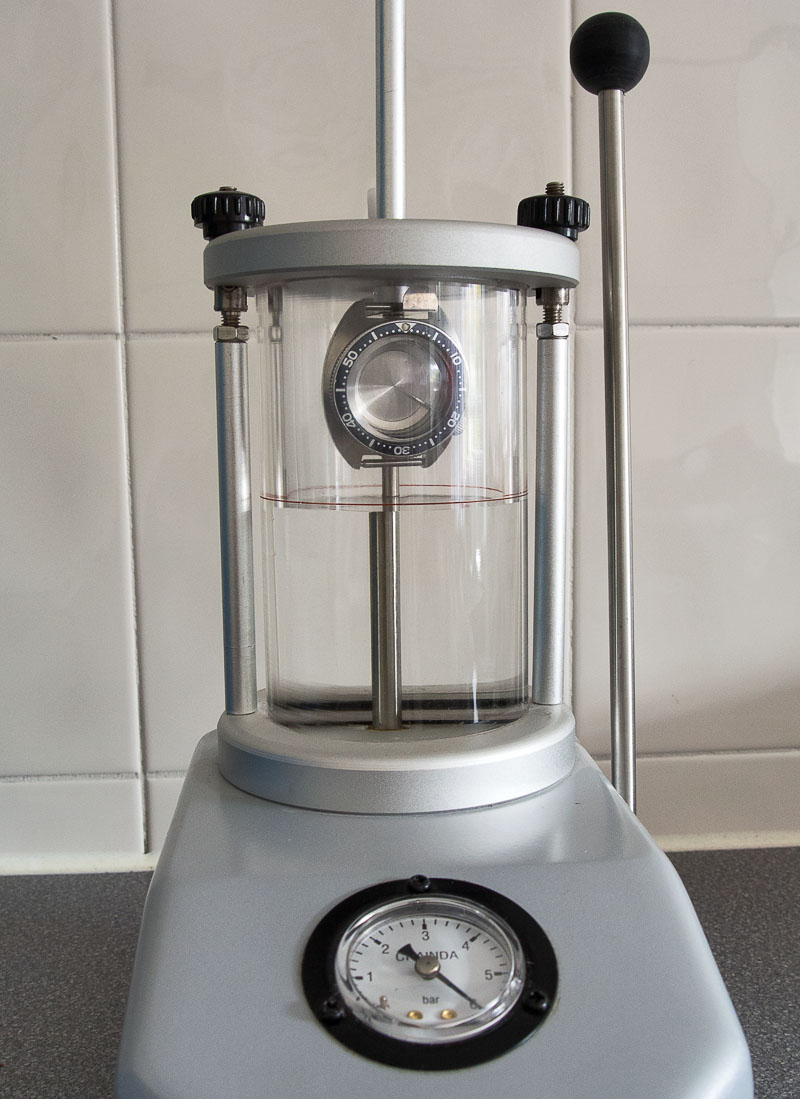
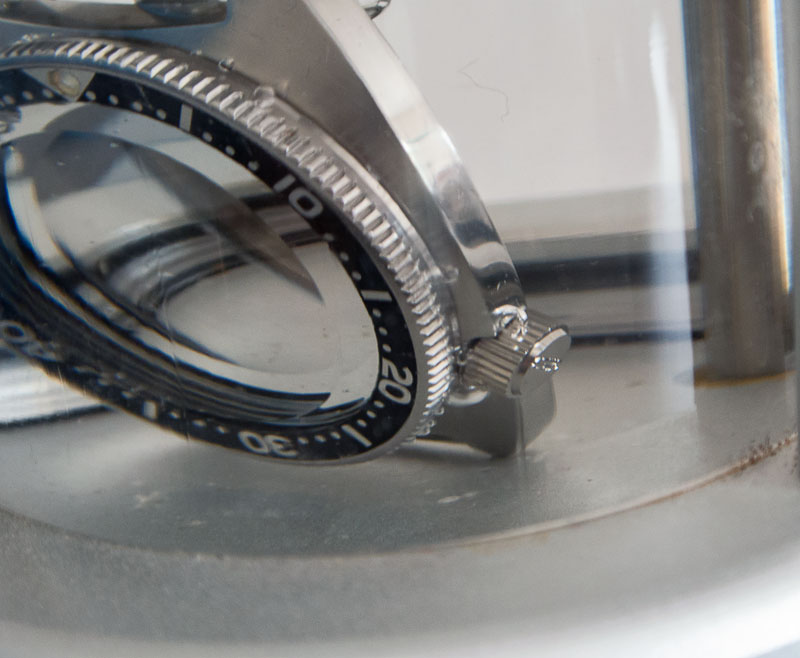
A little while later, the case is lowered into the water and the pressure released. If the watch is leaky, then a return to atmospheric pressure above the water level will result in a stream of bubbles from the now pressurized watch case emerging from any points of weakness. In this case, no such stream emerges, only the odd lazy bubble from air trapped in cavities within the exterior fittings of the case.
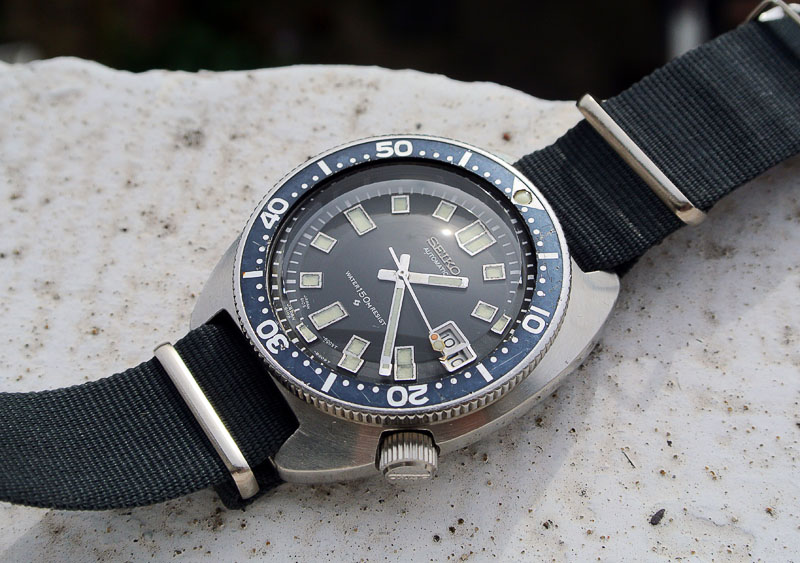
Satisfied that this old favourite of mine was now water tight, I dried out the case, refitted the movement together with its new crown, and have been enjoying it again for the past day or two, secure in the knowledge that the odd inadvertent dunk is not going to do it any harm.
*Apologies to Jane Austen

That is ingenious. It’s a real “Why didn’t anyone think of it sooner?” moment.
Kudos to Stefan. And to you too.
(Still looking for that damned Tudor 4453 crown tube…)
Great read as always Martin. Very nice job.
Excellent post as always Martin! Do you have the gasket measurements or a link to source the gaskets?
Thanks! Tom
Thanks all. Tom, the gasket dimensions are 2mm inner diameter with a 1.5mm cross section. I bought a pack of 10 for £2.45 from Ebay seller sealforce53.
Thanks Martin!
Does the 6105-8000 and 6217-8001 share the same signed crown? Cos they identical? Thanks
Yes, the crown is the same between the two models, although it is worth remembering that the earliest 62MAS, the 6217-8000, used a smaller crown unique to that model.
Thanks you so much for the quick reply 😊
Very clever method of replacing the washer in sound condition.
I’m wondering if it might be easier to use a solvent and then possibly a custom/handmade dremel bit to remove the original hardened o-ring with the washer in place, then pop a new one in, without removing the washer at all?
Can you give us more details to source replacement o-rings?
Thank you!
The problem with any mechanical intervention of the sort you propose is that the washer inevitably gets damaged, and potentially the crown itself too. I also don’t think you’d ever get the replacement o-ring through the gap with the washer in place. It is simply far too girthsome! The method described in my post has the huge advantage of being cheap, and if done carefully, leaves all components relatively unmolested.
How does the washer/crown get damaged by solvent, or a brush softer than the metal? I presume the crown is SS, is the washer also SS or plated brass?
I’m facing this exact problem. I’m an original owner of a 6105, worn heavily for 4 years then (original) boxed until last week. The watch is in excellent condition. Haven’t poked around in the crown yet, but the rear case seal is still supple. I also own a lathe, and would consider just making a new ss (or brass) washer.
Can you give us more details to source replacement o-rings?
Thank you!
It wasn’t the solvent I was worried about but the thought of unleashing a dremmel on the interior through the very small gap between the washer and central tube.
As far as the washer is concerned, you will see in a reply to Tom further up the comments that I gave the dimensions (2mm inner diameter with a 1.5mm cross section) and source (Ebay seller sealforce53). The only other detail is the material which is nitrile. If you find another way to do this, then do please report back.
Thanks, Martin.
If it was easy to find an old crown and stem I’d experiment, but it seems these don’t come up that often.
With regard to tools (dremel bits) many craftsmen make their own tools and jigs to suit the project at hand. I would either start with the narrowest shaft dremel bit I could find (ideally with a brass brush (cut it down), or start with a piece of brass stock, shape the end in a way to cut and mulch the decomposing rubber, or build a tiny wire or fabric brush to clean out the remains.
I don’t know if the new o-ring can be forced into place or not. I would try a bit of lubrication, possibly some stretching too, and probably a custom made wood jig and tool to help fulfill the job. I’ll report back when I get the time to play around.
I also wonder if there might be a wet seal/gasket which could be injected. This would require a tube to fit over the central tue to form the ID mold. After the gasket has dried, the tube is removed, and the crown/stem assembly fitted back onto the watch.
Hi Martin,
I am in the process of obtaining a Seiko 6105 8110 for my collection, as I wear the watch is in my collection I insist on getting them all sealed up in case of the water accident. Are you able to provide this crown service for me as well?
Thanks so much
Lawrence
Hi Lawrence, I’m afraid I am just a humble amateur and the only watches I work on are my own. There are folk who may be able to help you though – you could give Duncan Hewitt a try in the UK perhaps.
A question please.All screw crowns must have a gasket inside?I ve got a spork and the crown hasnt gasket inside .Only on stem .I think is wrong .
A single crown gasket can either sit within the crown itself and seal against the outside of the crown tube OR sit around the stem extension and seal against the inside of the crown tube. The latter arrangement is what is used in your watch. It certainly makes changing the gasket easier!
Here we are
https://postimg.org/image/m5myaqj85/
Hi Martin,
while reading your report (and thinking about the Omega crown I am going to do this to) I wondered whether a similar result might be accomplished using water and some swelling seeds, say, chia. I seem to remember even stone can be splitter this way. What do you think?
Thx
Frank
Might be worth a try as long as the internal pressure can build during the expansion process. The advantage of the micro o ring approach is that they self seal and the gap to the crown tube is filled by the tube during the process of repeatedly refitting and removing the crown from the tube.
Is the gasket same size as 6309?
No. I think I mentioned in the post that the o-ring is not of a size available, seemingly, from watch materials houses.
cool… i will follow the dimensions you gave on the bay then
Hi Martin,
thanks for this tutorial. Unfortunately this didn´t work out for me.
What I did was the reversed way how you closed the crown.
Carefully pressing down the washer with the staking set so it gets domed to the inner side.
I didn´t have to watch out for the logo side of the crow, as it already had a little dent from someone trying to open it before me – but it didn´t get worse.
Thx,
Andreas
If you have the dome on the inner side then I don’t see how you can then flatten the washer. It needs supporting around its circumference which means the dome has to be on the outer side before you press it square again.
The washer was domed to the inner side before taking it out. After replacing the gasket I will turn the washer around, so the dome points outward and flatten it again.
btw. do you have a hint for getting a crystal gasket?
Greetings
I’ve not been in the market for 6105 crystal gaskets in some time so am out of date on sources I’m afraid. Sorry!
Hahaha, lovely writing and very informative.
Thank you!
I’ve read this excellent (as per usual) article a few times over the last year and finally got around to trying out this method myself on my 6105-8000. I couldn’t find another crown tube or staking anvil to use (crown tube pressing tool tips came so close!) so I used the crown tube from the actual watch while pressing on the crown in a soft-jawed vise. I know that was a bit dangerous as this watch is precious. But it didn’t take much squeezing and it popped the washer up nicely, after loading about 15 o-rings. The washer was installed in the same manner as described here as well, but my cupped anvil was not quite a small enough radius, so I had to do a tiny bit more cupping in a plain anvil with a cylindrical hole while carefully tapping a little bit to close the OD by a hair. Too much and I could have trashed the washer but I was gentle. Other than that, it went just like written here. A brilliant solution. Thanks so much Martin for sharing this!
Thanks for this Dave. It is good to hear that others have had success with this approach.
Excellent write up! Thank you for that. Without trying to make a hash of this, Is anyone in the UK able to do this gasket for me if I sent them the part? Obviously in trade of cash to do It.
If you’d like to send me an email at amateurwatchfettler@gmail.com, we can discuss options. I can offer that service but I know of one other watchmaker in the UK who will do this for you and I can let you have their details. The approach they and I use is different to that described in this post.