
The second of my two palate cleansers conjures up memories of previously well-trodden paths and consequently offers a potential source of comfort in providing something with which to ground myself. As was common with many amateur watch fettlers of old, the first tentative steps into experiments in watch de-construction and reconstruction typically involved grappling with variations on the theme of the staple 1980’s Seiko 150m diver’s watch. Tatty examples of the slim-cased Seiko 6309-729x series of diver’s watches were cheap and in plentiful supply in the late noughties and were the staple choice of the nascent watch-modding community at the time. I produced my fair share of dubious transformations but also worked on a number of projects where the emphasis was more on restoration rather than transformation.

These included the classic cushion cased 6309-7040 as well as several examples of the quartz-powered 7548 variants, whose Japan domestic production dated from 1979 and whose case was to be used in the second generation 6309-7290 introduced about 3 years later.

The 7548-7000x series made its first appearance in the second volume of the 1979 JDM Catalogue.
I have documented the restoration of 7548’s on three occasions before (the three examples lining the bottom of the gallery shown above but described in more detail here, here and here), two of which the Pepsi model and one, the straight black bezel 7548-7000.
It is an occupational hazard that in trawling for horological nuggets, inevitably you accumulate assorted examples of parts watches, some of which unexpectedly turn out to be worthy of revival in their own right. One such example has resided in my waiting room for some time, its origins long since forgotten but which looks ripe for attention. It is a Seiko 7548-700B from June 1981 and aside from the authentically-faded bezel, does not appear especially ravaged by the passage of time.

The only fly in the ointment is that the movement is non-functioning, even with a fresh battery. The movement looks otherwise tidy with no evidence of electrolyte leakage, nor damage to that vulnerable coil and the battery retaining spring, complete with its two screws, is present and correct.

If we take the movement out of the case, we see more clearly the lovely blue colour of the dial (this is one of reasons I like this model so much, preferring it to the more sober black on black of the 7548-7000) but also that the hands are corroded around their periphery.

I’ve aligned the hour and minute hand with the stationary seconds hand to aid removal.

As I have documented 7548 rebuilds previously in some detail, I will fast-forward through the routine stuff, pausing to note anything of significance. Having removed the dial and hands, the first order of business is to deconstruct the calendar side.

Nothing much to note here other than that there is a degree of tarnish to the main plate that you might reasonably expect of a movement of this age and which has not previously been serviced. I will note, however, the plastic day/date driving wheel because this will come to our attention again later during reassembly.
Similarly, the train side disassembly proceeded smoothly but once again we note in passing a significant degree of tarnish and more obviously dirt.
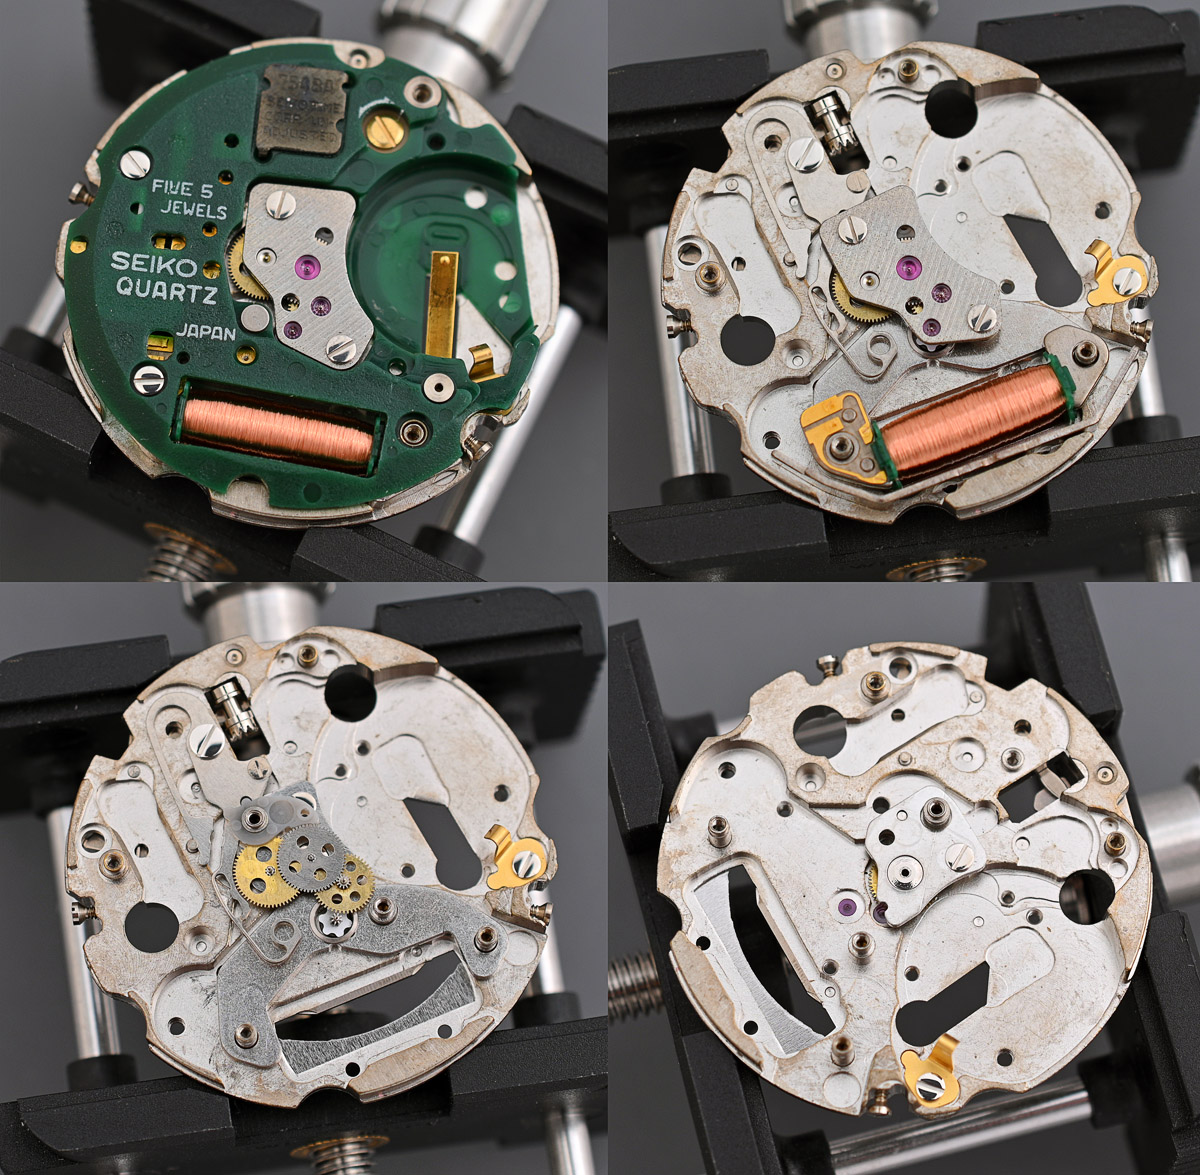
The non-running condition of the movement is perhaps accounted for in part by the encrusted state of some of the holes and bearings in the main plate, the centre wheel hole being a good example.

The technical manual recommends that the main plate is not cleaned in a watch cleaning machine but manually cleaned in benzine (petroleum spirit) and so this is what I did.
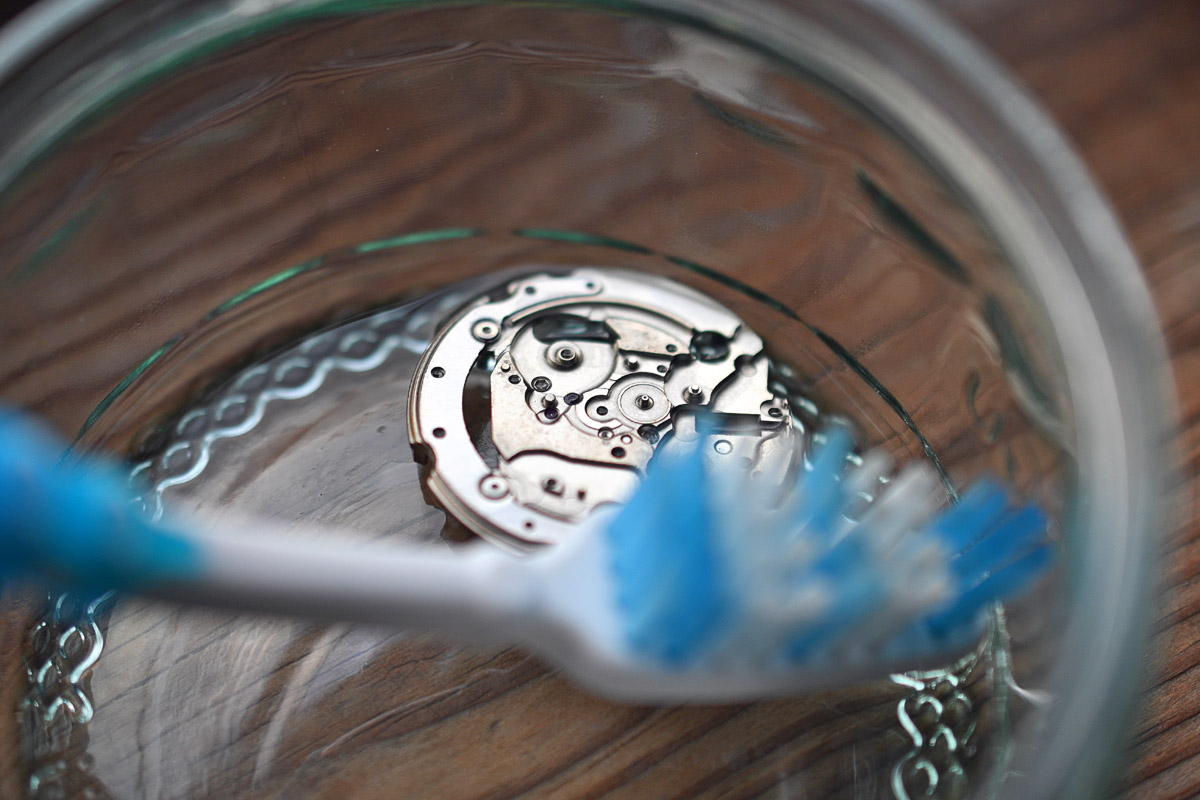
All of the other non-plastic and non-electrical components were pre-cleaned in the ultrasonic bath followed by the usual cycle through the watch cleaning machine.
Reassembly starts as usual with the setting parts before flipping over to assemble the gear train, fit the coil and then the circuit module.
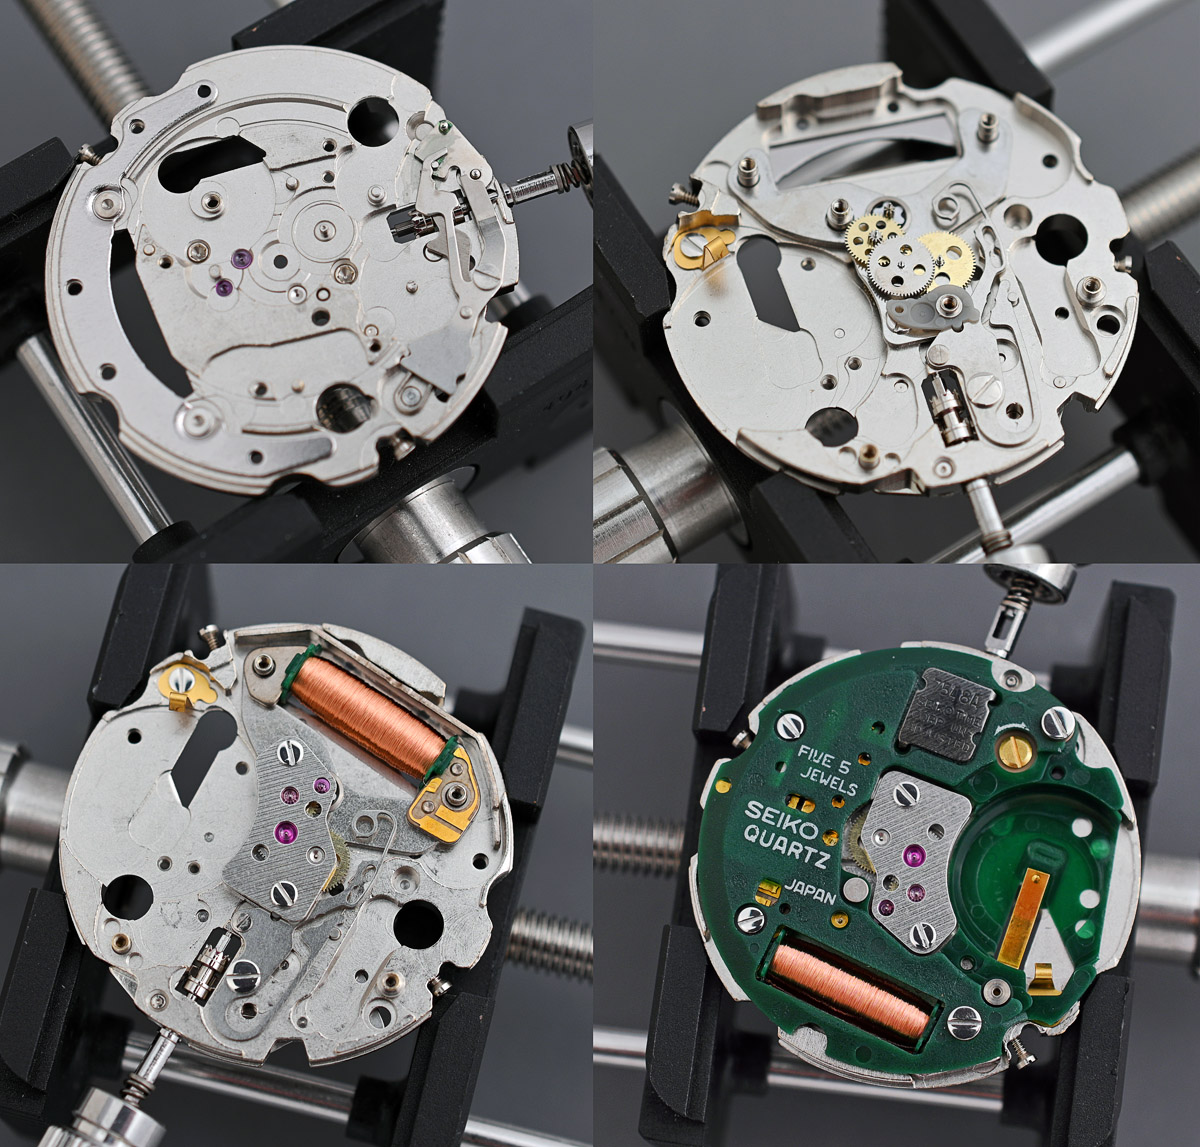
It was only during the assembly of the calendar components that I hit upon the first snag and identified perhaps the main reason why this movement had not been functioning. The plastic day/date driving wheel was binding on its post, and providing a degree of resistance to free rotation likely to have stopped the movement in its tracks.

Apparently, the wheel had shrunk with age and, given that there is no way to reverse or correct this, it is no longer fit for purpose. Happily, I have an embarrassment of spare 6309 and 7546 movements to call upon and quickly located a substitute which rotated on the post without any impediment. With that hiccup resolved, the remaining calendar parts can be fitted.

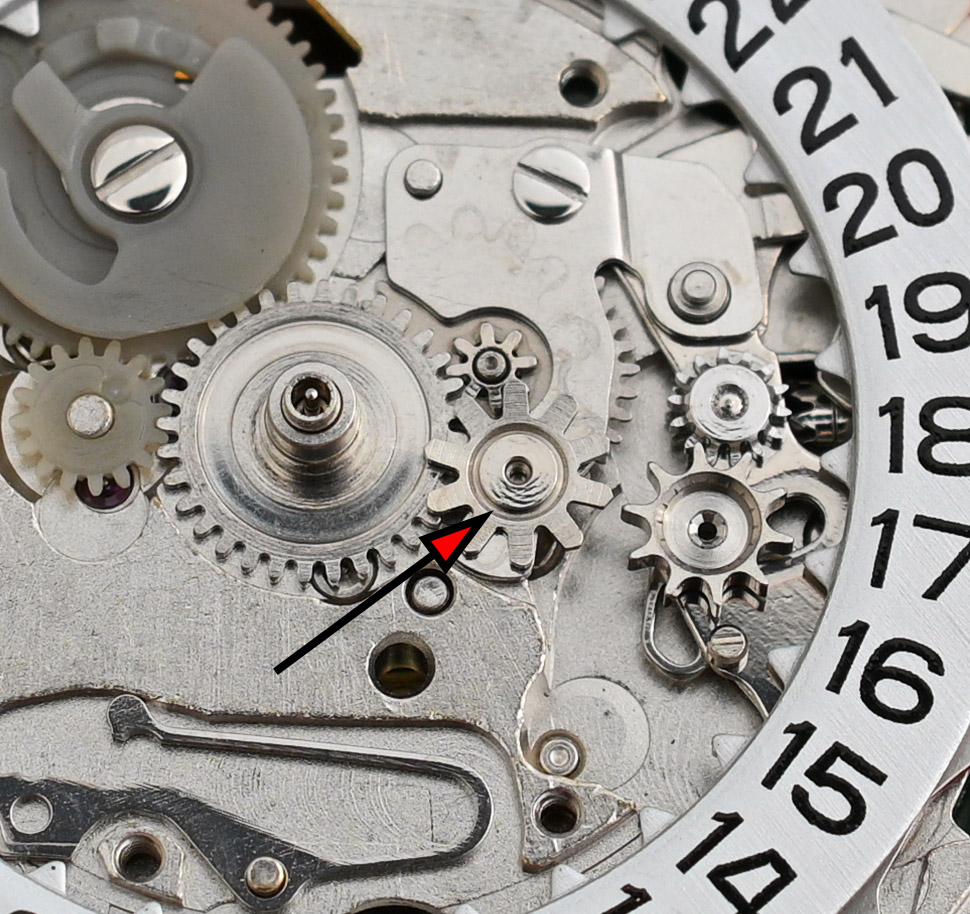
Note the day disk jumper visible though the slot near the centre at the 7 o’clock position and the quickset day correction intermediate wheel through the slot adjacent to the word RING. This intermediate wheel is called into action when the day corrector wheel mounted on the rocking lever swings across when the crown is rotated anti-clockwise whilst pulled out to the first clock position.
At this point, the movement is complete but before we fit the dial and hands, we need to sort out those encrustations affecting the top edge surface of both hands.
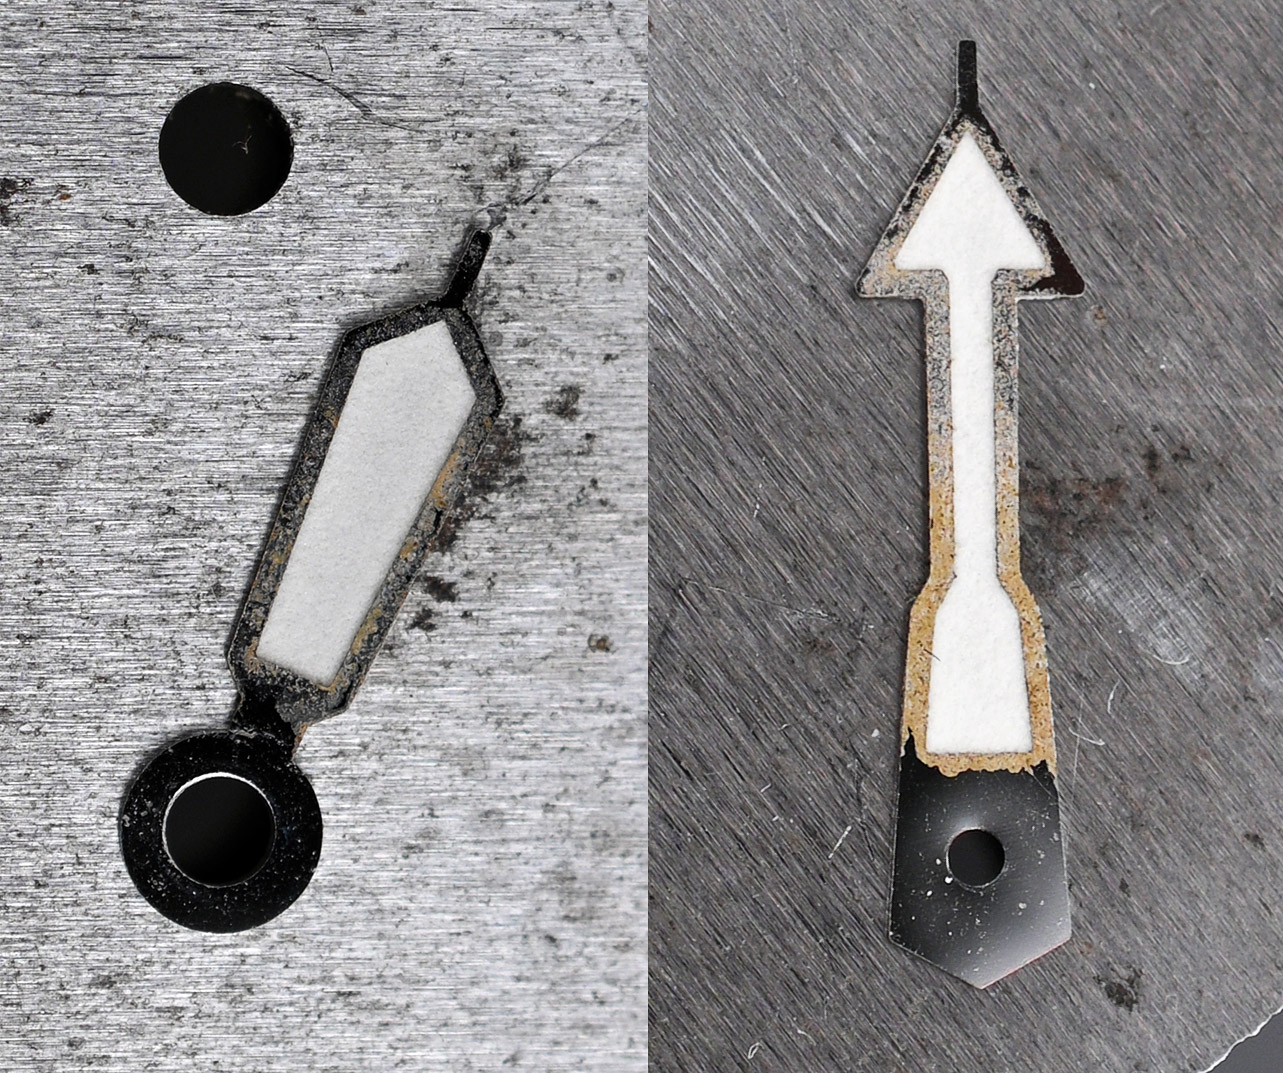
My approach to this sort of problem in the past has been gentle cleaning with a tissue soaked in a little Cape Cod solution and wrapped around a pair of tweezers. It is all too easy to take this a step too far and remove some of the plating, exposing the brass beneath so I proceed with caution to the point that the hands appear presentable, if not perfect. Any excess filmy deposits from the Cape Cod is removed with petroleum spirit and then Rodico. With that task complete, I refitted the dial and then all three hands.
The case is sharp and free from corrosion and all it needs is a clean, a new crystal and fresh gaskets.
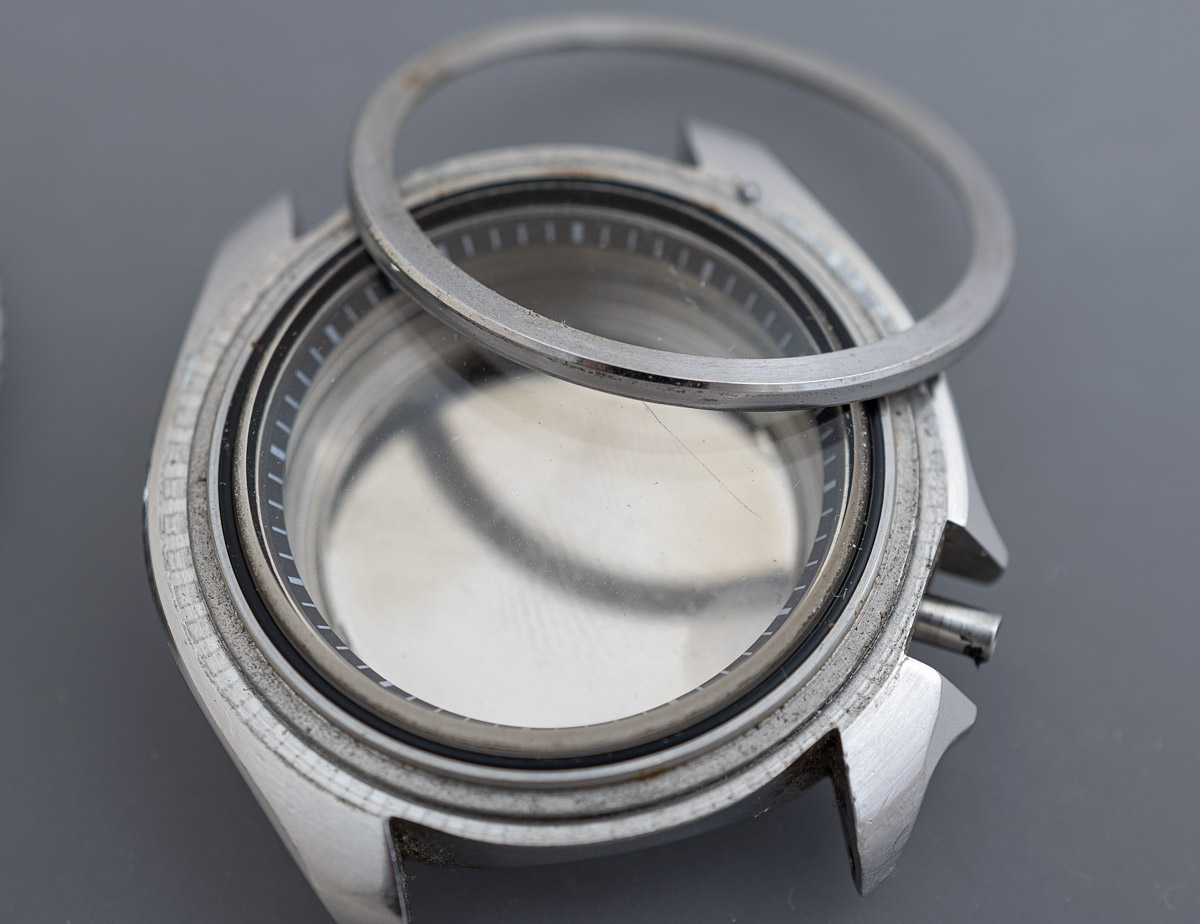
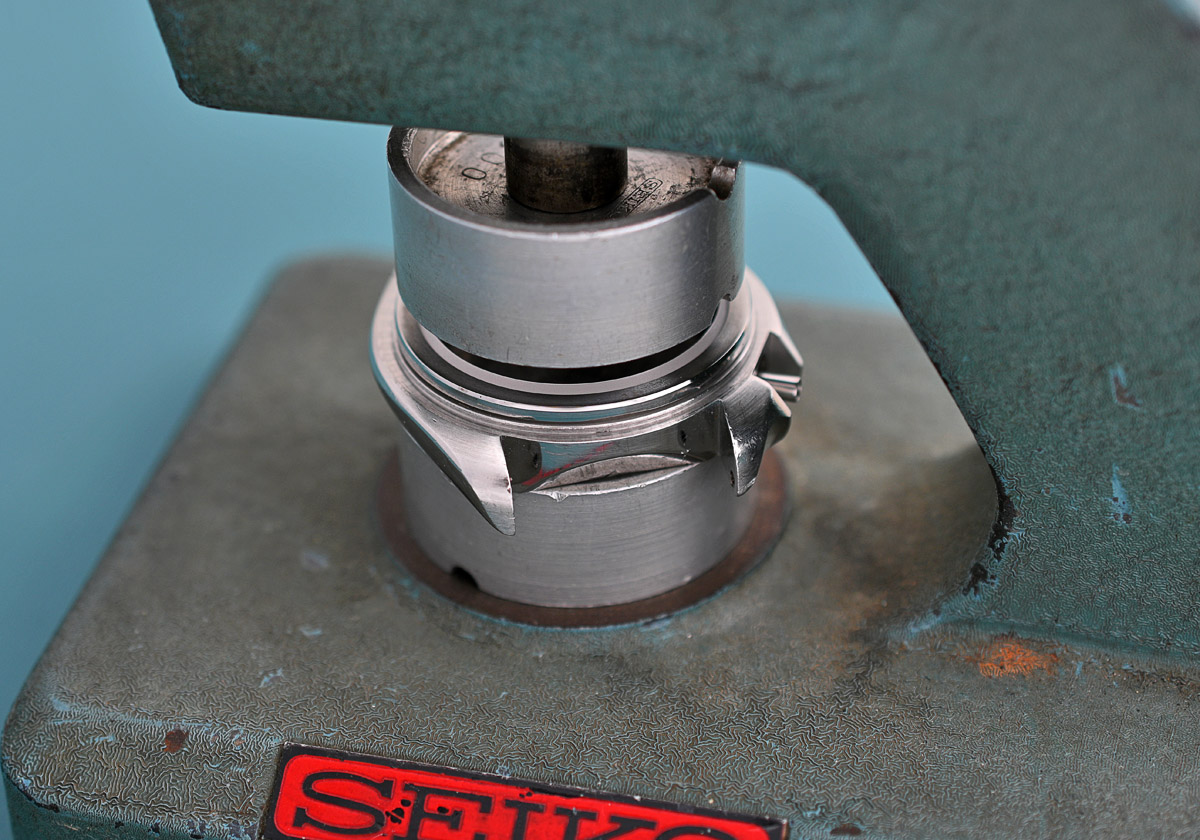
The case is dismantled and cleaned, aided by elbow grease, pegwood, toothbrush and toothpaste. Mid-way through the reverse process, we pause at the point at which a new sapphire crystal has been introduced.
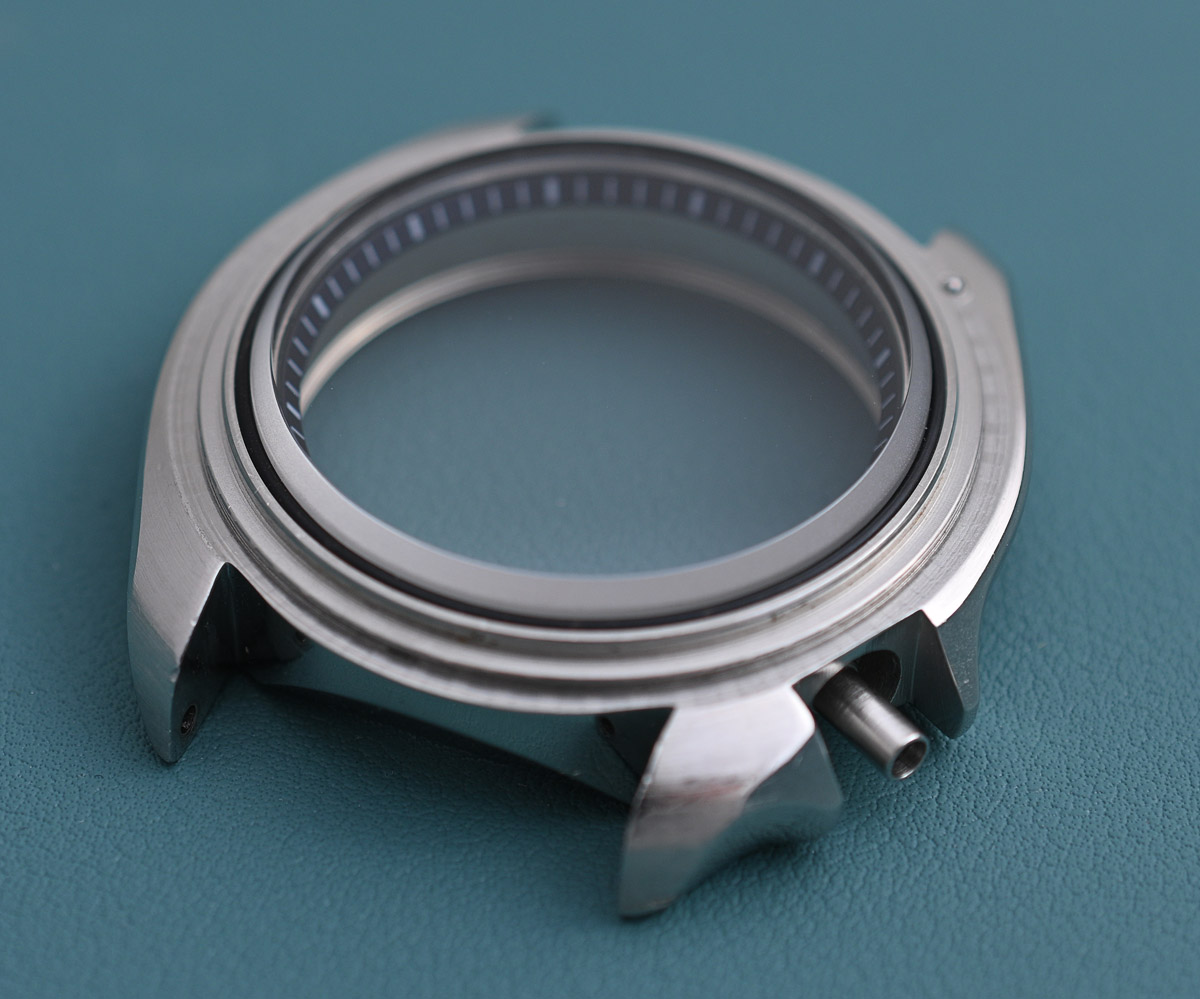
This crystal has the correct profile, a frosted bevel and is free from distracting coatings. It sits in an L-shaped gasket and is secured into position by a crystal retaining ring, pressed into place using a crystal press.
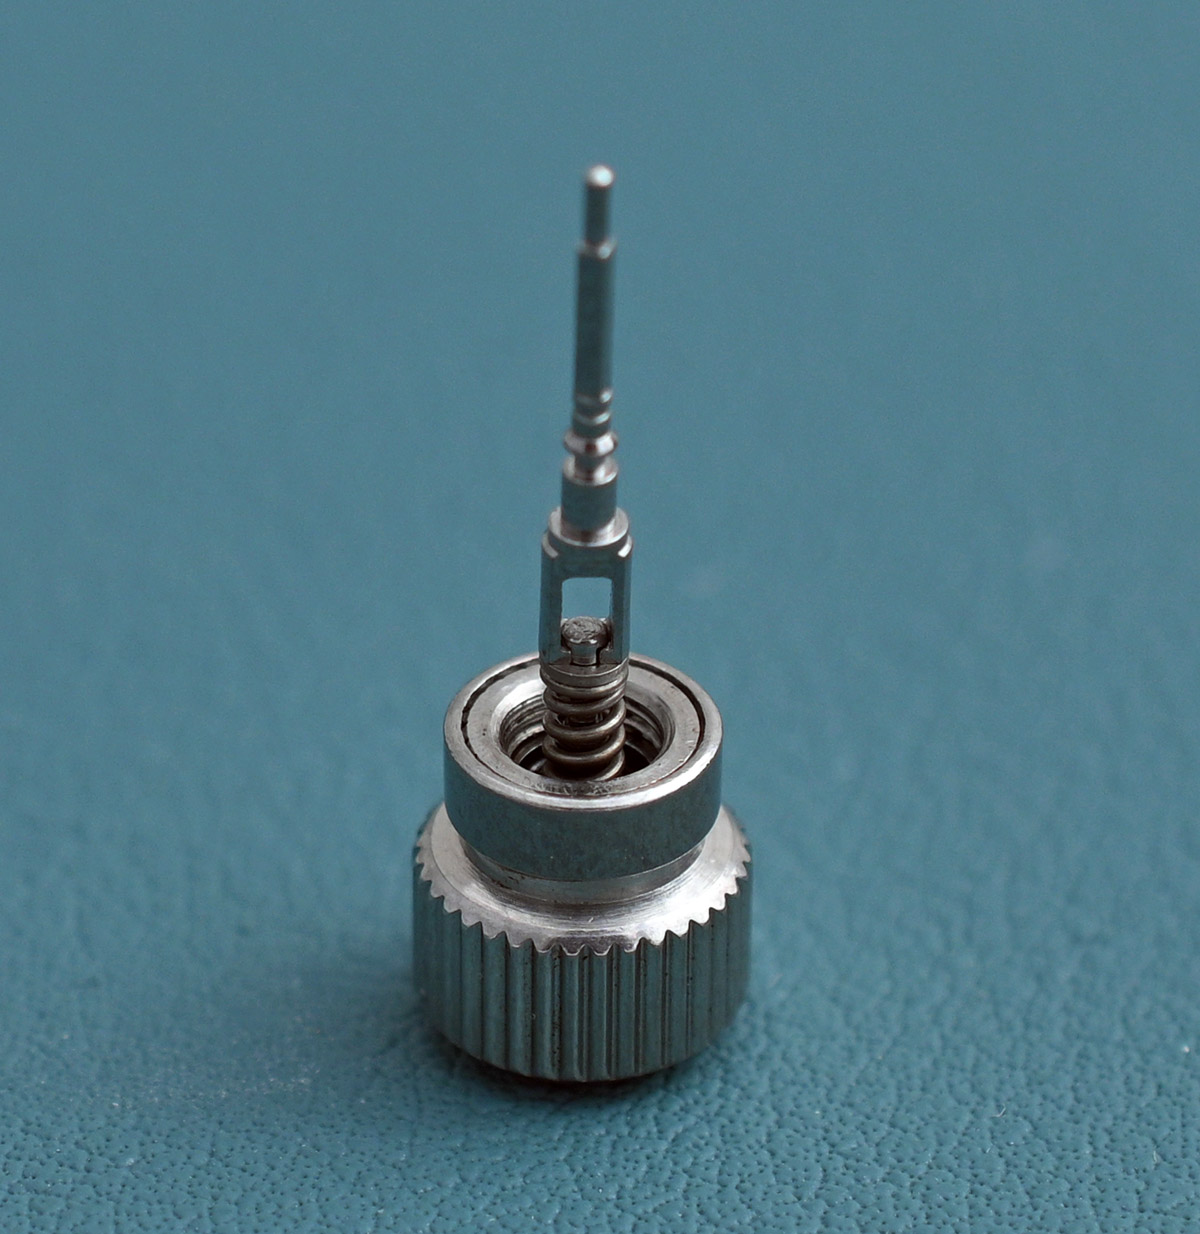
The last job before reuniting the movement with the case is to replace the worn-out gasket in the crown.
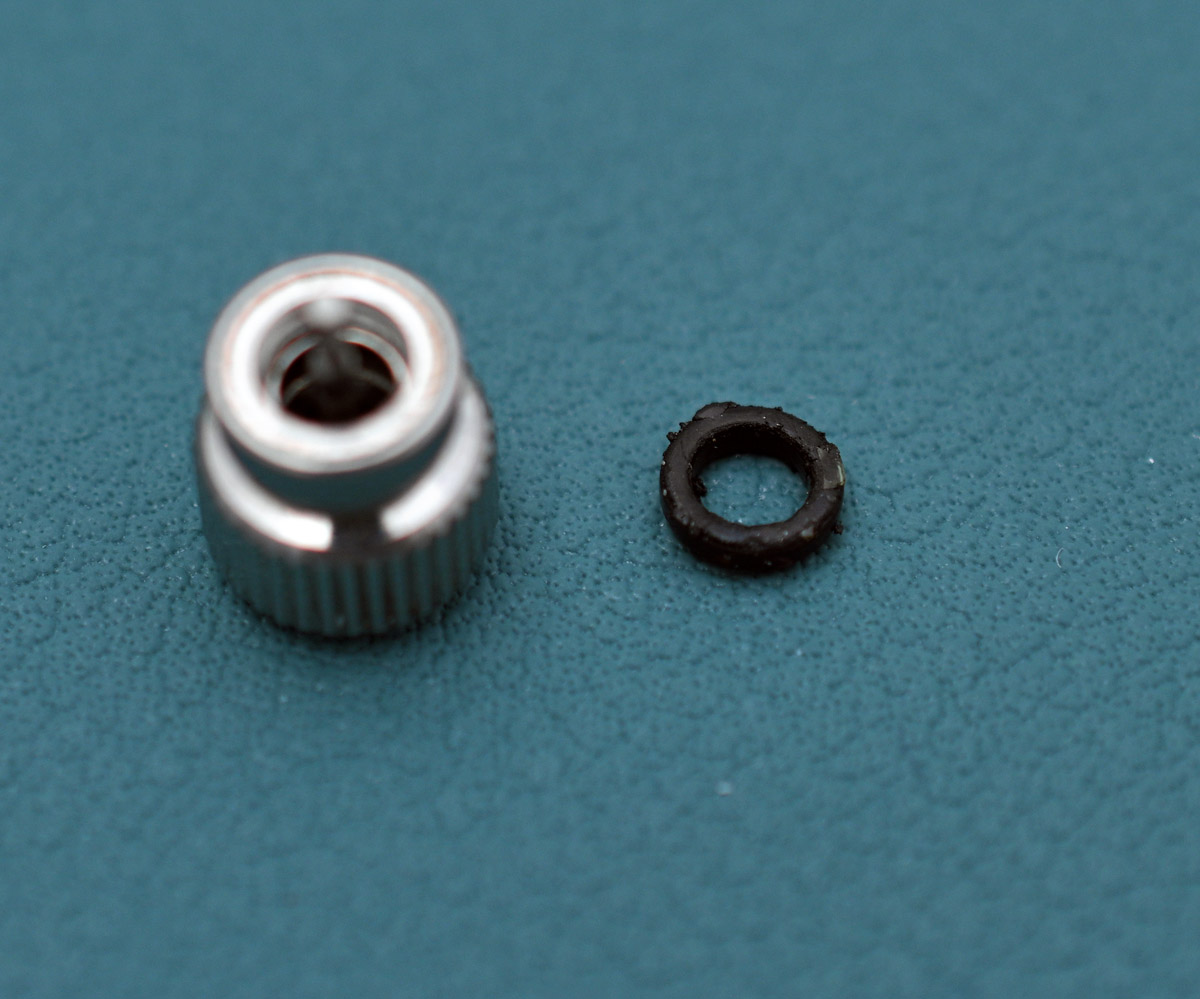
With a fresh gasket greased and fitted, the spring, washer and female part of the two-part stem can be reassembled.
We are all set now to reunite the movement and case.

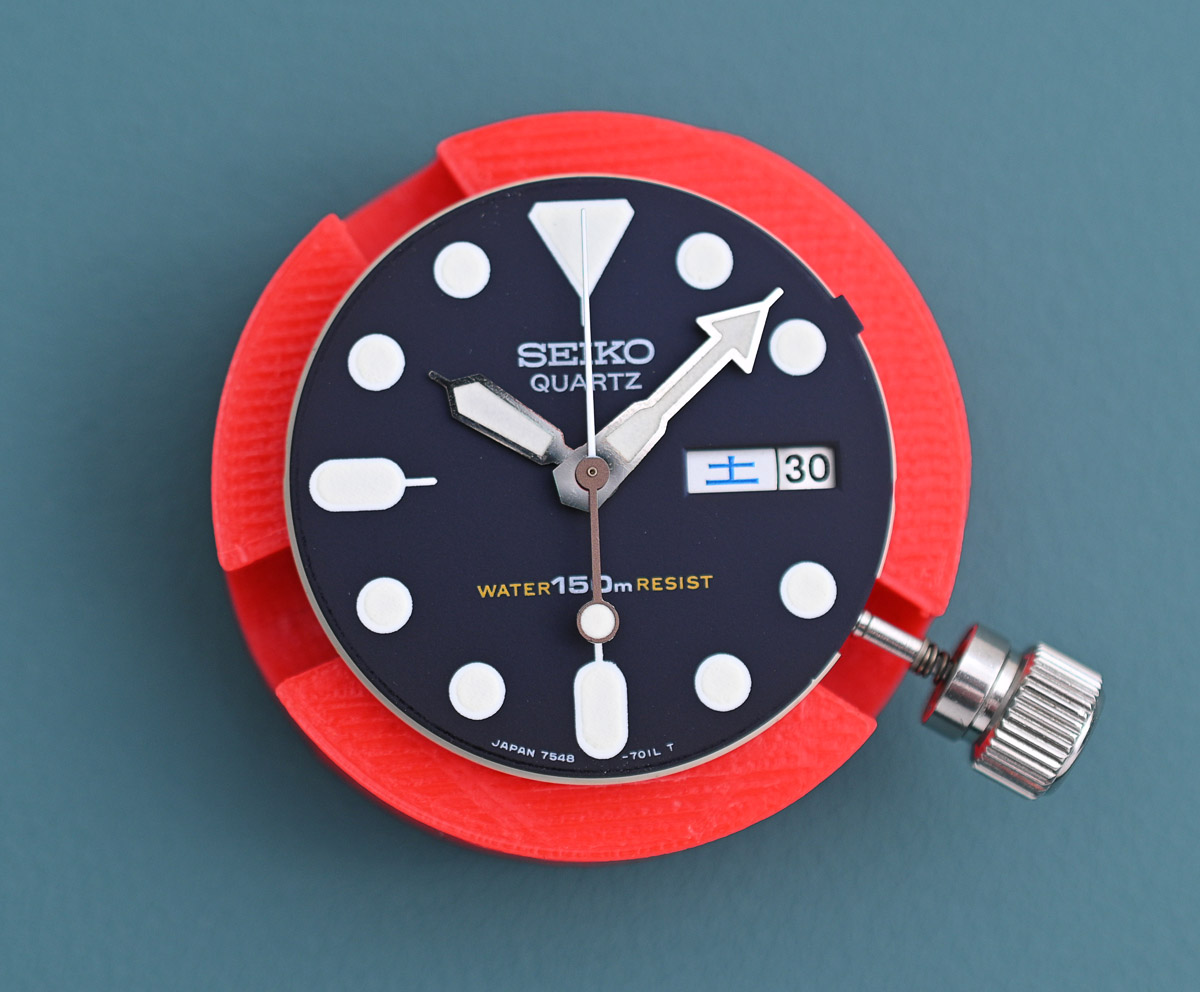
At this point we can confirm that everything works in situ by fitting a new battery.

It does. Case back fitted and we can check the alignment of the seconds hand with the markers as it works its way around the dial.
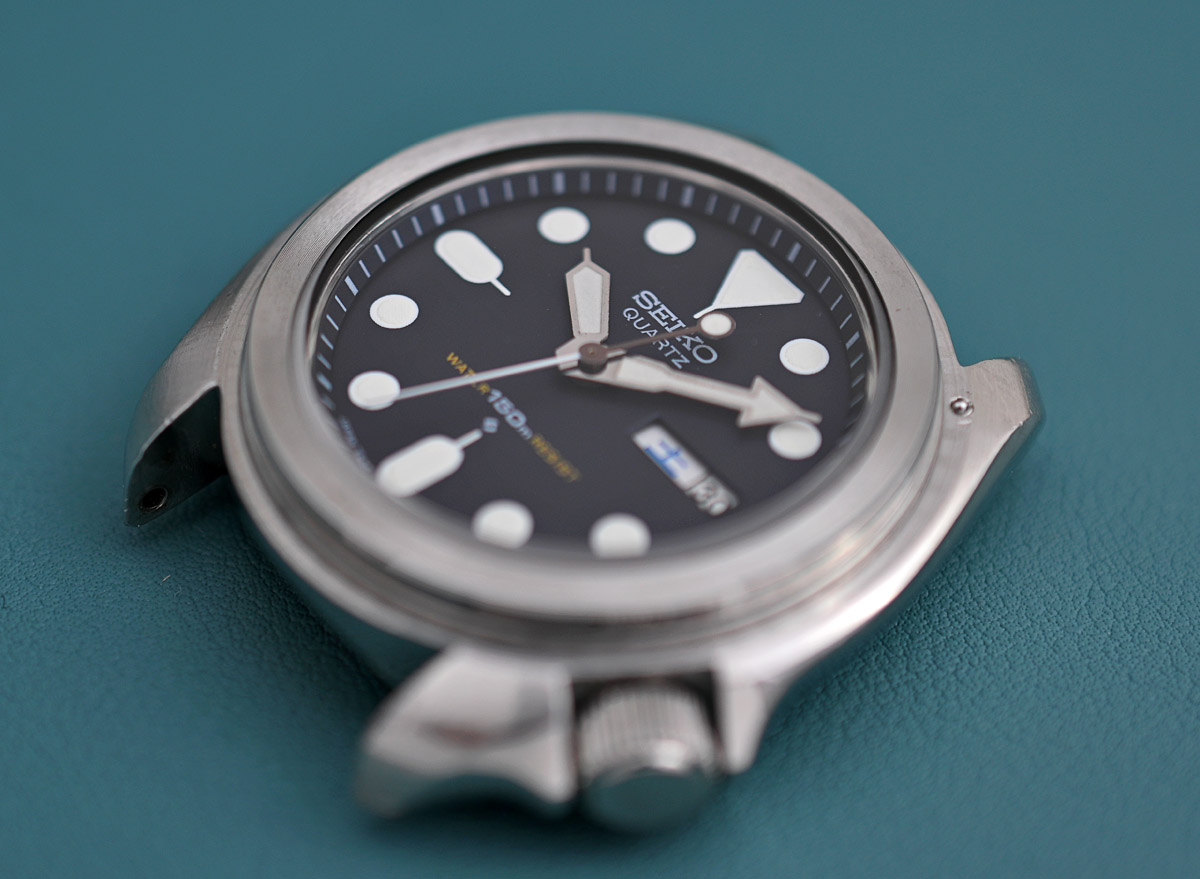
All that remains is to grease and fit a new gasket to the bezel and press it into place prior to selecting a strap. My choice for the latter employs the buckle half of the original GL831 paired with an aged but undersized partner that does the job for the moment, but which will need replacing in due course.

The stiff and weathered old strap complements the faded appearance of the watch itself although the pick n’ mix lower half can’t quite bridge the 22 mm distance between the two lower lugs!

Clearly, after all these years I am still drawn to these watches in spite of the fact that they violate my private code of practice never to wear or own watches with 22 mm lugs. In one sense, I comply with that principle because I rarely wear any 22mm lugged watches that pass through my ownership (my Seiko 6306 looks up at me dolefully from time to time as I ignore it for other slimmer-hipped competition) but I still like them. There is something ‘just right’ about this era of Seiko diver’s watch. It is uniquely styled, tough, very well engineered and fit for purpose. It’s just that it’s not my sort of watch. Even though it is.

Wow! Good that you decided to give this 7548 a second chance. The dial and bezel are gorgeous.
It’s a shame that it is so hard to find well preserved examples like yours in today’s market.
Thank you. I’m not sure that it is especially difficult. There seem to be a steady supply on Yahoo Japan but that may be a false impression based on my cursory attention.
Great work as usual..that blue dial colour is so subtle.
Thank you! It depends on the direction of lighting and viewpoint but you are right, it is subtle but also lovely.
I love the work you show us, and am thoroughly jealous of the collection of beautifully restored Seikos you are amassing. With the divers, the Pepsi bezel on black dials has never quite suited my eye, but looks at home on that blue dial.
Thank you. Yes, Pepsi on blue works a treat. The collection needs pruning though! It’s starting to get a little out of control.
Plenty of your regulars ready to help with the pruning, I suspect.
Hello Martin – I’m a fan of your watches and process but especially of your prose. While your work doesn’t (yet!) rise to the level of Patrick O’Brian, your writing is lovely.
Your readers all join your adventure and marvel at each step, while appreciating the humour, amusing turns of phrase and self-deprecating descriptions of victories and set-backs. Youtube is fine, in its way, but we readers vastly prefer to journey with you on more measured, thoughtful and creative plane. Very like fettling, I think.
Warm regards,
Bill
Thank you Bill. You are very kind. This is the format with which I am most comfortable and much better suits my process. Filming is far too intrusive and, as I discovered, difficult but it was a fun diversion for a while. Sometimes, you have to shake things up a bit to move onwards. I am glad you continue to enjoy the content. All the best Martin
I’ve inherited a7548 700B Pepsi from my bro in law who passed recently the watch was with him during his diving training F. I. T America sent to jewellers who sent away for service an bat not explaining what was required to repair didn’t even put the rubber strap I sent on sent a strap with it they sent back nothing they can do all parts discontinued /obsolete can you help bein the watch is sentimal to me
Hi Lee,
I am sorry to hear about the passing of your brother-in-law. His watch should be repairable, with all parts still freely available, if not as new Seiko replacements, then as aftermarket or sourced from donor watches. I would imagine that the movement just needs a service, unless the battery has leaked, but even that should be resolvable. All gaskets and the glass can be sourced too. However, I do not take in work at all – I just work on my own watches. You could try Spencer Klein though who I believe is based in Colorado. I know he is very busy so you may have a bit of a wait. Alternatively, Richard Askham in the UK may be able to help. Good luck. Martin
Hello,
I have the exact watch from about the same year which has recently started to run late. My local watchaker, after cleanning it twice and changing the battery, said there is nothing more he can do.
Would you be willing to work on it and bring it back to function on time?
I am in Israel and could ship it to you.
Hi Zeev, I’m afraid that I don’t take in work at all. This is just a hobby for me. Running late probably means it is stopping intermittently. If your watchmaker can find an old 7546, he could try swapping out the circuit block to see if that fixes the problem. Good luck. Martin
Hi Martin,
As ever, a fantastic article about a wonderful timepiece. Armed with your thoughts on what to look for in a vintage watch (no white glove photos, not ‘gussied up’, good, honest dirt in the right places) I’ve picked up my own 7548-700B minus it’s bezel ring. So obviously, the hunt begins for a suitable replacement. So, question for you; do the 6309 / 7000 series bezel rings fit the 7548 case, or are they 7548 specific?
Regards
Steve M
Hi Steve, the 6309 and 7548 case parts are all interchangeable. If by bezel ring you mean turning ring, then you may find that a replacement does not fit especially tightly and may be easily removable by hand. This is usually a sign of a worn case and there is not much to be done about that other than taking care not to knock the bezel. However, you may find that it makes for a tight fit in which case you are good to go! Good luck!
Thanks Martin!
Regards
Steve
I have enjoyed your article as I have 7548-700B 89121 that on sailing trip got we bit water intrusion but very little corrosion in edge of inner lid; battery seems clean. Jeweler indicated not worth repair but probably going to spend funds to get Seiko to evaluate to be cleaned, reconditioned or new movement as always liked this watch; it is in great shape otherwise. Any thought would be appreciated. Regards, Jim
Hi Jim, I would doubt that Seiko still have replacement movements for 7548 but they may still keep some spare parts. But it is still quite easy to find donor parts from 7546 quartz powered movements. I would say that these watches are absolutely worth repairing as long as you are not being charged too much of course! Good luck getting yours fixed up. All the best Martin
any chance you would give it a try as Seiko declined for lack of parts?
Hi Jim, I’m afraid that I do not take in third party work – I am just a hobbyist, not a professional watchmaker. Sorry!
Hi! I’m new to your site and wow… I’ll definitely be coming back for more. What brought me here was a search about the 7548. I have a really nice 700c but the crystal isn’t too hot, the rest is pretty great though. Removing the bezel is obviously part of your deconstruction of the watch, but I wondered if I were to just replace the crystal, would I need to remove the bezel? Some watches don’t require the bezel to be removed, so I thought I’d ask before potentially making a mess of things.
Thanks for your posts. 🙂
Eric
Hi Eric,
Thanks for your question. The crystal is held in place by a metal retaining ring that sits beneath the rotating bezel. So yes, you will need to remove first the bezel and then the retaining ring. The crystal will then push out from inside once you’ve removed the movement. You will find some of that process documented elsewhere on the blog. Maybe try Anatomy of a vintage dive watch revival (I think that’s what I titled that entry).
I hope that helps
All the best
Martin
Hi Martin,
Thanks so much. That helps a lot. And I also found the article you mentioned. Again, thank you so much. It’s perfect. Now the next step is buying a new crystal and seeing how I do.
Beautiful review, thanks for the details.
Yes, the 7548 is a nice movement. Ever tried a 7C43? They got even the mid-sized diver (7C43-6010) with 20mm lugs (for avoiding the 22mm code…)
The larger 7C43-7000 looks much the same as the 7548, but is absolutely not.
I quite like the look of the mid-size 7C43 divers but put off by the potential difficulty in finding replacement crystals. But I’ve not tried that hard. Maybe I’ll keep my eyes open for one. Thanks for the suggestion.
If you find one, you will discover, it’s plastic fantastic inside… Main-plate is plastic. Had to fix mine 7C43-7000 as it did not work. Luckily it was in a lot with another 7C43, that was really bad, but had the necessary parts to get it going again…
Found it harder to work on, than the 7548.
I have owned this Seiko dive watch since 1985. It was manufactured in May 1984.
It served me well during my 12 years in the army and lots of dives. It has a faded Pepsi bezel that I can’t bring myself to replace. I still wear it daily and it still tells accurate time.
Wonderful! The 7548 quartz movement is amazingly robust as long as you don’t leave dead batteries installed for extended periods of time.