
Tags
It is easy to develop a misapprehension, when first dipping one’s toe into the pool of what a particular watch company’s vintage back catalogue has to offer, that every watch is fitted with one or other minor variation of the same movement calibre. I plead guilty to forming just such an impression during my formative years as a vintage Seiko obsessive. It seemed to me at the time that pretty much every watch worthy of consideration was fitted with some variant of the Seiko 61 or 62 series movement, with the lesser fare served by a movement caliber beginning with a 7. The honorable exception to the rule was the Bell-Matic with its innovative 4005/6. It is all too easy to categorize as a result every Seiko as a non-hacking auto lacking a manual winding facility and further to conclude that the middle of the road staple Seiko movement is placed a notch or two below the lofty sophistication of say an ETA 2472, only countering in its ability to run for decades without maintenance.
Until relatively recently, my perspective on the Seiko movement landscape of the 1960’s was of a foundation defined by the venerable 62 series, fitted in various forms to all and sundry from aspirational to royalty, and subsequently replaced by the 61 series, also fitted hither and thither to pretty much all levels within the Seiko model hierarchy. However, that perspective fails rather to take account of a number of sophisticated, beautifully designed calibres sitting left of field, one notable example being the svelt 83 series automatic, which made its entrance as early as 1963.
The base 830, an automatic without calendar function was fitted to the Seikomatic Slim released in August 1963 and marketed for its slender profile.

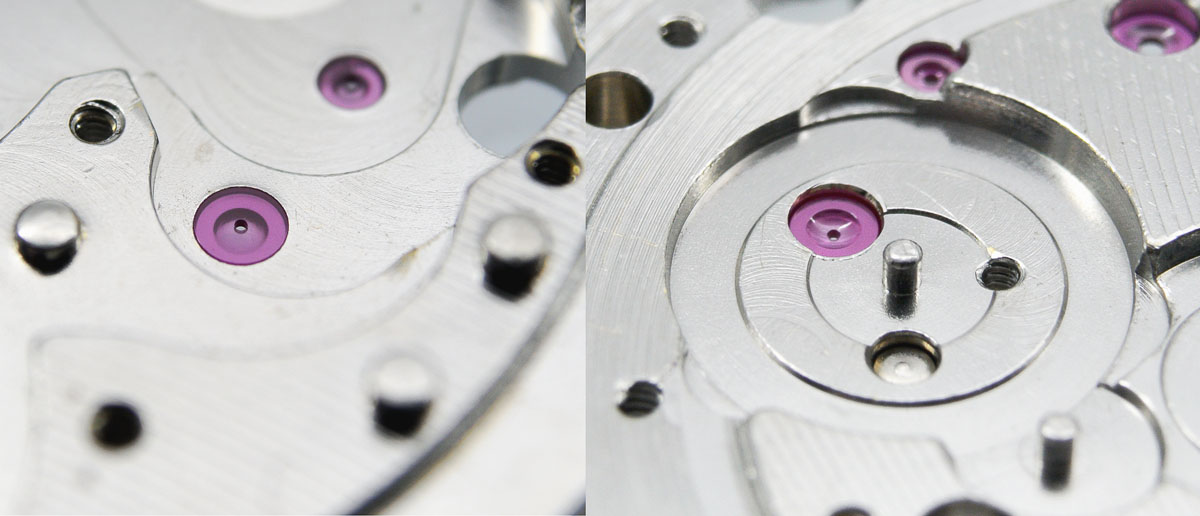
The sleek Seikomatic 830 (left) compared to the heavier-set Seikomatic Weekdater 400 (right)
At 28.6 mm diameter, the 830 calibre was a little wider than the 603 fitted to the first Seikomatic released a few years earlier, but at 3.8 mm thick it was a full 1 mm thinner than the 603. This allowed for a notably shallower case back and consequently for a watch that sat lower on the wrist. This lack of height was achieved by incorporating the autowinding mechanism into the main architecture of the movement, concealed beneath its own bridge at the same level as the train wheels. A date complication was introduced in June 1965 in the 840/8305B, resulting in an increase in height of 1mm but still 1 mm thinner than the equivalent dated 62 series movements. The C variant of the 8305 followed a few months later, now also featuring a hand winding facility. All variations of this movement were highly jeweled, every one of which serving a purpose.
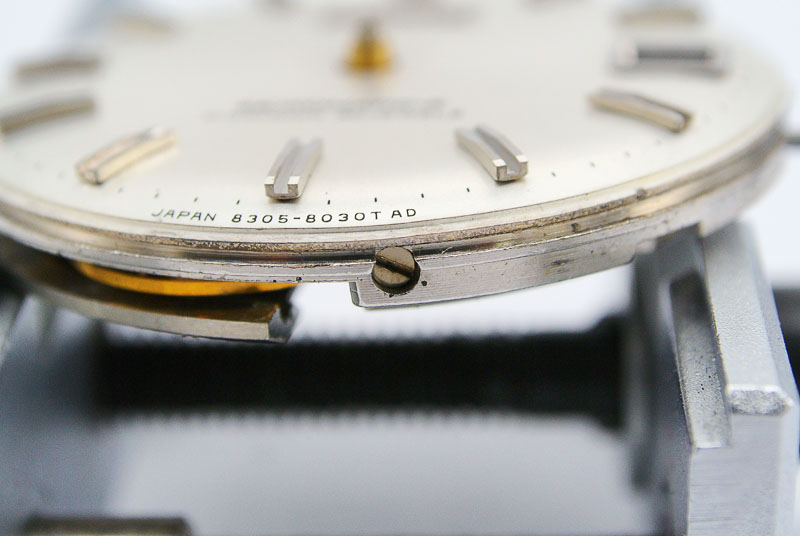
This brings us nicely to our subject, an 8305-8030 Seikomatic-R, dating from October 1966.

This particular model was released as part of a drive by Seiko to expand its Seikomatic range into the business market. The somewhat more conservative styling, aping to an extent the ‘60’s Omega dress watch aesthetic, aligned with that ambition. The incorporation of a manual wind capability in the 8305C fitted to this model also resulted in the relocation of the crown from the 4 o’clock position in the earlier 830 and 840 models, to the more accessible 3 o’clock.
The age of my example is hinted at largely through the scuffed condition of the crystal and the presence of plenty of case grot but otherwise it appears to be remarkably unscathed by the 50 years or so of its life. One aspect of the watch not apparent from the view from the front is that, in common with some of the contemporary dressier Omega Seamaster watches, this particular model features a one-piece mid case.

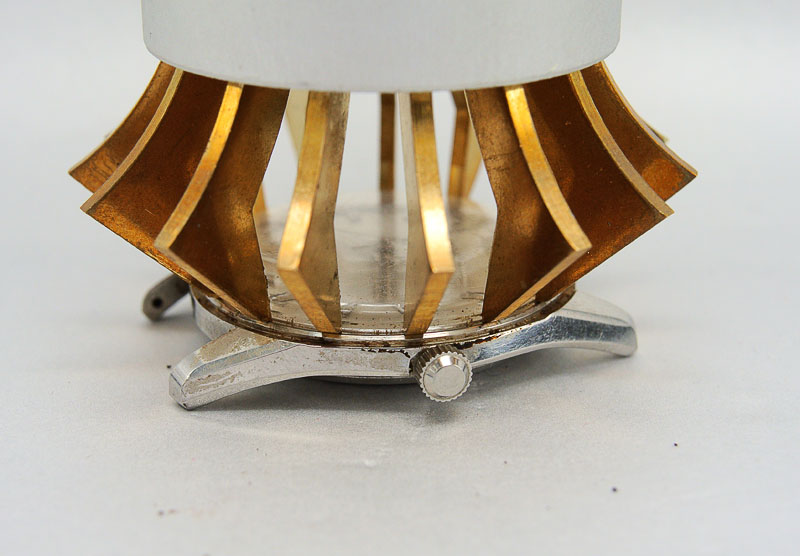
The relative lack of wear to the case is evidenced by the presence still of the crisply embossed dolphin, there to trumpet the water proof credentials of the watch. The advantages offered to water resistance in the unibody case are offset to an extent by the resulting obstacle it presents to the gaining of entry to the innards. The first step is to remove the bezel surrounding the acrylic crystal, in the process revealing the inevitable build up of dirt and some corrosion beneath.

The crystal is compression-fitted to the case, aided by the tension ring sitting around the inner circumference of the crystal. Its removal requires a tool to compress the crystal so that it releases its grip on the case sufficiently to aid removal. I do have a Seiko S-14 one piece case opener but the set I purchased is missing the correct crystal tightening ring for this watch and so I have to use my conventional crystal lift to extract the crystal.

The next problem is how to remove the crown and thence the movement when the setting lever pin is located to the rear of the movement. Closer inspection of the channel around the dial adjacent to the crown reveals a helpfully dimpled tab. In the spirit of Alice in Wonderland, I take up the implied invitation to ‘press me’.

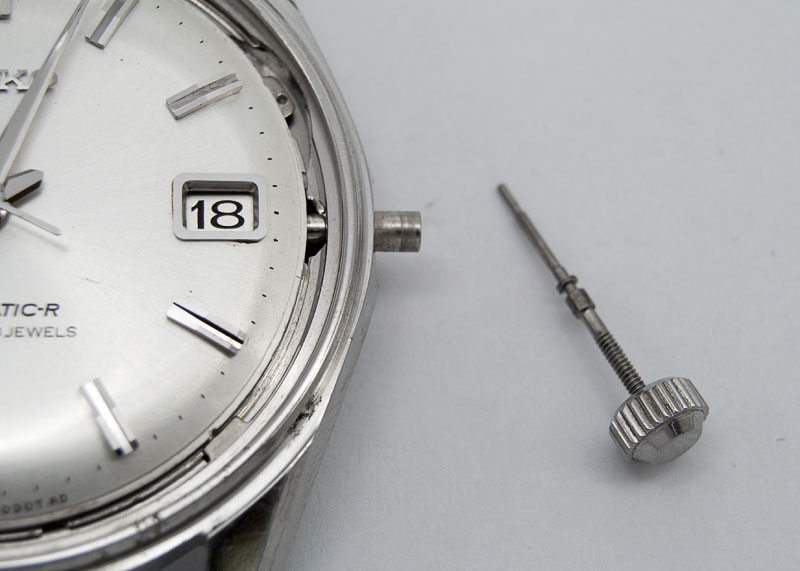
Success!*
With the stem released we still need to rotate the case spring around so that the inner tabs align with strategically located gaps at the edge of the movement main plate.

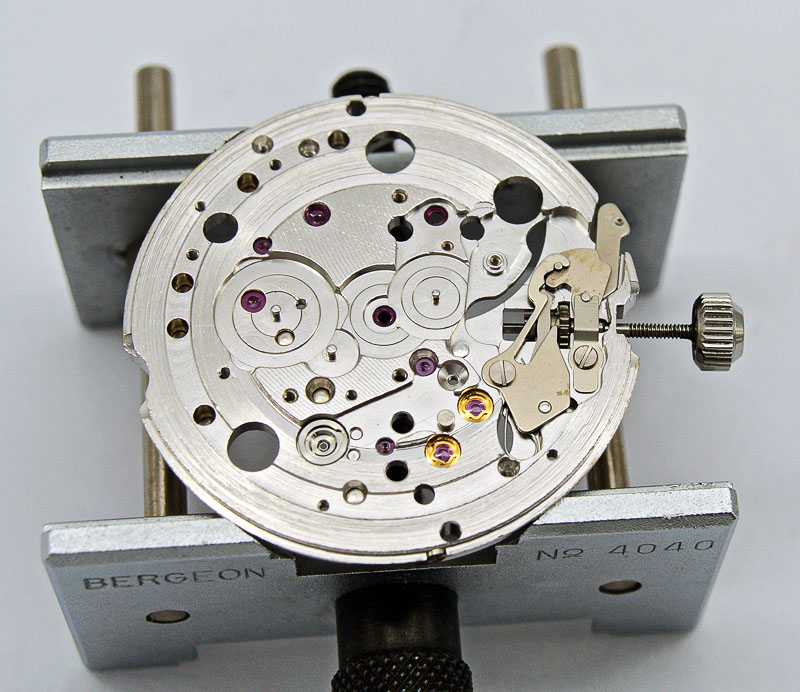
Finally, we can incline the case and carefully ease the movement out. With the movement safely sitting on a movement holder, the lovely condition of the dial, markers and hands is easier to appreciate.

The convex dial curves down to meet the edge of movement main plate, leaving no room for a dial spacer. With the hands removed, the dial comes next, once the recessed screws gripping the dial feet have been loosened.
The view provided of the calendar side yields no surprises; a conventional layout not dissimilar to that used on the 62 series.

I’ll proceed from this point more or less in the order suggested by the Seiko technical guide, starting conventionally with the calendar side, stripping it down as far as the keyless works.
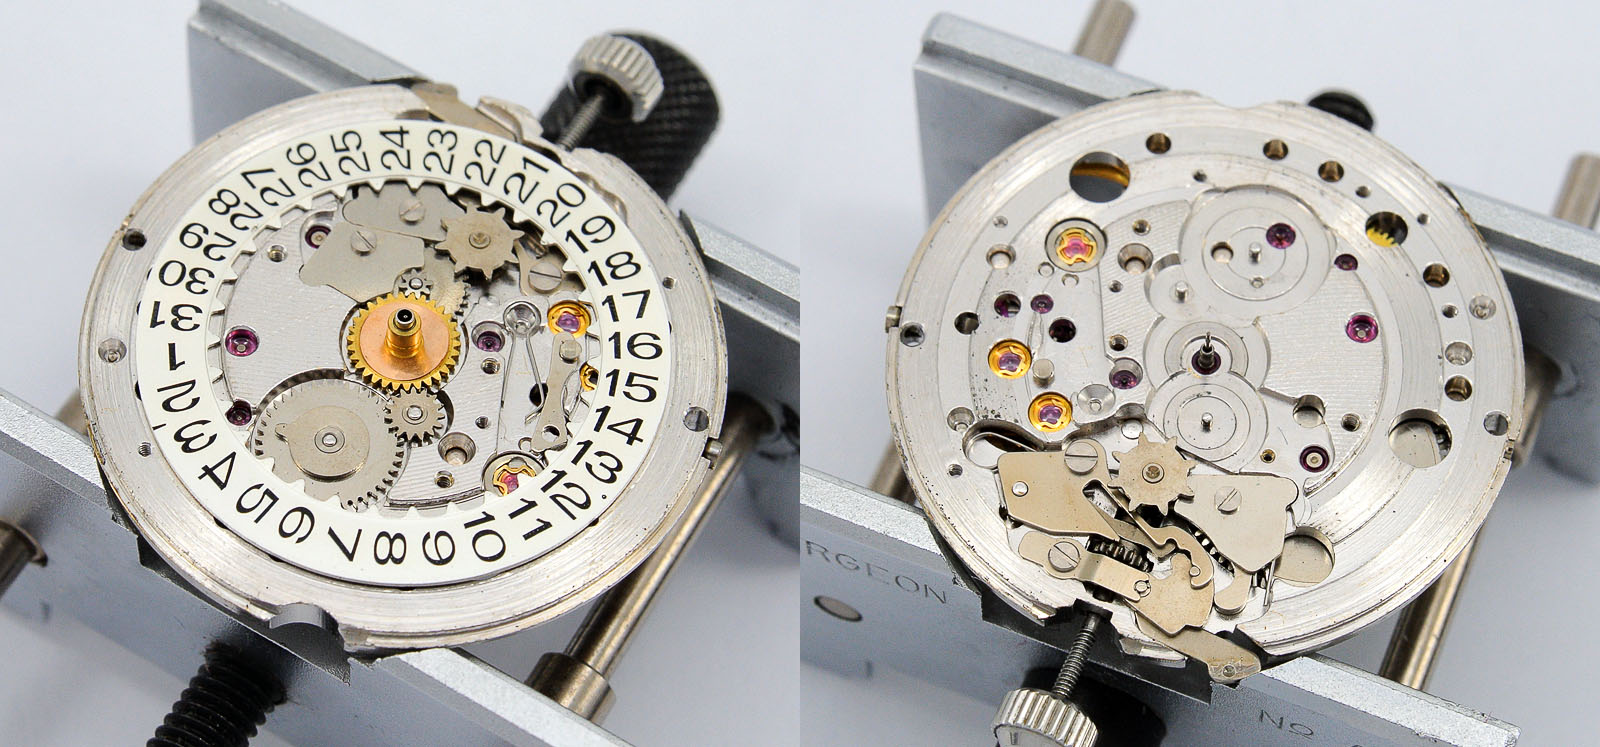
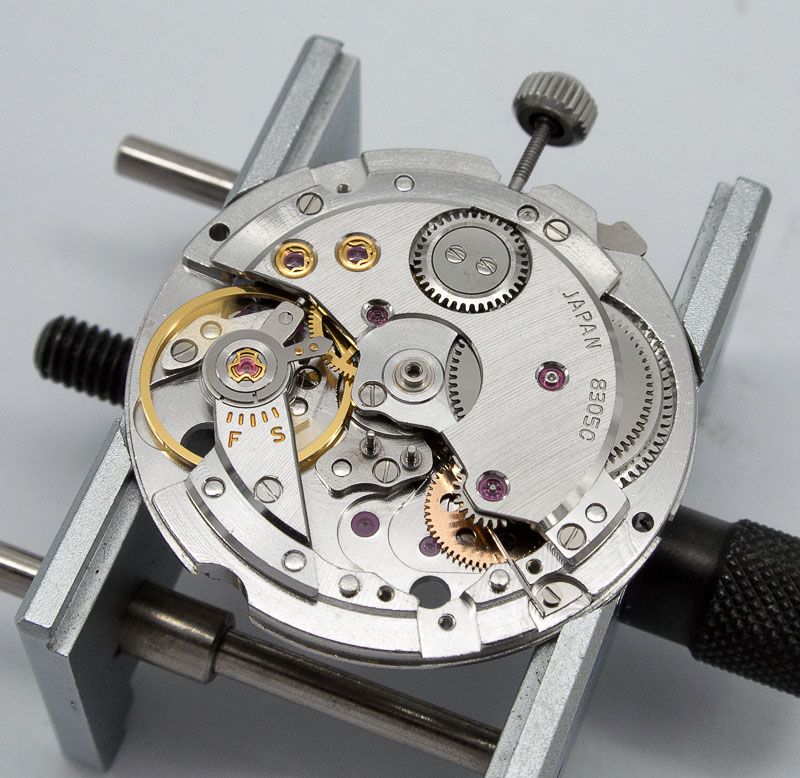
Once we’ve got to this point, we can flip the movement over and survey it from the rear, a view not offered until now because of the absence of a removable case back.

We can get a better view of the layout of the movement on this side by removing the rotor (oscillating weight). In particular, this allows us to see where the automatic winding mechanism has been secreted.

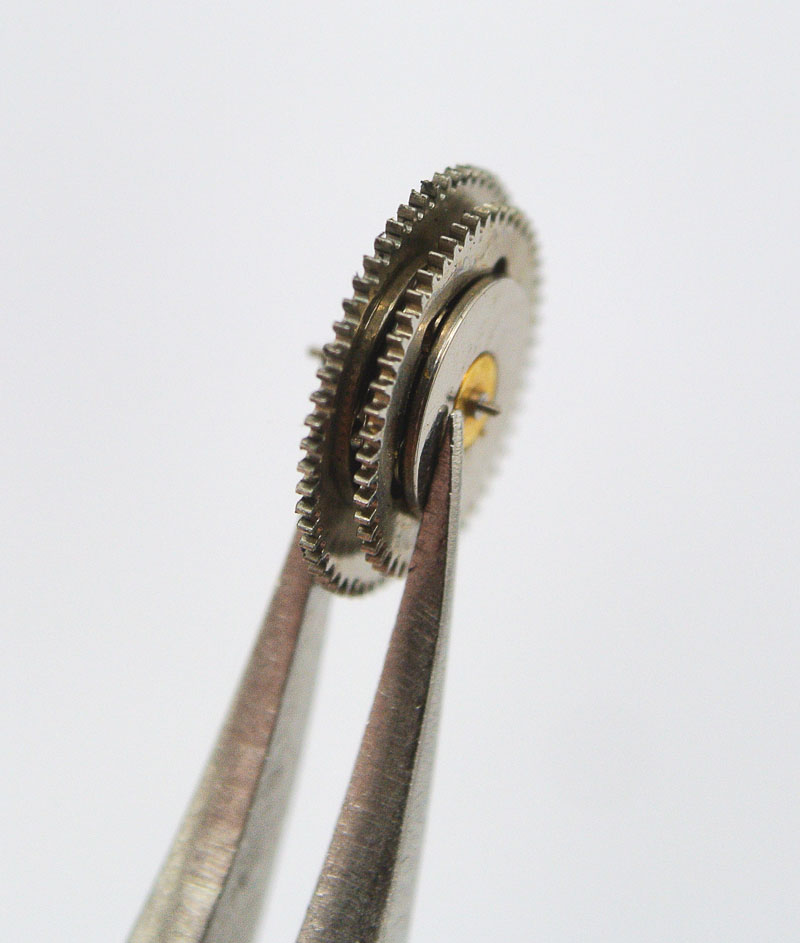
The disassembly of the automatic winding mechanism proceeds as follows: first remove the locking wheel bridge (top left and right, below), followed by the roller locking wheel (the multi-tiered wheel) and the first reduction wheel; next, remove the second reverser idler before levering off the first reverser idler which is secured to its post by a snap spring.
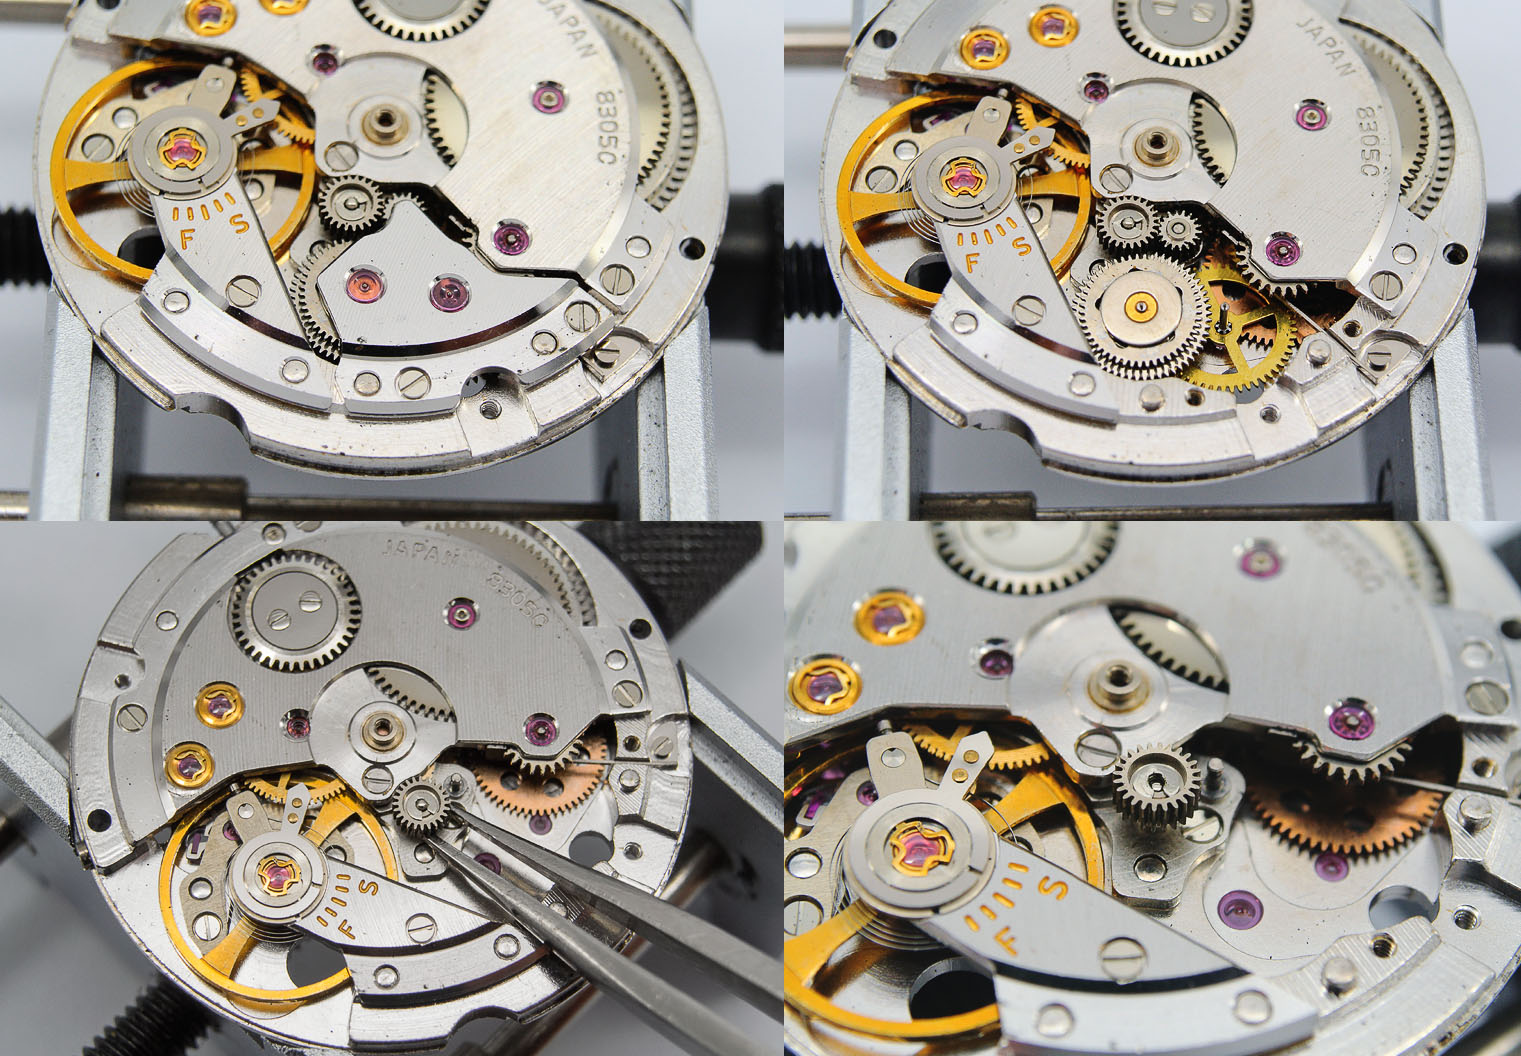
The transmission route provided by the rotation of the oscillating weight is shown in the figure below, taken from the movement technical guide:

The purpose of the roller locking wheel is to ensure that regardless of the direction of rotation of the oscillating weight, the ratchet wheel which winds the mainspring always rotates in the same direction (anticlockwise when viewed from above).
Next we turn our attention to the crown wheel ring (there to provide the hand winding facility) which is secured in place by two neat little polished screws. The ratchet click and train wheel bridge follow.

In contrast to the conventions adopted in Seiko’s more mainstream movement designs, the sweep second pinion sits separately on top of a friction spring and is driven by the third wheel. You may also have noticed from this sequence of photos that the barrel arbor is jeweled along with every other pivot bearing, two of which, also benefiting from Diafix settings. This is a movement whose generous jewel count does not flatter to deceive. I know I keep going on about this, but I find it slightly perplexing and vexing that Seiko can secrete such a beautifully engineered movement in a relatively low key and conservative watch whilst playing silly marketing games with jewel counts in more mainstream upper market watches to disguise the more homespun origins of the movements fitted to those models. All a bit odd but an interesting perspective on the extent to which marketing considerations drove engineering decisions at the time.
Removing the train wheels, ratchet wheel and barrel allows access to the centre wheel bridge, whose secondary role is to provide a platform for the first and second reverser idlers in the auto-winding mechanism.
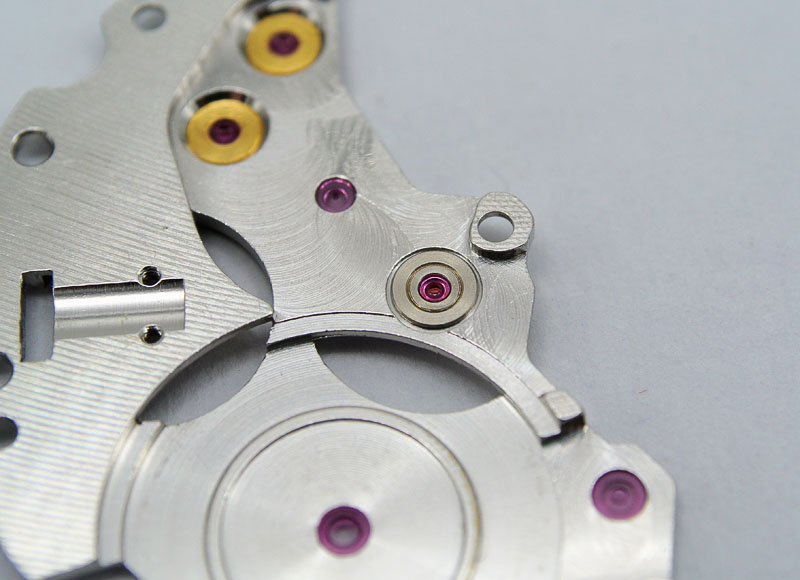
As we approach the half way point, it is worth pausing first to note how the dimpled tab sits in relation to the setting lever, there to aid removal of the stem from the dial side of the movement.

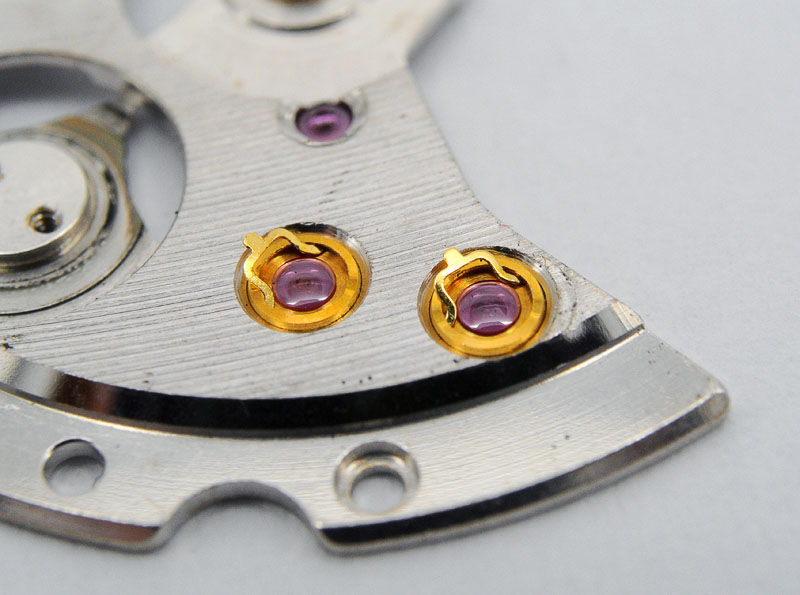
And just because I like the image, two Diafix springs leaning nonchalantly to one side, allowing access to the two cap jewels.
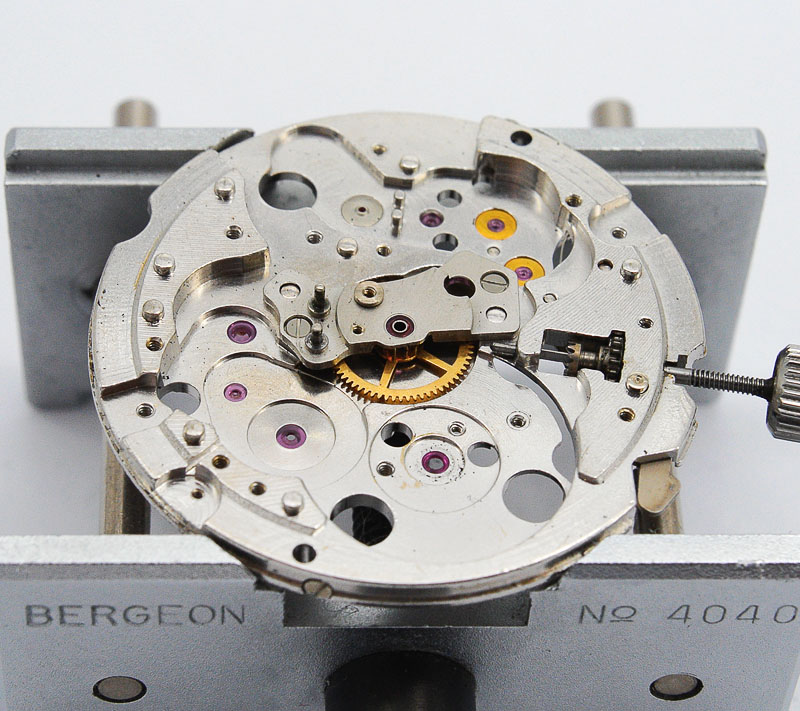
Prior to cleaning the movement, I took the opportunity to see how the movement is secured in the case by the case spring. With all the fixtures and fittings removed from the mainplate, we have an unobstructed view of how the movement sits in the case and how the two tabs on the case ring prevent the movement from jiggling about. The outer circumference of the mainplate sits on a ledge around the case aperture, allowing room for the oscillating weight to rotate clear of the rear of the case. The case spring then sits in its own groove above the ledge with two tabs pressing down on the upper edge of the movement edge.

In order to remove the movement, you have to rotate the case spring anticlockwise until the two tabs align with two gaps, one at the 3 o’clock position and one at about 8.30.

After a thorough clean, the constituent parts are ready for reassembly but an inspection of the bearings on the mainplate reveals a chipped jewel serving the roller rocking wheel.
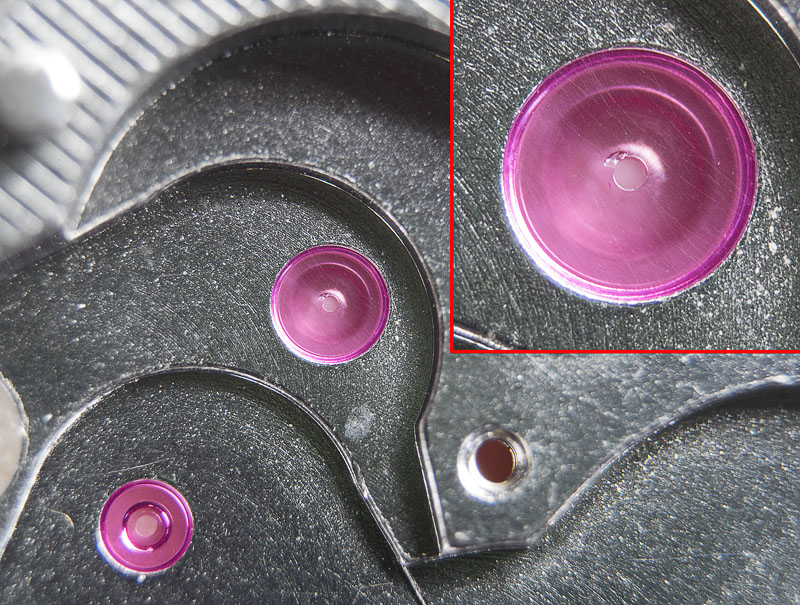
Were it not for the fact that I have recently acquired a Seitz jeweling tool, I would probably have chosen to ignore it and hope for the best, the jewel in question not impacting upon the running of the watch but on the auto winding mechanism.

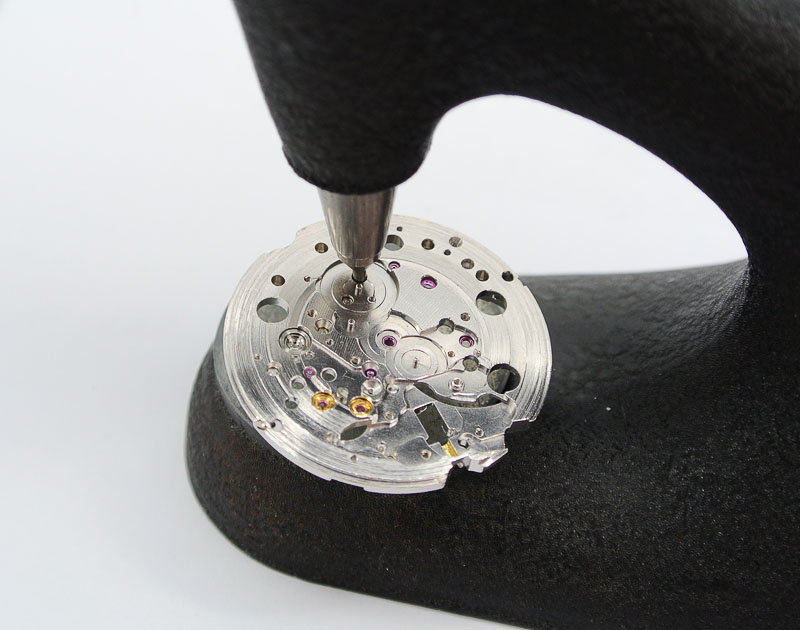
However, the chipped jewel provided me with an excuse to try out the new tool. Removing the damaged jewel requires selection of an appropriately sized pusher and an anvil that sits on the reverse side holding the movement flat and providing enough clearance to allow the emergence of the jewel as it is pressed out of its setting.
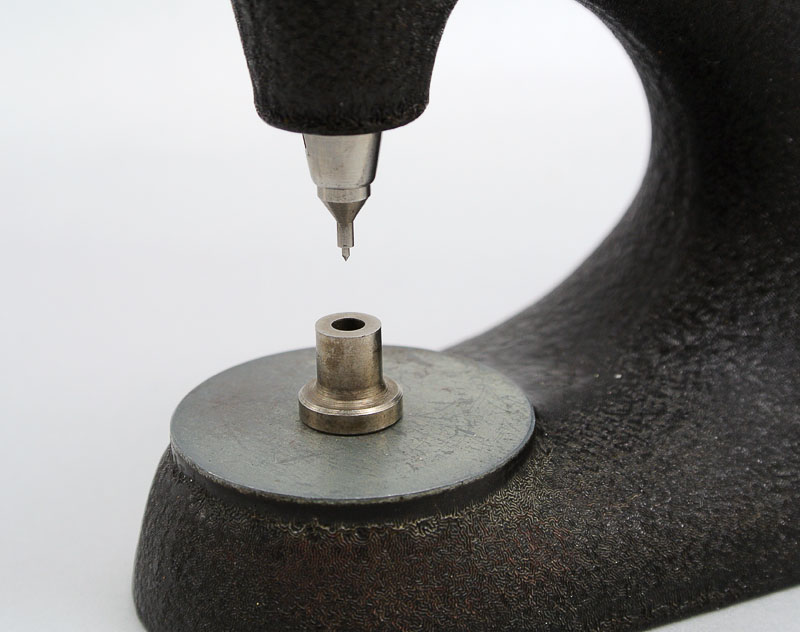
In this case, the landscape on both sides of the mainplate was obstructive and in the end I had to press it out from the oil reservoir side with barely enough clearance on the upper side of the movement to allow the anvil to sit flat.
Here’s the damaged jewel (left) sitting next to its new replacement (right):
And here’s the new jewel pressed back into place, viewed from both sides:
You may be able to appreciate the difficulty presented by the movement architecture in finding an anvil of the correct diameter to sit flat whilst also having a hole large enough to accept the outgoing jewel. Before pressing on, I checked the end shake by test fitting the roller locking wheel and its bridge.

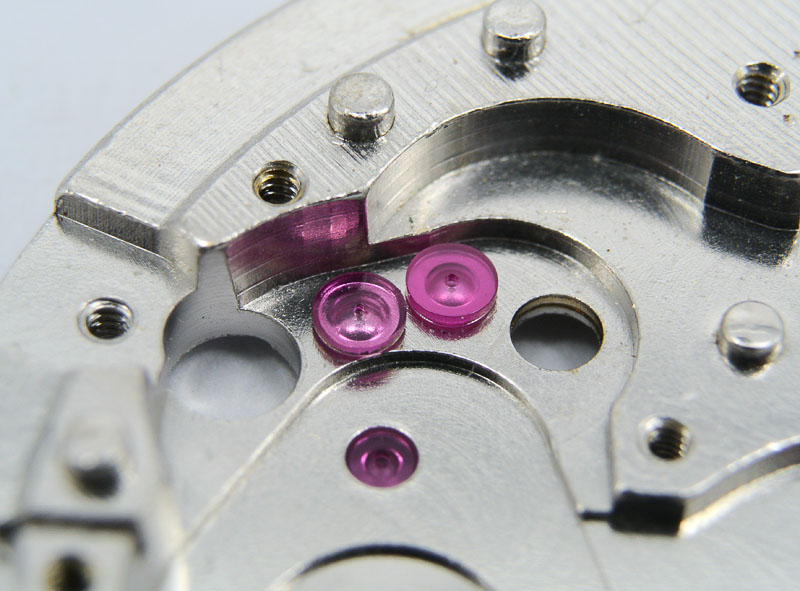
Next up, Diafix settings and mainspring. Mastering the dismantling, cleaning, refitting and oiling of Diafix jewels has for me been one of the more challenging elements of getting to the point where I feel I kind of know what I am doing. The simple business of realizing that it is best not to remove the springs altogether is a right of passage well known by many a vintage watch dabbler. It is also I think fairly common to attempt to oil the cap jewel prior to reinstalling it but this is almost guaranteed to result in the oil spreading all over the place rather than sitting in a neat circle at the centre of the jewel. The way to oil these settings is to refit the cap jewel first and then to oil the setting from the other side using an automatic oiler. I use a Bergeon 7718.

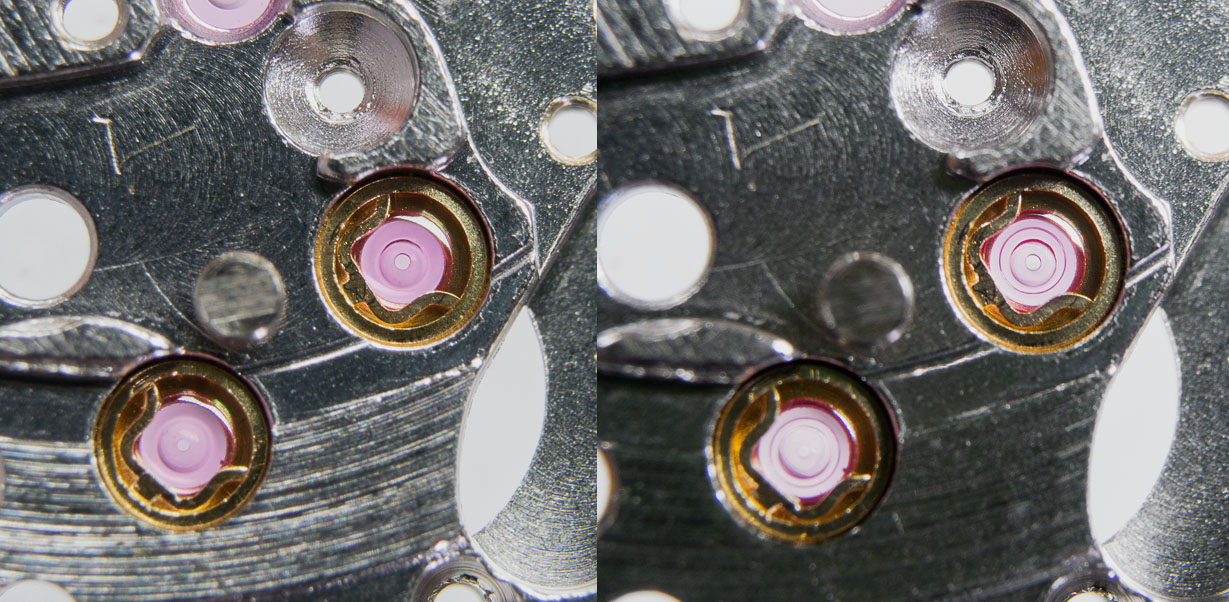
The proof of the pudding is in the eating. Below left, the two mainplate Diafix settings with cap jewels refitted dry. And to the right, both now oiled with the Bergeon oiler. A perfect quantity of oil deposited dead centre.
The next bit that has in the past ended in mild calamity is the removal, cleaning and refitting of the mainspring, these days achieved usually without disaster.

We are now ready to reassemble the movement, starting dial side with the keyless works,
followed by the centre wheel, its bridge, the sweep second pinion friction spring, second reduction wheel and barrel.

The trains wheels go in next followed by their bridge. You will notice that the top of the sweep second pinion sits in a jeweled bearing hidden in the underside of the bridge.

It’s all down hill from here. With the train wheel bridge and balance fitted, we can wind in a bit of power and check that the movement is running satisfactorily before proceeding further.
Getting the automatic winding bridge seated proves to be a bit of a fiddle but we get there in the end.

The final part of the puzzle on this side is the winding weight. With the mechanism itself located within the movement proper, the rear of the rotor is free from the magic lever and associated parts and all we are left with is an elegant gear and bearing, the teeth of which mesh with the first reverser idler gear.


The calendar parts are straightforward and in a jiffy we are ready to refit the dial and hands,

and re-case the movement.

The crystal proves to hold up proceedings for a week or so. I thought I might be able to get away with a generic 31.5mm tension ring equipped acrylic but these turn out to have tension rings whose diameters are too large resulting in a slight gap between the edge of the dial and the inner edge of the tension ring. There being no UK suppliers of the correct old stock part to which I have access, instead I manage to source a correct crystal from a seller in Germany. It arrives within a few days and tops things off splendidly.

I wasn’t going to remark on the timekeeping out of the box other than to note that the amplitude on full wind is hitting 309 degrees. And that is with its original mainspring. Not bad for a 50 year old. One concluding shot on a nice new croc.

* Eagle-eyed readers may spot that a bit of poetic license has been used here in the sequencing of these two photographs.
Acknowledgements: My research efforts have been greatly helped by the wealth of information available at the fantastic Seikomatic resource at http://matic6246.web.fc2.com/

You sir are a grand master 9 th degree bad ass. Love what you do with these pieces.
Thank you!
Hello Martin,
The article was interesting to read. I have recently acquired a seikomatic 6206-8040, there was a crack in the crystal. I managed to get the bezel and crystal off and have replaced the crystal. I wanted to ask how you can get the bezel back on? Is there a special tool? Any advice gratefully received. Thanks.
Hi Raziel,
You will need a crystal press with an appropriately sized die that is also deep enough to clear the crystal.
Good luck!
All the best
Martin
incredible job. these seikos are marvelous. I want to buy SEIKOMATIC-P with 33J
as always,I enjoy reading.
Thank you. I have a couple of Seikokatic-P’s in the stash somewhere and at some point one or other may make an appearance here.
yes please, I would be happy to see transformation of the seikomatic-p.
Another great post. I really look forward to these and appreciate you sharing with us. Now I want a Seikomatic too!
Thanks Martin!
Best,
Steve.
Great article. Posted it and the link to here on my watch forum. Thanks for the great research and blogs. Drop by some time. Also shared through the watchlords twitter and FB accounts
Love reading your articles. If only I had more time to delve right in to the movements like you. Currently doing a little case restoration on Bulova deep sea with similar corrosion spots as seen on yours. Cleaned up with rubbing alcohol and toothbrush and warm water.
Question, If the corrosion is not overly pitted, is it worth trying to gently remove material with something like a dremmel? or best to leave alone?
My approach to pitting is to remove as much corrosion as possible manually but to keep power tools out of it!
Hi Martin,
Very nice post as usual !
I have a question, you said in this post : [ I do have a Seiko S-14 one piece case opener but the set I purchased is missing the correct crystal tightening ring for this watch and so I have to use my conventional crystal lift to extract the crystal.]
Compare with the S14, does the conventional crystal lift does the job as well… I have a one piece KS 5625 and I am wondering if that crystal lift was good enough or if it was risky somehow. Thx!
PS : I want to ask a geneal question about watchmaking, can I ask it to you somewhere on your website (or here to be deleted later) or on your email ? I am thinking to start feddling with a few seiko watches to preserve them (maintenance) and you seems a very knowledgeable person about seiko watches.
Jerome
Hi Jerome,
Both my conventional lift and the S-14 tool are designed for use with tension ring equipped acrylic crystals. If your 5625 has a Hardlex crystal (as I suspect it does) then you should not need the tool at all. The crystal is glued to a metal ring and with the bezel removed you should be able to lever the crystal out of the case with a finger nail.
If you want to correspond directly, then write your email in a comment and I’ll email you. Your address won’t be visible on the blog.
Martin
Thank you for your reply! and for the advice on the type of crystal. I think you are right about it, I had heard for this metal ring on this type of crystal but as I have never seen the dfference between all those crystals (tension ring or not). It is still pretty abstract to me at the moment.
I wanted to correspond with you because I bought last year on Yahoo auction, a 5625-7040 KS and GS 5722 later on. From the outside they works ok but I want to give them an overhaul (also they seem needing one). I spent a while saving for the cost of for the overhaul and recently I decided to go a serious watchmaker shop in my city (Brussels) that seems to be the only professional shop I could find around. The 2 tenants seem to be serious watchmakers (studied in Geneva, etc) and deal with the watches all by themselves (In contrary to other shop I went that subcontract to somewhere else the job to do). So I went there and I got very disappointed because they told me where not dealing with brands like Seiko that bring them too much trouble. According to them the part break off too easily and they may end up working 4-5hours more than planed. As soon as I heard that I thought that they simply have no idea of what they are talking about and they just have pre-conceived idea on the asian watches and their low cost models. Now I am thinking to do it by myself. I also realized that even a good watchmaker if he is not familiar with vintage Seiko at all, he may know how to process with the watch (the hardflex crystal on the 5625 for example). Do you think it is something that I could manage to do on my own ? Or maybe I should do it under supervision… What do you think ?
– The first step is to remove the bezel usually. It is never showed on the internet how to do it (I have not found any info on the web, they only show how to do it with Divers watches). Do I need a special tool for that ? They always snap out ? or Do they screw ? When I look at those two watches (5625 & 5722), I feel like it is going to be hard and I have no idea how to start without damaging them. By chance, would you know ?
– About the crystal on the 5722, It would be nice if I would not have to also use the S14 for it, is it the case ?
Sorry to bother you and thank you again for your advices !
Jerome
Hi Jerome,
My answer to your question is going to be brief: the two watches you have are both very desirable and of high quality. I would strongly advise you not to make your first attempts at watch servicing on a valuable watch. You should practice first (and practice, and practice) on watches that are cheap enough and disposable enough to allow plenty of room for mistakes. I would instead advise you to send your watches to a professional watchmaker with experience with vintage Seiko. In the UK, I would recommend either of Richard Askham or Duncan Hewitt.
Finally, the 5722 has a removable case back and so you should be able to push the crystal out from inside once the bezel is removed. And the bezel is removed using a watchmakers knife. Good luck!
Martin
Thank you Martin!
Hi.
Thanks for this post. I have 8306 I would love to rebuild. I was wondering if there is an 8305/8306 technical manual for download available somewhere.
Thanks again.
Dan
I used my hard copy of the technical guide for the 8305. It may be available online somewhere but I cannot find a link at the moment.
Unfortunately my hard copy of the technical manual does not have this Caliber. I have searched high and low on the web for it and it’s nowhere to be found. Is there a possibility you could photograph the pages and email it to me . My address is danny@metrology.com.au
Thanks again
Dan
I’ll see what I can do but it may be a couple of days.
Hi did you ever get a chance to photograph the 8305 technical manual? I’m also looking for the part number for the Balance Cock Screw.
Hi Danny, I am sorry but I’ve been completely preoccupied and not yet had a chance to follow up on this. In any case, the technical guide does not give part numbers – just instructions on dismantling, reassembling oiling and so on. I have however uploaded the parts lists for both 8306 and 8346, both of which sourced from the SCWF. Hopefully the following links will work:
8306
8346
Thanks so much for this wonderful and informative blog. I’m not sure if these older threads can still yield replies, but here is my query: I am hoping to replace the crystal on an 8305-9000 sea lion m77 and am stumped by the bezel. There does not appear to be any spot for a case knife to gently get a purchase and pry from. Is there a special trick to replacing the crystal on these, or for removing the bezel. Am I going about it all wrong and is this one that needs an air pump? Many thanks.
Hi Jason,
I have not worked on this particular model before but normally there would be a cutout on the lower edge of the bezel aligned to the gaps between the lugs, usually at 6 o’clock. Sometimes though, the design of the case may make it more convenient to place the slot to one side, usually aligned to 9 o’clock.
It is not uncommon however for bezels to be refitted with their slots out of position and therefore hidden from view by the case sides. In such a case it may still be possible to gain purchase from the outside but when this has happened to me in the past, if the crystal has a tension ring, you can sometimes push it out from inside with the bezel still in position and then lever the bezel off from inside.
Good luck!
Martin
Hello. Tell me please, what difference between 8305/6 30 jewelry and 8346 – 27 jewelry. Where is missing 3 jewels? Sincerely. George.
I’ve not yet worked on an 8346 and so can’t provide an answer without checking the parts lists. I can do that later and update my reply.
Edit: Well, two of the missing jewels are accounted for by the replacement of a two Diafix settings serving the 4th wheel with single jeweled bearings. I don’t know how the third is accounted for though. That may have to wait until I service on of my two or three 8346’s that sit in my watch box!
Ok? thx!
On the strength of this post I bought myself a freshly rebuilt 8305-8000 from Japan. I am most impressed! On my timing machine there is almost zero positional error and the watch runs well within chronometer spec. A lovely watch! Thank you for drawing my attention to this excellent movement!
My pleasure. Glad you are enjoying your 8305.
Thanks…
Pingback: Seikomatic-R 8305: An Early Seiko Automatic | musingsofawatchaddict
Hello,
I have an Seikomatic-R 39 jewels 8325-8000, but there is a crack in the glass. Do you now the referance number of the glass and also a vendor that sells these?
Beste regards,
Wim
Hi Wim, I don’t have my casing parts catalogue to hand but the Jules Borel website suggests that the part number is 315W05AN. A quick search on eBay suggests bigvlad86 (a Dutch seller) has stock.
Hi Martin, I’ve recently acquired a Seiko Sealion CR220 with the 8306 movement in it, but it’s missing it’s mounting ring, which is a nightmare to source. It’s a stunning watch and i’d like to get it running again. can you give me any guidance on what I could do as a compromise, or if the same mounting ring can be found on more common watches?
You provide a valuable reference service to many watch lovers, with the excellent write-ups that you do on your website.
Hi Mark, I’ve not actually come across that watch before. The only thing you might try is to source a complete but junk Seikomatic-R and see if that might not provide what you need. The movements are all the same size and I would imagine the aperture in the mid-case will be designed to accommodate a standard 83 series case ring. I have no certain knowledge of that though so try it at your own risk! Good luck.
Thanks Martin. Keep up the good work. 🙂
Hi, Do you know what the correct lift angle is for a Seiko 8305 or 06 movement?
I’m afraid not, sorry.
Hi Martin, Thanks for the reply. Could you recommend a crystal press with a die set that would be suitable? I took the watch to my local watch shop and he also struggled. Thanks.
There are numerous options on AliExpress at various price points but you’ll want to choose one with a good assortment of dies included, particularly ones with a deep hollow on the inside to clear the crystal. I am very surprised that your watchmaker does not have access to a suitable tool. That ought to be a staple in any watchmaker’s collection of tools. Of course Amazon and eBay will have options too but I can’t recommend any particular model because there is no guarantee that any of the supplied dies will suit the particular task you need it for. Good luck!
Hi Martin, thanks for the amazing resources your site gives us all. Fantastic work. I have a question about the 8305 Seikomatic-R line. I have 3 models (0020, 1010 and 9010). Im servicing them at the moment and all should use new case back and crown gaskets. Do you have any insights into which fit. I have measured the outside and inside diameter of the existing 9010 caseback gasket (32.6mm x 31.8mm, 0.80mm) but wondering if there is a Seiko gasket that fits?
I have used a generic Gasket Seiko DJ0060B01 but havent checked it for fit yet.
Thanks in advance, Matt.
Hi Matt,
The 8305-0020 is not listed in my casing parts book but 8305-1010 uses OC3160B and DJ0060B and 8305-9010 uses OC3060B and DJ0060B.
All the best
Martin