
Tags
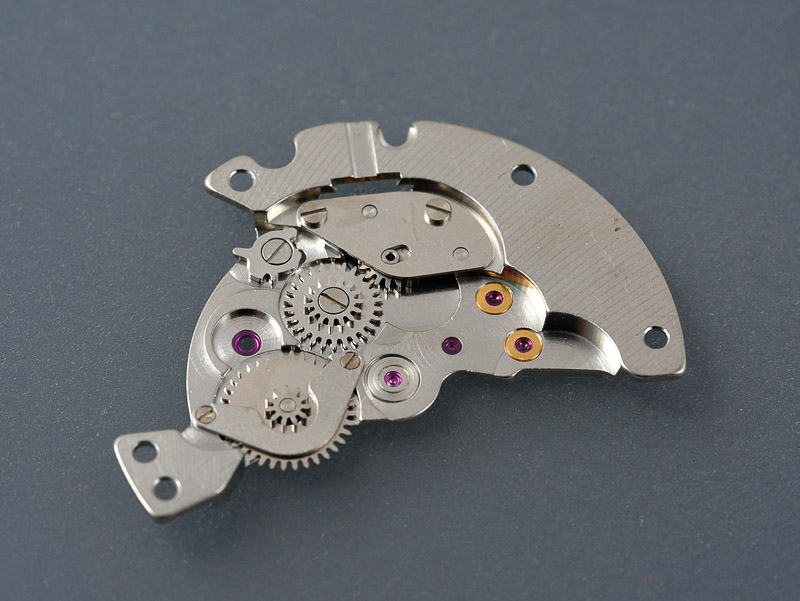
In our meanderings through the Seikomatic universe of the 1960’s, we have thus far explored only those products of the Suwa Seikosha division located in the mountainous Nagano region mid-way between Tokyo and Nagoya. The more familiar and certainly best known of the Seikomatic watches were those fitted with the relatively unsophisticated but ubiquitous 62 series automatic movements which I’ve described here on numerous occasions in the context of everything from tool-watch divers to high-end Grand Seiko chronometers.
The Seikomatic-R series which emerged initially in the form of the Seikomatic Slim in 1963 appeared to be pushing the engineering envelope somewhat more convincingly with its 83 series slim-line movement featuring integrated automatic winding mechanism as well as, subsequently, a retrofitted manual wind facility. The distinctive feature of the Seikomatic-R was its lower profile, a full 1 mm thinner than the contemporary 62 series, which allowed for slimmer line, conservatively styled cases that appealed better to the business market at the time (all the better to fit under those tailored cuffs). Those watches were also a product of the Suwa Seikosha.
However, the fierce competition that existed between the Suwa division in Nagano and the Daini division in Tokyo had already inspired the emergence of the King Seiko as the in-house response to the Suwa-produced Grand Seiko and in a parallel sense, so too the Seikomatic-P was born as a successor/competitor to the business-oriented Seikomatic-R. The Seikomatic-P series was somewhat short-lived though, being produced only for two years between 1967 and 1969 but in many ways they represent the technical pinnacle of the upper mid business market watches that Seiko were producing through this period.
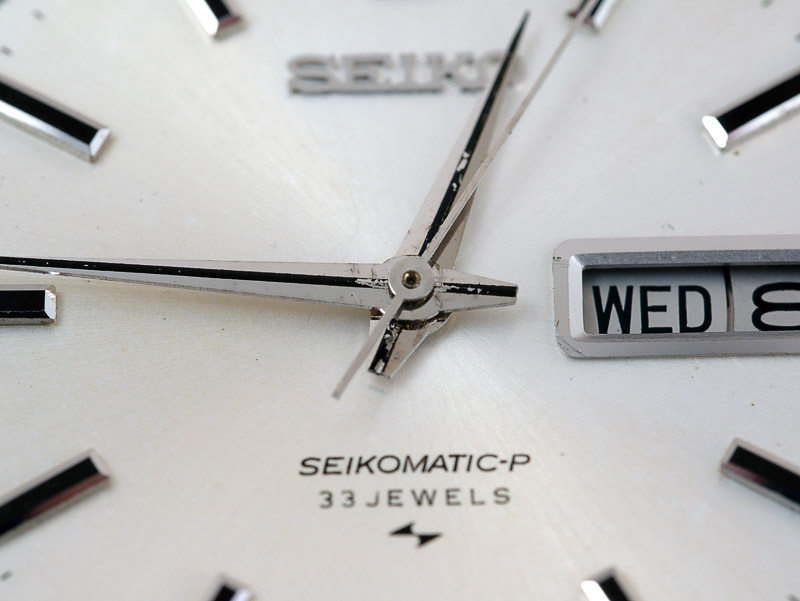
The Seikomatic-P series all featured the 33 jewel day-date 5106A caliber, a relatively slim-line but also smaller diameter movement than those fitted to the earlier Seikomatic watches. Small it may be, but in terms of features and engineering smarts, it packed a very considerable punch. There is a great deal to like about this movement, not least that like the 8305 fitted to the Seikomatic-R, the considerable jewel count correctly reflects the functional jeweling of the movement: there are no empty marketing promises made in its 33 jewel headline figure. What else does it offer? Well, it has a hacking seconds feature; its automatic winding mechanism is integrated at the train wheel level rather than featuring as a separate module added to ostensibly a manual wind base caliber; it has an integrated manual wind feature; a day date calendar complication with instant changeover mechanism of both day and date; and its party trick? A quick-set date function operated by depressing a button in the centre of the crown.
 Not only was the Seikomatic-P series relatively short-lived, but its range extended only to about 4 or 5 distinct models, with probably the best known, the handsome 5106-8010. Part of the appeal of this watch, for me, lies in the inspiration its styling appears to draw from the iconic second generation Grand Seiko with its distinctive squared off lugs. My example of this model dates from November 1967 and arrived looking really rather presentable, complete with its original bracelet.
 The hands look a little tired, having lost a bit of the paint from their go-faster stripe whilst the dial possesses the merest hint of golden discoloration on its lower left diagonal half but other than this very little indeed to object to.
 Functionally, it sort of ran but the calendar feature did not work, the day function seemingly immune to the passage of successive rapid 24 hours cycles. However, the smart and largely unmarked case back otherwise boded well for its interior health.
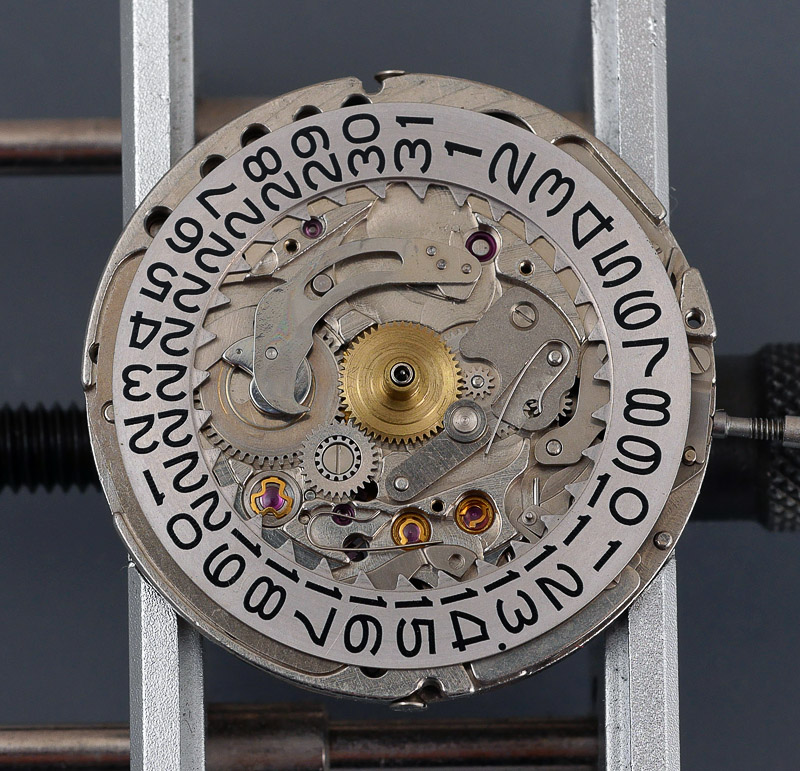
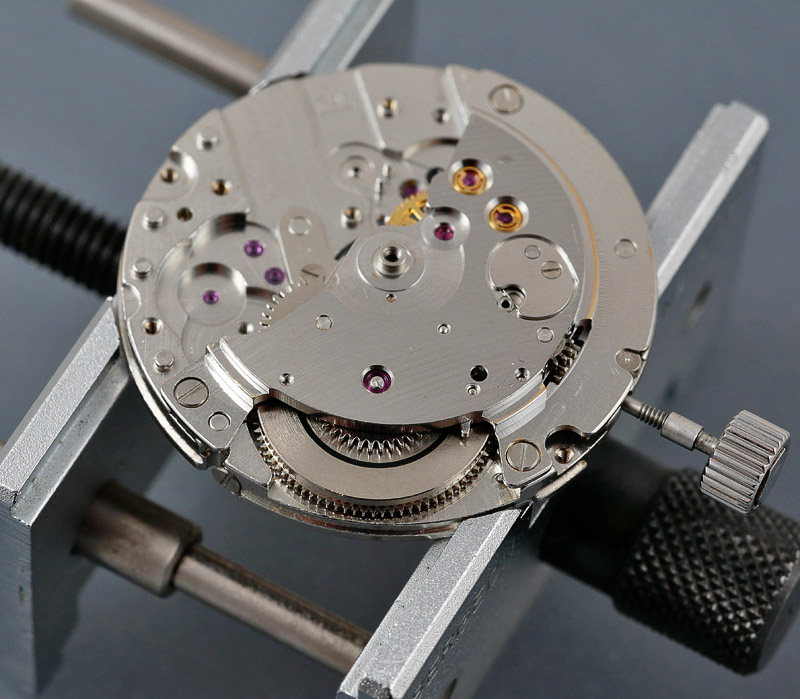
 A bird’s eye view of the movement serves only to bolster confidence that this is a bit of a peach, regardless of fact that it is not quite functioning as originally intended.
 This is a handsome movement whose aesthetic does an excellent job at broadcasting the technical sophistication beneath the rotor. It appears to fill what is a decent sized case (36.5 mm diameter, not including the crown) but this impression is partly due to the presence of a generously proportioned dial spacer ring, bridging the gap between the edge of the movement proper and the inner sides of the case.
To the left of the rotor axle, one of four Diafix settings peeps out but this is evidently of a style I’ve not come across before in the flesh although I’ve met them in the pages of one of my Seiko technical guides.
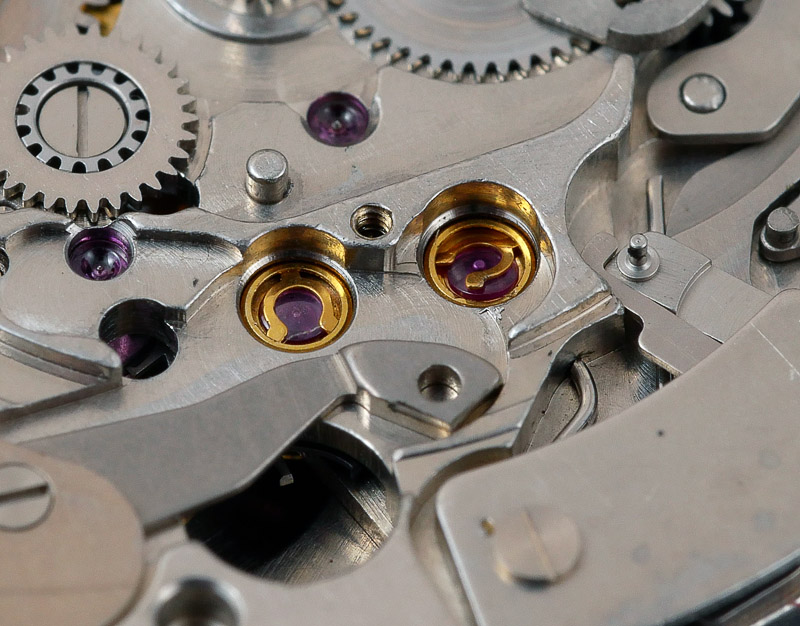
 Although the 5106A is a movement intended for men’s watches, its smaller dimensions appear to have called for the fitment of a Diafix design normally used in much smaller movements used in women’s watches. The function is identical to the more familiar Diafix setting but the handling of the spring during cleaning is different in that it has to be removed altogether.
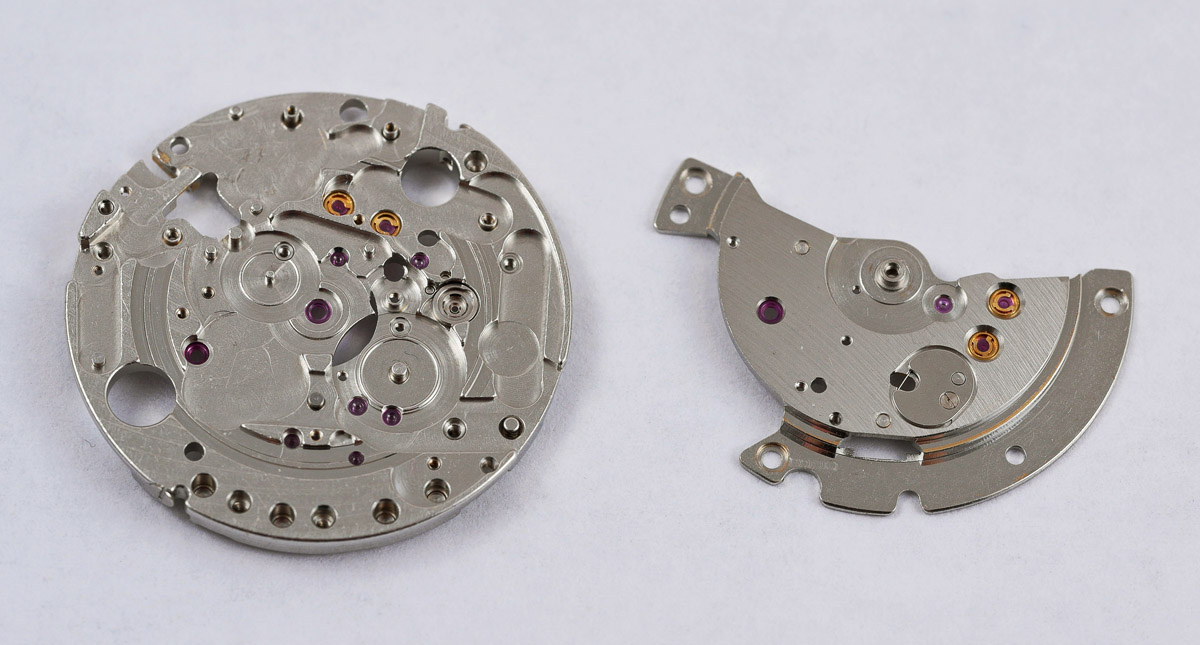
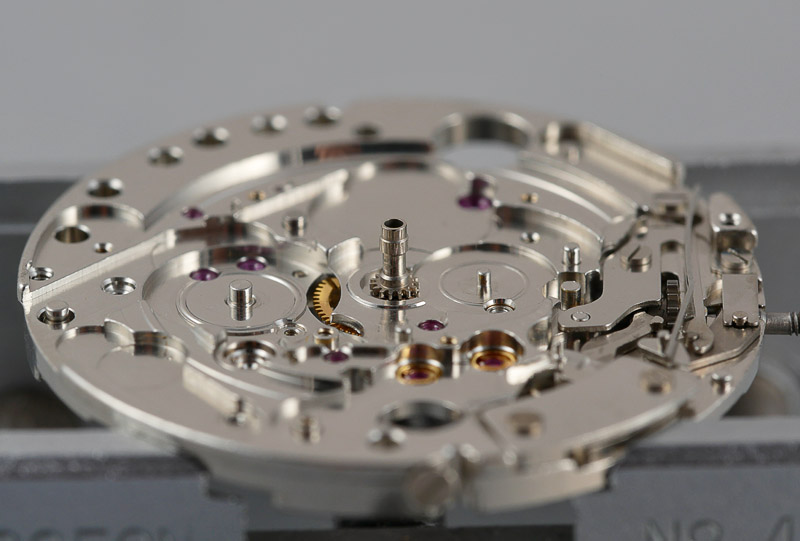
Removing the rotor provides a clearer view of the layout of the two bridges that cover the going train as well as the auto and manual winding mechanisms.
 Notice the oval shaped guard covering the crown wheel spring to the right. Access to the dial feet retaining screws requires the movement ring to be detached.
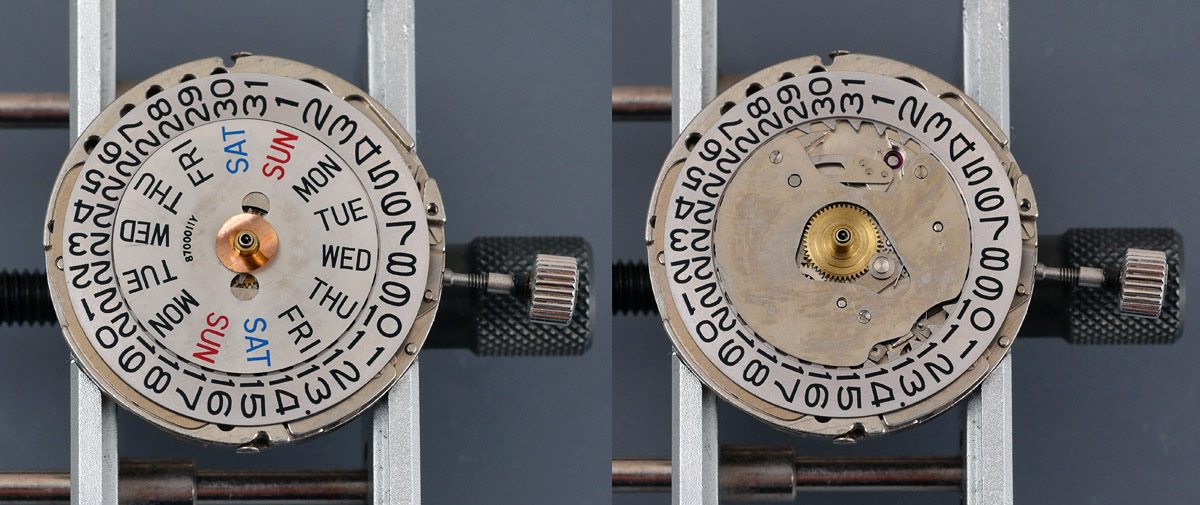
 Removing the dial and hands now provides access to the calendar, which I confess fills me with a degree of mild anxiety.
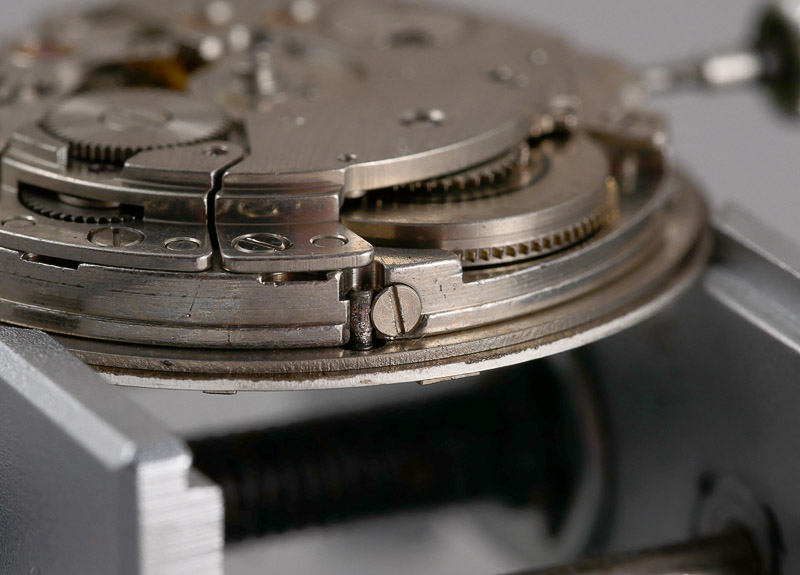
 Nothing too much to be alarmed about at this point but a view from the side suggests a reason for the inoperability of the calendar. Something has been incorrectly seated beneath the day dial guard before it was fastened down and you can see that it is not sitting flat, having lifted on the left hand side.
 Let’s get the guard off and survey the calendar landscape.
 Good grief, what have I got myself into? Surely that’s just showing off? The immediate logistical challenges facing me in tackling this rat’s nest of complexity are (a) I have no technical guide to this movement and am therefore flying blind and (b) above all I need to ensure that none of the tiny springs nestling in that lot make a bid for freedom. So let’s take this slow and steady.
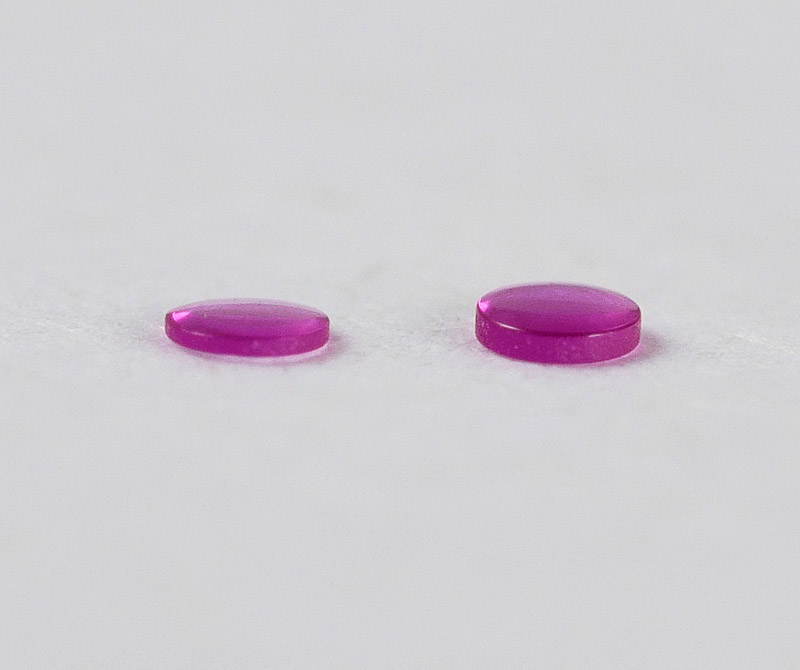
Before diving in though, I notice that one of the Diafix springs has sprung loose, allowing the cap jewel to displace from its setting.
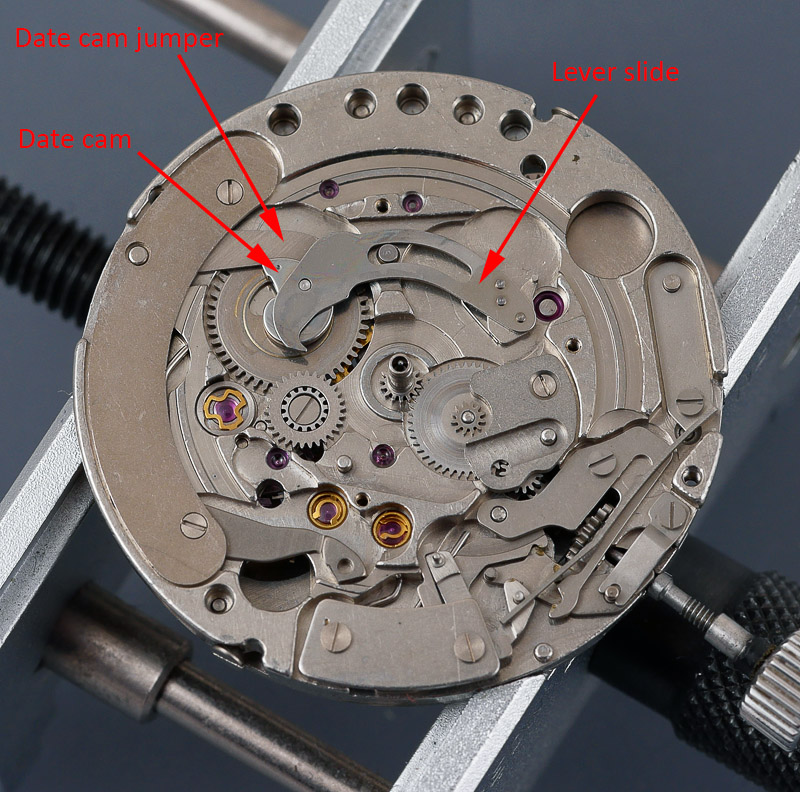
 With the day and date jumper springs released, the date ring can be removed which provides an unimpeded view of the calendar side in all its glory. The mechanism to the left hand side in the image below operates the instant day-date change, with the characteristically shaped cam atop the date driving wheel sitting at the centre of the action. I particularly like the eagle beak shaped lever that flicks the date wheel forward at the moment the date cam jumper slips down the straight edge of the cam.
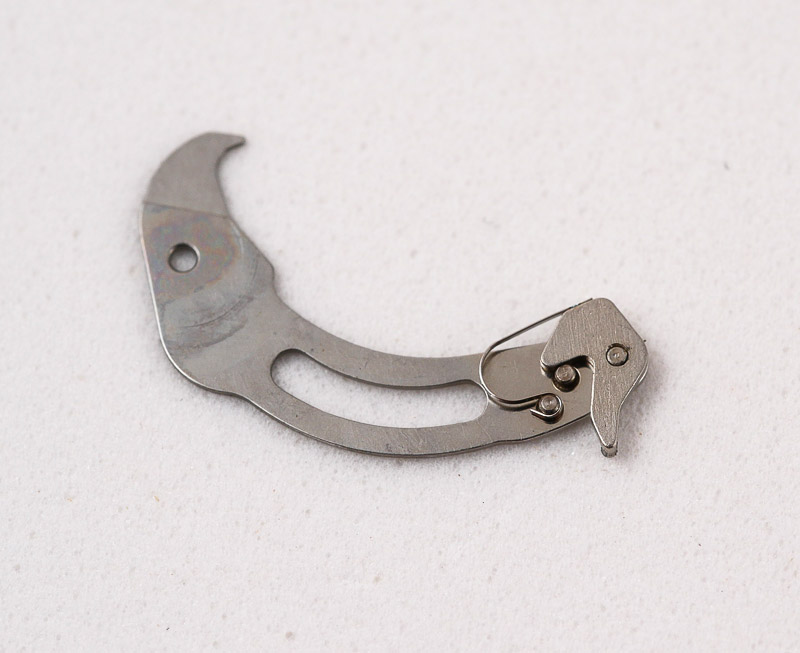
 The image below provides a better view of the rear of the lever slide, the sprung loaded tip responsible for flicking one of the inner teeth of the date wheel at the critical point.
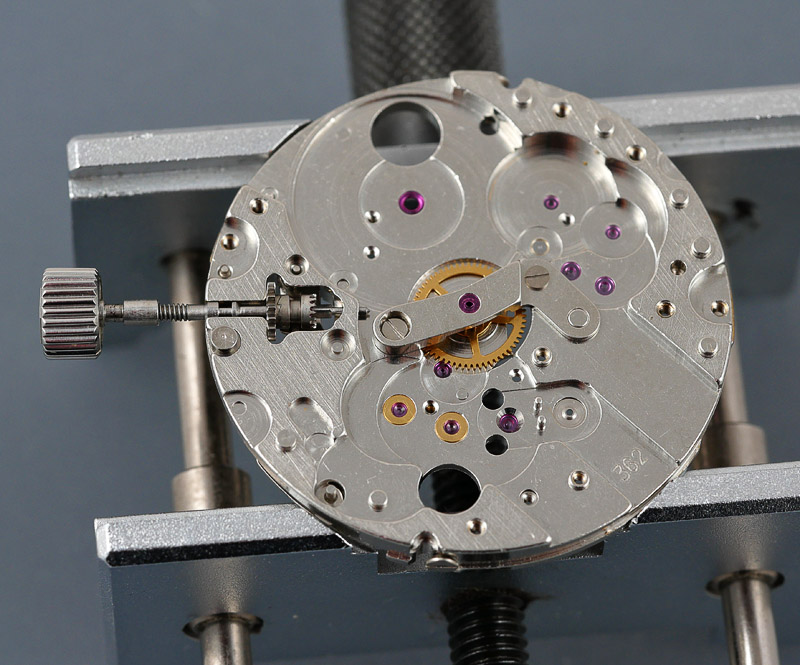
 Let’s take a break from the calendar, and turn our attention to the train wheel side. The photo below shows the train wheel bridge still in position but with the balance cock and balance removed.
 The sensible thing would have been to remove the transmission wheel prior to this point because without the reciprocal resistance offered by the balance, it is very difficult to unscrew its retaining screw because the wheel just freely rotates. So for the moment, the automatic device framework comes off complete with transmission wheel still attached.
 Removal of the train wheel bridge whose underside is decorated with gears, most of which associated with the manual wind mechanism, reveals one other very unusual feature of this movement: the going train features a so-called go-and-back sweep second system driven by one of two third wheels, both of which mounted on a common shaft.
 We’ll cover how this arrangement works and what advantage it offers later on when the movement comes back together after cleaning.
Returning to the calendar side we pause to survey the quick set date corrector mechanism initially partly hidden by its guard
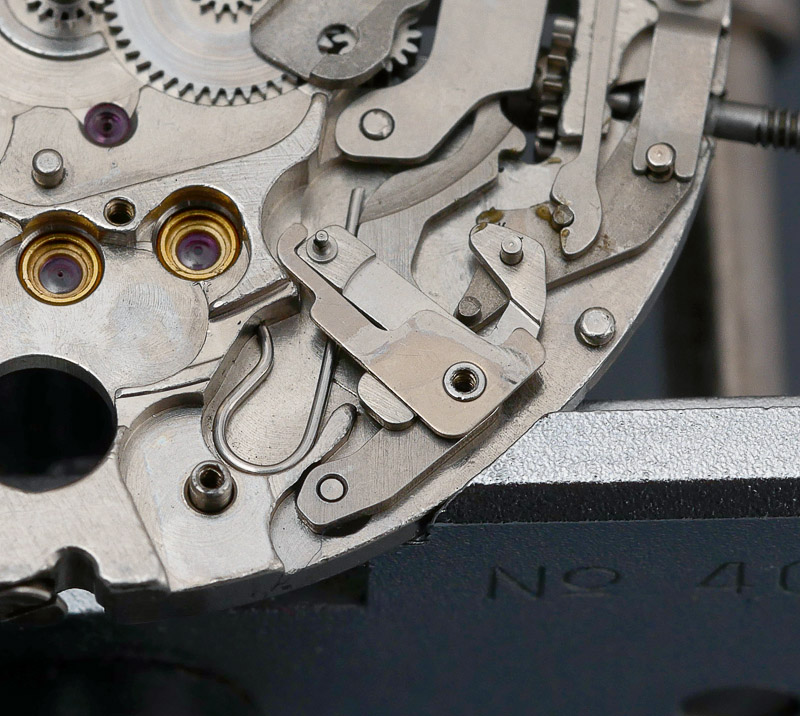
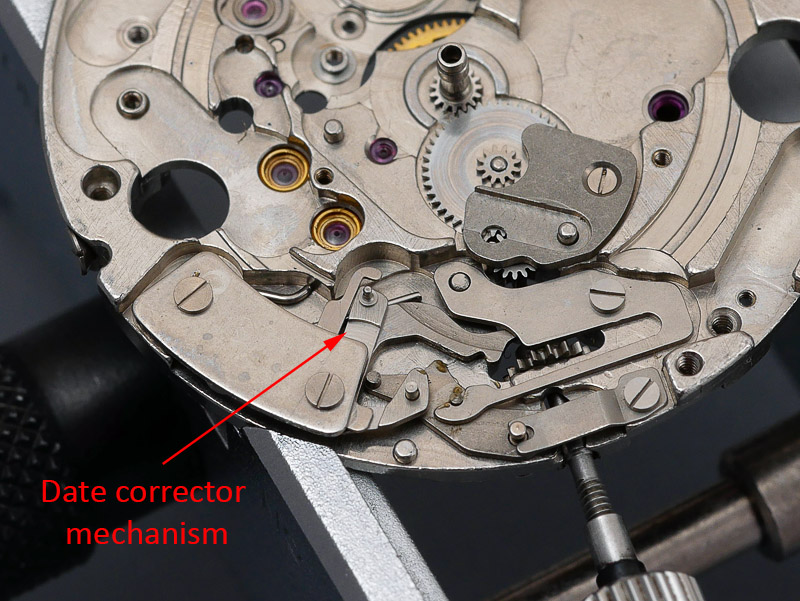 and then revealed with the guard removed.
 With the main plate stripped of pretty much everything, the remaining tasks are to denude the train wheel bridge and to extract the mainspring from the barrel. The underside of the train wheel bridge is decorated with four wheels and the click: three of the wheels (the crown wheel, winding pinion and intermediate ratchet wheel) transfer power from the winding stem to the barrel ratchet wheel and the fourth (the second reduction wheel) transfers power from the auto-winding system to the barrel.
 All seemed plain sailing at this point until I started to unscrew the screw securing the intermediate ratchet wheel. The all too familiar sense of dread followed as the screw head parted company with its thread.
 The air turned blue, not because such hiccups present insurmountable problems these days, but because this particular screw is unique to this movement and not listed as stock on Cousins website. My only short-term holding solution was to ‘borrow’ a bridge from my only other Seikomatic-P (a 5106-8020 waiting its turn in the queue) and then to start to look for a junker on Yahoo Japan to provide a replacement in due course.
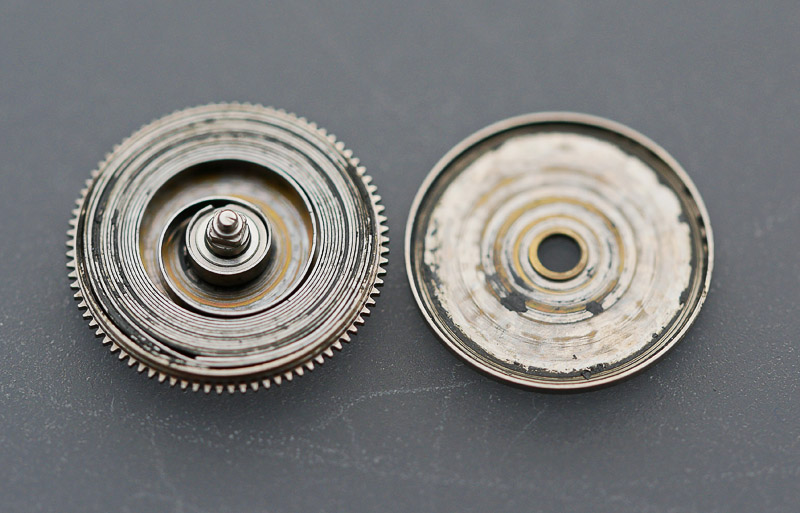
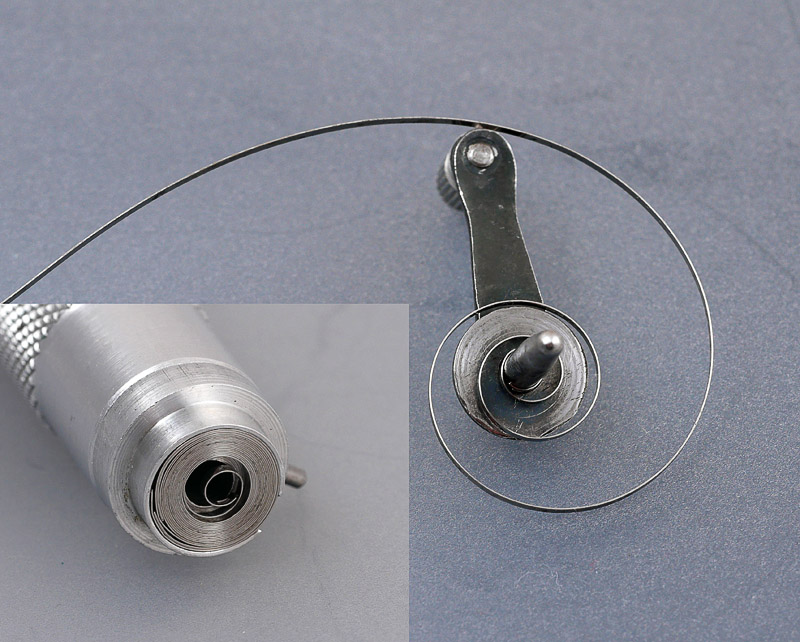
Last order of business is to open up the barrel and note that access to the mainspring is from the top rather than bottom of the barrel and consequently the main spring presents itself with its coils winding clockwise. This may present a difficulty when it comes to refitting, which we get to as the first order of business once everything emerges from the cleaner.
 The reason why a clockwise spring raises a slight concern is that all of my mainspring winders are right-handed which means the spring winds into the drum by turning the handle clockwise. To accomplish this, the nub on the post is profiled to find purchase on the hole at the end of the mainspring with clockwise winding direction in mind (if you are getting confused at this point, remember that clockwise winding into the drum will transfer to anticlockwise winding when the mainspring is subsequently pressed into the barrel. Fortunately, my somewhat antique mainspring winder easily found purchase on the spring when mounted in the opposite sense to its design and I was then able rather easily to wind the spring backwards into the drum.
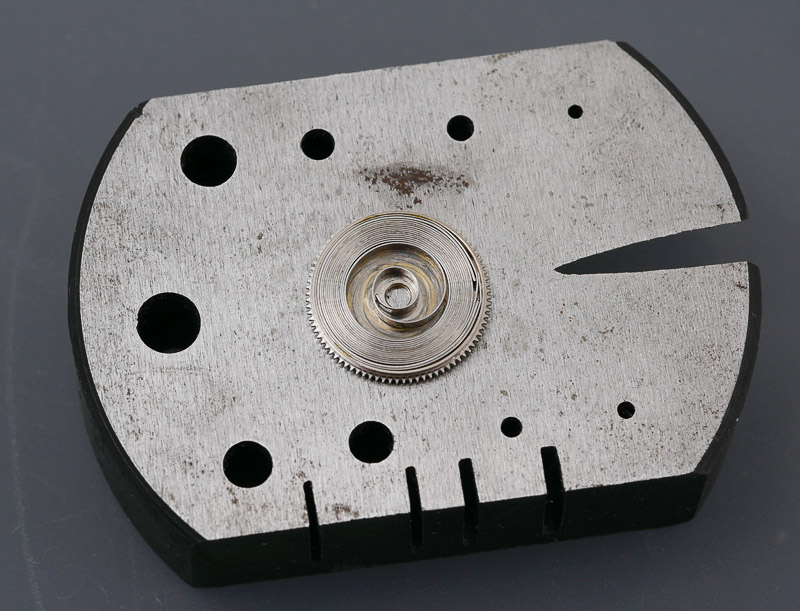
 Here’s the cleaned mainspring back home in the pre-lubricated barrel.
 The next job is to refit the cap jewels and retaining springs to the Diafix settings, two on the main plate and two on the train bridge. I anticipated this being fiddlier than normal because of the different spring design but in practice, refitting was not really any more difficult than usual, just requiring a slightly different approach. Lubrication turned out to be a headache though because the tip on my automatic oiler was sticking in the reservoir and a replacement tip arrived from Cousins pre-bent i.e. damaged. You’ll notice in the photo below that I have also fitted the spring and guard for the crown wheel.
 We are all set to begin reconstruction of the remainder of the 150 or so separate parts that constitute this movement (that’s about 50% more than in the 35 jewel 6218 fitted to the posher models in the vanilla Seikomatic range). As usual, we begin with the stem and setting parts.
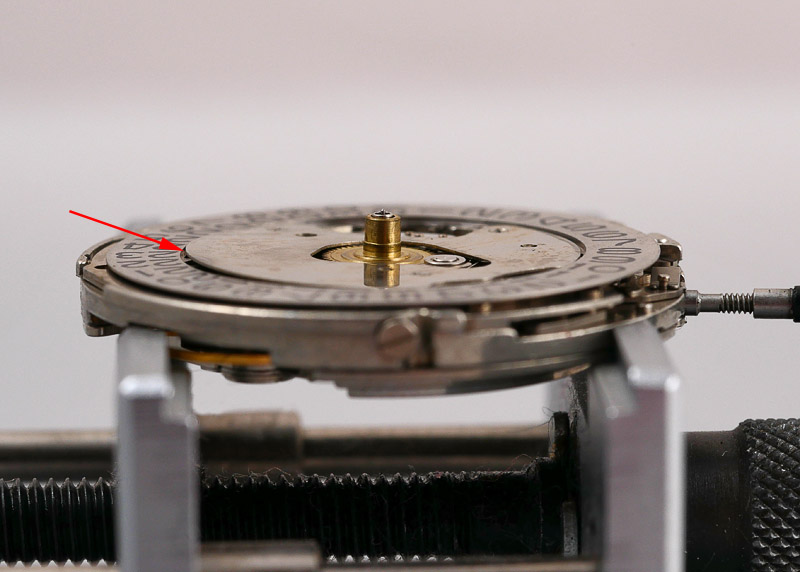
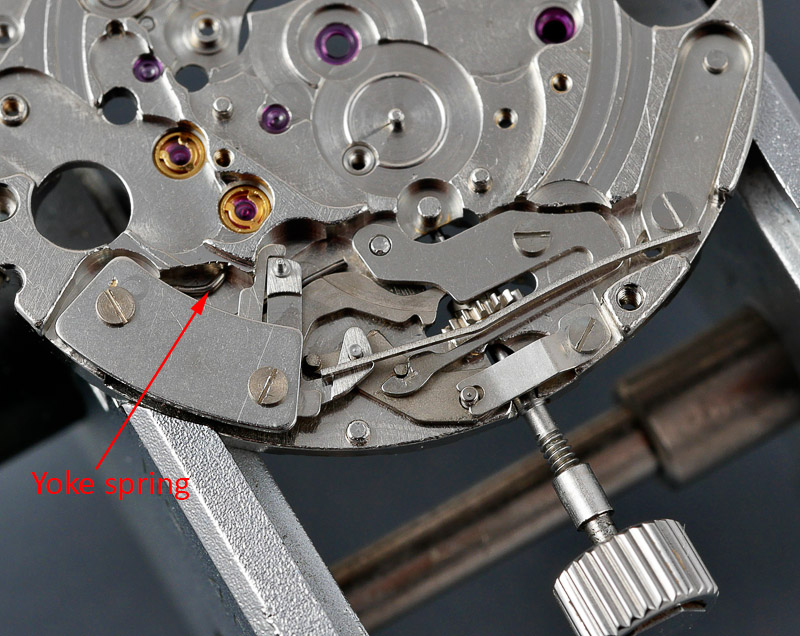
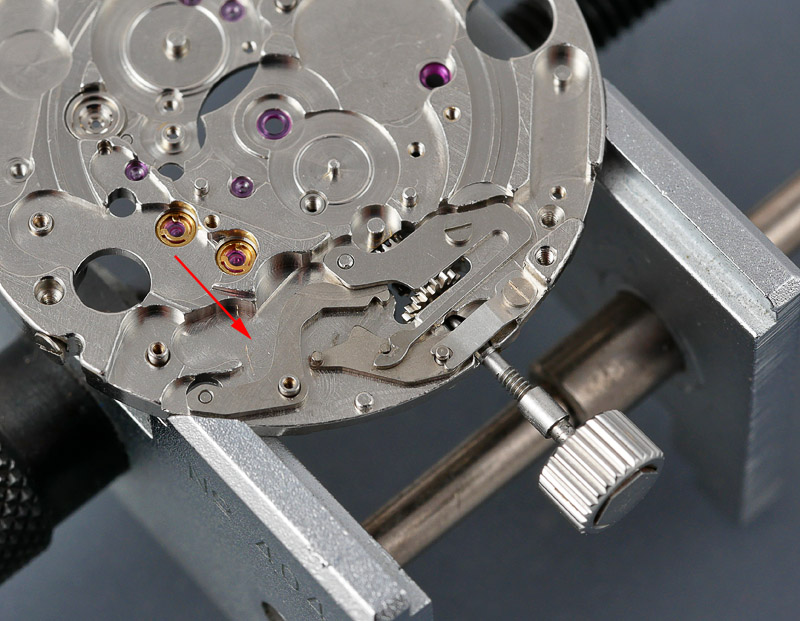 Progress was halted briefly by the inevitable loss of a spring, this one the yoke spring which should locate where the arrow indicates in the photo above. Happily, a replacement was sourced from a spare 5126 movement, a much less sophisticated derivative of the base 5106, and I was able to proceed.
 Next up, the centre wheel (a new replacement) and slim-line bridge followed by the cannon pinion (also new).
 The barrel, ratchet wheel and stop seconds lever come next, taking care to fit the correct lever spring.
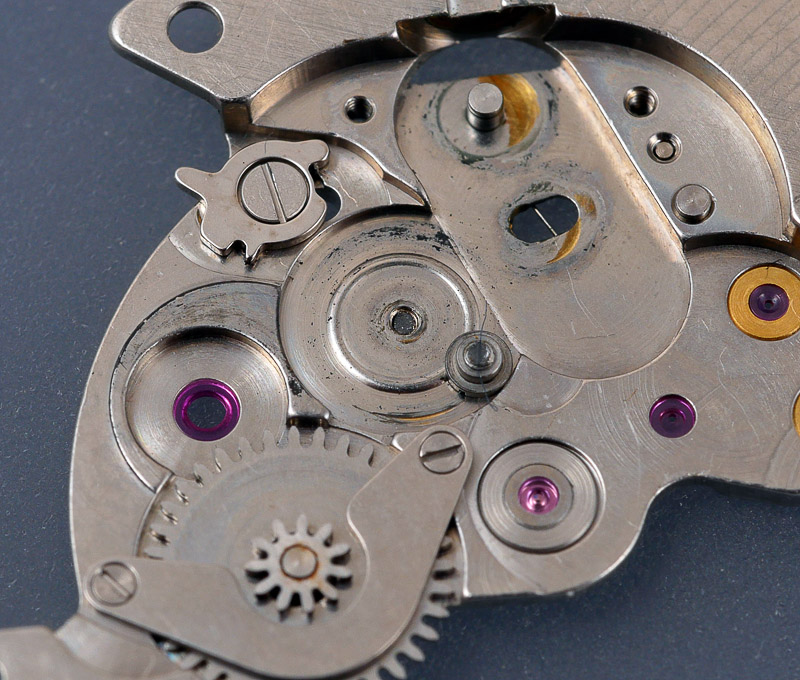
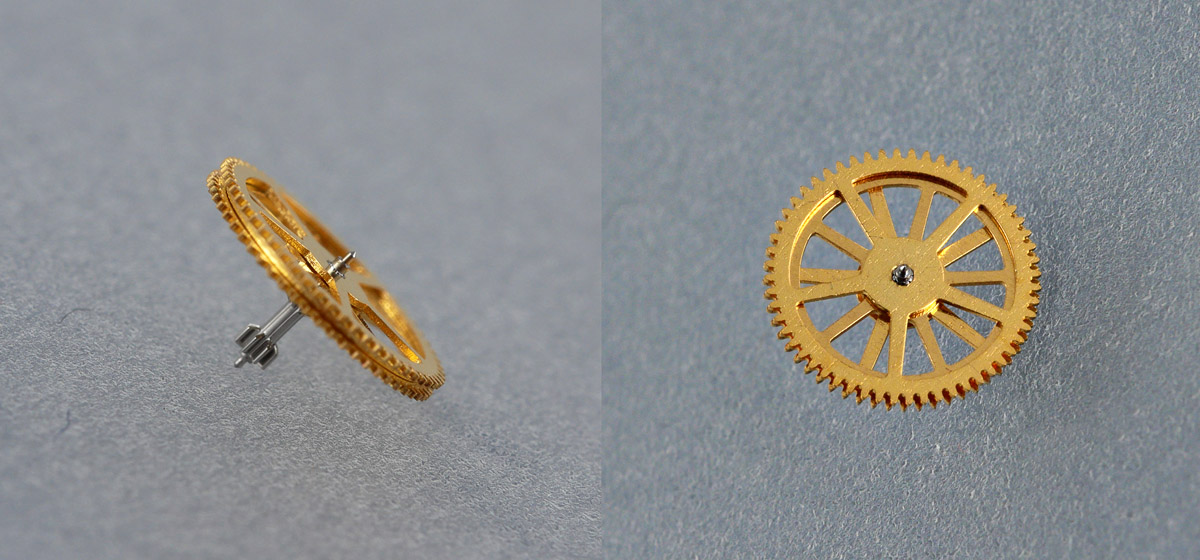
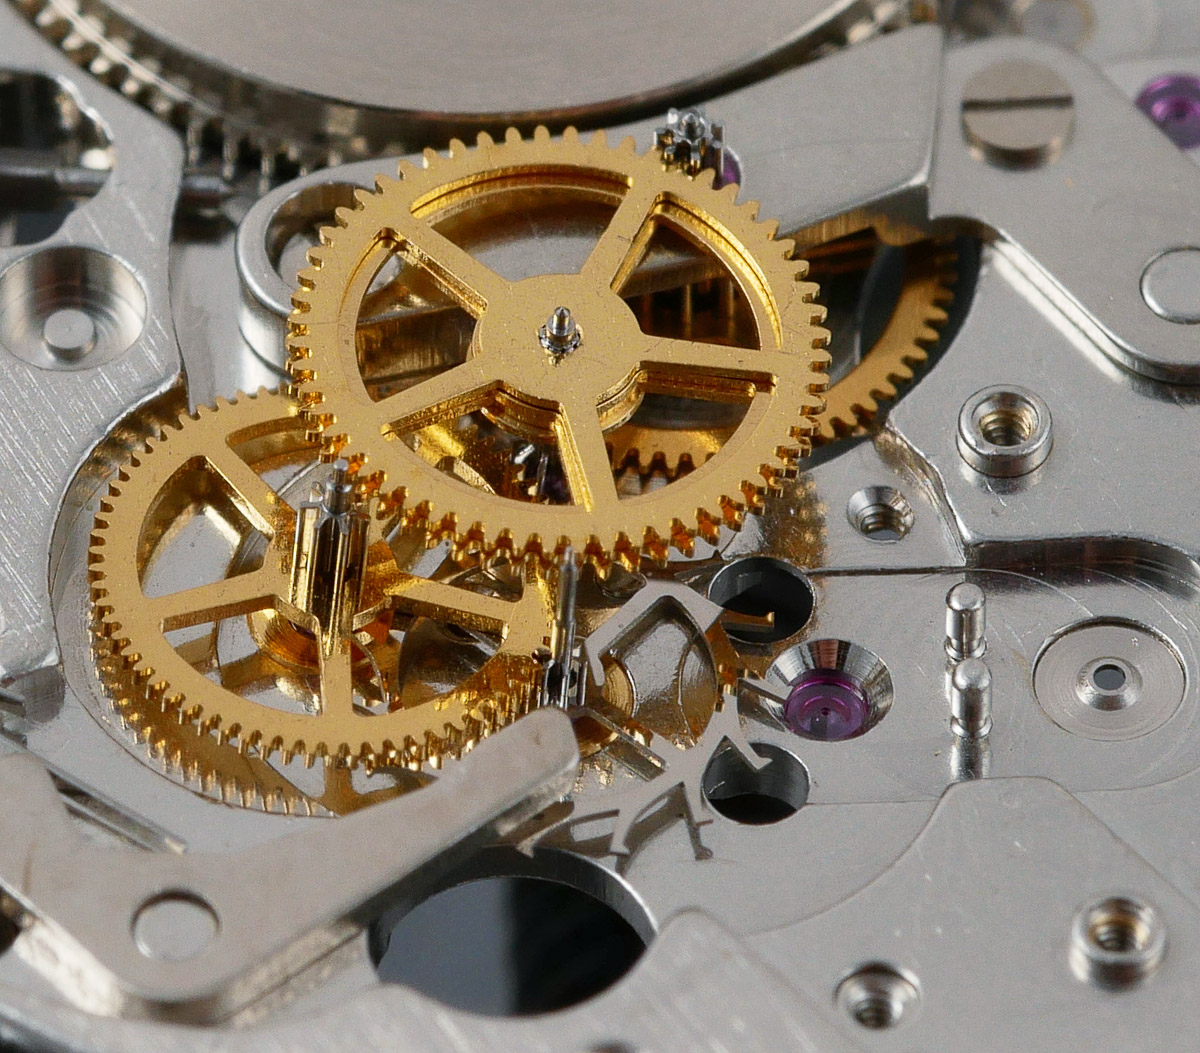
 We’ve arrived at the point where we need to assemble the going train with its very curious doubled-up third wheel. The wheel itself comprises an upper wheel fixed to the pinion and a lower wheel which is not secured to the pinion and is therefore free to rotate independently of the upper wheel. The two wheels are separated by a third spacer wheel and so when viewed from above, we are greeted by three sets of spokes.
 The escape wheel, fourth wheel, third wheel(s) and seconds pinion are fitted in that order and we can survey them now as a group to get a sense of how they work together.
 The transfer of force from the barrel goes something like this: the barrel drives the centre wheel which in turn drives the third wheel pinion at its lower end. This turns the fixed upper third wheel which transmits torque to the sweep seconds pinion which simultaneously drives the freely rotating lower third wheel in the same direction as the upper third wheel. However, the lower wheel is geared differently and turns at a different rate to the upper wheel. The lower third wheel then drives the fourth wheel which drives the escape wheel which regulates the back and forth swing of the balance. The reciprocal transmission of force between the upper and lower third wheels and the sweep seconds pinion is the reason this is known as a go-and-back sweep second system. Rather than needing a friction spring to retain the sweep seconds pinion, this design allows for the pinion to sit in its own jeweled setting located on the underside of the train wheel bridge. The figure below, taken from the 2517 technical manual, may help you to understand better how it works.
 Normally at this point, the train bridge is fitted but first we must build up the gearing for the manual and auto-wind mechanism located on its underside.
 Note: this is not the original bridge but one borrowed from the second of my two Seikomatic-P watches. With this complete, fitting to the main plate proved relatively unproblematic although I needed to take care that the click was properly located before tightening down.
 The auto-winding mechanism comes next, whose operation, if not construction, is quite similar to that of the 8305 caliber described here.
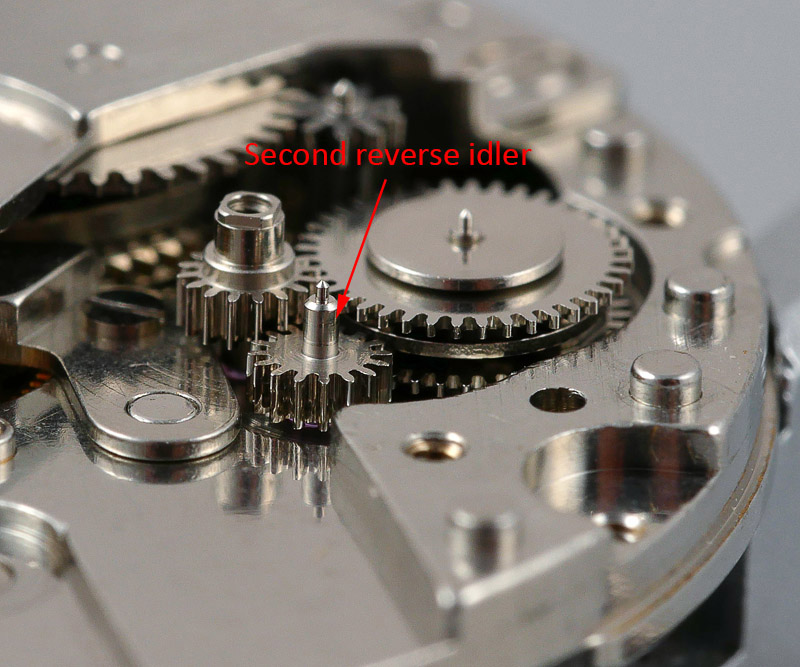 The only potential pitfall here is to make sure that the second reverser idler is the correct way up otherwise the whole shebang will just lock rigid. The bridge comes next, followed by the transmission wheel and its screw.
 All that is left for the moment on this side is to fit the balance and Diashock jewels. Some attention is required with respect to the latter because the cap jewel on the balance side is thicker than on the calendar side and we must not mix them up.
 With that accomplished, a bit of power to the mainspring and she’s up and running.
 My initial nervousness at tacking this most complicated of movements has dissipated somewhat having got this far and having assumed some familiarity now with its layout and operation and so I launched into the reconstruction of the calendar without too much concern, other than the firm resolve not to allow any further springs to vanish.
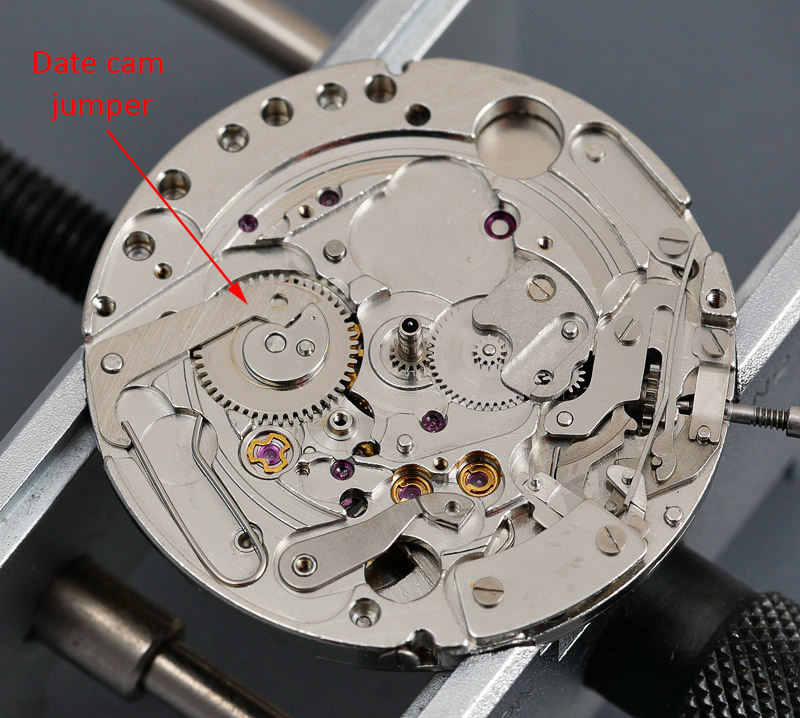 The photo above provides a clearer view of how the instant day-date change mechanism works and the key roles played by the cam and date cam jumper.
Some of you may also find it interesting to chart the path of the lever slide tip as it slowly makes its way around its circuit, controlled by the passage of the jumper around the increasing radius of the cam. In the upper part of the photo below, we see the lever slide tip at the start of its journey and then as the hands march around the dial, so it approaches the teeth on the inner edge of the date wheel. At the point the cam jumper sits teetering on the edge of the shear drop along the straight edge of the cam so the lever tip sits poised to flick the date wheel to its next position (lower left). In the second of the two insets (lower right), we see the result of that final, sudden movement, the equivalent of the guillotine coming down upon the neck of an enemy of the French revolution.
 You’ll have to forgive the sorry state of one or two of the screws fixing the date dial guard: these had been mangled by a previous watchmaker and are unique to this movement and unavailable from watch materials houses.
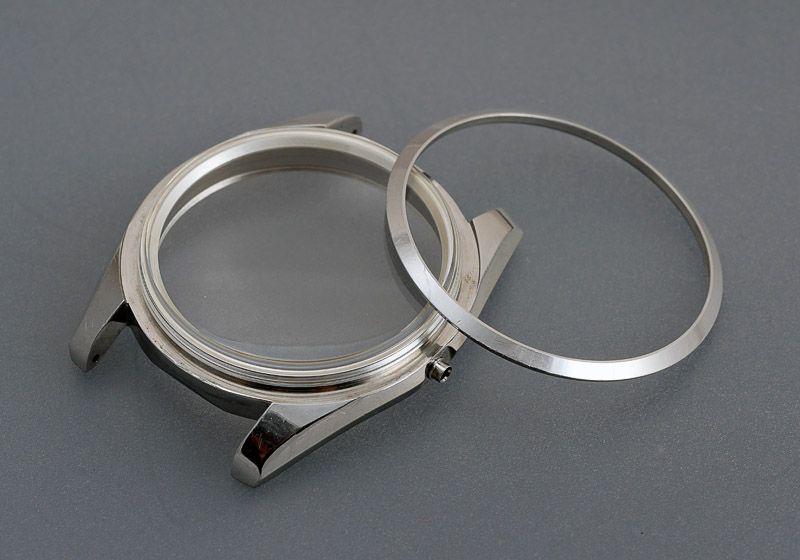
With the movement more or less there, we just need to spruce up the case, fit a new crystal and fresh gaskets before refitting the movement. The bezel took quite some persuading to part company with the mid-case and in the process I managed to gouge my thumb (hence the blood stains in the photo of the case below).
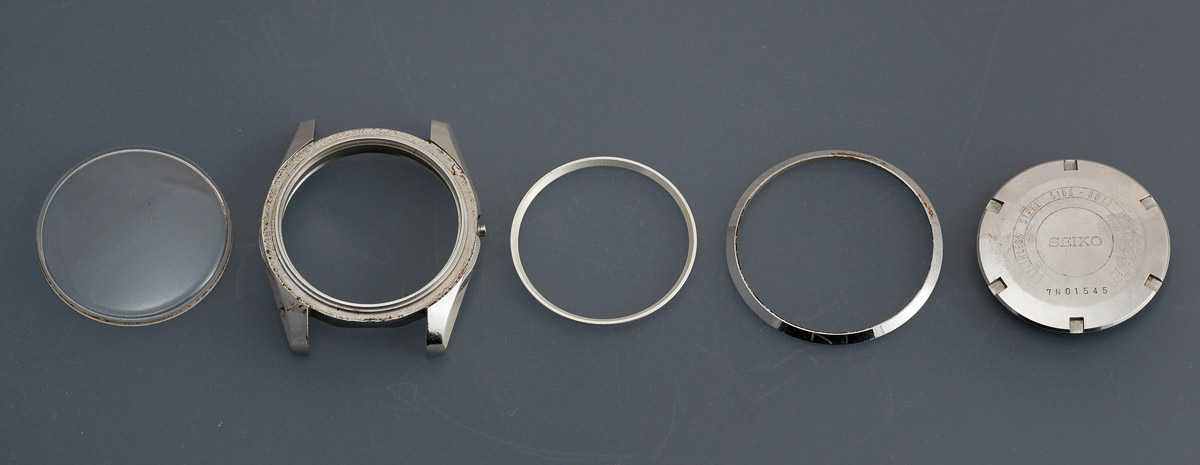
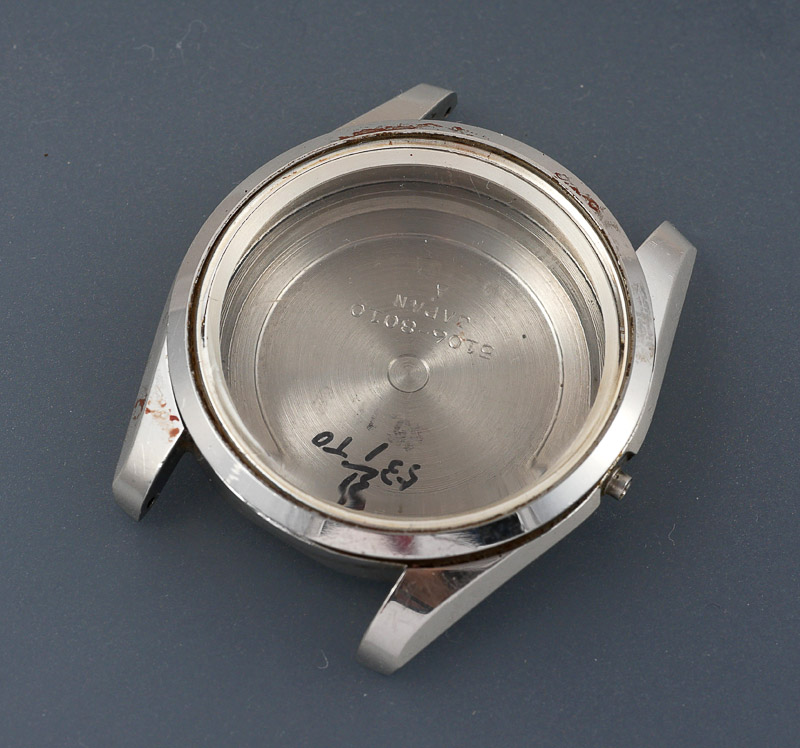 The case separates out into five parts: from left to right, the crystal, mid-case, dial ring, bezel and case back.
 A thorough clean and we can fit the new crystal, whose design is similar to that of early ‘60’s Seikomatics in that it sits around the outside of the case lip and is held in place by the bezel.
 Sometimes, pressing the bezel home can be problematic but on this occasion it re-seated without incident.
 The case is now ready to receive the movement, complete with refitted dial and a new set of hands.
 The remaining tasks are to lubricate and fit a fresh case back gasket, followed by the case back, turn over and survey.
 This is undoubtedly a very handsome watch, whose size, for me, just about hits the Goldilocks sweet spot: neither too large, nor too small. The timekeeping out of the box, with minimal regulation looks spot on, with negligible beat error. I had not given much thought to strap choice because the bracelet was in such good condition and so I fitted that prior to a day on the wrist.
 I had two problems with this choice however. On the one hand, the bracelet was only just big enough to fit my wrist, with no wriggle room at all and certainly not enough to accommodate the natural variation in wrist diameter that occurs during the day. Secondly, as much as I try, I am simply not a bracelet kind of guy. For me, watches of this type belong on a leather strap of some sort and so it was off with the bracelet, and on with a black teju strap.

 It is increasingly the case these days that my interest in watches and horology focuses much more on the unearthing of technical ingenuity in watches that otherwise hide their light under a bushel. The fact that so much of this clever design is to be found in watches made by Seiko, so frequently dismissed as a mass market brand, is particularly satisfying but also just a little bit sad. These are brilliant, under-appreciated and hugely undervalued watches produced during a wonderful period for the brand. In some ways I want them to remain under-appreciated – or at least under-valued – so that I can continue to be able to afford them and to enjoy them. But I also want others to come to know and appreciate these watches for their very considerable hidden depths. Watches of substance indeed.

Very nice watch and work! Always a pleasure to read your writeups 🙂
Masterful fettling ,brilliant writing and perfect photography.
Thank you!
Well done, as ever. Always appreciate the effort you put in to these write ups (as well as the watches ).
Slackjawed admiration once again. Amazing crown design! A perfect example of form and function sharing the limelight. Thanks Martin
Incredible job. I’ve always admire this seikomatic-p.
Martin, I feel as if you are a kindred spirit after stumbling upon this post and your site today. I’ve just purchased this exact model and anxiously await the postman for its delivery. Although I have no experience in watch repair or restoration, you’ve seriously inspired me here with your knowledge and fearlessness. I must commend you as well on photo quality. Would you mind sharing your gear of choice? The lens you’re using is sharp as a katana.
Mason – thank you. I appreciate the positive feedback and very pleased to hear that some folk out there also like these under-appreciated watches. As to photo gear, I’ve been struggling for years with a Nikon V1, extension tubes and continuous light sources, the latter the bane of my life, requiring seemingly unending struggles with white colour balance. Recently however, I’ve switched to a micro four thirds set-up with a pair of radio controlled speedlights, and finally no more worries over white balance. The lens I am using is the Olympus M. Zuiko 60mm macro. And yes, it could slice salami!
Martin, lovely work, as always, and since you’ve done the Hellas, and now the 5106-8010, I’m waiting for a Mirexal from Switzerland, since I own and have restored all three. Which, BTW, I was unable to successfully complete until I noticed the tiny spring on the eagle beak day jumper was missing on my watch but depicted so clearly in your write-up! Thanks for sharing your work – always drop what I’m doing and read right through when a new post appears.
Bill, glad to have been of help with the 5106. Not much chance you’ll see a Mirexal make an appearance here any time soon. The to do pile is already overwhelming!
A beautyful, beautyful watch! looking for one to own since I´ve read your post…
Are the hourmarkers actually black(Onyx) or just silver/steel looking black on the photographs?
Thank you! Yes, the markers have a black strip but I don’t know what the material is. Onyx sounds as good a bet as any 🙂
Hi Martin, I just finished overhauling one of these 5106-8020’s. Thanks for this post, it was an asset. Question, I’m looking at your 4th picture of the intact movement with caseback removed. I see the case clamps securing the movement to the casing ring. What is actually holding the movement in the case though? Other than the stem, my movement would fall out. The casing guide (screw type 8) says the “case ring with spring”, but mine doesn’t seem to have a spring. Let me know if you recall. Many thanks!
If you look at the case ring, you should see that there are two horizontal cuts on opposite sides with the upper most part of the ring above those cuts raised up, forming an arc. Those parts are sprung and so the spring is simply an integrated part of the case ring itself rather than being a separate part.
Everything seems to look ok. I have 3 sets of horizontal cuts. the casing guide seems to suggest the one towards the caseback should be bowed out slightly applying pressure to the case, but if I tilt the movement it just falls out. The ring is a perfect circle.

Hi Martin, firstly, sincere thanks for posting information they way you do. The reading is magical and I enjoy the text as much as the learning. I was hoping you might be able to help me? I am only just starting out and have located a Seikomatic P that needs a new gold crown. I was hoping to buy the watch and do some minor “Fettling” as it seems to be a one to admire. 33 jewels seems to have some attraction?
I have just modified my old SKX007 as 15 years had taken its toll, wearing it most days and my friend has a 7548 quartz Divers which I am hoping to fettle soon…..With your help!
Hi Chris, I am always pleased to receive positive feedback on the blog – I am glad you enjoy it. As to your Seikomatic-P, you did not mention the model number but it is likely that the part number may be 45E01NA1. Cousins in the UK report this part as obsolete as do Jules Borel but you may find a seller on Ebay (schillachi61 for example) with stock. Best of luck!
Dear Martin, I hope you’re well.
Since you note that this watch is redolent of the second-generation Grand Seiko, a watch which you also have, do you happen to have any photographs showing these watches side-by-side? I think it would make for an interesting comparison. Thank you very much!
I don’t think I do but I have recently posted wrist shots of both on Instagram so that should give some idea. My handle on there is amateurwatchfettler.
I suppose it also resembles the third model Calibre 5722B version of the second-generation Grand Seiko in having an unusual 19,800 vph beat-rate!
Hi Martin. Sorry to hit you with this question so long after the event, but can you remember how you lubricated the day/date cam? it seems to rely on friction with the wheel beneath to make it turn, but also requires some degree of slippage in order for it to make its little jump when the hammer falls. I was thinking a little blob of grease might do the trick but I’m conscious that too much slippage would result in the date changing at the wrong time. Perhaps it doesn’t require any lubrication at all. Can you remember what you did?
Hi Tom, I can’t remember now exactly what I did but will almost certainly have lubricated the flat surface on the date cam jumper with 9104. Good luck!
Thanks. I’ll try that. It’s a lovely watch but a bit of a challenge!
Hi Martin, thank you very much for such a detailed write up–it was a pleasure to read (and reread several times over the past months as I searched for my own 6206-8990). The model I own is contains a 6206A which, as I understand, provides only a quickset date function, but none for the day. My question is this–do you know if the quickset date function works only forwards, or is it intended to work both ways? The crown is a real challenge to work through a full month to go back a single date, but I am also afraid of using the quickset function backwards and damaging the movement.
Hi Leonard, the quickset date does work both ways but it is certainly slicker going forward than backwards which suggests that the intention of the designers was that the purpose of this function was to advance the date. I do routinely operate the quickset in both directions but feel more comfortable operating it as I believe the designers intended. Either way, you should avoid using the quickset within the date changeover period. Days can be pseudo-quickset by iteratively changing the time back and forth through midnight.
Thank you for that!
I also just realised that I posted my comment on this article, instead of the one on the 6206-8990 which I intended. This the trouble of having too many tabs open at once, my apologies!
No problem!
Came across your site almost by accident , love reading your articles , as a recent devotee of vintage Seikos , particularly the G S & K S , I find your articles very informative and great reading . I hope to add a Seikomatic-P and a Lord Marvel to my small but growing collection , particularly after reading your articles .
Thanks Chris. I’m pleased you are enjoying the content. Good luck in your quest for a Seikomatic-P and LM!
Great Artical Martin,
Can I ask how you get the crown out? I have the the same movement in a gold Presmatic, I’d like to clean the case etc in my ultrasonic cleaner & replace the glass, however, I can’t find any info on getting the stem/crown out safely… Please help
The setting lever axle is located right at the edge of the movement, next to the stem. You should see it as a flat button with a dimple in the middle. You depress this whilst pulling on the crown and it should slide out.
Absolute Gent of a man! Thank You.
Carl
I have read and re-read several times. Great work, thank you. I just purchased a 5106-7000. Seems to run well, but the day or date do not advance. Any quick thing to look at. might you be able to do a fix on my new beauty?
Hi Mike, I had the same issue with my watch but I can’t remember exactly what had caused the problem other than that some part of the calendar mechanism had become unseated. You can see the issue in the 11th photo down in the blog post. There is no quick fix. It just needs to be dismantled and re-seated, assuming that that is the cause of the problem. And I’mm afraid that I don’t take in work at all – more on the reasons why under the About tab. I hope you get your watch sorted out.
Martin, Thank you for your reply. I see two ways forward, first, find someone to sort it out. Can you recommend someone? Second, do it myself. I have done some work and have basic tools and probably more courage than sense. I have a request if I do it myself would you coach me through the steps? I could send you status pics. I know this is a big ask from someone you don’t know, but here we are. Mike I
Hi Mike, I don’t know where you are based, but if in the UK, you might give Richard Askham a try. As to tackling it yourself, this would be the last movement that I would recommend a relative novice jump into. It is probably the single most complex calendar design of anything Seiko produced through that period. That is not to say that you might not succeed, just that it is not something I would have relished tackling when I was starting out on my own journey. And as to coaching, I’m afraid I simply don’t have the time. I have a very demanding day job and what little spare time I do have I like to devote to my own projects. Good luck!
Martin, Thank you for your advice. I will look for someone in the Houston area. And thanks again for your work. I will just read it again. Regards, Mike I
You could give Spencer Klein a try. He is based in Colorado I think.
Good idea, I have watched many of his videos. He is not taking new work, but might want to check out my 5106A. Will contact him. Regards, Mike I
Hi Martin, I was born in 67 and have just purchased an identical watch. It seems unmolested and runs, but no doubt needs a service and is losing time. The second hand has also fallen off! Can you recommend someone to service it in the UK please? I was a jeweller for over 20 years and have always worn Seiko’s, as much of the trade used to, due to their reliability and underrated technical ingenuity!
Thanks Chris
Hi Chris, I would suggest you give Richard Askham a try. He works on all sorts but has plenty of experience with vintage Seiko. A seartch for his name and ‘watch repair’ should find his site. All the best Martin
Brilliant thanks Martin 🙂
Thank you for your throughly documenting this model which I may have worked on in the 1970’s
I have just acquired many old Seiko parts which I am trying to sort & sell on eBay
I listed a new 5106 rotor weight yesterday
Lots of chronograph & Bellmatic parts
Regards Michael
remember the seiko 2505a and 2505b have the same tiny dial guard screws
Hi Martin,
I think you forgot to mention how the hex button on the center of the crow moves the date wheel when being pushed.
Best,
Brian
You are right. I may have thought that I could focus on that in another post because there was already a surfeit of complexity to wade through with other parts of the movement. Maybe a stand-alone post on this detail at some point might be in order. Thanks for the suggestion.
Hi Martin, apologies for commenting so long after, but I have an identical watch (albeit yours is in much better condition) and I am looking for a bracelet for it. Would you happen to still have the code for the original bracelet or perhaps some suggestions? Thanks!
Hi Austin, I think I used that bracelet on a Business A watch and as far as I can tell, it has no identifying code stamped anywhere. Sorry not to be able to help.
All the best
Martin
All good! Thank you regardless.
Hello!
May I ask if the screw that broke was a left-hand screw?
Thank you!
B
Not that I recall. I think it was probably just previously over-tightened.
Thank you!