
By some weird quirk of the ebb and flow of taste, fashion and the power of marketing, that most evocative of truly great Swiss watch companies, Omega, seems to have found its standing diminished, its image sullied by associations with one too many anniversary, special edition, ‘one-off’ regurgitations of, or homages to, glories past. This is a shame because Omega’s heritage is steeped with a convincing sense of authenticity in its credentials as a manufacturer of watches that arguably evades a company like Rolex.
Through the 1950’s and 60’s, Omega established a reputation as a maker of luxury watches to suit pretty much all applications. Omega catalogues from the early 1960’s presented a coherent range of watches, with a number of different sub-brands each fulfilling a particular niche. The top of the precision tree was occupied by the Constellation Chronometers, fitted with officially certified chronometer movements.
 The Seamaster, whose origins date back to the second world war when the British Armed Services commissioned Omega to produce a watch that combined sturdiness under combat conditions with precision, maintained that essential proposition: “flawless accuracy even at 200 feet below the sea.
 An extrapolation of that premise is provided by the iconic Seamaster 300 diver’s watch whilst the Speedmaster covered the chronograph angle in providing timing and stop-watch functionality.
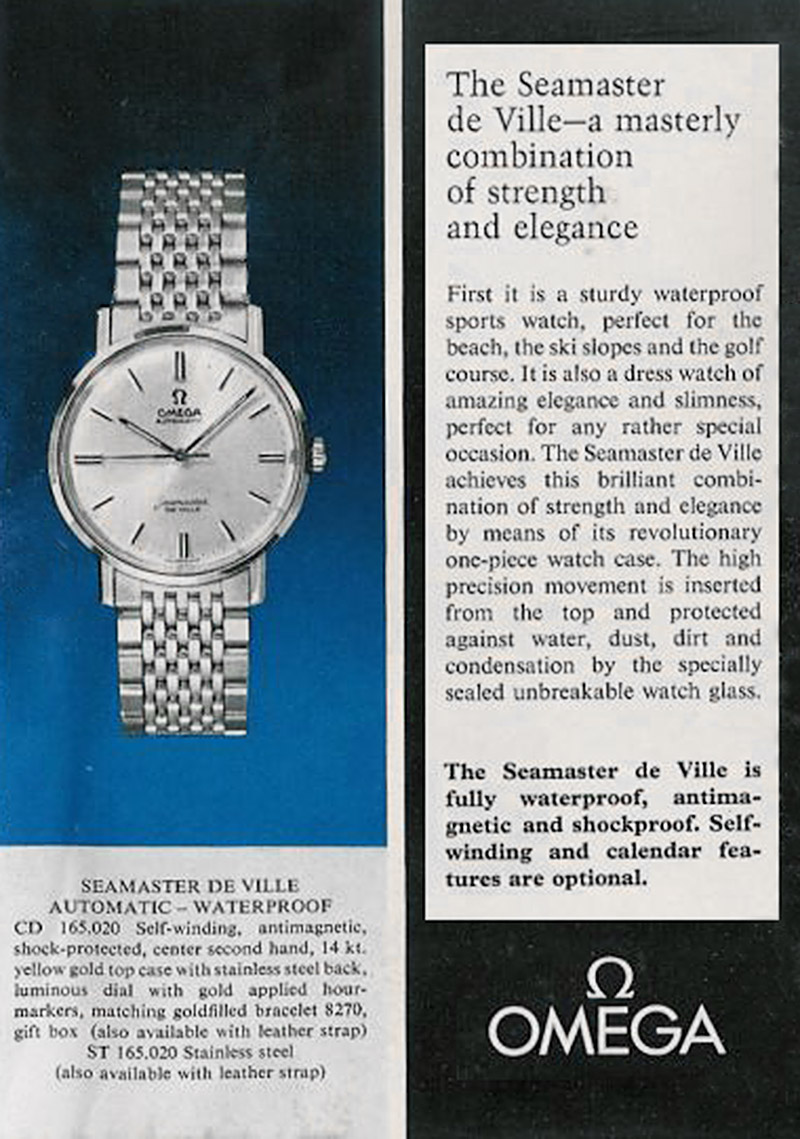
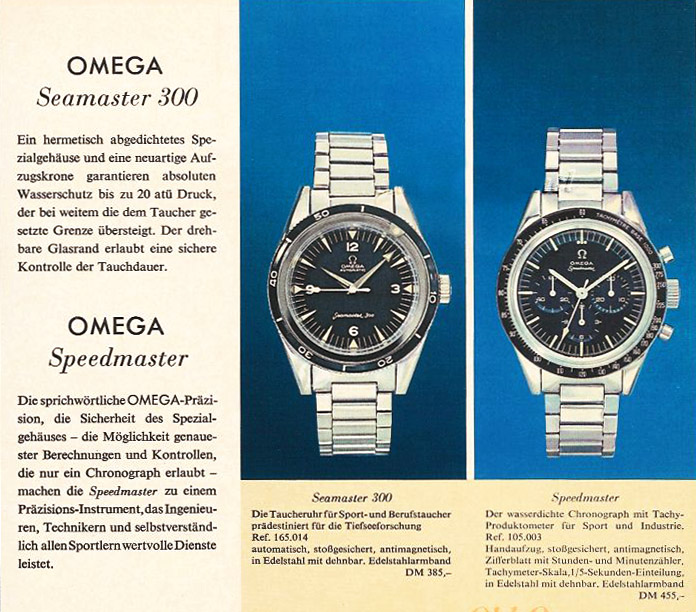 The bonus piece of the niche jigsaw is provided by the Seamaster Deville, combining ‘the ruggedness of a sports watch with the elegance of a slim dress watch’. This seemingly conflicting combination of elements was achieved by dispensing with the conventional removable case back and fitting the movement and dial from the front into a one-piece case. Water resistance was provided through a combination of a specially-sealed acrylic watch crystal and a water proof crown.
 It is an example of this last category of early 1960’s vintage Omega that forms the basis of this current entry. You may be wondering how a 56 year-old Omega dress watch has inveigled its way into the ocean of oriental content that defines to a large extent the spirit of this blog. The answer to that question derives from my accounts of the acquisition and subsequent servicing of an old stock 1975 Seiko King Quartz. A short time after completing that project, an Australian reader expressed an interest in its acquisition, and I agreed to sell it for a nominal sum that covered my original purchase costs but took no account of the service. The gentleman in question very kindly offered up an Omega Seamaster De Ville that had been languishing unused in his collection by way of compensation for the service. Transaction completed, and a couple of weeks later, the De Ville arrived. This was in July 2015 and somehow nearly 4 years have passed before it has occurred to me that I might attempt its revival.
 In spite of appearances, the watch was complete but the two-part stem had snapped and so the crown parts were supplied separately.
 The package also contained an aftermarket replacement crystal, a replacement crown tube and a couple of spare screws. This being a De Ville, the movement is accessed from the top and because the crystal was already loose, all that was required was to rotate the movement locking ring anti-clockwise to its stop, invert the case and ease the movement out.
 The dial and hands are removed in the usual way and we can take a closer look both at the condition of the dial and that of the dial side of the movement.
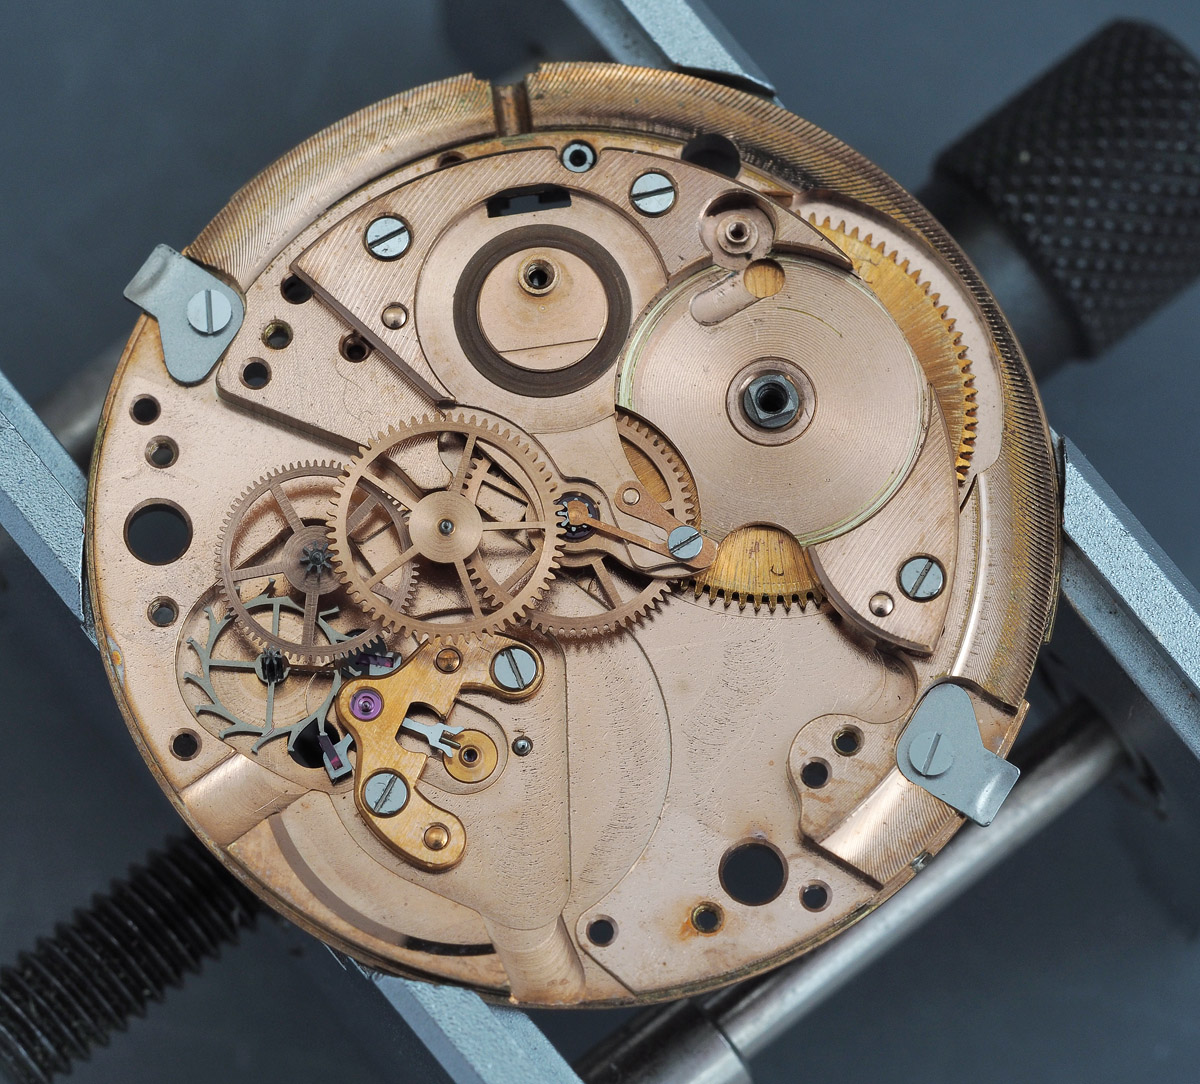
 The dial is clearly peppered with age spots but in spite of this, it is still an object of beauty. The movement looks sound from this side, although missing the hour wheel film washer and I note too that the setting lever pressure spring is corroded. The business side of the movement is much more interesting and allows us to take in what exactly it is that we are dealing with.
 The markings on the train wheel bridge identify this as an Omega 552, a member of the 550 series of Omega automatic movements that featured fully rotating rotors with bi-directional winding. The base movement is the 17 jewel 550, introduced in 1958, 4.5mm in height, indirect centre seconds, automatic, running at 19800 bph and featuring swan-neck regulation. The 552 increased the jewel-count to 24 and was fitted to mainstream Seamasters and De Villes. The chronometer-spec 551 was essentially the same as the 552 but adjusted to 5 positions and temperatures and fitted to the top-of-the-tree Constellations. The serial number inscribed on the train bridge is in the low 20 million range which dates the watch to 1963.
Now, there are a couple of curiosities to note with this particular example. Firstly, and of most significantly, the upper bridge for the automatic winding mechanism is marked with ‘adjusted to five (5) positions and temperature’. To the best of my limited knowledge of these movements, the 552 was not a chronometer movement and certainly not when fitted to the De Ville and so I can only conclude that the autowinding mechanism on this watch must have been substituted with one from a 551 at a previous service. The second noteworthy point is that the rotor is clearly not one from a 1963 552 but is of the later design used in 550 series movements towards the end of the decade. I suspect that this example is a service replacement. The rotor and bridge of my 552 should resemble those of the 565 fitted to my now long gone self-build Seamaster 300.
 That rotor is a proper work of art and somewhat puts to shame the rather simpler rounded profile of the service replacement.
This being my first time through with a 550-series Omega, and given the lack of a comprehensive service guide, I was having to follow my nose to a degree in figuring out how to proceed. A reasonable first step seemed to be to remove the autowinding bridge and perform a timing check to see how well (or not) the movement was running. The bridge is secured in place by just two screws, one at either end.
 You will see that I am using a substitute crown and stem sourced from my box o’ bits. With a full wind’s worth of power under its belt, we can see how she’s running. Dial down, the amplitude is low and the beat error chronic but the traces look clean enough.
 Dial up is another story. Oh dear.
 The reason the trace stops where it has is not because that’s when I took the photo but because that’s the point at which the movement threw its hands up in surrender. Clearly some work is required to restore this wonderful movement to full health once more.
Returning to the job in hand, I start by tackling the ratchet wheel. Or rather the ratchet wheels. The 550 series feature a clever winding system that features two ratchet wheels, one of which, the main ratchet, primarily serves the hand winding capability and the other, the automatic ratchet, is driven by the autowinding mechanism as well as the main ratchet as required. The two ratchets are mounted one atop the other with the main ratchet mounted freely on the automatic ratchet which in turn is mounted onto the barrel arbor through its square holed aperture. The main ratchet rotates the automatic ratchet via a satellite pinion operating on the inner teeth of the automatic ratchet.
 The design ensures that winding of the main ratchet simultaneously winds the automatic ratchet but operation of the automatic ratchet through the automatic device provides no reciprocal action on the main ratchet. Moving on, we see that the crown wheel and click are of a fairly conventional design.
 Removing the balance and train wheel bridge provides us with a nice view of the gear train.
 This movement uses an indirect sweep second pinion driven by the third wheel. The triangular train wheel bridge secures the third, fourth and escape wheels whilst the sweep second pinion is held in place by a friction spring.
 The remaining parts from this side disassociate themselves from the main plate with a little help from me and we can flip over to survey the final stages of the dismantling of the setting parts.
 A bit on the mucky side and the corrosion of the setting lever pressure spring a little more evident than in our initial appraisal. Note the proprietary Omega antishock spring set against the Incabloc jewel serving the lower balance pivot.
The automatic device on these watches is ingenious.
 The bidirectional winding is orchestrated by the winding gear (550.1464 in the figure below) whose job it is to convert both clockwise and anticlockwise rotation of the rotor into clockwise rotation of the automatic ratchet wheel discussed earlier.
 The winding gear comprises two winding wheels, H and I, that sit either side of a winding wheel core, J, upon which are mounted two satellite pinions, K and L.
 I’ll attempt to describe how the device works by taking us through what happens when the rotor turns clockwise and then anticlockwise as viewed from the perspective in the figure below.
 Clockwise rotation of the rotor pinion A turns the winding wheel B in the opposite direction and this in turn causes the superior of the two winding wheels to turn in the direction F2 in the figure above. The rotation of the superior winding wheel is transmitted to the winding wheel core through a locking of the superior satellite pinion K and it is this that turns the pinion G in the same direction. Pinion G then drives the ratchet wheel driving gear, E, in an anticlockwise direction and this in turn drives the automatic ratchet in the direction F3. So far so good. Now what happens when the rotor turns in the opposite direction?
 This time, the anticlockwise rotation of the rotor pinion drives both winding wheels B and C, with C meshing with the inferior winding wheel of the winding gear causing it to turn in a clockwise direction, F2, this time controlled by the inferior satellite pinion. I sense that I may be at risk of lulling some of you off to sleep and so let’s curtail this and march on with the business of trying to put theory into practice. This necessarily, requires me to break down the autowinding device into its constituent parts.
 The final part of the dismantling process is to release and inspect the mainspring.
 This looks healthy enough with no kinks or distortions and so I propose to reuse rather than spring (!) for a new replacement. This brings us to the half way point. We’ve reached the summit, but we still have to find our way back to base camp. Retracing our steps begins with installation of the now clean mainspring back into the barrel, noting the lovely finishing of the barrel.
 You will remember that the two part stem was broken and so a new stem was one of the small number of parts I have had to buy in preparation for the rebuild. This prompts a consideration of what to do with the crown, whose gasket is long past its sell-by date. If possible, I want to keep this as original as possible and so rather than attempting to find a new crown, I opt instead to replace the gasket, its encapsulated state notwithstanding. The first step in this process requires gasket extraction.
 Some minor impairment to the retaining washer resulted from my exertions but nothing to lose sleep over. Having cleaned the crown, I installed the new stem but will wait until the service is complete before selecting a suitable replacement gasket.
 Meanwhile, the rest of the movement parts have been cleaned and dried and we are ready to begin reassembly. First up, the setting parts, upon which I have lavished a brand new setting lever pressure spring.
 The dial side Incabloc comes next, with its unfamiliar spring design.
 Turning over to the train side and we can install the centre wheel, barrel and barrel bridge.
 The escape, fourth and third wheels follow together with the centre seconds pinion and its friction spring, topped off with the train bridge.
 Construction of the crown wheel, click and ratchets proceeds straightforwardly.
 At this point, we are ready to install the pallet fork but when I inspected it prior to installation, I noticed that the fork itself was not flat.
 There was a crease half way along the fork extension which meant that the fork itself was not sitting in the same plane as the pallet jewels. So progress halted at this point while I tracked down a replacement. An excellent seller in Sweden came up trumps and a few days later, a replacement arrived. With the new part cleaned and fitted, we can move on.
 With the balance and its Incabloc installed, some power wound into the mainspring, she’s off and running.
 One hurdle I had yet to overcome was the lubrication of the winding gear in the automatic device. You will see from the exploded figure shown earlier that the gear comprises seven separate parts and the service guide details how each part should be lubricated. It also sets out how to dismantle the winding gear but this requires special tools. It is possible to improvise but I did not want to run the risk of damaging the part and so instead followed a suggested route to lubrication recommended on one of the Omega forums. This suggests that following cleaning with the other parts, the assembled gear is immersed in Lubeta V105 immersion lubricant designed especially for reversing gears. The process is as simple as immersion for 10 seconds, removal of excess solution using a blower followed by drying within a bell-housing for 15 minutes.
 I followed this procedure and installed the winding gear along with the other parts into the automatic winding device.
 Refitting the autowinding device almost completes business on this side of the movement.
 The winding weight is fitted by simply positioning its pinion over the central shaft and then securing it into place with the polished gib.
 With the cannon pinion and hour wheel fitted the only missing element on the dial side is the hour wheel film washer. A suitable used substitute located, and we are ready to receive the dial.
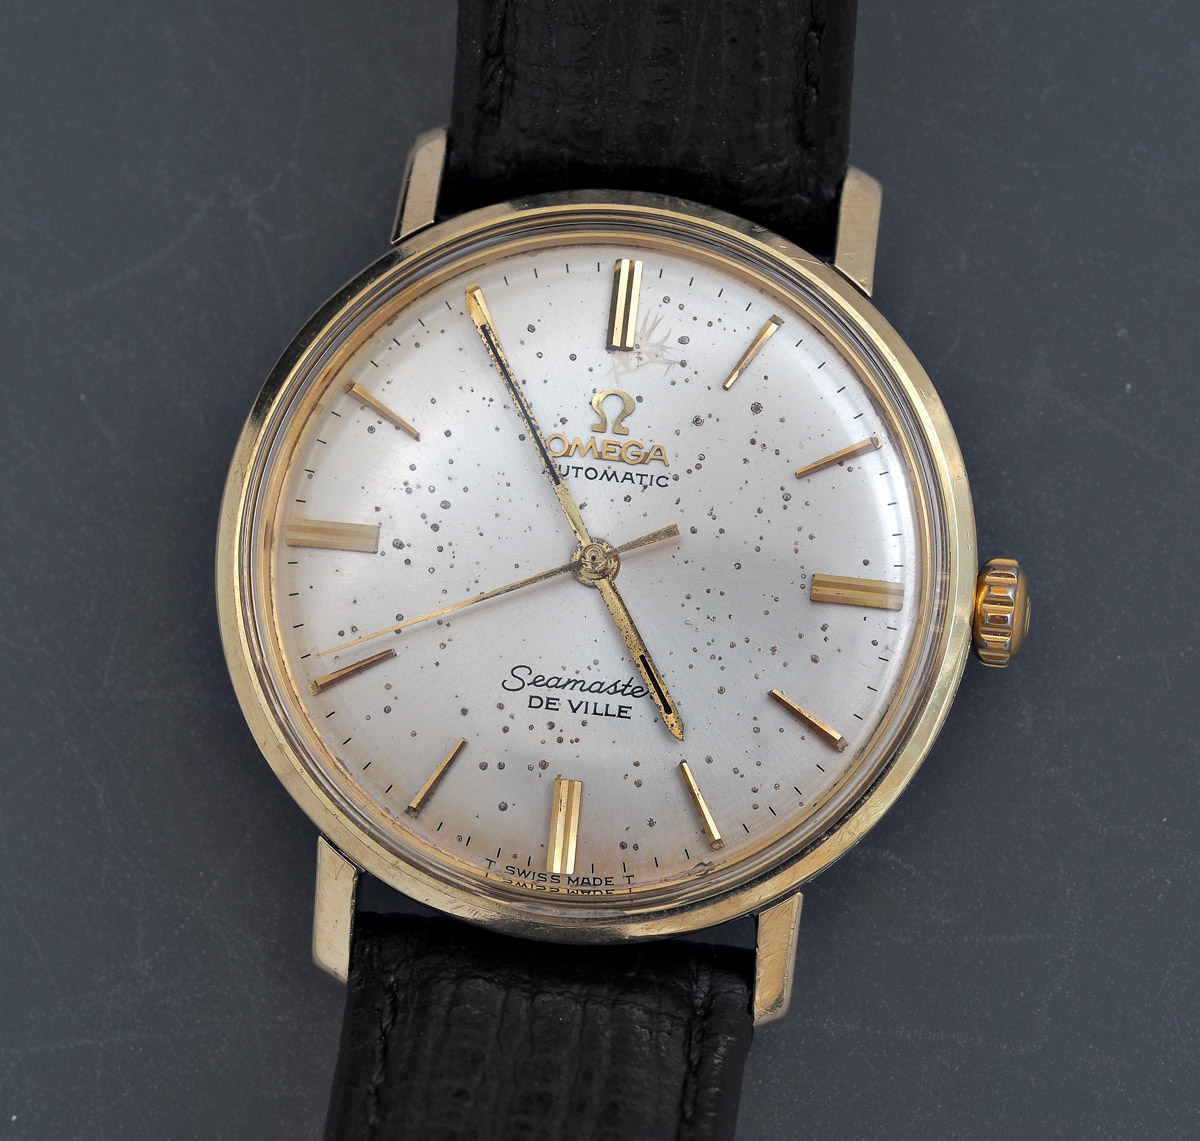
 I had entertained attempting to find a replacement dial, but with that appearing to be a fairly remote possibility, I started to come around to the view that the dial spots are in fact beauty spots and should be displayed with pride. In fact they are just freckles and as everyone knows, freckled faces are wonderful.
 Let’s take a break from the movement and turn our attention to the hands. While the dial flaws can be celebrated, the hands were verging on decrepit. In fact, in attempting to clean off some of the corrosion, the seconds hand disintegrated altogether and I had to source a spare from an old Omega Geneve I had left over from a previous project. You may also have noticed in the opening appraisal photo that the black infill on the minute hand had mostly fallen out and so some sort of relume job was required. I accomplished this by removing all of the old infill on both hands and replacing it with a mix of white lume powder, black matt emulsion paint and binder. This seems to have done the trick.
 The gold cap case was in excellent condition and only needed a proper clean.
 The last bit of casing housekeeping required was to source and fit a suitable crown gasket.
 We are pretty much ready at this point to refit the movement to the case. I should mention before doing so that the movement was showing between 250 and 275 degrees of amplitude with its original mainspring refitted and noiseless timing curves with low beat error and so I was content enough to commit to reuniting movement and case knowing that any subsequent regulation would require a rather tedious business of extracting crystal and movement from the top once again. The process continues therefore with crown and female part-stem being separated from the male part.
 Having at this point already refitted the hands, the movement can be eased into position.
 The crown with its female part-stem is then placed through the crown tube with its slot aligned with the male part and simply pressed into place with a satisfying click (no sniggering at the back please).
 Any good plot line has some sort of twist to round things off and this is no exception. You will remember that I reported at the start that the watch had been supplied with an aftermarket acrylic crystal. The part number on the packaging was G22740 which corresponds on Cousins’ site to a 31.6 mm domed acrylic with gold tension ring. Mine even had an Omega symbol impressed at its centre. The design of these one-piece cases is incorporates a collaboration between the case bezel and the profiled edge of the OEM crystal to form the water-tight seal.
 My replacement crystal however had a simple flat profile to its sides and could be fitted first, with the bezel following. Innocent as I was initially to these subtleties, I fitted the crystal and bezel and then proceeded to check the timing again. Much to my exasperation, the amplitude had dropped and the timing nowhere near where it had been out of the case. A couple of recycled in and outs later and I was none the wiser and starting to think that something else was amiss with the movement. However, after the final cycle with this aftermarket crystal, the movement stopped altogether with the crystal in place but restarted once more as soon as the crystal was removed again. I noticed too that the crystal tension ring was left sitting around the periphery of the dial rather than coming away with the crystal. This was my light bulb moment. In pressing the crystal into the case, the ill-fitting tension ring was pressing down onto the outer edges of the dial to the extent that it was exerting excessive force and somehow impeding the operation of the movement. With that pressure removed, the movement ran sweetly once more.
The solution of course was to buy an Omega crystal (PX5072) with the correct external profile. Refitting requires the bezel and crystal to be fitted together rather than in sequence and with this done, the watch was complete and running happily.
 One minor challenge to fitting the crystal is to ensure that the embossed Omega symbol at its centre is correctly aligned.
 I have for some time felt that the 550 series of Omega automatic watch movements is one of the more charismatic and certainly most beautiful of all. I have been wanting to tackle this particular project for some time but had not been energised sufficiently to do so partly I think because of the slightly dilapidated cosmetics but also because I knew so little about the brand and had no real emotional investment to commit.
 However, I am really pleased to have finally done so now, so much so that I’ve started trawling through auctions for 1950’s and 60’s Seamasters and Constellations in the hope of taking another crack at this most iconic of watch movements. I need to get my eye in first so while I anticipate some more Omega content at some point again in the future, I can’t guarantee it will be soon. In the meantime, I will take pleasure in wearing this one from time to time, and taking satisfaction in knowing that in spite of its elegant, classic lines, beneath is a watch of considerable substance.


Wow! Another great read Martin, especially so for me as I’m the Australian in the story!
If memory serves that Omega came to me via Nick Hacko, watchmaker, in that same sorry state, as part of a bundle during a clearing out sale he held many years ago.
I’m grateful for your effort repairing it and generosity in sharing the story with us.
I do still regularly wear the lovely King Seiko and enjoy it very much.
Thanks again!
Steve.
Thanks Steve. It had been so long that I had had to refresh my memory about how it had come into my possession. Anyway, we got there in the end. Glad to hear you are still enjoying the King Quartz!
…and to comment Steve’s post, Nick Hacko is yet another great person who thinks educating amateurs in the art of watches is good thing 😀
Well done. Well researched and written review. I enjoy reading these.
Thanks!
Just come across these posts & have found the whole thing a revelation, the quality of writing, the photographs & the quality & quantity of information is incredible. Thank you very much.
David – thank you. Any and all appreciation welcomed!
Hi Martin, thanks for the great writeup! I have a few questions if you don’t mind as I’m in the midst of having my grandmother’s 1961 Seamaster restored. It also has the 552 movement.
First, that last photo you have of the plexiglass. I can’t tell if the outer edge of the glass top is square and boxy in shape or curved and round in shape? I believe the original PZ5072 has a round/curved edge which is the style of the ’60s? But your photo, from that angle, it looks like it has the boxy/square edge of the modern glass?
Also, the crown is, I believe, ST43041. Do you know if that crown comes with that femal outer winding stem attached and the rubber gasket already inside? or do we get those separately? If so, what would be the part number for those? I would like to find NOS.
Lastly, do you know if NOS of those hour, minute and second hands can still be purchased? I need the steel versions. Any idea on the part numbers for those? Current replacements look to be about 2 mm shorter than the originals.
Thanks a lot!
Hi Jimmy, I’m afraid that I can probably only answer the first of your questions. The crystal I bought is domed but does have an edge near the bottom of the dome. So not perfectly smoothly curving dome but not boxey at all. As for crowns and hands, I reused the originals and don’t know what modern replacements are available. I would suggest you input the model number of your watch into Cousins UK website and see what it reports back. Good luck!
How about I make this a bit easier to answer. Does it look like A: https://image-host.s3.amazonaws.com/DSC03242.jpg or B: https://image-host.s3.amazonaws.com/DSC03238.jpg ?
I also have a few questions regarding the winding. Do you find the winding to be a bit tough? That is, is the winding a bit stiff? I find that my other mechanical watches are much easier to wind as the gears/spring don’t seem to be as stiff as on the 552? Either that or the movement needs service. Also, do you know if the movement has protection from over-winding? I didn’t want to test it out so thought you might know from looking at the movement.
Thanks!
Hi Jimmy, the crystal I have looks like image A. As for the winding action, you must remember that this is a hand-winding automatic and so there will be additional resistance from the automatic winding device and the winding gears within. As this is an automatic movement, there is a slipping bridle at the end of the mainspring whose job is to allow the mainspring to slip just enough at full wind to maintain full power with no over-winding possible. If you continue to hand wind the movement to full power, you may feel some additional resisitance just before the point at which the bridle starts to slip but then continuing to wind will serve no purpose. In fact, there should not really be any need to wind in more than a few winds of power from stopped because the automatic rotor will then pick up the task.
Hi Martin, I came across your nice write up when searching how to replace crystal on the Deville. I had already separated the the cracked crystal from the bezel. In an attempt to put a new one (5072) back on using a generic fitting press from Amazon, I notice that none of the plastic dies would fit perfectly over that thin bezel. Was there a special tool from Omega that you used to press the crystal back onto the bezel (or trick/special technique)?
Thanks!
Ah the swiss claw finally arrived and it made the installation relatively painless and super easy. Returning the junk lift & insert tool from China. Wha was I thinking earlier….
Glad to hear it! Well done.
Hi, I am sorry to ask such a basic question but I have a Seamaster De Ville with serval scratches on the crystal. I took it to a jewellers who said that the scratches could not be buffed away as the surface was plastic and the whole crystal would need replacing. I note that you describe the crystal as acrylic but the diagram above labels it as armoured glass. I was sure that I had previously simply had the crystal buffed to remove the scratches. Do you have any advice?
Watch glass would have been and is a generic term used for the crystal and in this case the glass is made of acrylic. As long as the scratches in your crystal are not too deep, you should be able to polish them out using Polywatch or similar compound.
My Omega Seamaster De Ville 165.020 (silver) crown is detached when I pull it out for time adjustment. Which parts do I need to get it fix?
That depends on what, if anything, is actually broken. It may just be that the female and male parts of the two part stem have separated in which case, realigning and pressing the crown back home may be all that is required. If the coupling is worn or broken, then you may need a new male part stem and/or the female stem extension and/or a new crown.
If the coupling is worn or broken, where can I buy the male n female stem? What are the parts no.?
You could try Cousins in the UK. If you do a search under Watch Parts Branded > Omega > Omega Movement Parts and then input 552 for the movement, you should see options for male/female stem parts. I am not an Omega expert and so cannot say for sure what the correct part numbers are.
I found the following parts in the Cousins website:
1. Stem ( 1106 ), Omega 550
2. Stem, Inner ( 1160 ), Omega 550
3. Tap 9 Female Stem Extension
4. Tap 9 Female Stem Extension (No Shoulder)
Are item 1 and 3 I needed? Thannks.
Item 1, no. That is a full stem for a case with a removable case back. I don’t know what the difference is between items 3 and 4 though.
I have a spare female stem for sale, the one that’s attached to the crown itself. The male stem you can find on eBay.
Also there are Omega Crowns with Stem, are these suitable for my watch? Thanks.
Again, I don’t know – sorry. I suspect they may not have the same appearance as your current crown but that depends on how old your watch is and whether the crownn is original.
Thanks Martin. It’s alright, you helped me a lot already.
Hi, a very nice and informative report. I myself have an DeVille US-version from the New York Omega dealer Norman Morris. I have noticed that you have added nice technical illustrations that obviously come from old documents. Where did you get these or where do they come from? Regards, Marc
Hi Marc,
I just used extracts from technical manuals that I had found online. Relatively easy to locate as I recall.
All the best
Martin
Hi Martin, thanks for your feedback. Yes, in the meantime I found something at “Old- Omegas / Richard Grimmel”. Technically nothing new but I love these old technical detailed sheets and templates. Thanks again. See you then. Marc
Do you service watches? I have an omega Seamaster deville with day date. And how much?
Hi Ignacio, I’m afraid that I do not take on third party work at all – sorry. Please see the About tab for my motivations.
Fantastic article! Thank you.
I am about to start servicing a cal 552 as well and your point about the reversing wheel and Lubeta v105 were incredibly helpful.
One question though: how did you lubricate the different elements of the “double ratchet wheel” and the rotor pinion?
Your advice would be greatly appreciated!
It was a little while ago and so I can’t recall exactly but I will have followed the lubrication guide from the 551 service manual. Probably!
Hi, thank you so much for the detailed documentation of a very professional service. Apologies for reviving such an old thread, but I had a question; I have an Omega 14735-1SC which needed a new crystal. After some rudimentary research, I was able to identify it as a 5072 crystal which seems to be the same as the watch you documented (both have very similar monocoque cases as well). After the old (incorrect) crystal was removed from the bezel, I installed the tension ring to the new crystal and attempted to marry it with the bezel. Unfortunately, it seems the bezel would not accept the crystal. I then tried to install the bezel first, but then the tension ring would not fit inside the crystal. Could you kindly elaborate the crystal replacement procedure in a bit more detail? It would really help me out!
Thank you so much for providing exceptional documentation on the servicing of beautiful watches.
Best regards,
Aayan
Hi Aryan, it’s been a while since I fitted mine but the trick with these is to fit the crystal to the bezel first, hen fit the tension ring and finally the whole lot to the case. The correct PX5072 have a stepped profile to the edge and this seats into a groove in the bezel. My experience was that generic crystals do not fit properly and so you need to confirm that yours is a genuine Omega crystal. Good luck!
Thank you so much for your reply Martin!
I purchased the 5072 from Cousin’s UK, it is generic but I believe it is the correct dimensions. Once the crystal is installed onto the bezel, the tension ring seems to have insufficient space to fit inside it, the two ends of the tension ring overlap. Though when the bezel isn’t installed the tension ring fits perfectly onto the crystal.
If the tension ring is installed first, the bezel doesn’t accept the crystal, and if the bezel is installed first the crystal doesn’t accept the tension ring. I’m at a loss honestly. Once again though, thank you so much for getting back to me!
Regards,
Aayan
My experience was that the generic crystal does not fit because it does not have the correct cutout to seat properly in the bezel. You probably need to buy a correct Omega part.