
Tags
Just as the 1964 Tokyo Olympics served as a celebration of Japan’s reemergence onto the world stage as a first world economic power, it crucially also provided the catalyst for a hugely ambitious program of infrastructure modernization that would include the completion of the Tokaido Shinkansen, the construction of subway and highway networks across the Tokyo Metropolitan area and the modernisation of Haneda International Airport. The games were noteworthy too for the introduction of such technological innovations as the photo finish to determine the outcome of races and the use of sophisticated sports timing devices such as those used in the Olympic pool that used the sound of the starter’s gun to start the timer and electrical impulse from touch pads at the end of the pool to stop it.
 The Official Timer for the Olympic games was to be Seiko but with no experience in sports timing prior to the games, they were faced with a considerable challenge to get up to speed. Work started in 1961 with each of the three Seiko divisions taking on different responsibilities for the project: the large timing instruments were the responsibility of the Seikosha Clock Factory who also shared responsibility with the Suwa division for the printing timers for cycling, modern pentathlon and equestrian events. The Suwa division was responsible for crystal chronometers whilst Daini Seikosha took on the development of stop watches, electronic timing instruments for swimming and printing timers for rowing, canoeing, swimming and athletics events.
 As part of the process, it was natural that the company would want to produce special wristwatches to mark Seiko’s role in the project and so in 1964 Seiko released their first GMT watch, the World Timer 6217-7000 and their first chronograph, the one-button Seiko Crown 45899, both of which sporting case backs embossed with an image of the Olympic flame.
 Although the significance of the World Timer was clear in playing the internationalisation card, for me it is the chronograph that resonates more compellingly with the Olympic theme. The 45899 was fitted with a simple one-button chronograph featuring a traditional pillar wheel that orchestrates the transferring power from the third wheel to the chronograph wheel via a horizontal arrangement of coupling wheels. In a design whose primary function is to engage, disengage and reset the sweep seconds hand, this approach is conventional, elegant and effective. Towards the end of the same decade, Seiko would adopt a different strategy in designing its one and two register automatic chronographs, with a vertical clutch responsible for transferring power not only to a sweep seconds but to a minute register.
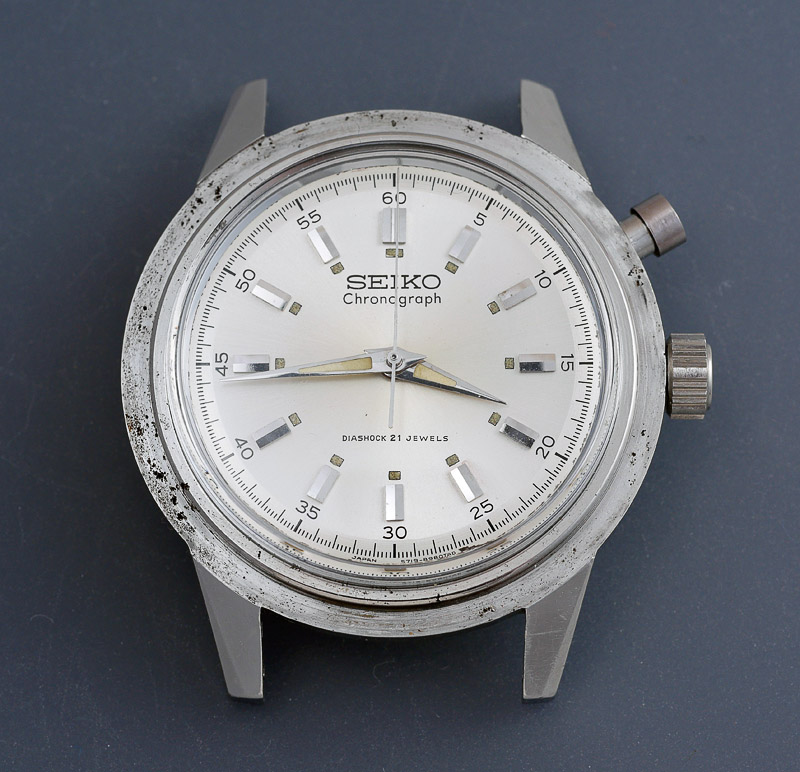
The original one-button chronograph of 1964 spawned a bewildering number of variations on the central theme, with different dial designs and colours, plastic or metal turning rings, turning rings with inserts and watches featuring a date complication. The non-date watches were fitted with the 21 jewel 5719A movement running at 18000 bph; the dated watches with the 5717A. Both movements are based on the 560 Crown movement which also spawned the 5740 series fitted to the Lord Marvels as well as the 3180, 430 and 5722 chronometer movements fitted to the first Grand Seikos.
Time to meet our 52 year old Olympian. I bought mine about 18 months ago reasonably cheaply for reasons which should be evident from the arrival photo below.
 The watch makes a poor initial impression through the truly knackered condition of its original bracelet, the eroded push button and heavily worn plastic bezel. But there is a ‘however’ lurking: the dial and handset look very nice indeed, barring some minor yellowing towards the dial centre. The serial number on the case back dates this particular watch to October 1964, the month in which the games were held, which adds a certain additional appeal, in spite of the obviously compromised state of the exterior. Removing the ratty bracelet allows a more level-headed appraisal face on.
 The most important aspect of any vintage watch is the dial and handset and in this respect, I think we have a very nice example on our hands. In fact, at the time, I felt the watch had sufficient potential to delay diving in until I’d at least attempted to find a suitable bezel and push button to replace the heavily worn originals.
Inevitably, the bezel hides a goodly amount of grot as well as a little surface corrosion here and there.
 A view from the crown side exposes the very poor condition of the button pusher, its outer cylinder entirely missing.
 One not unexpected additional sign of the age of this watch is the almost obligatory stress fracture to the press-on case back. Probably the majority of watches I own from this period with press-on case backs have cracks adjacent to the cut-out.
 Time to take a look at the movement.
 Not having worked on one of these before, it all looks tidy, with nothing obviously missing or out of place. Plenty of tarnishing mind but no reason to suppose that we can’t get this ticking along nicely again. One thing that does catch my eye though is the jeweled bearing supporting the chronograph wheel which appears to be filled with some brown slurry.
 The brown colour suggests that the pinion might be corroded. First things first though and we need to extract the movement and attend to the dial and hands.
 Removing the hands was complicated by the fact that the sweep seconds hand was a great deal more reluctant to part company with its post than the hour and minute hands and so I had to remove the seconds hand separately before attending to the other two. With the dial and hands liberated from the movement, we can take a look at the lower side of the movement, refreshingly free from calendar complication clutter.
 The first order of business on the upper side is to remove the balance, thereby providing a nice view of a stack of bridges sitting atop the main plate.
 Before we can get to the chronograph bridge we need to remove the collection of levers, clutches, springs and hammers that transmit the binary instructions from the columns on the pillar wheel to the horizontal train of coupling wheels connecting the fourth wheel to the chronograph wheel. This process is documented below as follows: top left: brake lever, spring and its screw; top right: coupling clutch, spring and its screw; bottom left: hammer snap and hammer (during which operation the snap snaps!); bottom right: operating lever and its left handed screw.
 The pillar wheel jumper, followed by pillar wheel come next, not forgetting (or losing) the pillar wheel ring.
 We are now in the position to remove the chronograph bridge that provides access to the upper end of the chronograph wheel and a view of the suspect pinion.
 The wheel itself looks ok but the pinion is somewhat on the rusty side and so this part will probably need replacing. The chrono wheel comes out followed by its friction spring which then allows the train wheel bridge to be removed, exposing the crown wheel and click on its underside.
 You will notice in the photo above that the fourth wheel and pinion has in fact two fourth wheels: the lower and larger of the two serves the conventional role of driving the escape wheel while the upper, smaller wheel plays the roll of chronograph fourth wheel, there to pass power on to the chronograph wheel via the coupling wheel. To the right, above, we also observe that the click unusually interfaces directly with the crown wheel rather than the ratchet wheel on the barrel.
In completing the dismantling of the movement, no surprises presented themselves and so it is into the cleaning machine with everything barring the mainspring (which I always clean separately). While the movement parts are percolating, we can turn our attention to the case.
In close-up it inevitably looks rather worse than it does at distance.
 The crystal is a conventional tension ring equipped acrylic and so removal requires only a pair of thumbs pressing up from beneath.
 The corrosion in the channel in which the crystal sat looks worse than it actually is. As is generally the case, the volume of oxidation product comfortably exceeds the volume of material lost, occupying about six times the volume of the original iron in the steel.
The pusher presents the only minor impediment to progress, requiring the button stem to be unscrewed from the inside of the case while holding the button with sufficient force to allow purchase on the screw.
 With that accomplished, we can get a much better view of the stem and its push button in all its degraded glory.
 Proof positive that human sweat is acidic. The usual cleaning routine on the case has an acceptably transformational effect, and once thoroughly dry, I fit a fresh crystal and set it aside for the moment.
 We are ready now to start to rebuild the movement, beginning as usual with the installation of the cleaned mainspring into the barrel. On this occasion, this not being an automatic movement with a slipping bridle, the spring is inserted back into the barrel with the tongue at its end positioned to slot back into the groove machined into the inner wall of the barrel.
 As we’ve met most of the key components in the dismantling of the movement and as reassembly up to the fitting of the train wheel bridge proceeded smoothly we can skip to the point at which I contemplate that corroded chronograph wheel pinion. I suspect that if I had fitted the original part, the watch would have run happily enough but in the interests of doing the job properly, I opted instead to replace the wheel with a new part. In the image below, the outgoing part is on the left, incoming ‘new’ part on the right.
 The use of the adjective ‘new’ in this instance means of course that it is a part manufactured half a century ago and depending on the condition in which it has been kept since, may well not necessarily conform exactly to one’s expectations for how a new part might appear. In this case, the pinion of the new wheel is clearly a huge improvement but the profiled heart cam shows some signs of corrosion along its edge. I am not unduly concerned about that though as the slightly rough edges should not effect the functioning of the cam. A period in the ultrasonic cleaner, and I am happy to fit the new part.
 Note the friction spring seated in the channel beneath the wheel. Next we fit the chronograph bridge which secures not only the chronograph wheel but also the chronograph fourth wheel. With those two now seated in their jeweled bearings, the movement has reached the point where it will run once the pallet and balance are fitted. So that’s what we’ll do next.
As I’ve yet to find a way to oil the pallet stones in situ cleanly, I am in the habit of doing so before fitting the pallet fork into position.
 The pallet cock, balance and Diashock jewels all take their positions and with some power wound into the main spring, she’s off and running.
 Satisfied that the movement is running strongly (with the amplitude peaking impressively at about 305 degrees), the pillar wheel, operating lever, hammer, coupling clutch, brake lever plus the two springs all find their way into position in reverse order to that in which they parted company earlier in proceedings. The only point to note is that I fitted a new snap securing the hammer, the original having cracked during removal. In the photo below, we get a bird’s eye view of the chronograph train with the chronograph engaged.
 The key components are: 1) the chronograph fourth wheel; 2) coupling wheel; 3) centre chronograph wheel; 4) reset hammer and 5) brake lever. You can see that with the chronograph running, all three wheels are connected and power can then transfer from 1) to 3). The columns on the pillar wheel are positioned in such a way that both hammer and brake lever ends are in contact with a column each but the end of the coupling lever sits between two of the columns (you can see it just beneath the 4 in the photo. Clearly, with the chronograph running, there will be some additional drag on the train and indeed, in this condition, the amplitude reduces to 275 degrees.
Pushing the button once rotates the pillar wheel clockwise one notch with a column then coming sufficiently into contact with the end of the coupling lever to decouple the coupling wheel from the centre chronograph wheel. Simultaneously with this action, the brake lever is brought into contact with the edge of the chronograph wheel, maintaining its position at the point at which the chronograph has been brought to a stop. Pushing the button again moves the pillar wheel one more notch clockwise, which action lifts the brake off the chrono wheel and swings the reset hammer onto the cam, resetting the chrono wheel to the 12 position. Here it is in that third state:
 Note that the coupling wheel is no longer in contact with the chrono wheel.
Satisfied that everything appears to function as intended, it is time to fit the dial followed by the hands. The sweep seconds hand is naturally fitted with the chronograph in its reset condition.
 So far so good, but the two key areas of aesthetic weakness in terms of the exterior aspect are that eroded push button and the worn plastic bezel. The first of these I solved a month or so after landing the watch itself, stumbling upon an auction for a push button, no additional description but it looked like the correct part and so I went for it, although at a cost of a little more than a quarter of the price of the watch itself. The bezel would have to wait a further 10 months when at vast expense, I snagged a brand new old stock plastic bezel, still sealed in its original packaging and, needless to say, at a price more or less the same as what I paid for the watch. With these two loose ends sorted, the cost of the project has comfortably more than doubled but in for a penny, in for a pound.
Here is the case, with that new button fitted, and secured in place with a dab of Locktite on the end of the stem thread.
 The hardened and inextricable gasket in the original crown means that the new button will need to partner up with a new crown, this time secured from an Ebay seller in Germany, once again at significant expense.
 Fortunately, the gasket in the new crown is still supple and so that investment (and slight gamble) appears to have paid off. We are finally ready to fit the movement to the mid case and check that the hands clear the inner surface of the acrylic crystal.
 The case back gasket provides a minor challenge in that originals appear to be unobtainable and so some careful measurements and a bit of hedging later, I have a pack of three Cousins gasket that do the job admirably. The case back snaps into place and we can turn the watch over to see how we are doing so far.
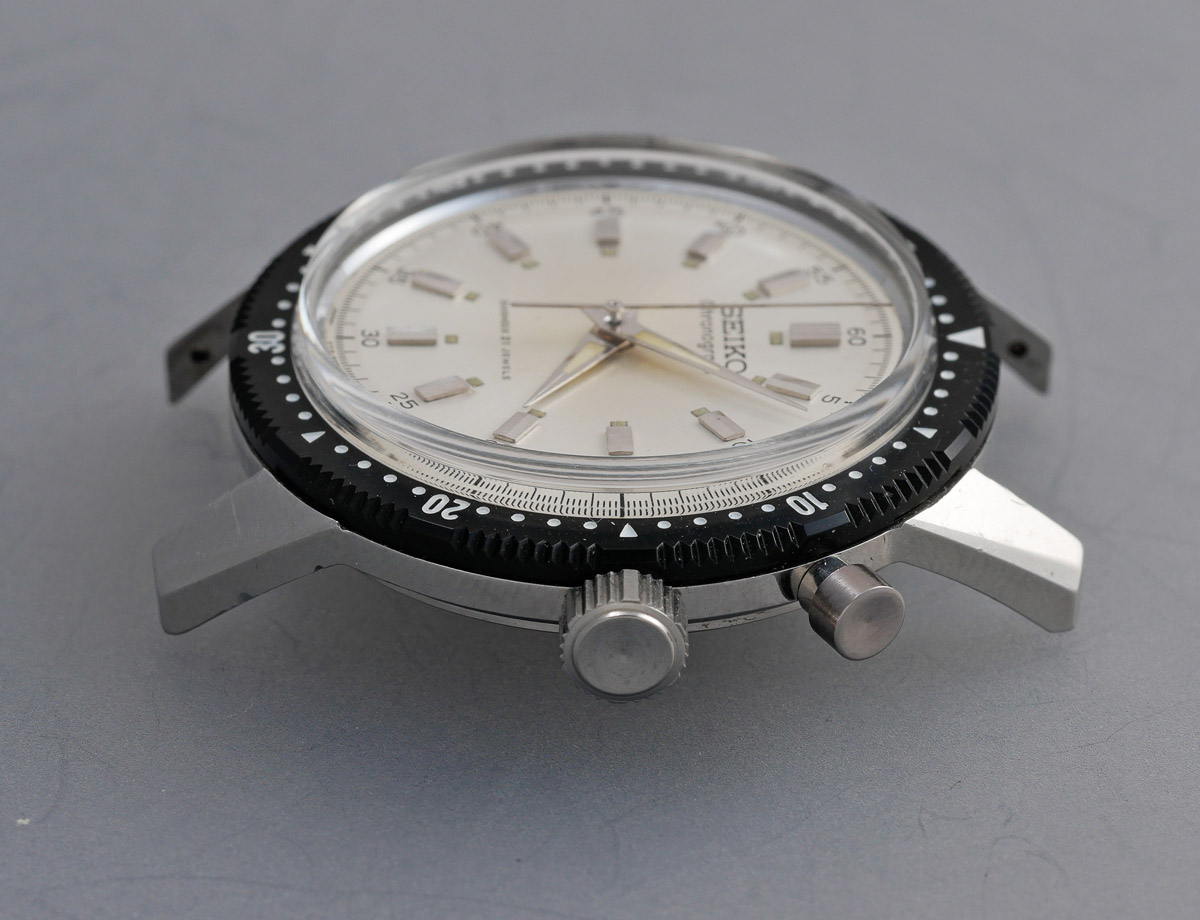
 Obviously, it looks a bit naked still so let’s bring into play that hugely expensive new bezel.
 The bezel comes with its retaining spring pre-fitted.
 Fitting is easier said than done, not least because of my nervousness at inflicting some injury on a 50 year old plastic part but eventually with some careful easing of the retaining spring into position and a firm yet fair hand, its snicks into position.
 With so much additional investment already made it would seem churlish to hold back when it comes to a suitable choice of bracelet but herewith my only miss-step on this project. I had jumped on what I hoped was a correct old stock original bracelet some months previously but neglected to confirm whether the lugs were 18mm or 19mm and my misplaced purchase ended up being for the identical bracelet intended for a 6217-7000 World Timer.
 This will need some additional thought and so for the moment, I decide to borrow the bracelet from my near unused Seikomatic Silverwave, stashed away a while back and still not yet attended to. As it happens, this proves to be an excellent interim match, suiting the watch beautifully.
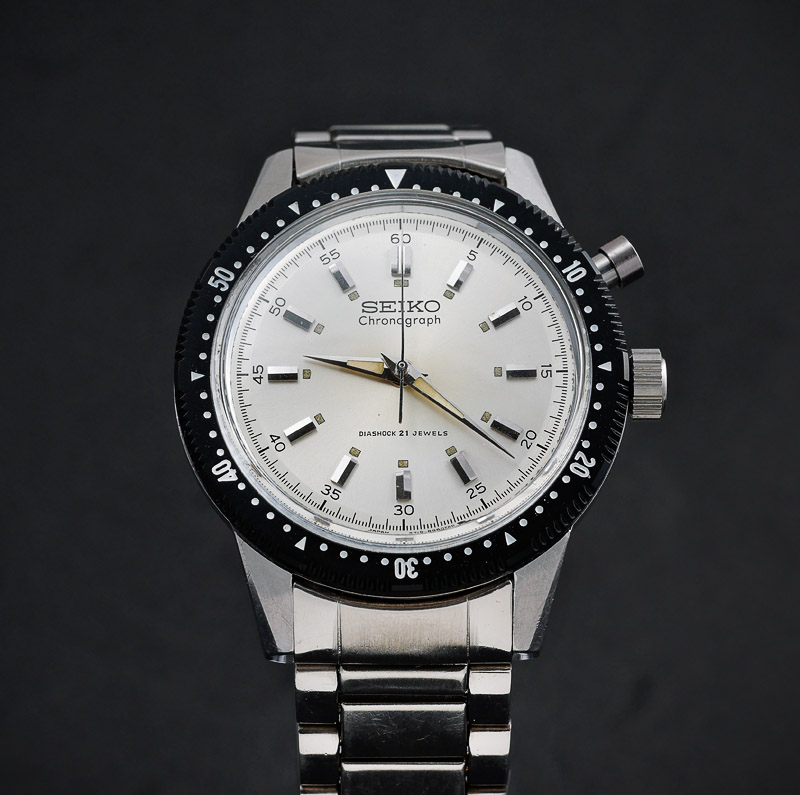 It may look the dog’s danglies, but a couple of days on the wrist and I find myself wincing regularly as clumps of wrist hair detach themselves from me in favour of the inner links of this lovely bracelet. That is all the incentive I need to see if that World Timer bracelet might somehow be cannibalised to accept the endlinks from the tatty bracelet that came with the watch.
 The 18mm bracelet is a complete lash-up with the end links (in)secured into place with bits of wire. Consequently, removing them requires nothing more than a couple of well-placed snips from my wire cutter. On the other hand, the 19mm end links on the new bracelet are very securely fastened and require some careful and determined endeavour to liberate them. Eventually, I manage to detach them without inflicting permanent injury on any of the parties involved, and we can now attempt to fit the now polished 18mm end links to the new bracelet.
 The result is not perfect because there is a little side-to-side play where the bracelet joins to the end links but I think good enough to call this one and declare a finish.
 This project has been notable for me for a number of reasons, not least of which that it was so enjoyable. I really like the design of the movement, and significantly the fact that after my attentions it is performing about as well as any movement I’ve worked on. The watch means something to me too because it was born one month before I was. It is also a watch that has arguably required a slightly unreasonable amount of investment in parts but that investment has resulted in a rare transformation from something properly tatty into something rather special. This is a very beautiful watch, one with pukka presence and above all, pedigree and it fully deserves its place as a greatest hit in the parade of horological output from the 1960’s.


Martin , I have a folder of more than thirty of your restorations and have thoroughly enjoyed reading every one but this last one is exceptional.
It wasn’t just the text and photos (which were superb as usual ), but you clearly really saw this as a labour of love. Hats off to you..
Paul, thank you for that. I’m pleased you enjoyed this one.
I have one I bought in Japan and 1964 during the Olympics. After reading this article I Can Only Imagine what it cost to bring it up to its original state.
How wonderful! The only really significant cost for me, as I was supplying the labour, was the new bezel. Is your watch still running?
What Paul said 🙂 Excellent work and writeup!
I’ve never oiled pallets that way, since I can’t see myself installing them without making a mess. Maybe I should try it sometime. I just dab oil on the impulse faces via the access holes in the plate. (Under the microscope, while stabilizing my shaky oiler against the side of the hole).
I’m curious how you manage to get such excellent pictures. What camera do you use? Do you use a tripod? I have a Canon 60D with macro lens and an old S90 (no tripod), but I have so much trouble getting decent pictures. I think my equipment should be fine, it’s the operator that’s not 🙂
I’ve tried both approaches to oiling pallets and just find pre-oiling easier. In fact, the Seiko technical manuals suggest that this is the way to do it, oiling first, then fitting the fork.
As to photo setup, I use a Panasonic GX80 fitted with an Olympus 60mm macro together with a couple of radio controlled speed lights. The latter mean no worries about camera shake for general documentation of the process but I do use a table top tripod for extreme close-ups, sometimes then lit with continuous light sources. I may also combine the macro lens with extension tubes.
Another terrific write-up. Thank you for taking the time to share. Best regards from Australia.
Les.
Holy moly, that’s a beautiful watch! Great job, and I really enjoyed reading about your work. I can’t believe I haven’t followed your site before.
Thanks – I’m glad you enjoy the blog.
Excellent post. I own one of these fantastic watches, and I had to search high and low to find a bezel (mine was missing when I acquired the watch). After 2 years of searching I had to settle for a replica replacement from France…and I’m very happy to have it. It cost a fortune, but worth it.
This is an awesome watch.
Thank you! I was very lucky to find an original replacement bezel and at the time, the French replacements were not yet available. However, I suspect I paid more for my replacement that you did for your replica!
Lovely written about a lovely watch. I have a brother of your chronograph myself and it is always a delight to learn more about these little mechanical marvels.
I wonder if you have any good suggestions on where to find endlinks for the bracelet? I have the bracelet, but lacking the small but essential part to actually attach the bracelet to the watch…
I have no leads to suggest on end links but one alternative option might be to source a contemporary beads of rice bracelet that seem to be in freer supply. Glad you enjoyed the post!
It is already on a Seiko Bor, but you know, sometimes the itch for having the right stuff is mighty.
Here it it, BTW:
https://klocksnack.se/threads/bespoke-ändlänkar.110514/#post-2797877
Thanks a lot, I really appreciate your site and I never get tired reading about your loving care for old Seikos.
No problem.
Me gustaría ponerme en contacto con usted ,pues poseo un reloj igual ymegustaria saber cuánto me costaría arreglarlo
Translation: I would like to get in touch with you, because I have an equal watch and I would like to know how much it would cost me to fix it.
You can contact me via the Contact tab but as you will see from there and the About tab, I do not take in work. Sorry!
Hello Johan, great work! I have a brand new one, original, never used, with original documentation and box from a family member that collected watches, original owner. How much do you think I should sell it for?. Thanks for letting me know!!! Cristina
I meant to say Mark! Sorry I confused your name!
Or Martin even! No worries.
Hi Cristina, it is impossible to say how much it might be worth without seeing it but if it is genuinely unused and comes with all of the original documentation, then it could have a very high value if sold through the correct outlet. Two years ago, I wrote about the state of the vintage watch market through the eyes of the Yahoo Japan auction site and one example from the list of watches I used to illustrate my point was an old stock one button chronograph that sold for more than $3500 US before fees.
The market has heated up quite a lot since then but I have a sense that the bubble may be on the verge of deflating a little. The only way to know for sure what it is worth, is to see what it fetches through an auction, or to price it at a particular price point and see if anyone bites. To realise those sorts of values though, I think you will need to have some sort of credibility or track record on whatever platform you choose to advertise it. Good luck! (by the way, my name is Martin 🙂 )
Great piece of work.
I own one 5719 myself but i lost the pusher . Do y know where to get a pusher for this watch
I appreciate if y contact me.
Best regards Onno
The pushers are very hard to find. I managed to locate one on Yahoo Japan but I don’t know of any source to recommend in particular. Sometimes these things crop up on eBay or from a parts trader but it is usually a combination of persistence and blind luck that turns them up. Good luck!
Dear Martin,
As usual, great work and even better review:)
May I ask did you throw away the old bezel? I just bought this chronograph for a bargain price on Japan auctions and I can say only one thing: having no bezel at all is much worse than having an old eroded bezel, especially on this model:)))
So please contact me if you want to sell me an old one:)
Best Regards,
Ilya
I do still have the bezel but I also have another one-button chronograph that may be worth saving. For the moment, I prefer to keep hold of the bezel.
Well it appears that any bezel from Vostok Amphibian fits this watch.
Sorry to disappoint all the folks that had their kidney removed for such a bezel, mine looks almost the same as original and came off a 20$ watch:)