Tags
The current state of the Seiko universe is a function of the complex, multi-dimensional evolutionary path that it has followed from an initial infinitesimal singularity that we might imagine to have been the twinkling of an idea forming in the mind of one Kintaro Hattori some short time before 1881. That idea developed into action and the opening of a shop, K. Hattori & Co., in Ginza in Tokyo to sell and repair imported clocks and watches. The subsequent 137 year long ride along the free energy roller-coaster has brought us to an incarnation of Seiko Holdings Corporation that is simultaneously monolithic yet also two-body: on the one hand, we have a singular corporate entity that normal people recognize as Seiko, a watch company making a perplexing array of Seiko-branded lines that includes some very high end product; and on the other hand, we have a slightly diminished version of the same within whose gravitational influence orbits a much smaller but more precious satellite, Grand Seiko, a high end watch brand that normal people have never heard of. However, for the tiny minority of people who care about such things, Seiko and Grand Seiko co-exist in a sort of comfortable perpendicular arrangement in which their identities are quite clearly defined.
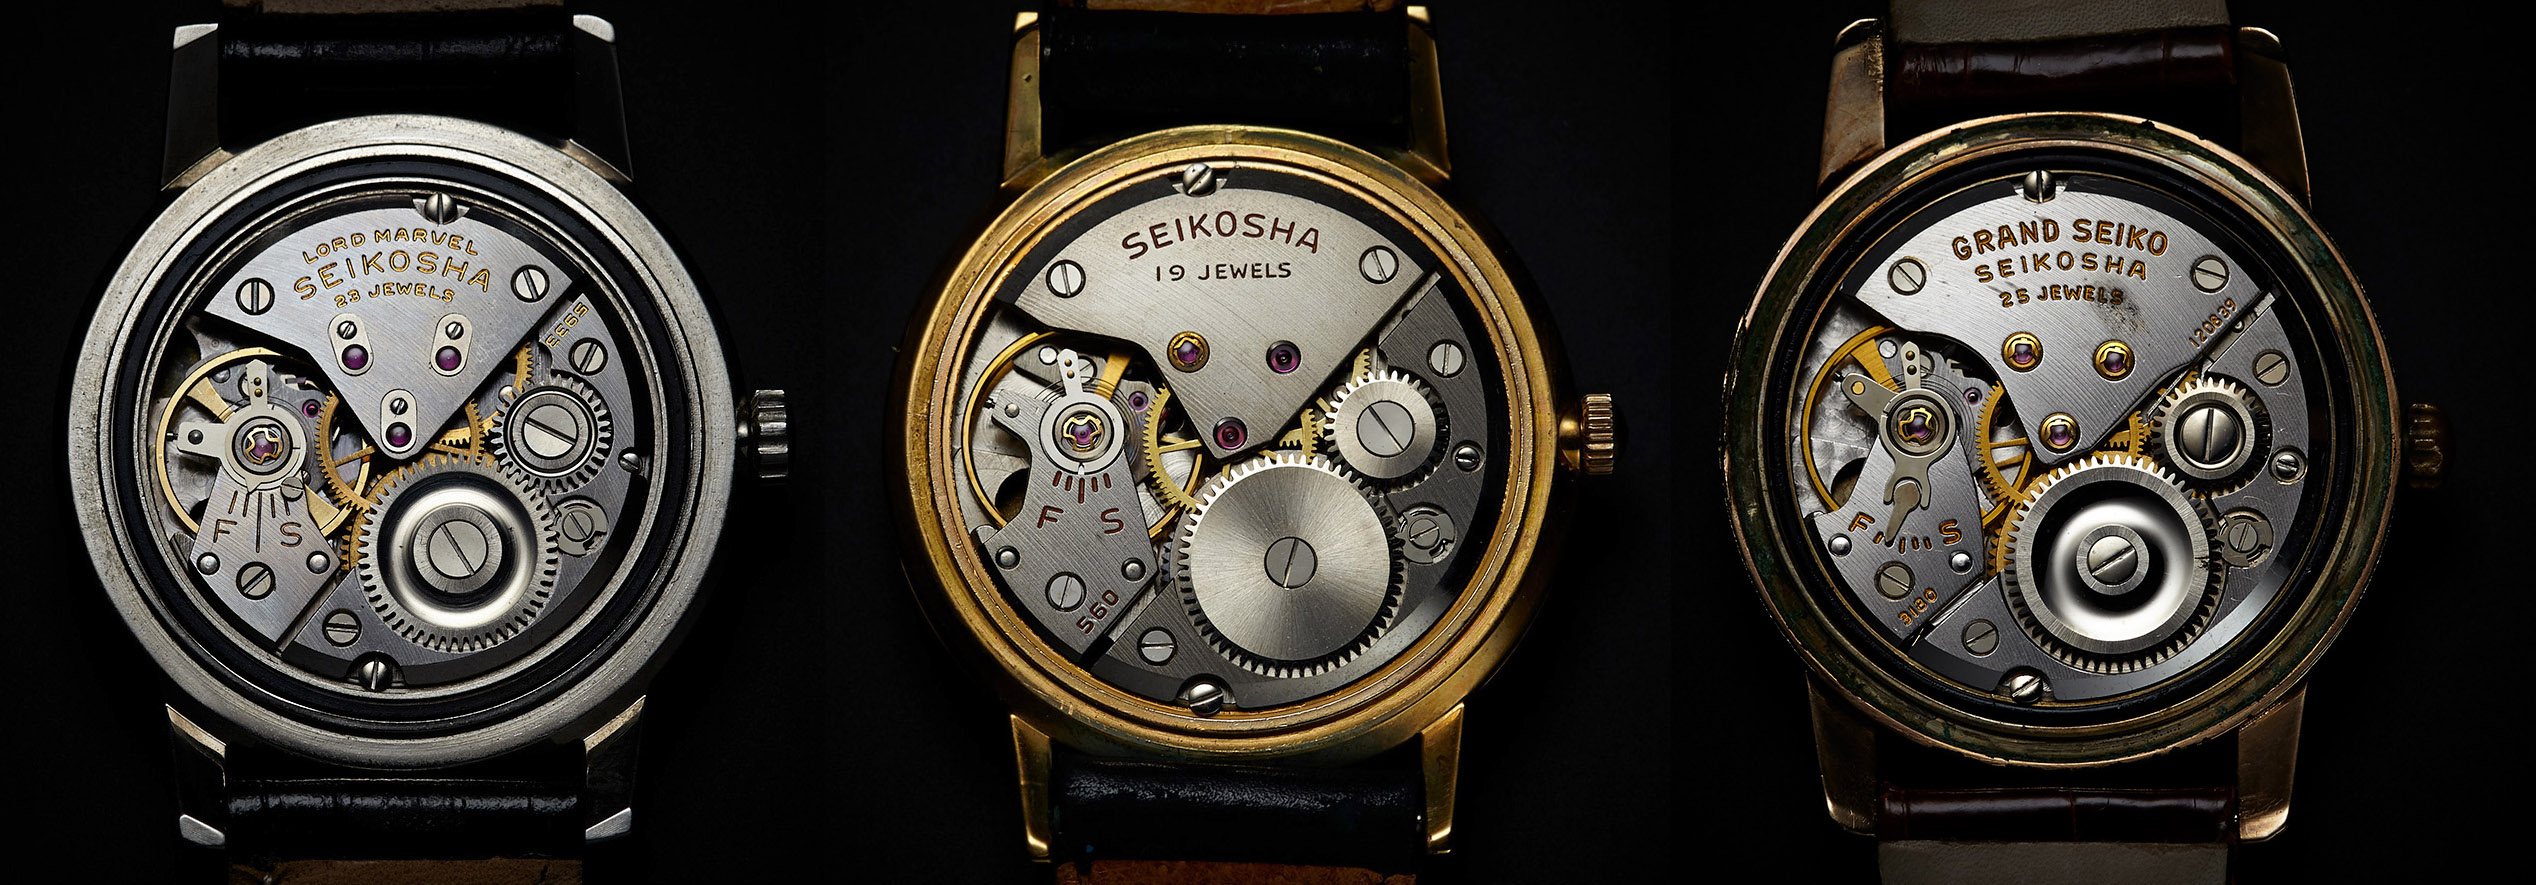
It is often the case that we perceive particular individual turning points as being critical to the path that our lives take, but Seiko’s route to its early 1970’s apogee was the result of a series of parallel trajectories spanning a 15 year period dating from the late-1950’s. One of these was defined by the evolution of the Seiko Marvel into the Lord Marvel, the up-scaling of the Lord Marvel into the Crown and the refinement of the Crown into the Grand Seiko 3180.
 This Marvel Universe existed as a creation of the Suwa division, whose operations were based in Nagano.
Meanwhile, a parallel DC Universe of sorts was tracking a path that would eventually lead to collision and subsequent fusion. That universe was rooted in the Seiko Cronos, developed within the Daini division, based in Tokyo. The Cronos movement was the same diameter as the Lord Marvel movement but considerably slimmer. The original Cronos 54A movement would find service as the base movement for both the Cronos and Champion product lines, the former in 17, 21 and 23 jewel variations and the latter in 17, 19 and 21 jewel variants.
 A refined version of the 54A also formed the basis of the 25 jewel King Seiko movement that would power the first King Seiko of 1961. King Seiko was intended by the Daini division to be a competitor to the Suwa division’s Grand Seiko, although it is probably fair to say that the first King Seiko incarnation fell somewhat short of the 3180 Grand Seiko, lacking its design flair and execution of its exterior elements.

1963 Seiko World Watch Brochure
The extent to which Seiko acknowledged that the King Seiko had not quite reached the Grand Seiko benchmark is reflected in the fact that its pricing at the time was only a little more than half of that of the GS 3180. Nevertheless, as a historical reference point, it is an important watch and one that formed the basis of an evolutionary series of manual wind King Seiko models that rapidly ascended the aspirational greasy pole. That first generation watch underwent a mild facelift a year or so into its lifetime with the most obvious external difference being a set of thicker, faceted lugs.

Photocredit: global.rakuten.com/en/store/auc-kyotoya-shop/
The follow-up, which appeared towards the end of 1963, was a bolder watch with improved water resistance, thanks to its screw down case back, and whose thicker beveled lugs have become its stylistic signature.

Photocredit: https://www.instagram.com/oldexpatbeast
The earliest examples of this second generation King Seiko were marked with the five-digit model number 44999 and featured a stop second mechanism that employed a hooked lever acting upon a disk mounted on the shaft of the fourth wheel.

Photocredit: http://www.wornandwound.com
Later production versions of this watch acquired the more familiar two-part model number, 44-9990, and dispensed with the top-mounted stop-seconds feature.
In parallel with the mainstream 44999/44-9990 KS, Seiko released a chronometer King Seiko, the 49999, produced in much smaller numbers and housed in a completely different case that hinted at the grammar of design style that would become so iconic a few years later. The production run of this special King Seiko extended from late 1963 through to the end of 1966. Its movement was held in such high regard that it was used in the 4420-9000 Grand Seiko that would join the established Grand Seiko 5722 Self-Dater in 1967 at the top of the manual wind tree.
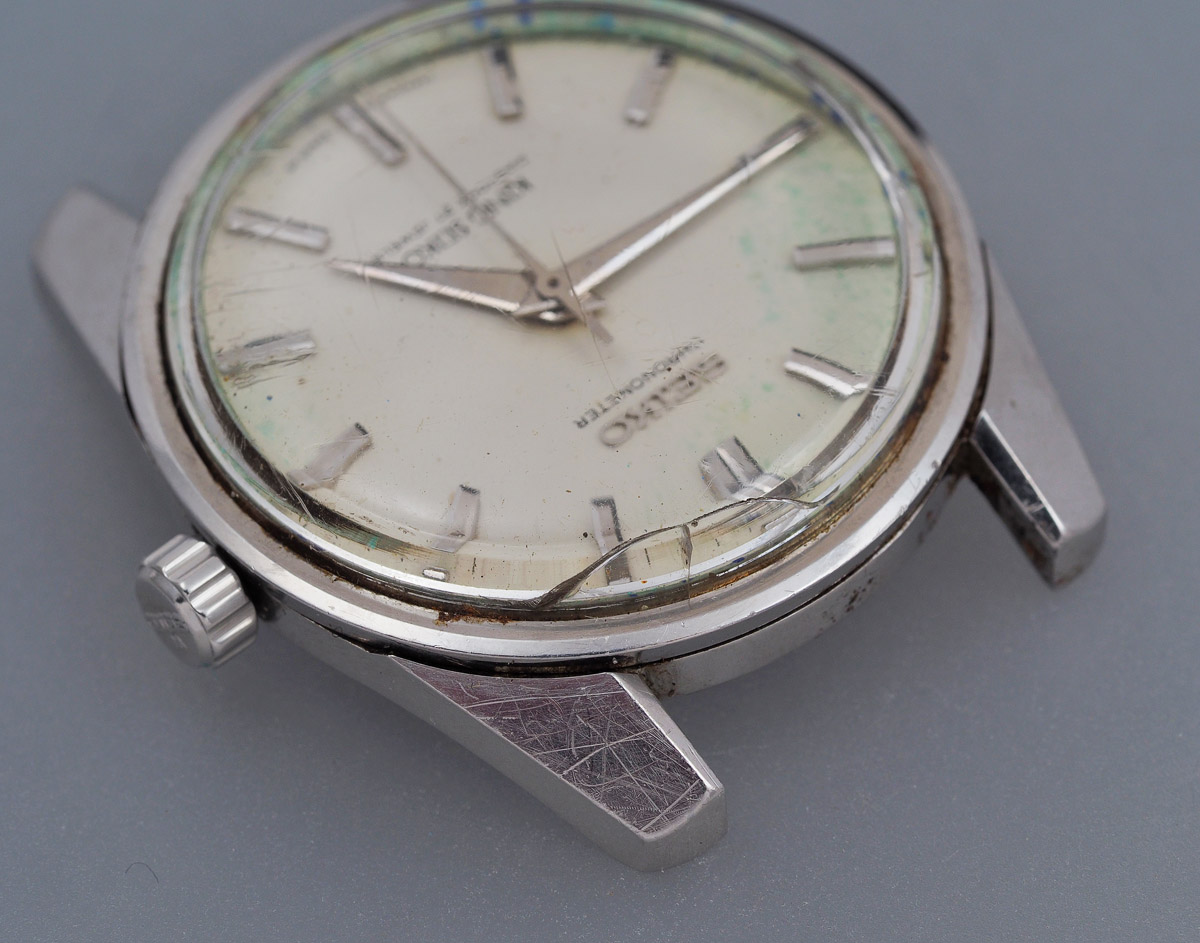
If you were wondering when I was going to get to the subject of this entry, then I would note that we have arrived already. In fact we have overshot the mark slightly and so, let’s rewind one step and introduce our contender with the photo that lured me in:

Photocredit: Yahoo! Japan
It is not that common for me to make a genuine misjudgment in my appraisal of watch auction photos but I made a doozy with this one. I am not so negligent that I did not notice the discolouration between 9 and 12 – my error was to think (hope?) that it was a combination of the shadow thrown by the lighting, craftily positioned north-by-north west, and a scuffed and cracked crystal. I should say that while I did not pay full market price for a hypothetical semi-decent example of this sought-after watch, neither did I get a complete bargain. At the time I won the auction, I was ignorant of the actual condition of the watch and so waited for it to arrive in blissful ignorance. Once in my hands though, the full weight of my blunder became painfully apparent.
 Yes, the crystal is cracked and scuffed but the dial is badly degraded, both in the upper left quadrant but also to a lesser extent between the 3 and 4 markers.
 The case back retains most of the gold lion medallion but shows considerable wear. I am fine with that actually. It’s got history, it’s been used and so fair enough.
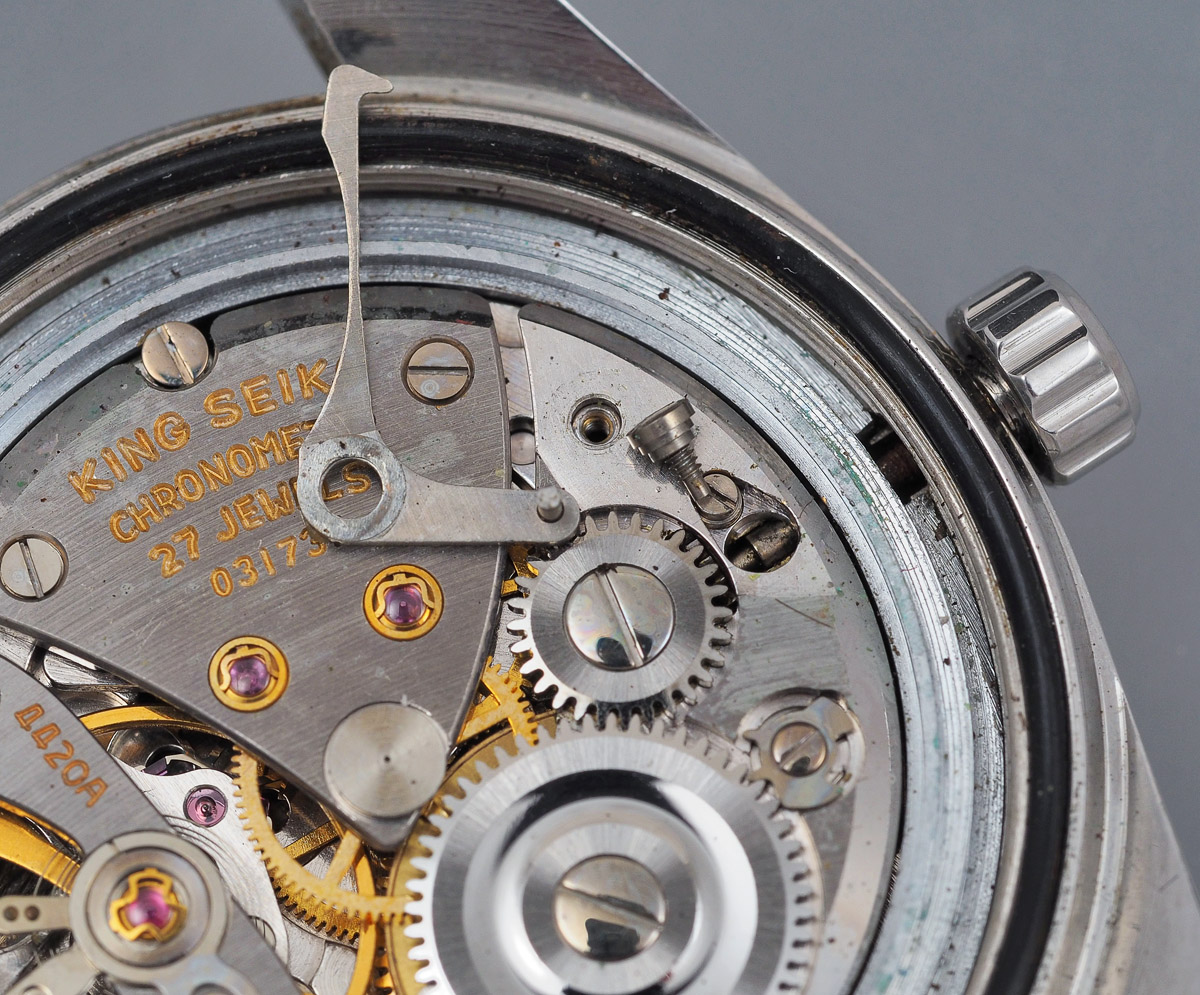
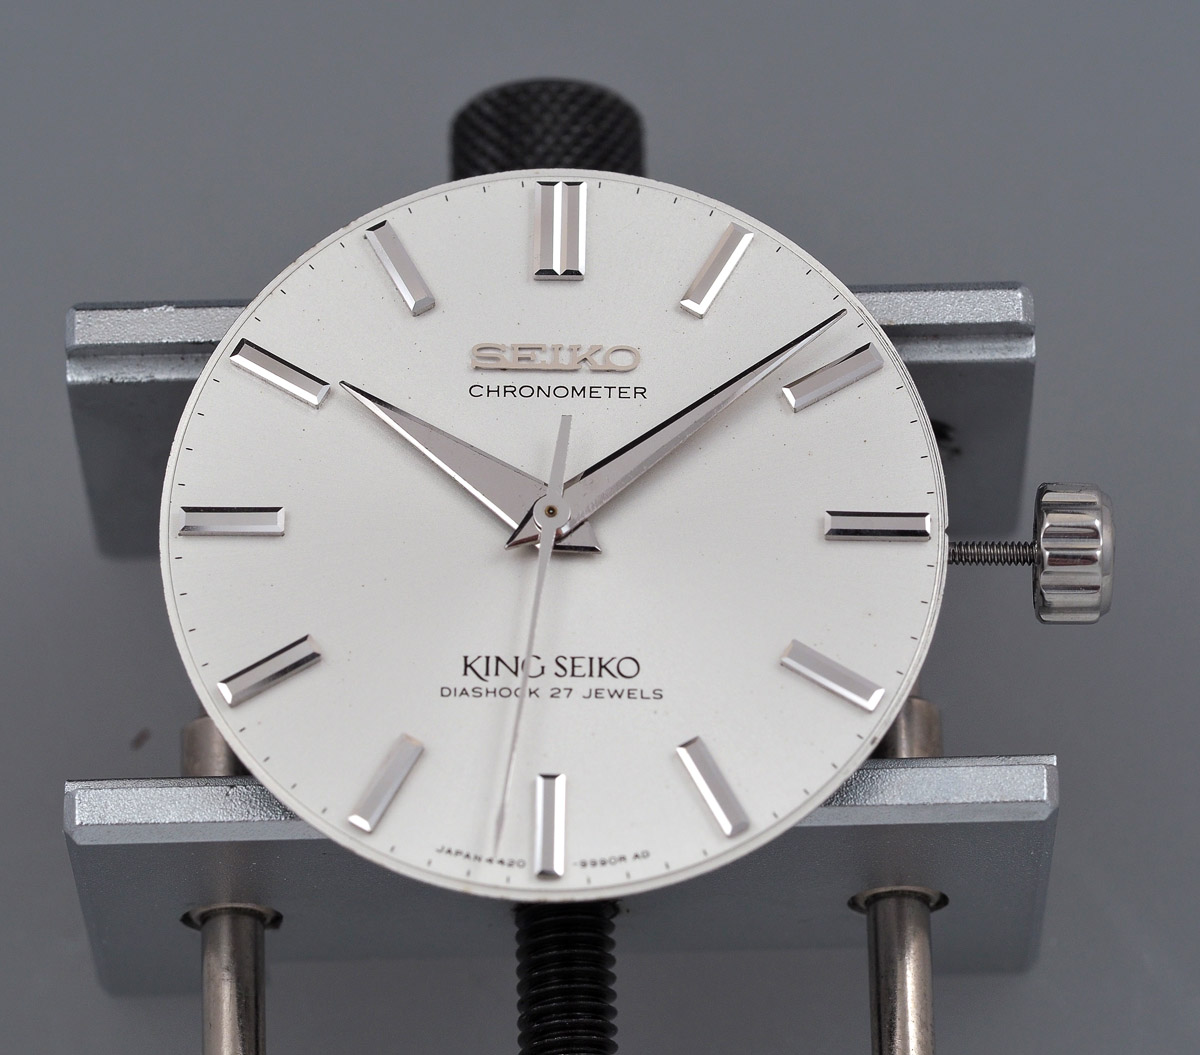
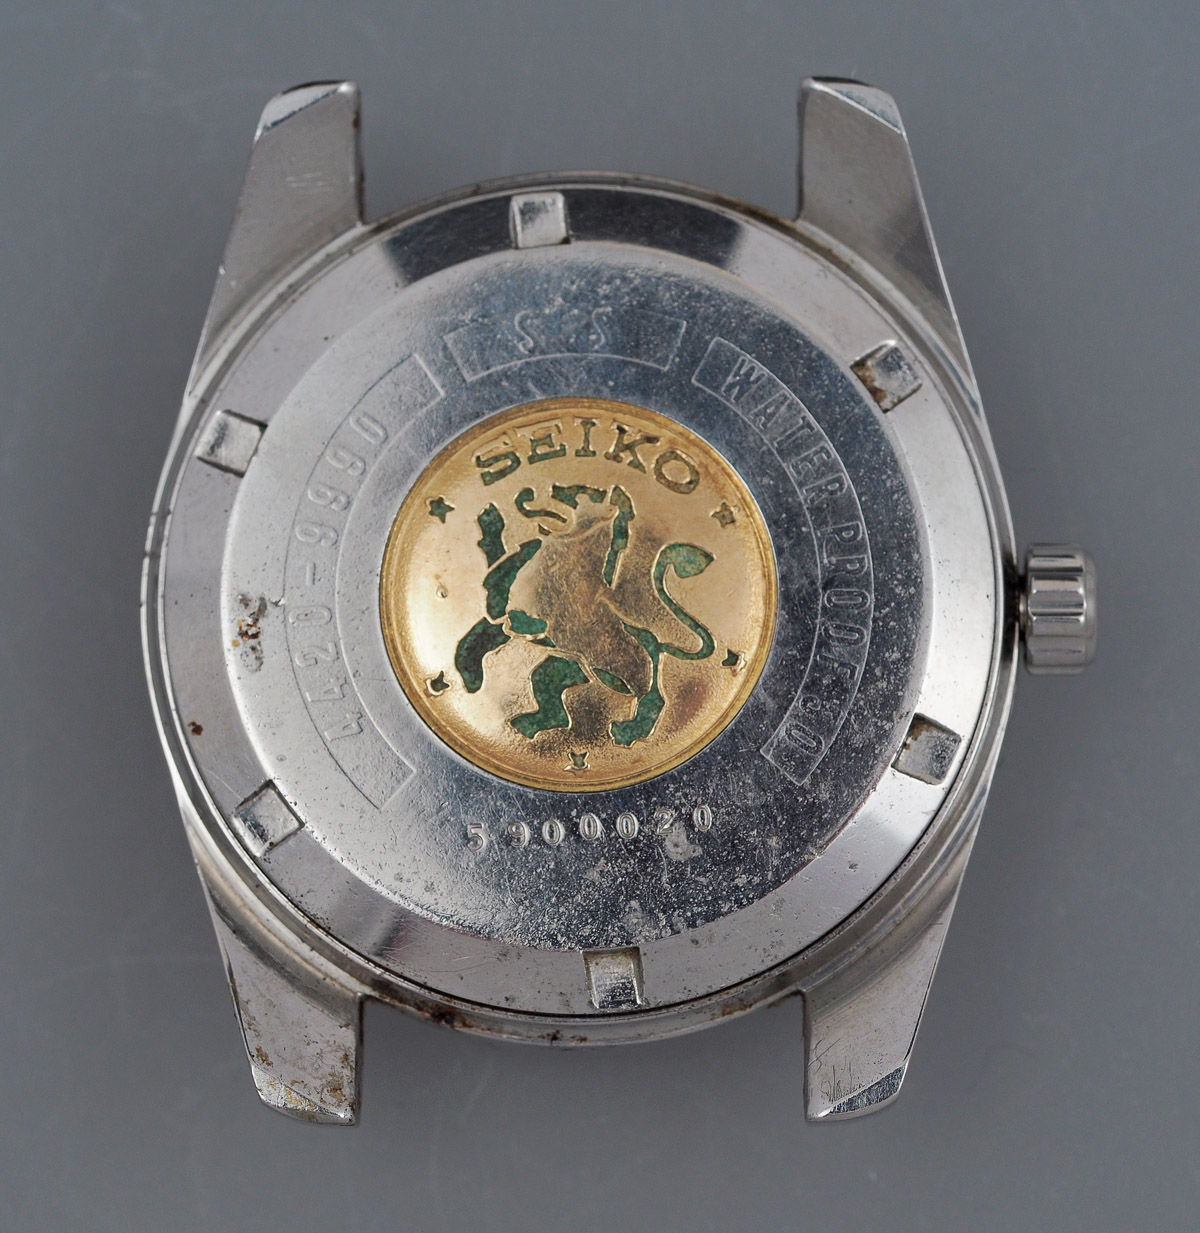 The serial number dates the watch to September 1965, consistent with the block rather than cursive script used in the ‘chronometer’ below the Seiko logo. In all other respects, the watch looks original, retaining not only its original crown but importantly its original hands, complete with the characteristic arrow seconds hand.
I refuse to blame poor luck on this misadventure, partly because the blame for my error rests pretty much squarely with me but also because a week or two later, a miracle occurred. These watches were made in small numbers, although not so small that their appearance on Yahoo Japan auction site is that uncommon. However, it is very unusual to see really nice examples for sale and consequently, even the poor examples fetch fairly strong money. So there was no way that I could contemplate buying a second watch to act as a parts donor; that would have been insane. My only prospect for salvation would be if I were able somehow to find a replacement dial and that seemed at the time to be about as remote a possibility as I could imagine. But then about a week after I received my watch, I happened to notice the following auction pop up.
 This translates straightforwardly to King Seiko Chronometer (4420-9990) dial. What was on offer was an unused dial of the correct style and vintage and still in its original packaging.

Yahoo! Japan
At the time I felt like some sort of divine intervention was at play. What are the odds on me stumbling upon this a week after having committed such a monumental blunder? I wasn’t home and dry yet though because this was an auction and not a ‘Buy it now’. A few days of nervous waiting and the closing minutes of the auction approached. With the number of bids approaching 20, in mine went. Outbid. A raising of the stakes and outbid again. What the hell, in for a penny in for a pound and my determination won the day. The dial was mine but at a cost of about 40% of what I paid for the watch. With that somewhat deranged undertaking complete, and with the dial received a week or two later, I could contemplate this as a viable project. 12 months later and we can crack on and discover what this one has to offer.
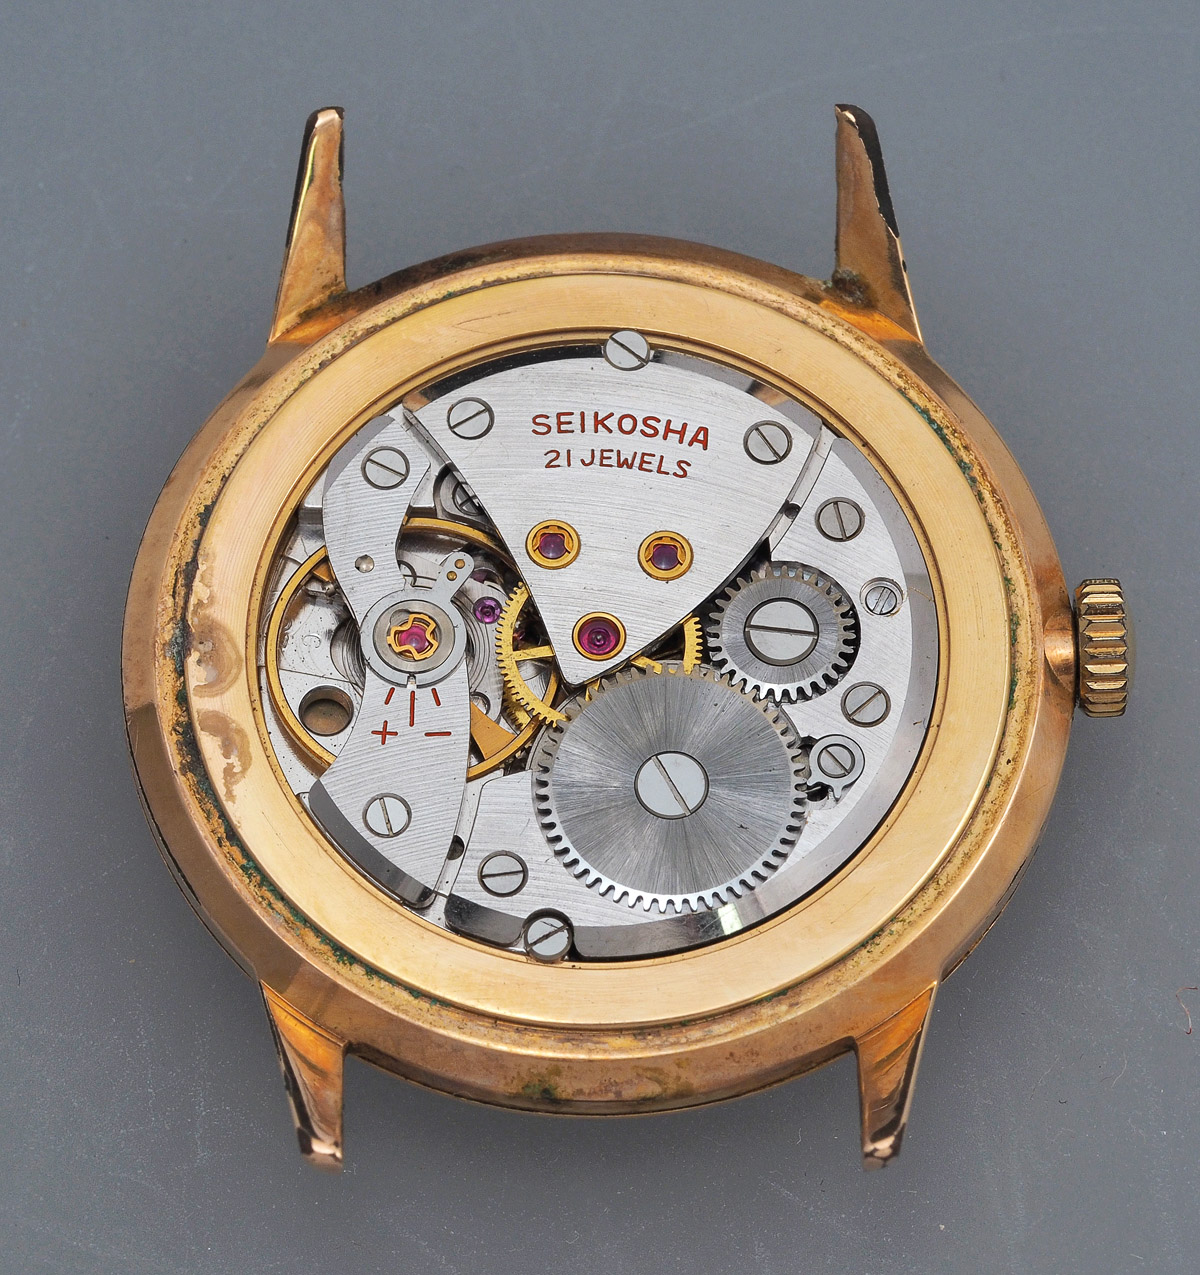
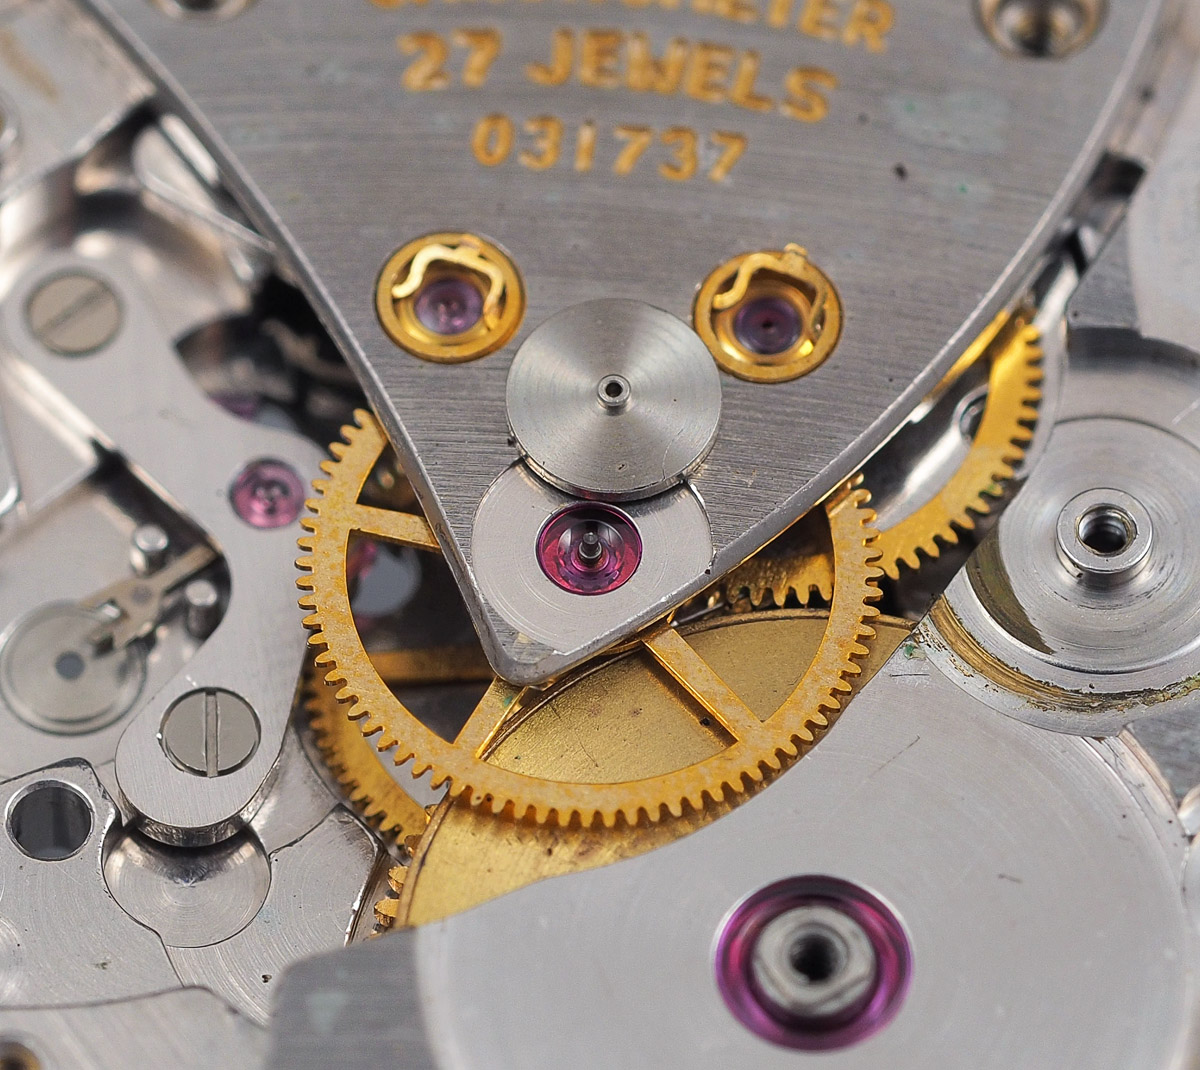
The first job is to remove the case back and check that everything appears in order.
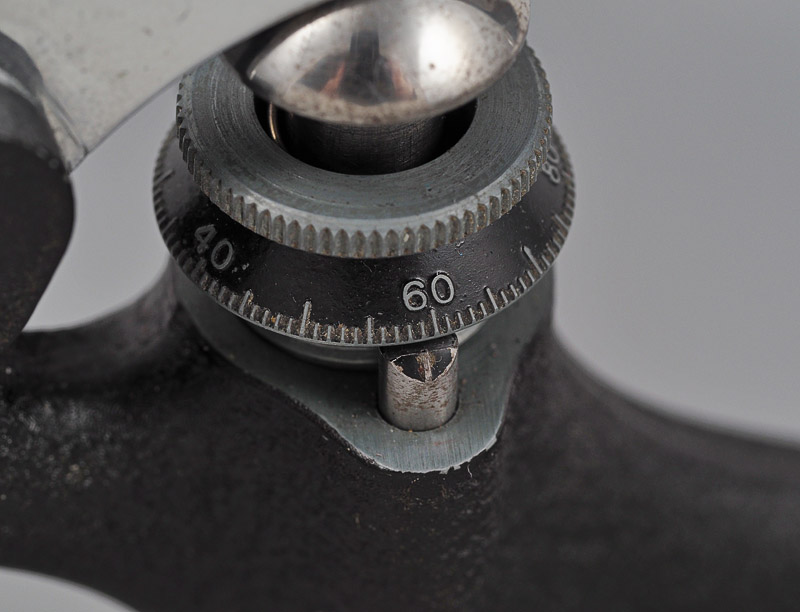
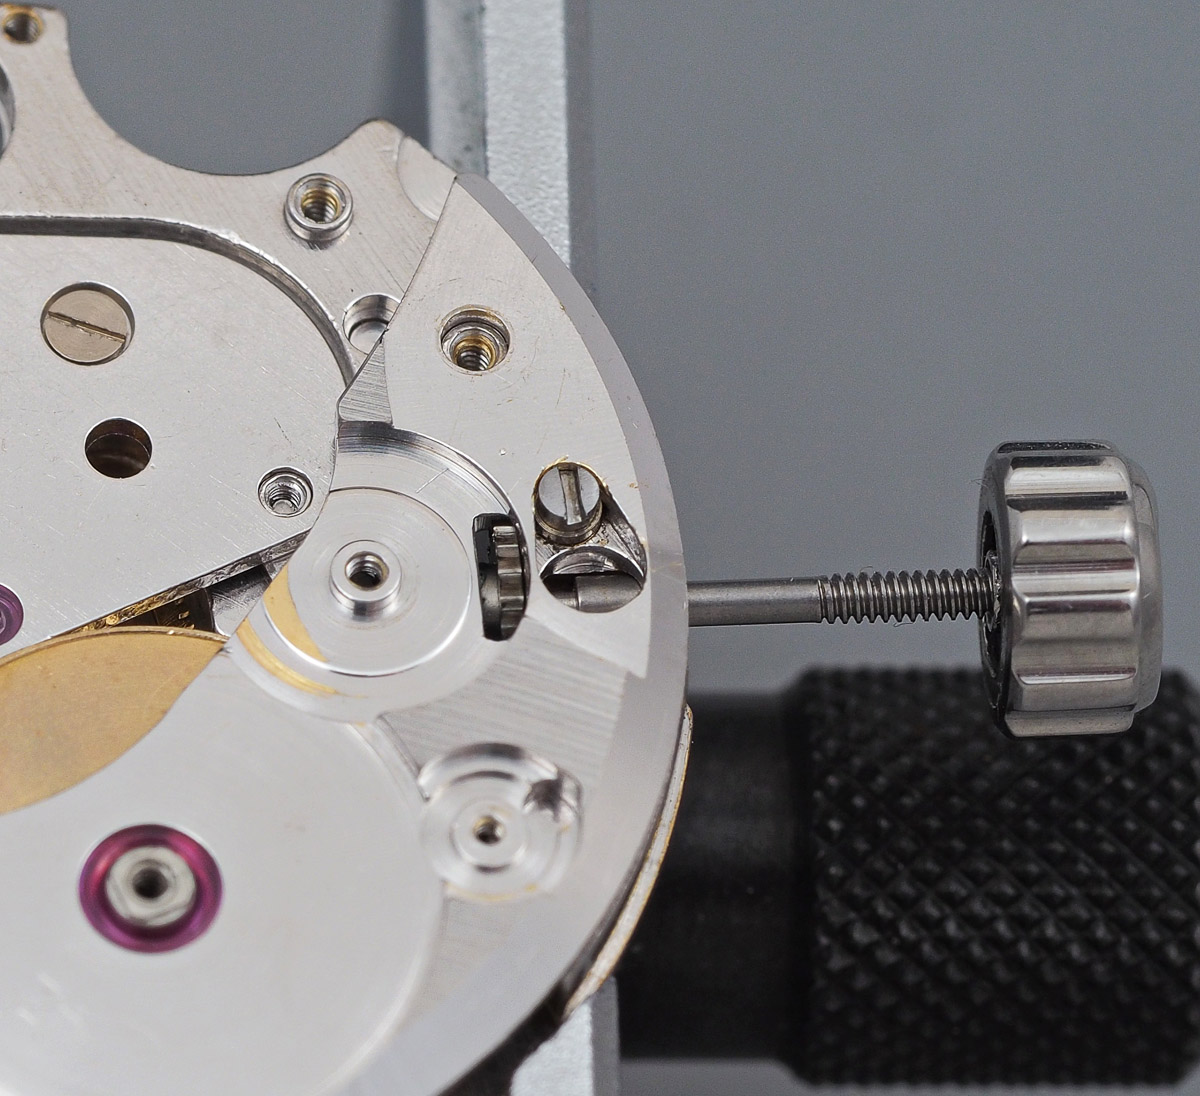
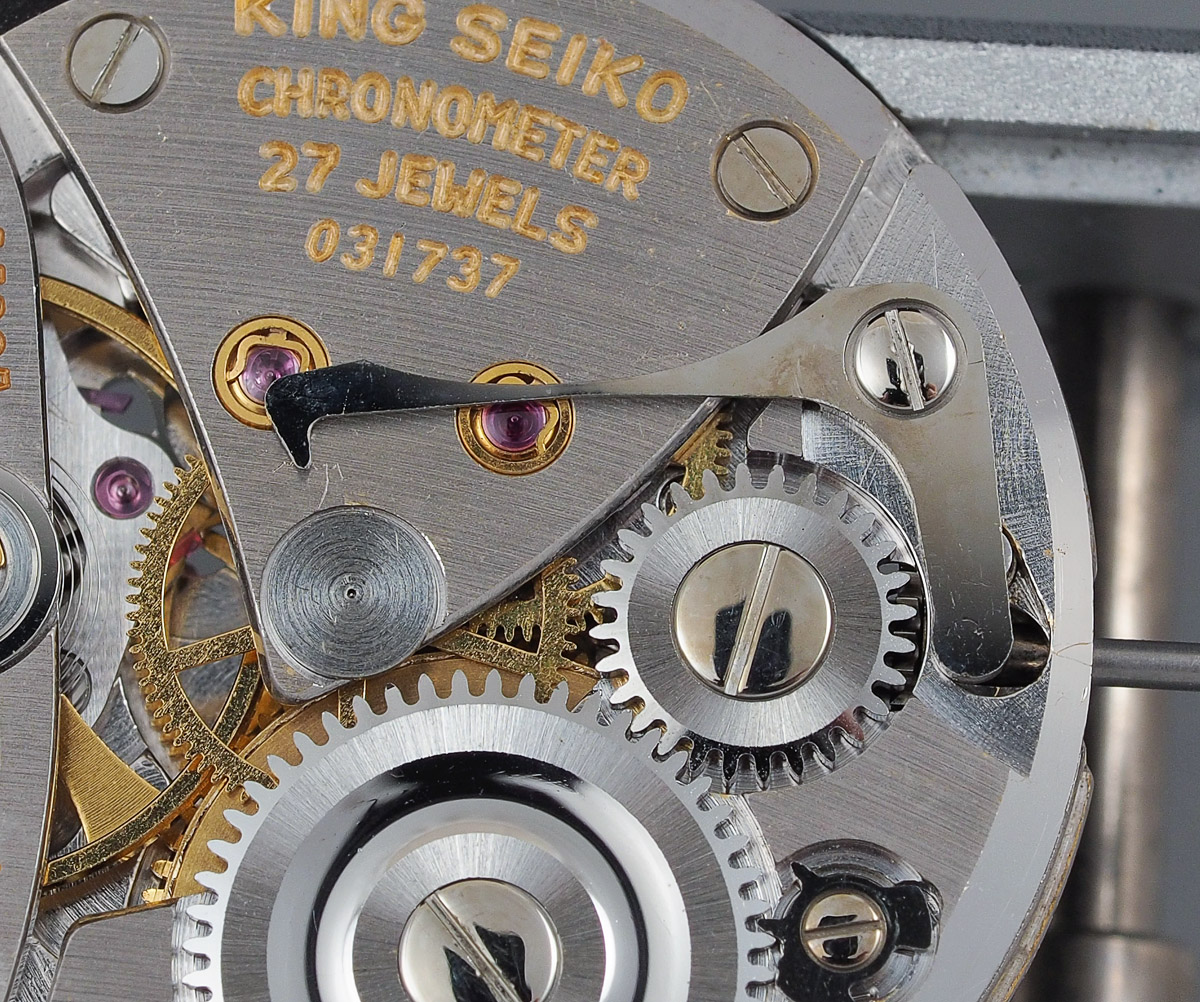
 I am particularly relieved to see that the seconds stop lever is present and correct. The operation of the lever is simple: pull out the crown and the short end moves outward while the hook moves down and comes into contact with the disk mounted on the shaft of the fourth wheel.
 I am focusing on this crucial part at this point because the crown end of the lever completely obscures access to the setting lever screw that we need to loosen before removing the crown and stem. So, the next step is to remove the second stop lever.
 The lever comprises four parts: the lever itself, a film washer (adhered to the bottom of the lever in the photo above), the screw and the second setting lever ring that is supposed to sit in the hole in the plate but in the photo is sitting around the collar of the screw. Again, I am very pleased to see all four parts are present and correct. With the lever set to one side, we can access the setting lever screw and remove the crown and stem.
 This then allows us to remove the movement from the case and to get a better look at the dial.
 The full extent of the damage to the dial is revealed in all its unfortunate glory: the lacquer is compromised, bubbling and tarnished with green oxidation across its upper left and lower right quadrants.
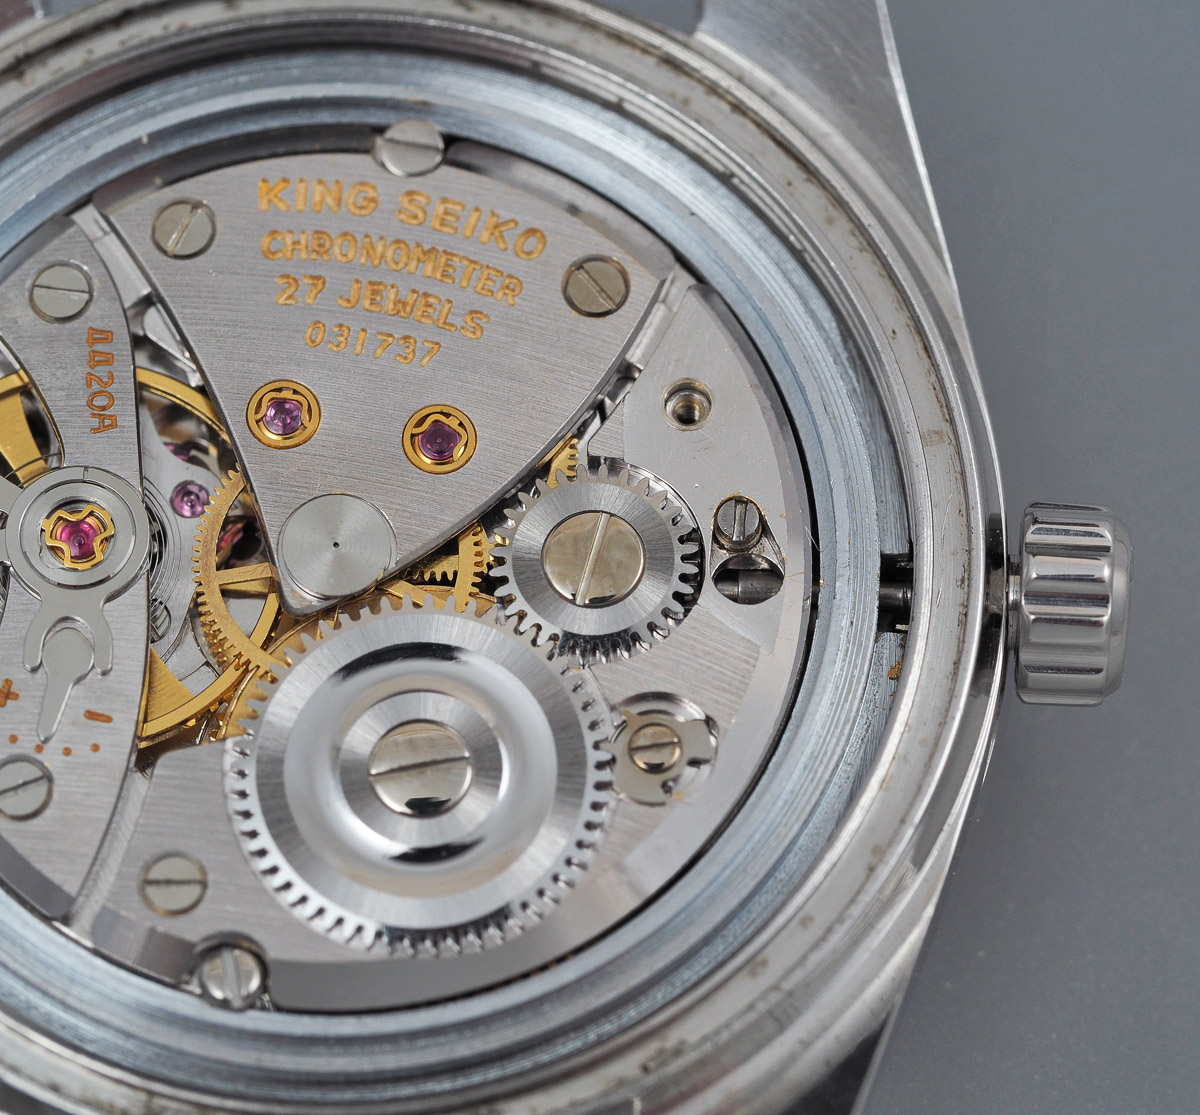
The first incarnations of the King Seiko movement fitted to the first and second generation models were marked simply as King Seiko with no movement calibre number but this mid-life chronometer is marked with the 4420A calibre number on the balance cock.
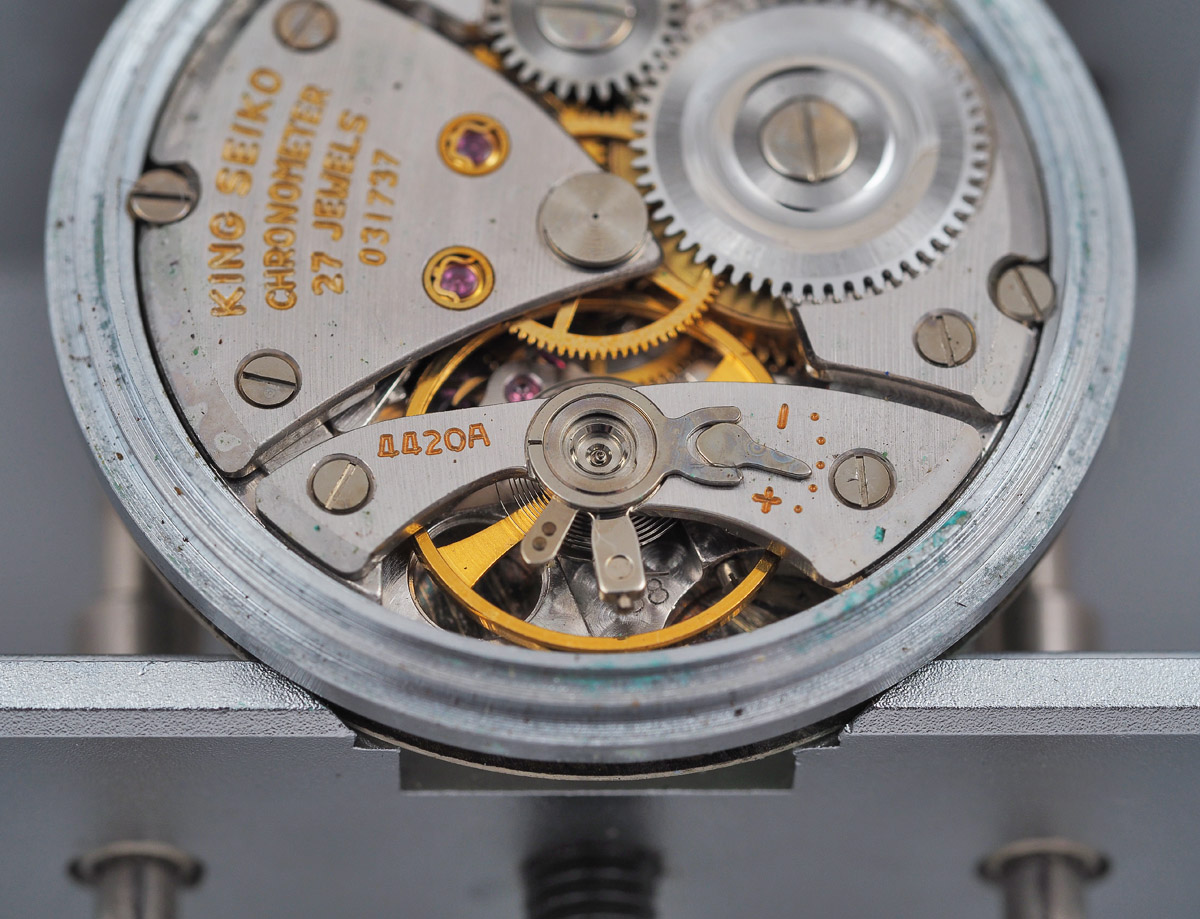 The photo above provides a good view also of the generously proportioned case ring, there to bridge the gap between this relatively small movement and the larger interior dimensions of the case to which it is fitted. That ring needs to be removed to access the dial feet screws.
 The screw shown above is located in a position perilously close to the balance wheel, were that still fitted. When refitting the dial after service, any watchmaker will need to take care either to refit the balance after fitting the dial or to take the greatest care when wielding their screwdriver!
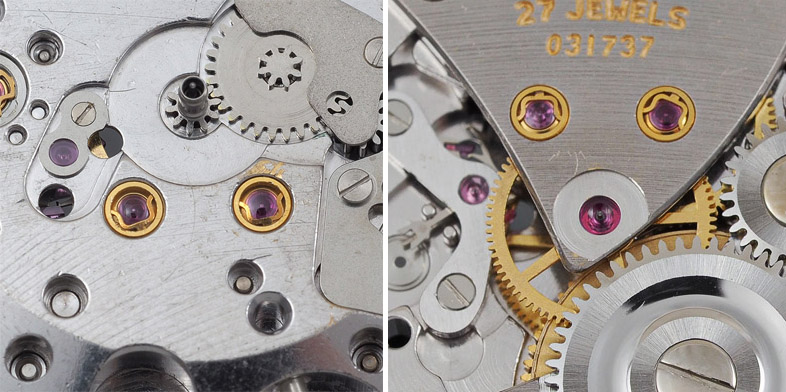
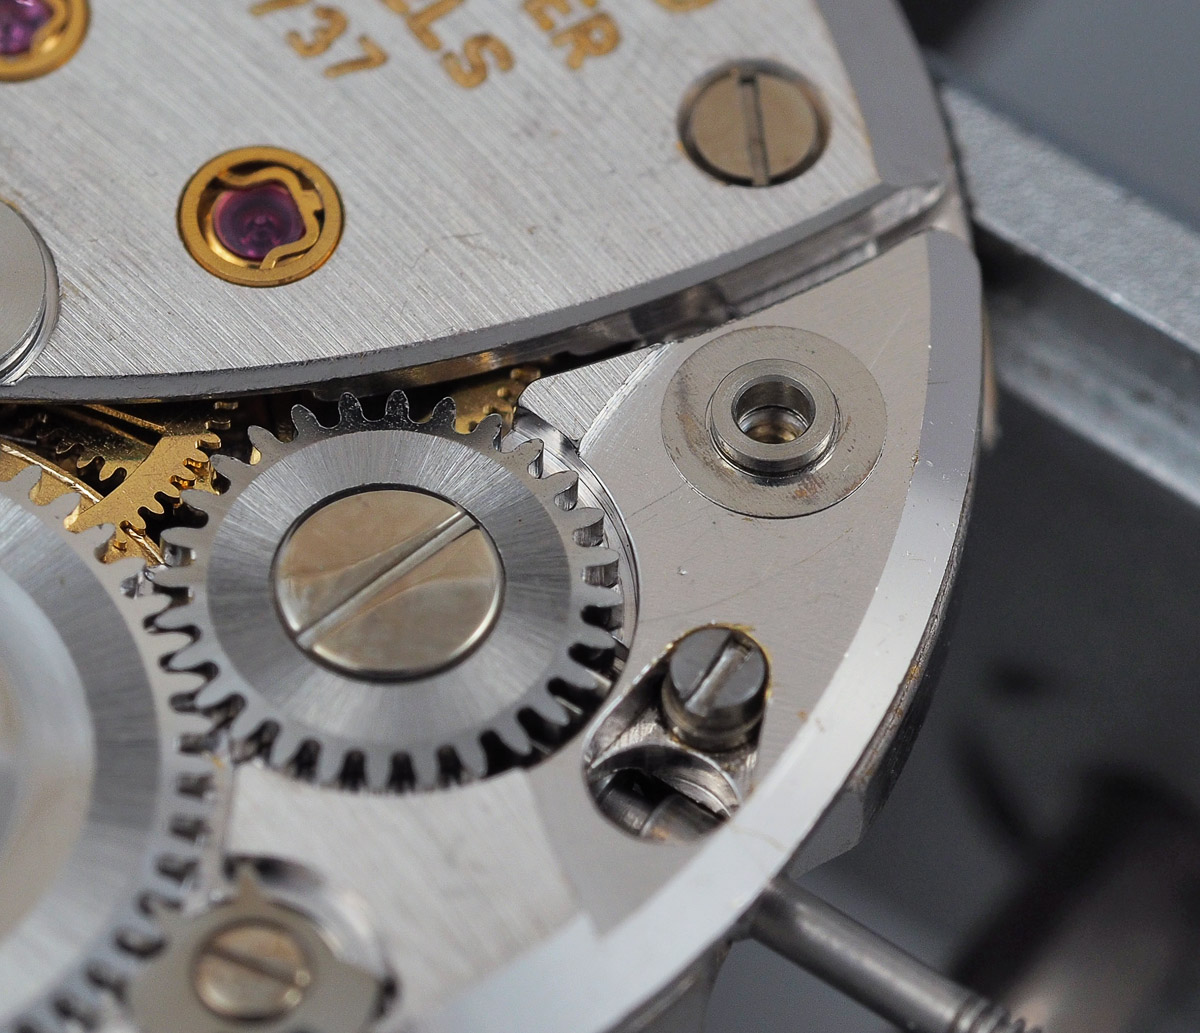
With the dial removed, we can peer at the dial side of the movement, and take in some of the features that contribute to its more elevated status compared to the Cronos movement from which it can trace its ancestry.
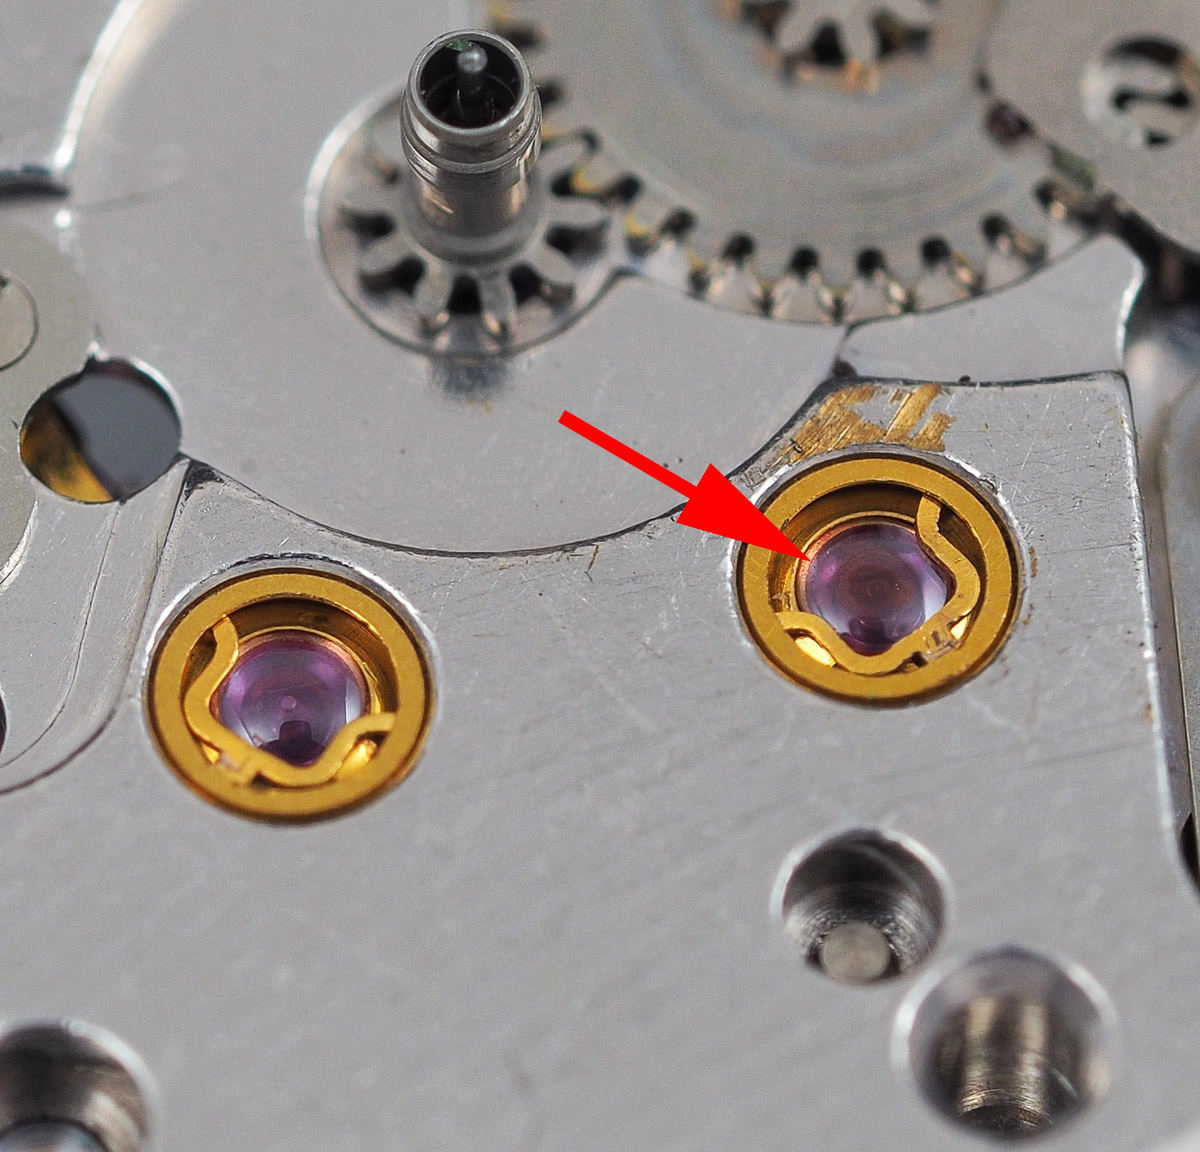
 We note the presence of Diafix settings serving both the escape and third wheels (the Cronos makes do with end pieces containing flat jewels whose only role is to act as dust covers), a jeweled end piece serving the pallet (indicated above) but most significantly, a jeweled barrel arbor bearing (also marked). You will also see from the photo above that the stem threads have seen better days. A fresh stem is going onto the shopping list for this one.
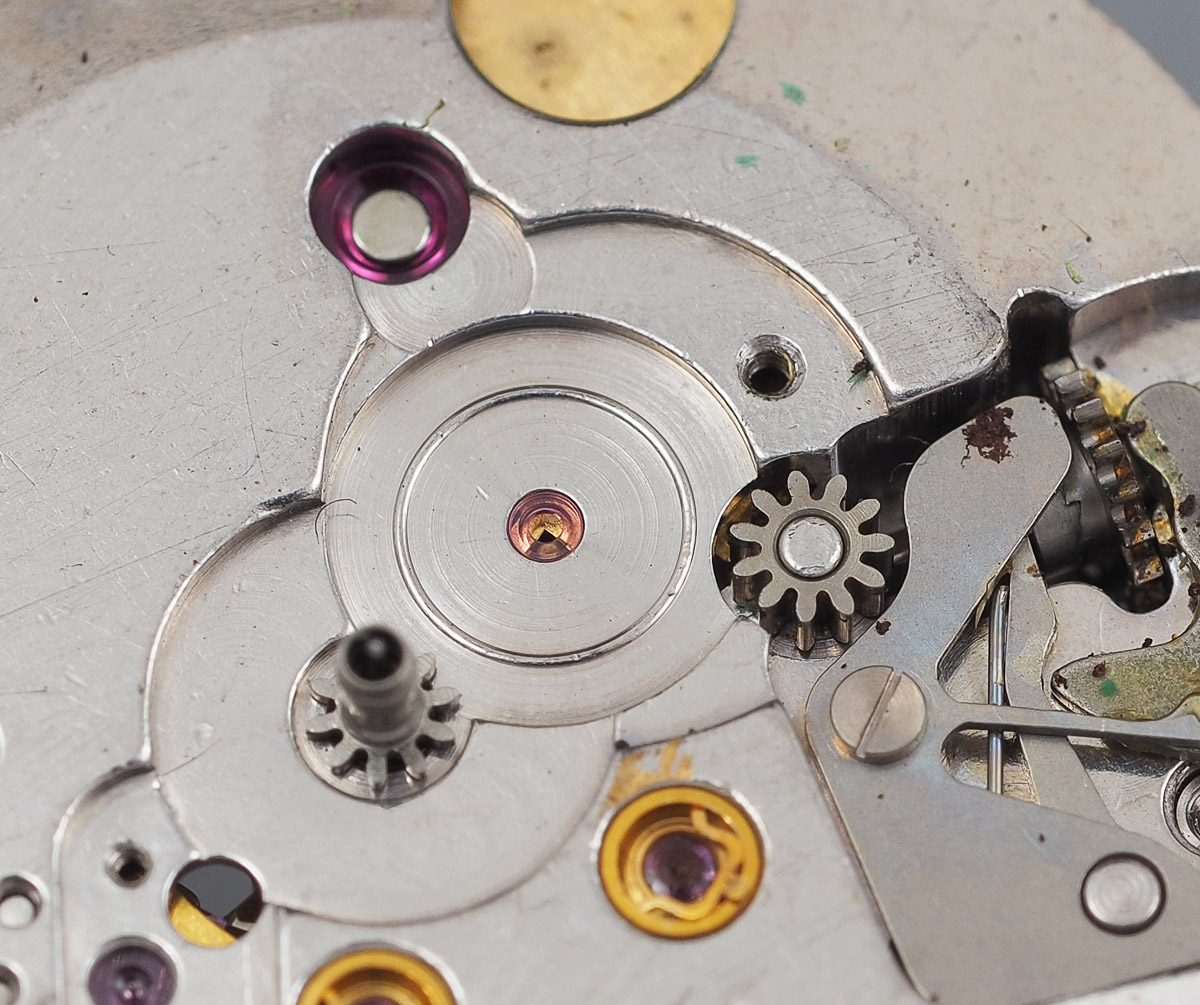
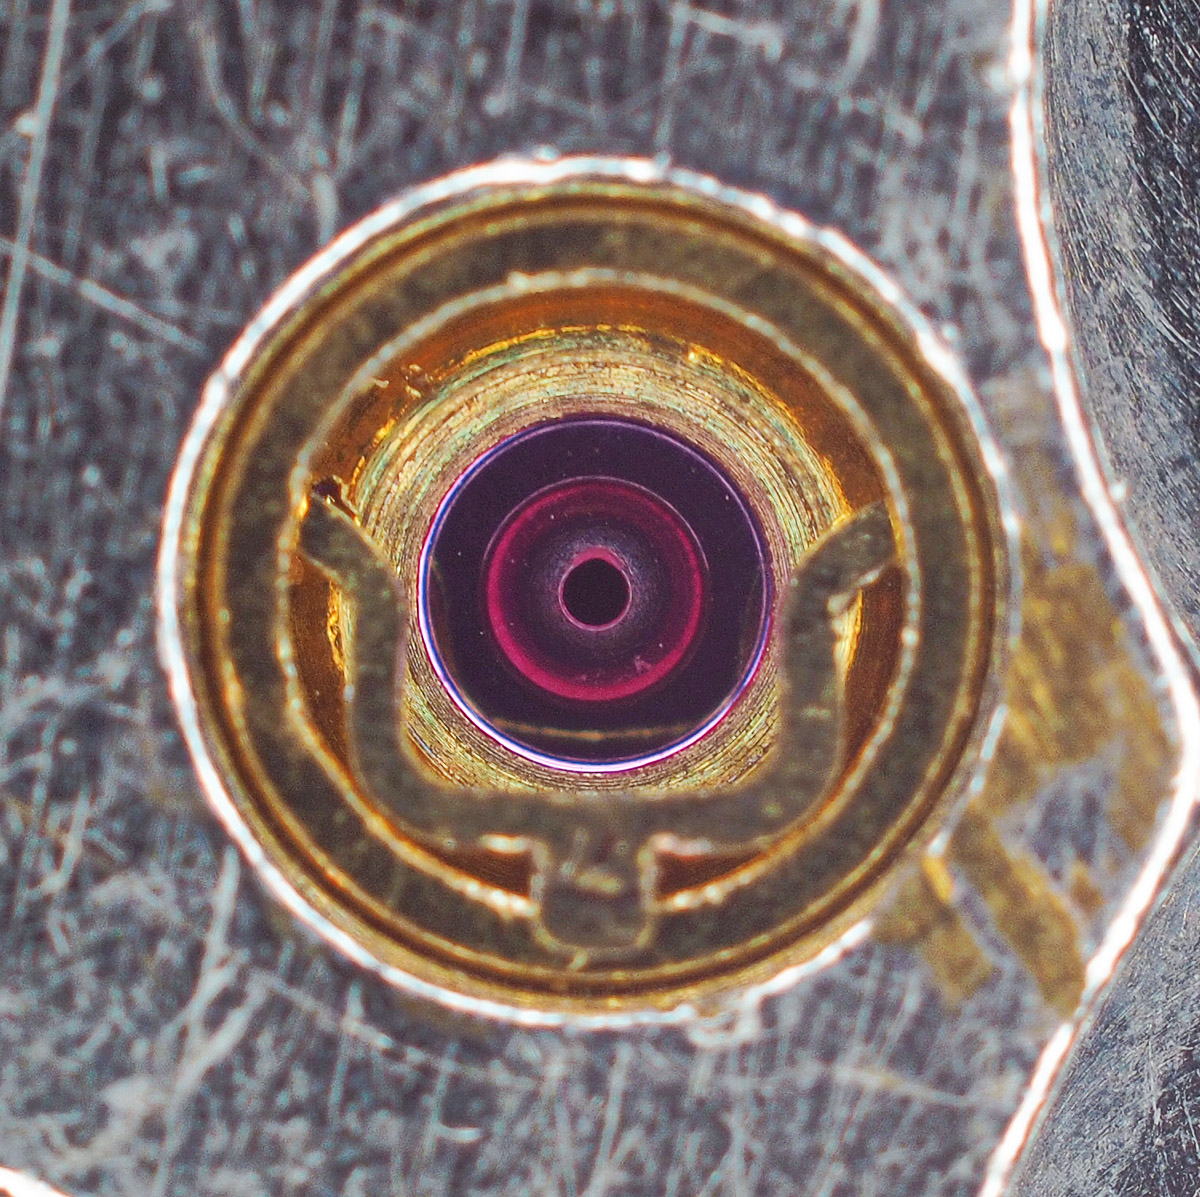
A closer look at the Diafix settings sets off an alarm with respect to the state of the third wheel bearing and shaft.
 We’ll get to see what’s been going on there shortly. One more observation to make before we return to the balance side: the minute wheel axle is served by jewel hole into which locates the minute wheel axle whereas the Cronos movement uses a small shaft mounted onto the main plate that locates into a hole at the centre of the minute wheel. Different strokes for different folks I guess.
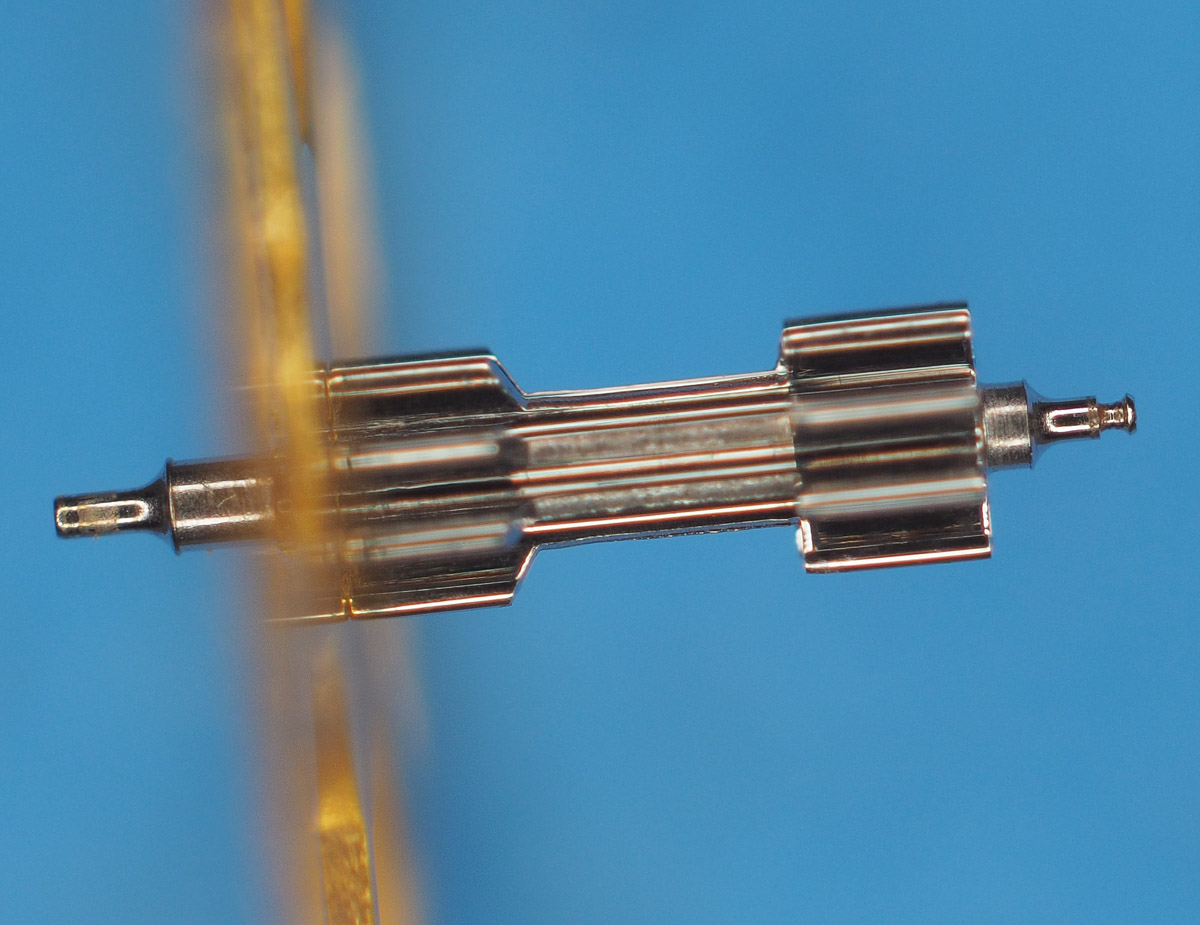
 The dismantling of the balance side follows the same route as the Cronos documented elsewhere but I’ll pause to show the second-setting disk, removed from the fourth wheel post and inverted for display.
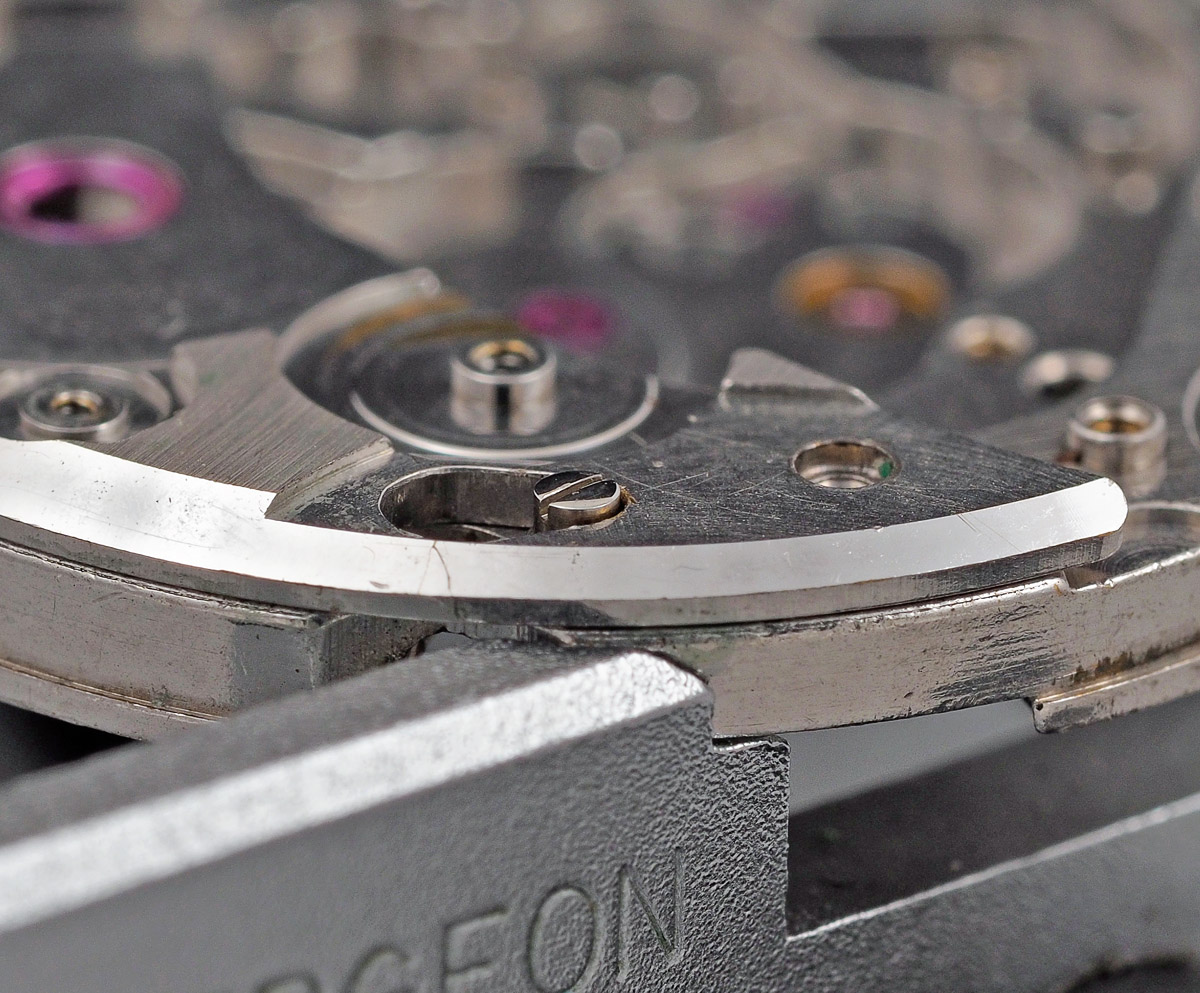
 Let’s pause to take a quick look at the setting works to note the use of the setting lever screw rather than a push pin.
 I highlight this at this point to direct your attention to the fact that the screw is still sat in its hole in the next photo, in spite of the fact that the setting works has been removed at this point in proceedings. Some of the more wizened amongst you might want to speculate about what further misfortune might be about to come my way.
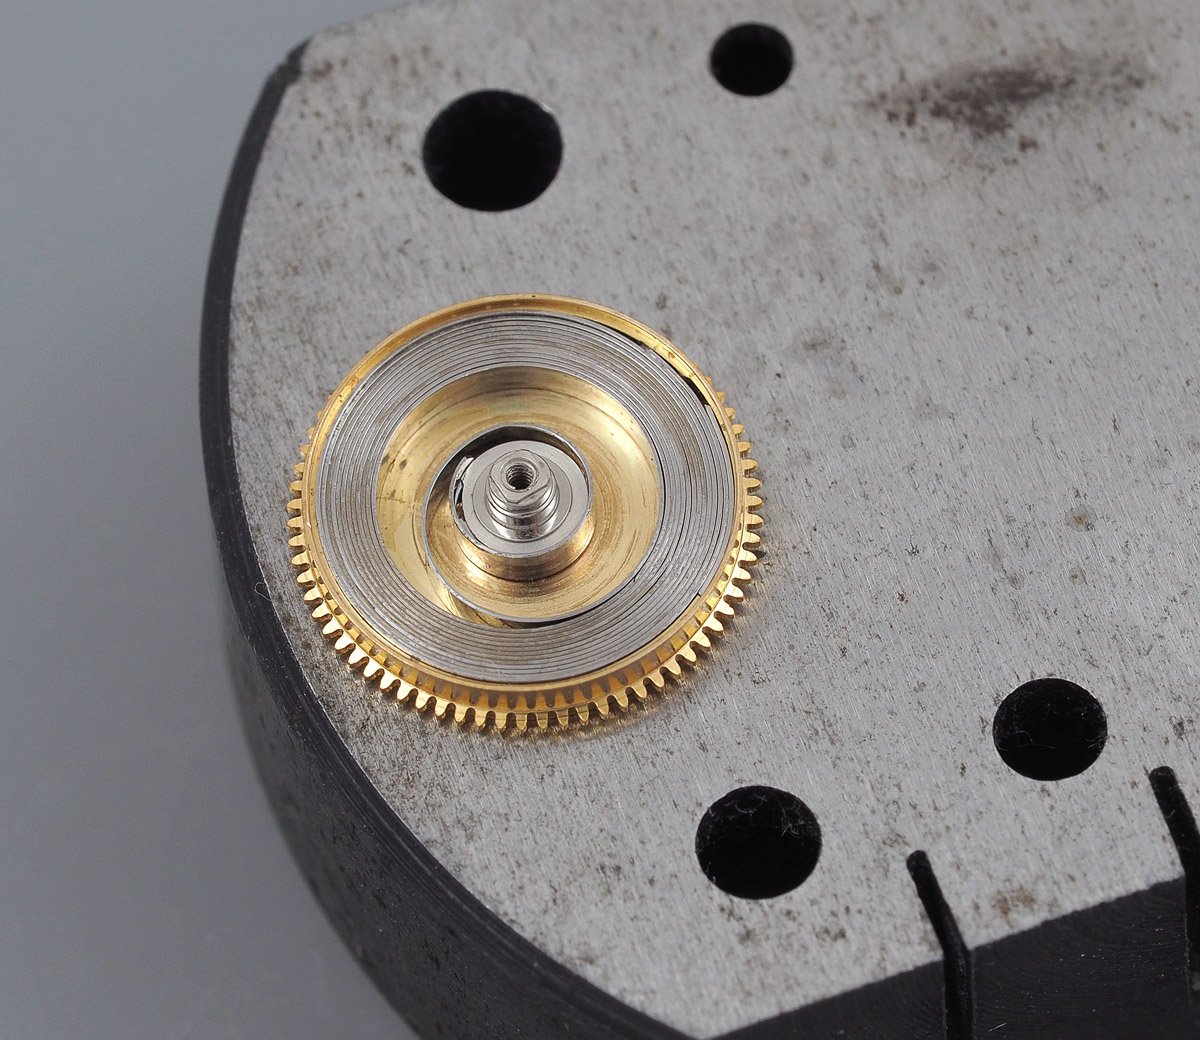
 Not only are the barrel arbor bearings jeweled in the main plate and barrel bridge, but the base and lid of the barrel itself are also jeweled. Thus twice as many jewels serve the mainspring barrel in this movement as in the notationally higher tier 5722 Grand Seiko. The original 25 jewel King Seiko calibre as well as the ordinary KS 44A also feature jeweled barrels but lack the jeweled barrel arbor holes in the main plate and barrel bridge.
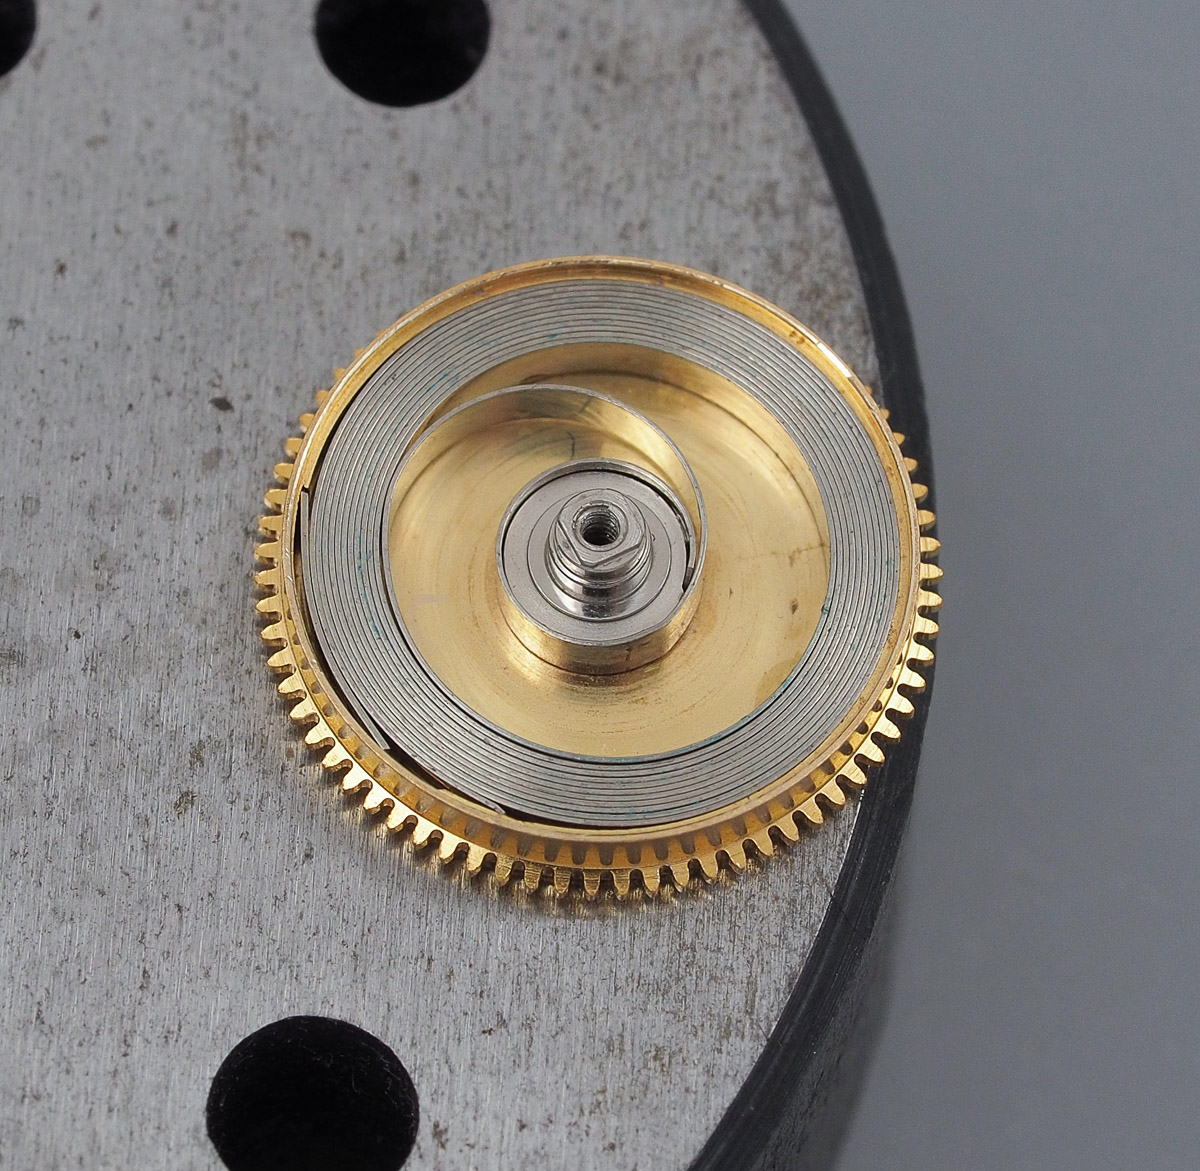
While we are on the subject of the mainspring, let’s open up the barrel and take a look.
 A first glance suggests that it looks healthy enough but if you take a squint at the 6 o’clock edge of the spring where it contacts the barrel wall, you may just be able to make out that something calamitous has befallen the mainspring tail.
 The tail-end attachment has broken and the mainspring then has no purchase on the inner wall of the barrel other than friction. Consequently, this mainspring will not hold its power beyond a certain state of wind and is therefore destined to be consigned to the cylindrical receptacle sat on the floor adjacent to my chair.
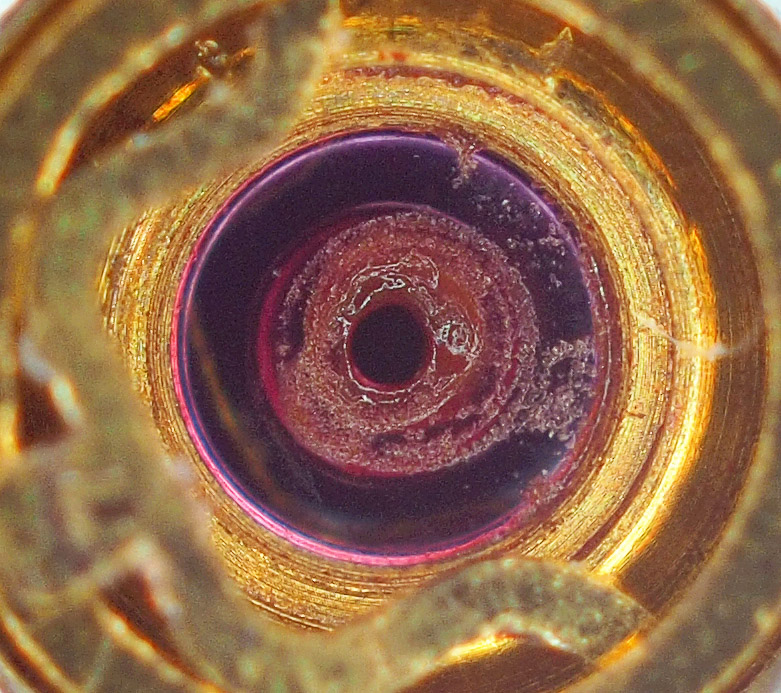
You will recall a short while ago that I drew attention to the state of the third wheel Diafix setting on the dial side. The shadow at the centre of the cap jewel hinted at the likely contamination of the oil with foreign bodies. With the cap jewel removed, the Diafix jewel is revealed be caked in an oily paste.
 This then prompts an inspection of the third wheel shaft.
 Oh dear. While the shaft at the barrel bridge end looks fine, the other end is a write-off and the wheel has to be retired from active service. I was hopeful that perhaps the damage was limited to the third wheel and not to the jewel itself but that hope was in vain. A quick clean of the setting reveals a significantly enlarged hole, worn away from years of abrasion from the damaged shaft aided by an increasingly concentrated paste of metal and ruby fragments combined with the original lubricant.
 One of the problems with the 4420A caliber is that a number of its parts are either proprietary or shared with only a very small number of other movements and locating spares can be very challenging. The 1974 edition of the watch parts interchangeability list for example suggests that the third wheel, part number 231540, is interchangeable with the following movements: 4420A. That’s it. And of course, Cousins have no supply (in fact they do not even recognize the part number) neither do Jules Borel, eBay, Yahoo Japan or any of my other usual sources of parts. However, the Jules Borel database comes up trumps because it suggests that the Cronos 54A movement also uses this part and I have two or three junk Cronos watches sitting around waiting to be plundered. And plunder I do, with the result that I locate a pretty clean looking third wheel.
The next step is to figure out what to do with the Diafix setting. The part number for the Diafix hole jewel with frame for 3rd wheel is 015321 (both upper and lower); Cousins report stock and so gratefully I order one. Having received the part a day or two later, I quickly checked the fit with the replacement 3rd wheel.
 That looks good to me and so the next step is to remove the old setting. The Diafix frame needs a degree of careful handling in extracting it from the main plate and so I elect to use my Seitz friction jeweling tool for the job rather than a staking set. The frame is flat on one side but has a profiled channel on the other to receive the Diafix spring and so the correct strategy is to press it out from the rear. With a suitable combination of anvil and press selected, I line up the press with the frame.
 Next, we set the height of the handle using the pivot gauge on the top of the tool, making a note of the value at which the press just makes contact with the frame.
 Then, dial out some height, press down firmly and out pops the frame.
 Fitting the new frame is just the reverse but we must first ensure to reset the pivot gauge back to its original setting before pressing the frame home.
 That was a somewhat satisfying process but it may need fine tuning later depending on how much end shake there is with the third wheel once the cap jewels and springs have been fitted.
Having sorted that head-scratcher, off stage left I seem to have created another one. You remember that setting lever screw that I had failed to remove from the main plate? Well, needless to say, it has gone walkabout and the search parties have turned up sweet f.a. And of course, once again, this part is shared only with the 4420A and the very first version of the 44A movement used in the 44999. I can find no stock anywhere. My only option seems to be to see if the equivalent parts from either a Cronos or Champion movement fit and then modify as required. The problem is that the screw needs to sit at least flush with the surface of the barrel bridge to avoid fouling against the second setting lever. I tried one part from a Champion and one from a Cronos. The thread from the Champion movement was too shallow to properly locate the setting lever but the Cronos part was fine. The only issue is that it stands proud of the bridge and so will need to be reduced in height and the screw slot deepened appropriately.
 No doubt I will find the missing part in 6 months time whilst on my hands and knees looking for an errant spring from another movement. At this point we are ready to clean all of the movement parts and so that is what I do.
While the movement is going through its wash cycle, we can turn our attention to the case. The case condition is consistent with that of the dial in that it seems clear that water has made its way in at some point in the past. The recess beneath the bezel is very dirty and shows some corrosion but the detachable dial ring is covered in green and blue oxidation – perhaps copper salts leeching from the brass beneath its plating.
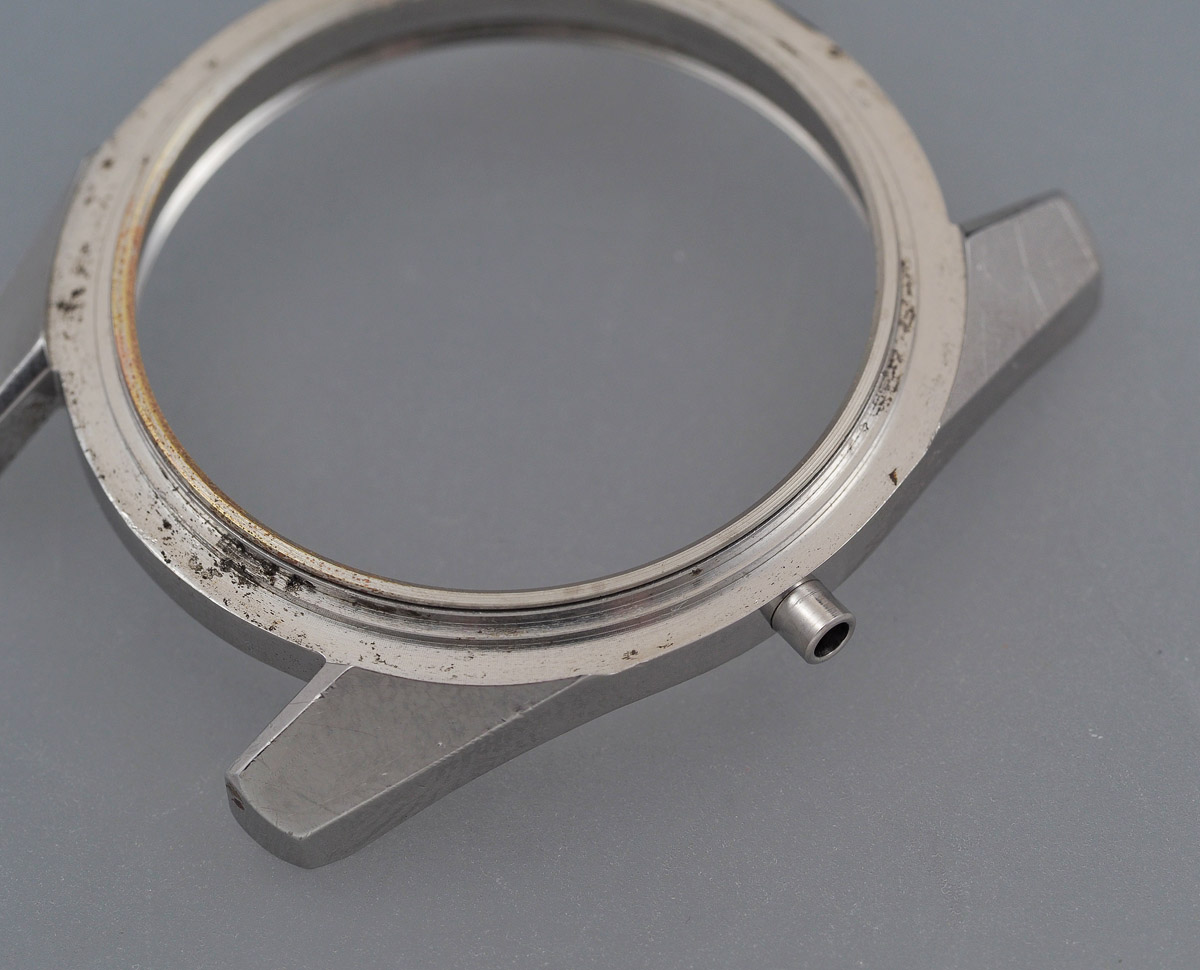
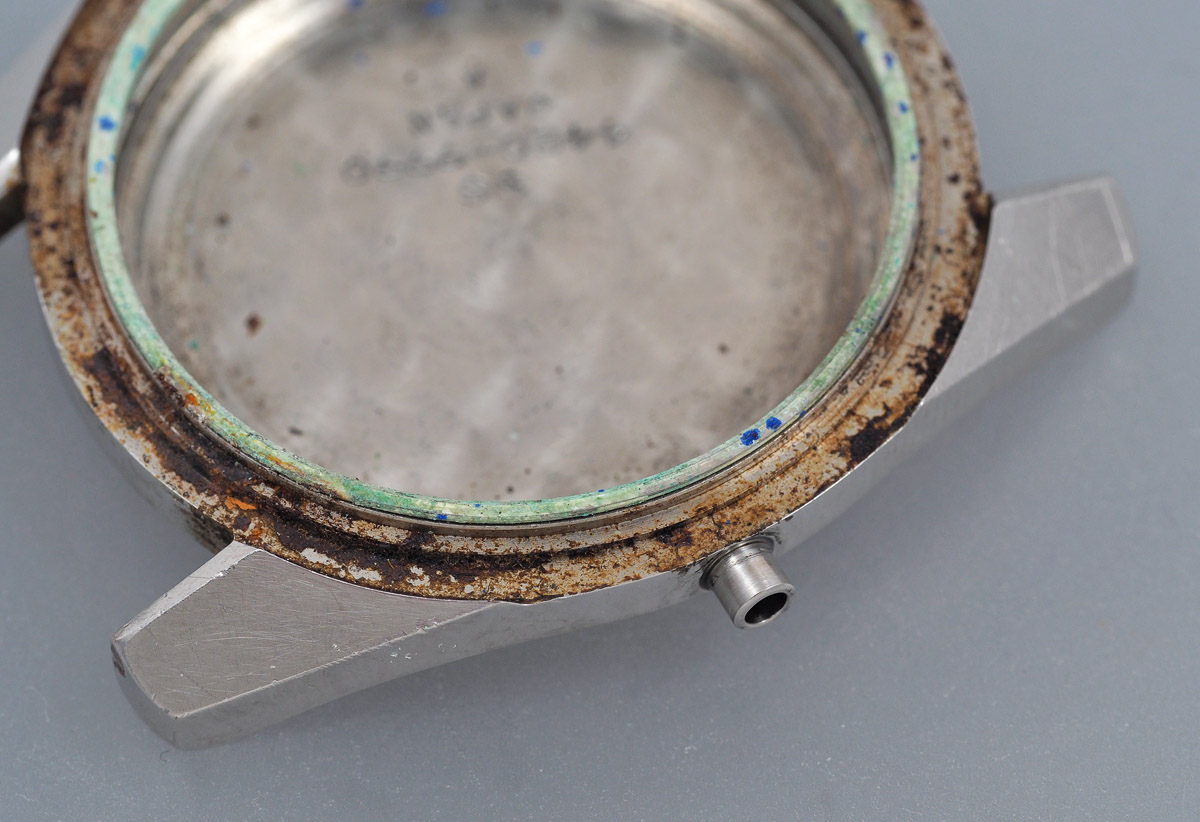 I am not too worried about the case itself – that should clean up nicely – but the dial ring will need a bit more care to avoid damage during the cleaning process After some mulling I decided to immerse the dial ring in a salt and vinegar solution to dissolve the oxidation salts from the surface – an approach that works beyond my expectations, leaving the dial ring completely free of salts but with the plating revealed to have been compromised on about a 5th of its diameter. With both case and dial ring thoroughly rinsed and dried, the case looks a good deal more presentable.
 The crystal is of the type that fits over the case lip rather than sitting inside and is held in position by the external bezel whose force against the crystal provides the water resistant seal.
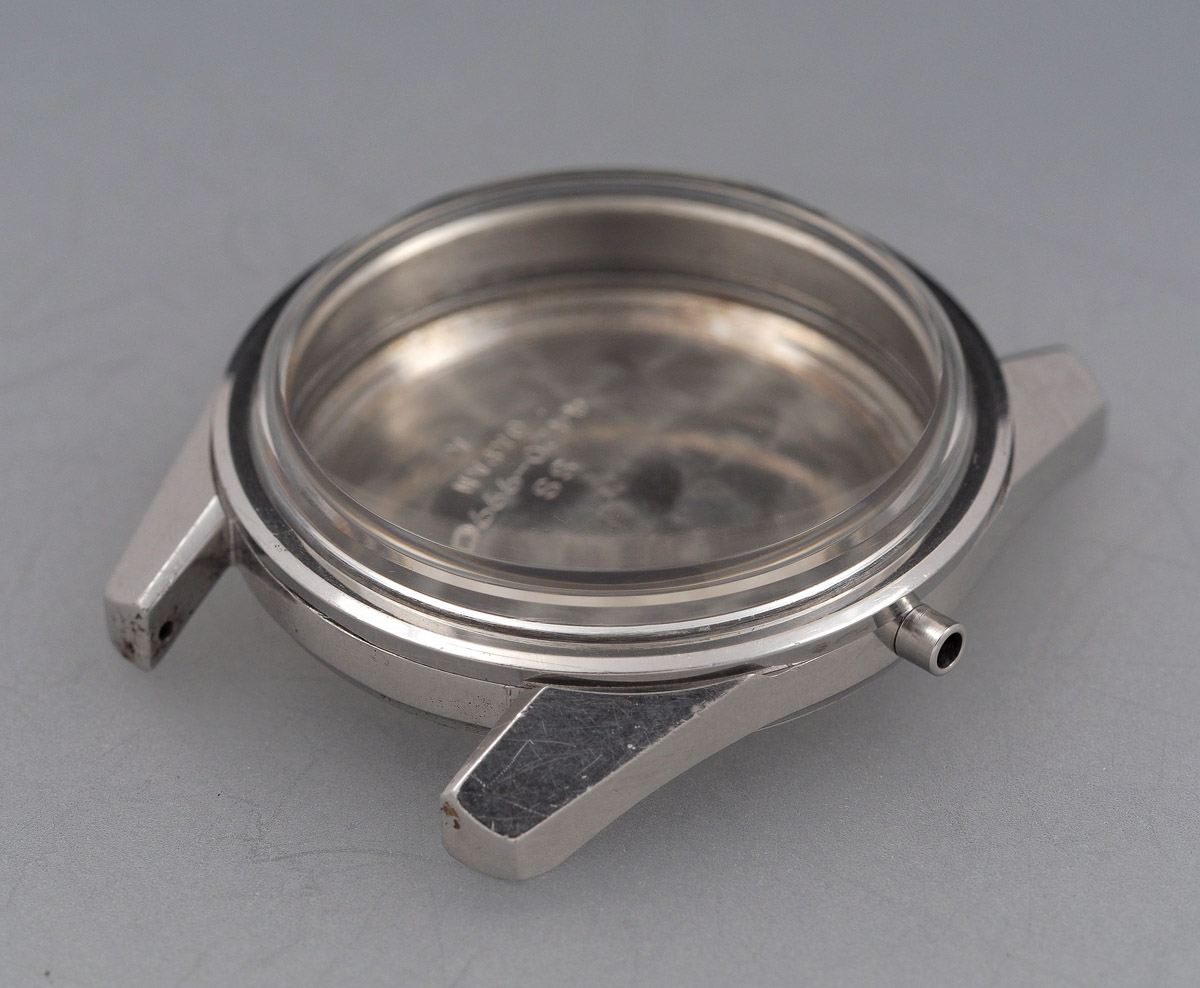 The original crystal, 300W01AN, is very hard to come by and in the end I had to resort to buying a GS supplies PA472-23. As is sometimes the case with third party facsimiles, the fit was not perfect and I had to remove a little material from the crystal edge to get the bezel to seat properly. While we are on the subject of keeping the elements out, I think it time to turn our attention to the crown.
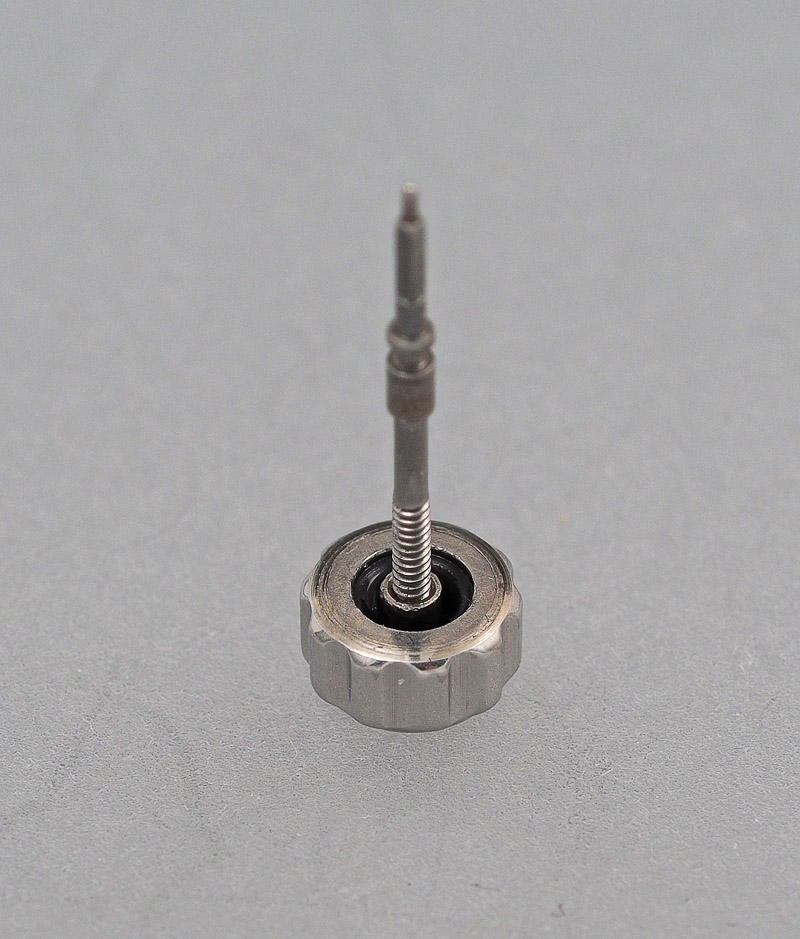
 The crown uses an encapsulated gasket sealed into the crown using a metal washer in a similar arrangement to that of the 62MAS/6105 described elsewhere. The gasket in this crown was hardened and no longer fit for purpose but replacing it is far from straightforward. I thought about trying the technique that I had used with my 6105 crown but noticed that the gap between the washer and stem pipe was a bit larger with this crown and so thought I’d have a go at extraction without dismantling the crown. Some determined endeavour with a selection of sharp instruments resulted in the successful extraction of the several hundred fragments of shattered gasket that resulted from my efforts. Having cleaned out any straggling remnants I contemplated how I was then going to fit a replacement gasket. With a selection of candidates in front of me, the choice appeared clear.
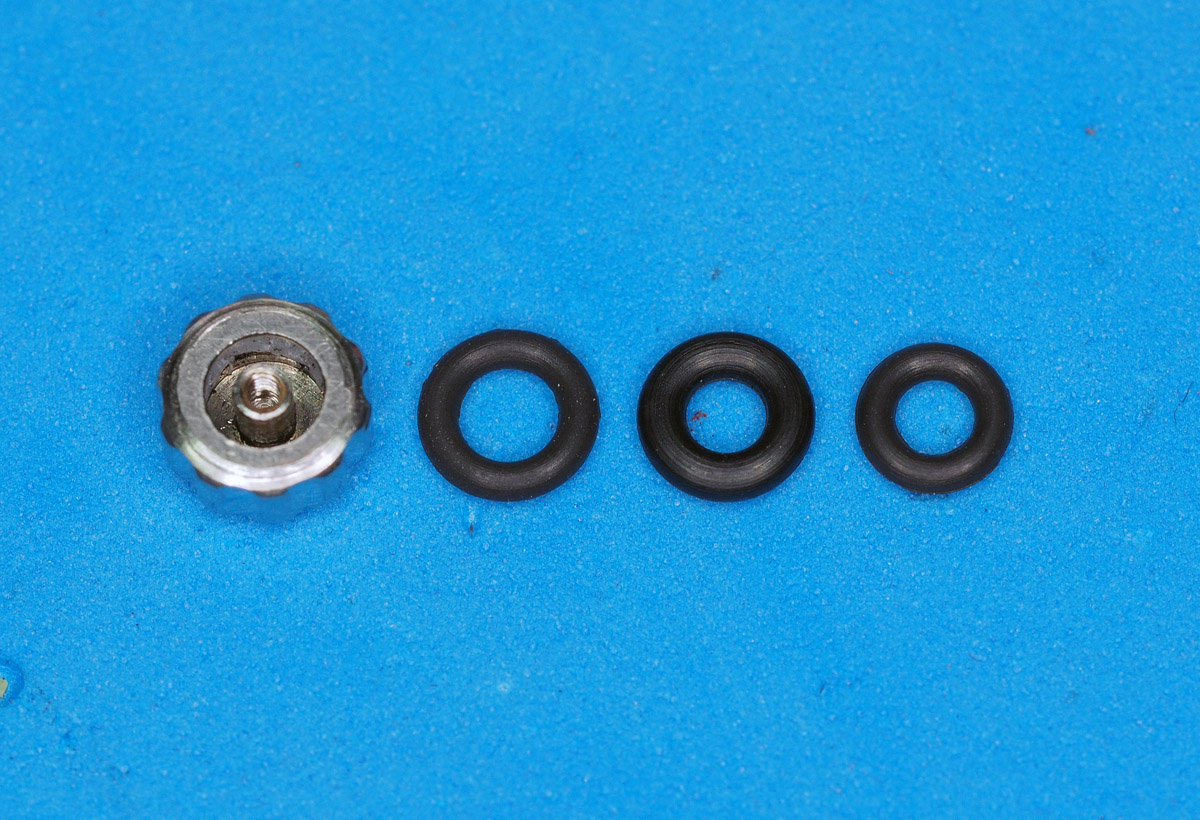 The fit of the one on the left on the case tube was not quite snug enough, the one in the middle fitted nicely but it is likely to be too thick to cram through the gap between the washer and stem pipe. The one on the right on the other hand looks just about right (in the best Goldilocks tradition). Some liberal lashings of silicone grease and a following wind and I managed to coax the gasket into its new home, free from any damage.
 Replacement old stock crowns for these watches, when you can find them, can be fearsomely expensive and so I am hugely satisfied with the outcome, having spent a total of only £9 on a selection of Viton micro o-rings.
Before we get back to the movement, it is probably worth mentioning that one of the spring bar ends had broken off in the upper left lug hole and corroded solid. No amount of cajoling would persuade the fragment to emerge and so in the end I had to use an Archimedes hand drill with a selection of tiny drill bits to drill out the hole.
While we are on the subject of infuriating obstacles, the mainspring part number for the 4420A is 401680 and needless to say long obsolete and unavailable anywhere. The only other model that shares this part is the equally rare Cronos Special and I do not have the patience to wait for one of those to pop up at an affordable price in the hope that it might liberate a healthy mainspring. The recommended replacement generic part has the dimensions 1.3 x 0.12 x 340 x 10 mm but of course, the GR mainspring of this dimension, although listed, appears no longer to be available. And so I think about other options whose thickness, length or diameter are close enough to provide a solution. I order three variations.
1.3 x 0.115 x 340 x 10
1.3 x 0.125 x 340 x 10.5
1.3 x 0.12 x 360 x 10.5
The first is correct in every sense, barring the spring thickness and I worried that this might not provide sufficient power. The second is a tad too thick and at 10.5 mm diameter might just about squeeze into the barrel without too much drama but its extra thickness might then provide a bit too much power. The last option was of the correct thickness but too long and too wide. I decided to err on the side of a bit more power and went for the second option as my first choice.
 In spite of the fact that the diameter was a little large, it just fitted into the barrel without requiring too much remedial action.
 Having overcome the numerous challenges that this particular watch has thus far thrown at me, the reassembly of the movement proceeded smoothly. I am not going to document much of that process here because it is essentially the reverse of disassembly and we’ve covered the essentials in any case with the Cronos project a few month back. I will pause however to survey my slightly inelegant solution to the lost setting lever screw. This has involved reducing the height of the Cronos donor screw head to get it to sit flush with the barrel bridge surface whilst deepening the slot to compensate.
 This should do the trick, either as a permanent solution or until I can locate a correct original part.
The four Diafix cap jewels and springs found there way back home without too much cursing: two on the dial side and two on the train wheel bridge:
 The pallet, its bridge, the two Diashocks and balance follow and with a few turns of power into the mainspring, and its chocks away.
 I was a little nervous at this point winding in a full wind because of the potentially over powered mainspring and so I monitored the amplitude as I gradually worked my way up to a full wind. I was right to be cautious because straight out of the box, I am seeing 330 degrees of amplitude on a full wind with the lift angle set to its default value of 52 degrees on my timing machine. This is mighty impressive but getting quite close to the point where we might worry about over-banking.
I left the movement running overnight with a feeling of satisfaction. In spite of all of the curve balls this movement has been throwing at me, I seem to have survived.
The following day, as I contemplated refitting the dial and hands, I checked the amplitude once more and was dismayed to see that it was barely clearing 200 degrees. I thought initially that perhaps the amplitude had dropped because I had turned it dial side up in preparation to receive the dial but flipping it back over made no difference. I rewound the movement once more but the amplitude stubbornly refused to nudge above 210 degrees. The clue to the source of the problem was provided by the fact that I was not able to detect a clear resistance and stop when winding in power and I concluded that something tragic must have befallen the brand new mainspring. My only option at this point was to break down the movement, remove the barrel and inspect the mainspring.
 That most definitely does not look as it should. The mainspring has failed following one full wind. I am not impressed.
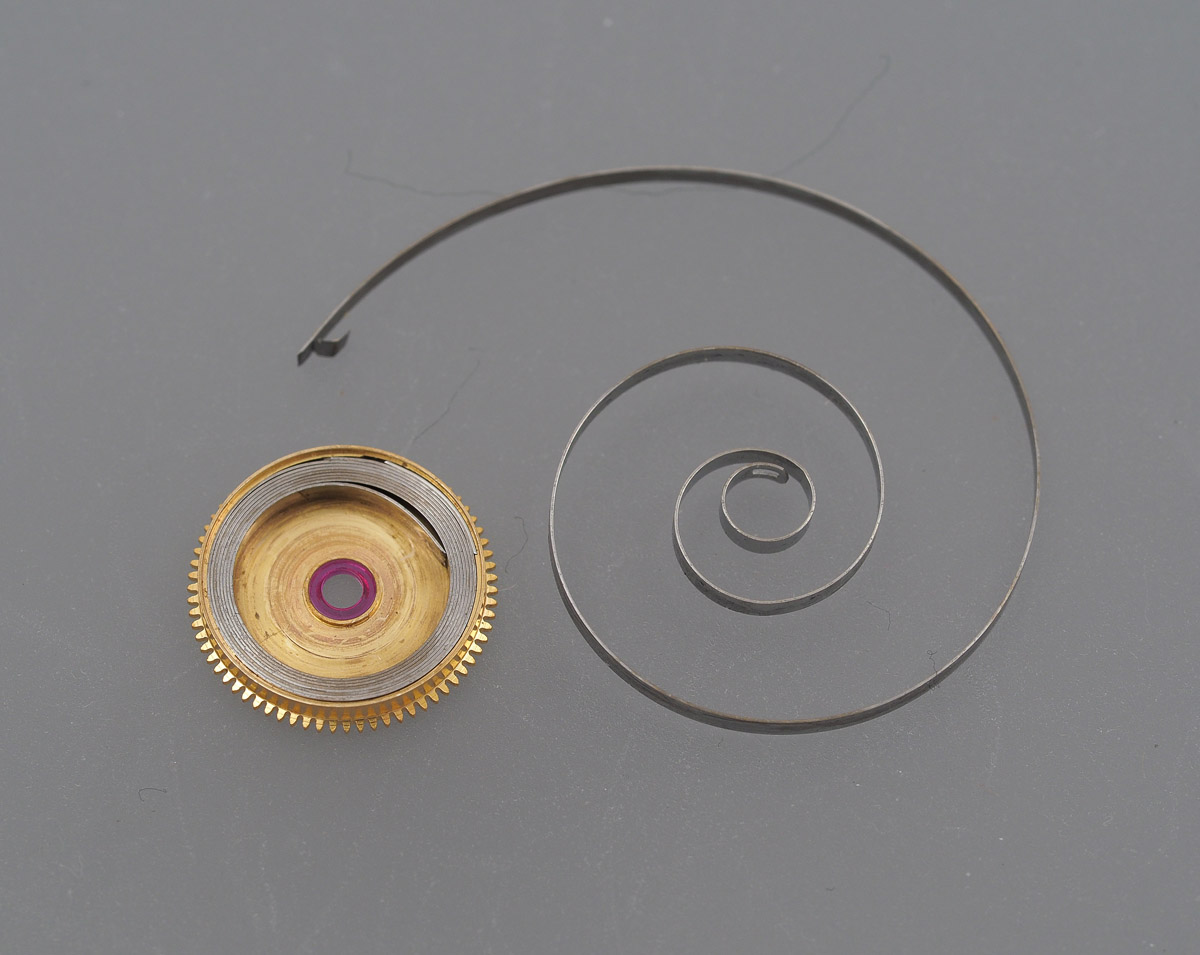 Looking back at the photo I took having just installed this brand new mainspring, I can just about make out what looks like a flaw exactly where the spring actually failed.
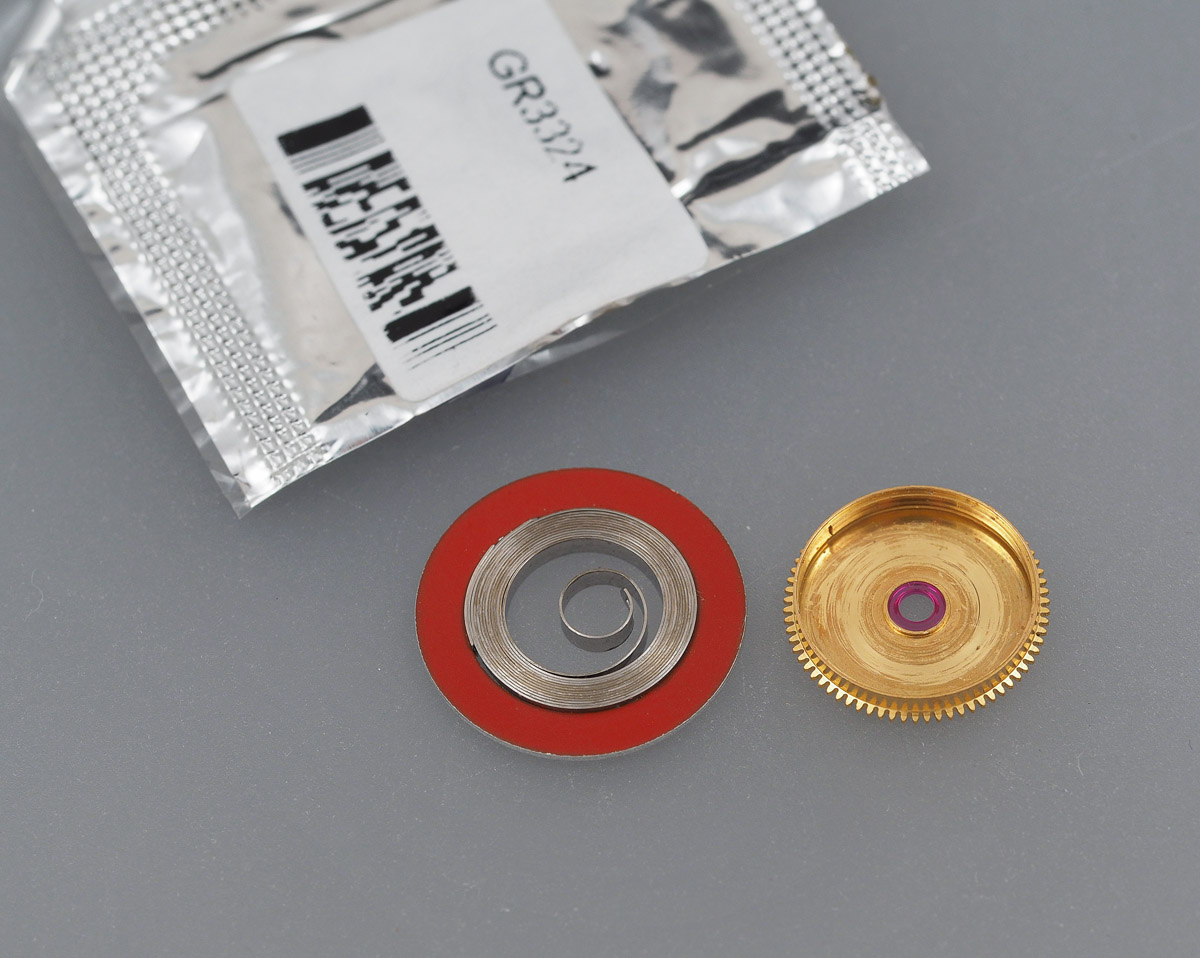
 Given that this mainspring was realizing somewhat alarming amplitude figures before it failed, I thought I’d err a little more on the side of caution in selecting its replacement. This time, I opted for a GR3296 whose dimensions are correct barring its slightly undersized thickness (see earlier for the full dimensions).
 With fingers and toes crossed, I reinstalled the barrel complete with its second new mainspring, refitted the barrel bridge, a full wind of power and measured the amplitude once more.
 This time the figures read as follows: 306 degrees, 0.0 ms beat error and an utterly noiseless timing curve. That feels just about perfect to me. You may have noticed in the photo above that I’ve fitted a temporary screw to the upper barrel bridge hole as I’ve not yet fitted the second stop lever whose screw would normally serve that purpose. Without a screw in position, the bridge would pop out of flat under the force of the torque of the mainspring. At this point, I thought it worth test-fitting the second stop lever just to make sure everything worked as it should. As I mentioned earlier, the hacking lever comprises four parts:
 The lever ring goes into its hole in the barrel bridge first, followed by the film washer.
 The lever is placed into position next and secured down with its screw. Everything operates as it should.
 I have a sense at this point that we may really now be on the home straight. It is time to unwrap that precious dial and prepare it for fitting.
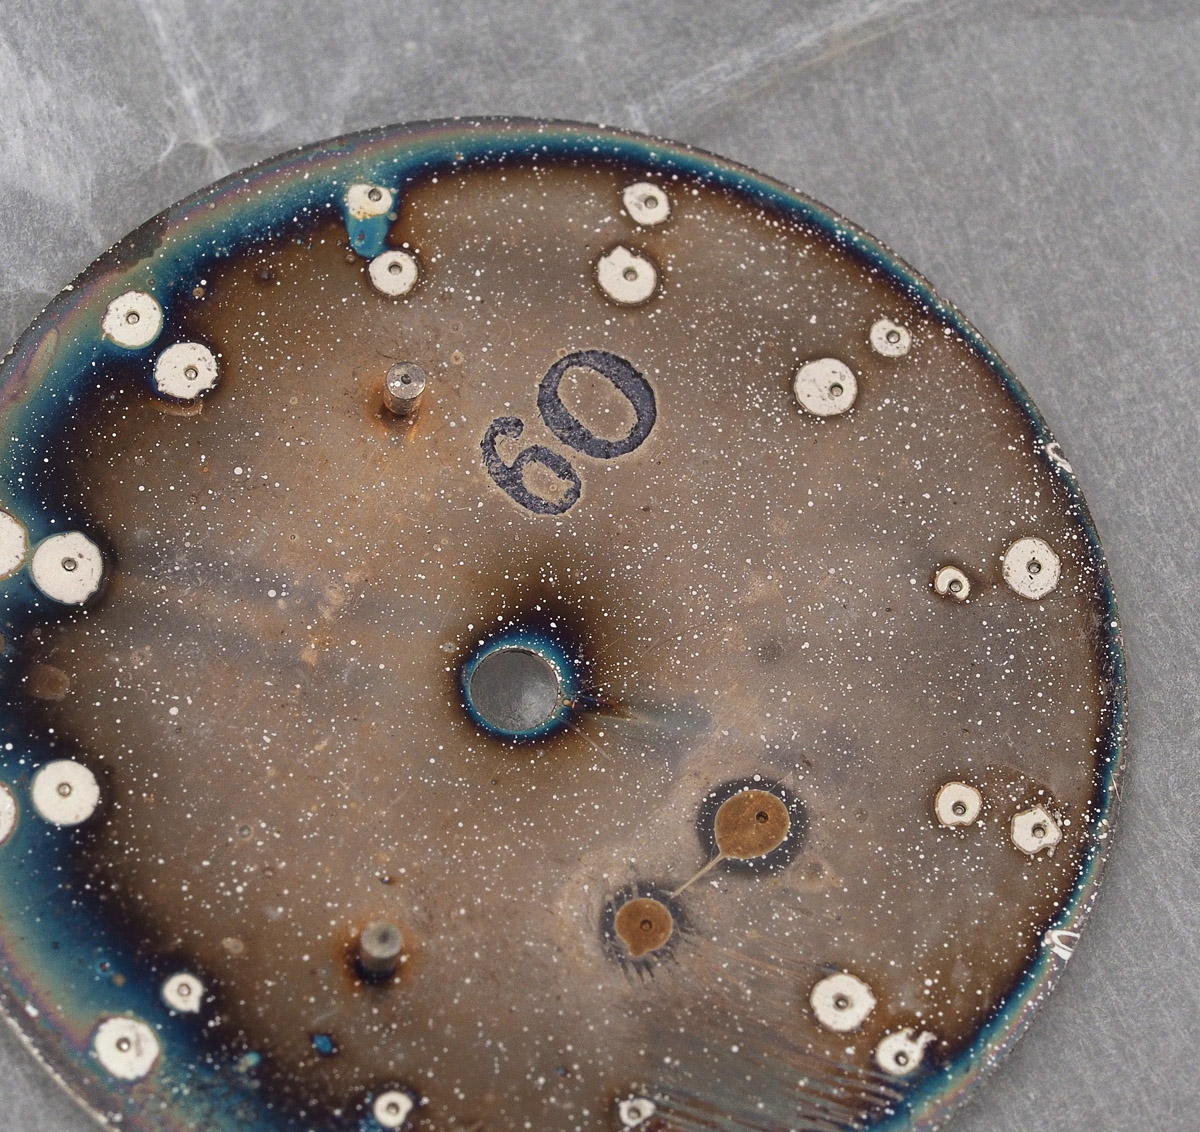
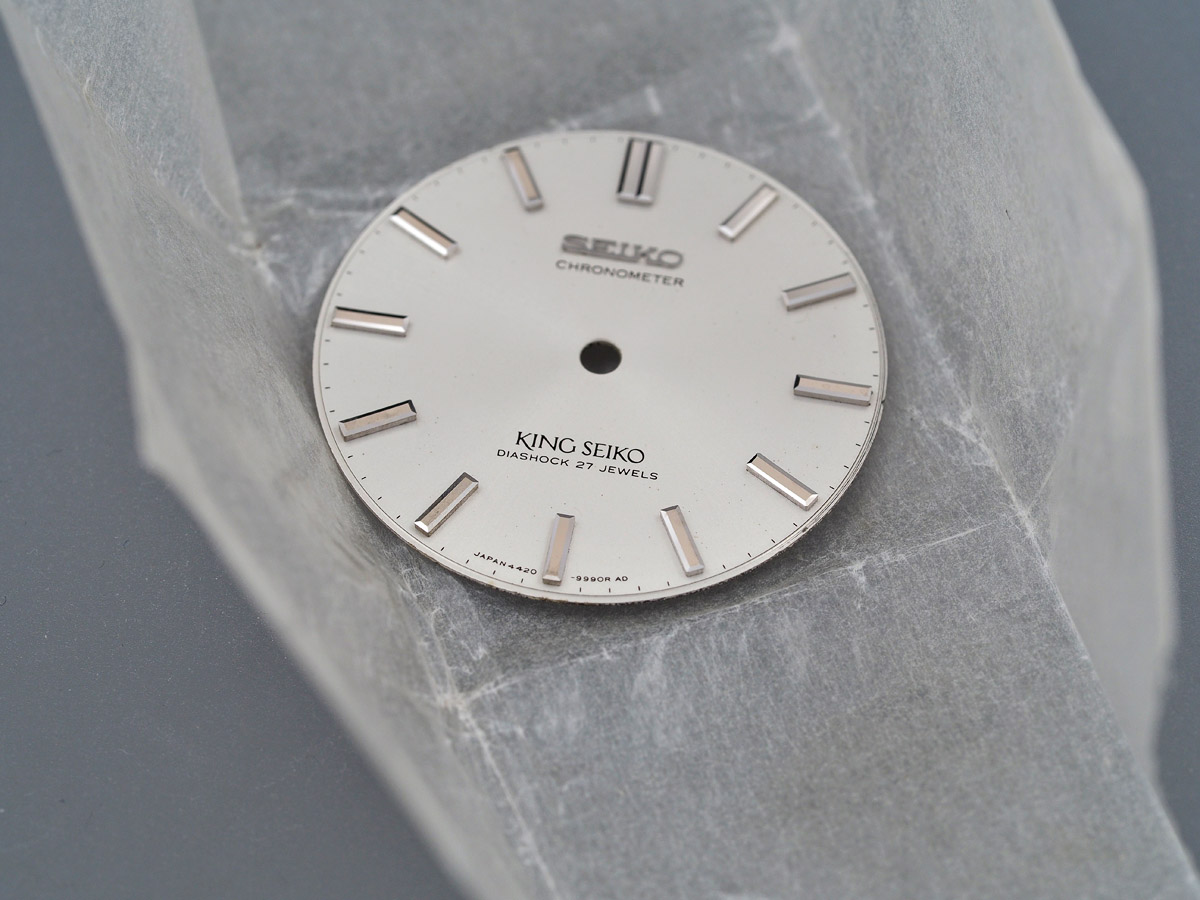 A few of the hour markers are a little tarnished from having been in store for such a long time and so I give them a careful clean, bringing them more or less back up to par with the others. The ‘6O’ marking to the rear of the dial dates it to October 1966, one year younger than the rest of the watch but in every other respect, exactly correct for the model and vintage.
 The hour wheel and its film washer precede the fitting of the dial and hands and at this point it looks like we are edging significantly closer to having a watch on our hands once more.
 The hacking lever needs to be removed once more before refitting to the case because otherwise access to the setting lever screw would be blocked.
 The new stem trimmed to fit properly, a dab of Loctite to secure the crown, insert crown and stem, refit the hacking lever, grease and fit a new case back gasket and we are ready to refit the case back.
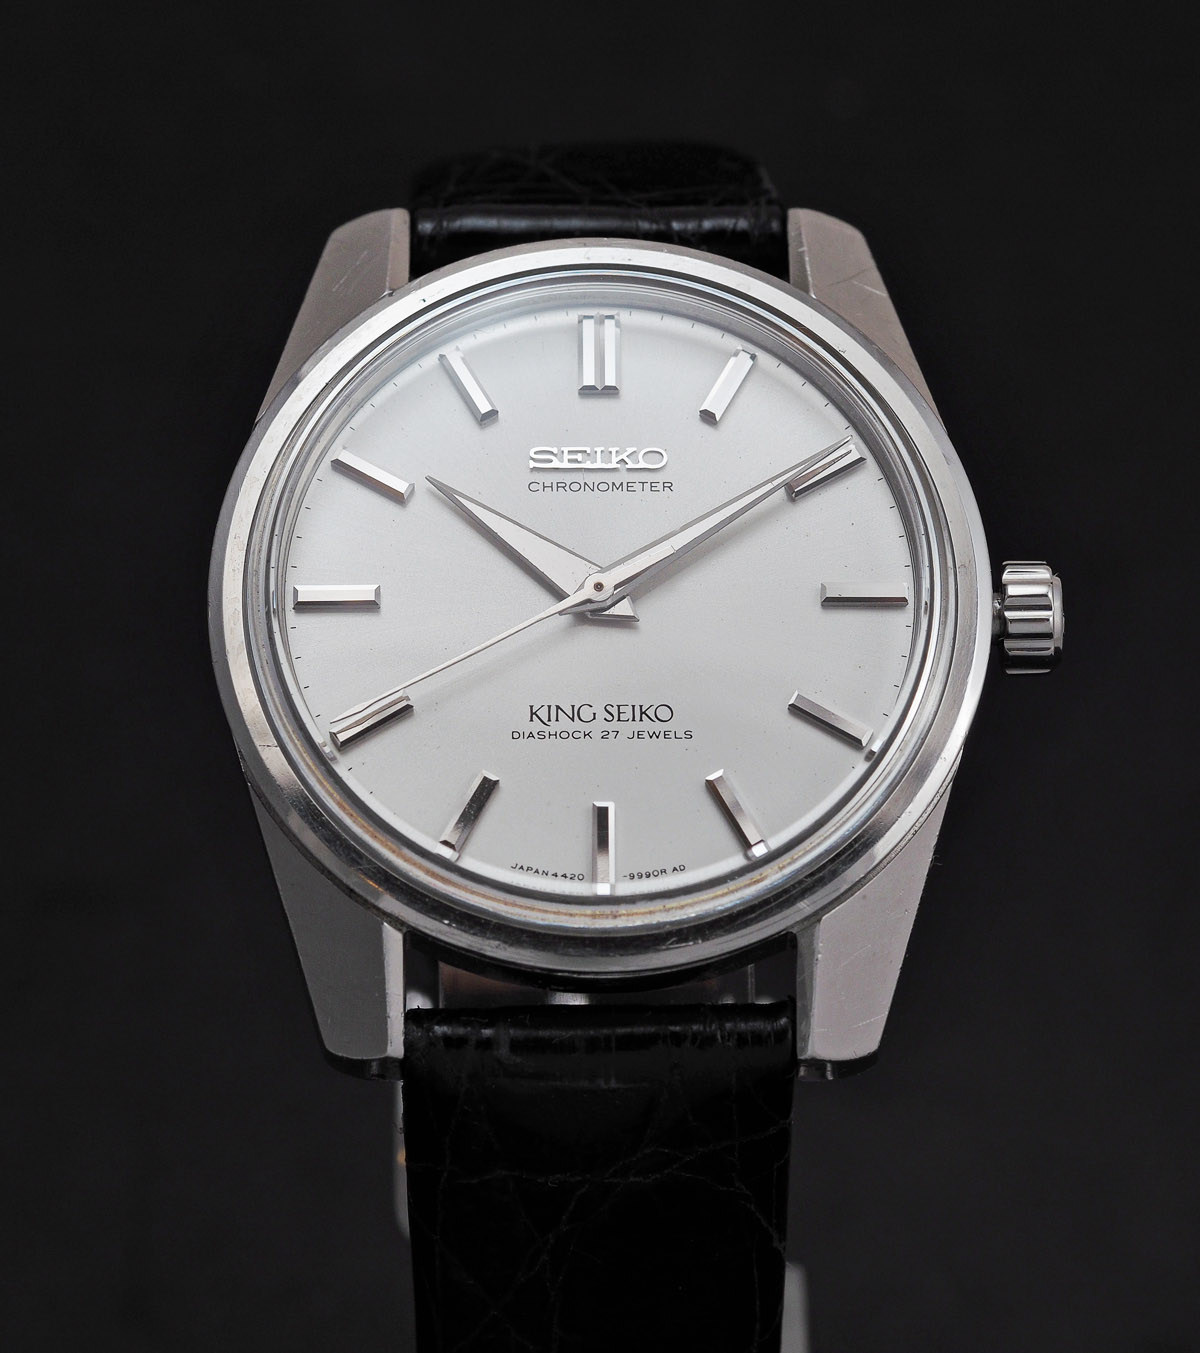
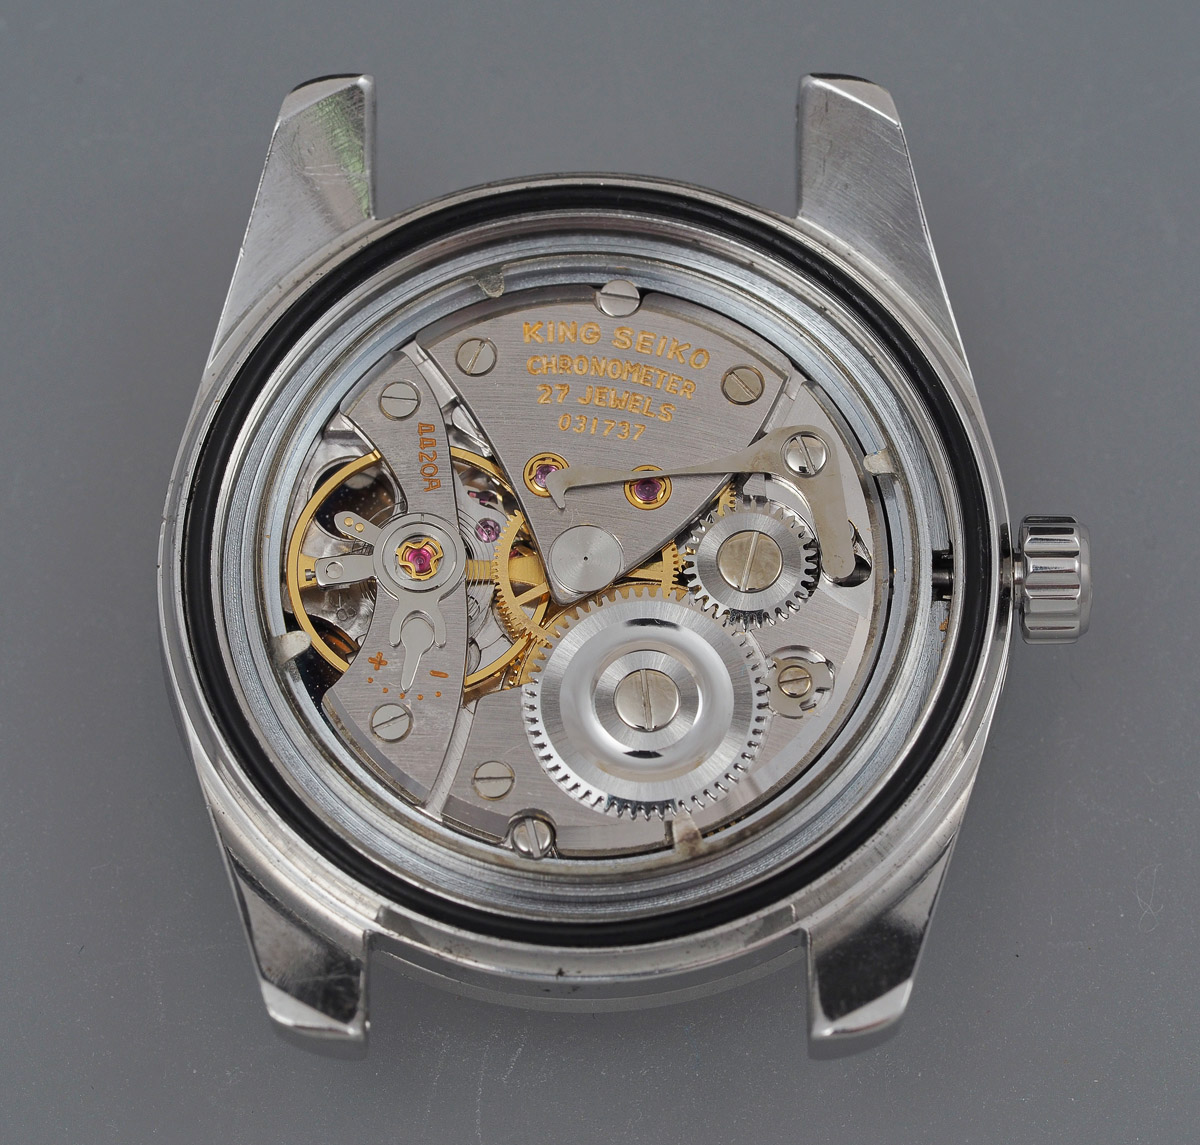 This has been a bit of a marathon but I think we are finally across the line.
 The 4420-9990 King Seiko chronometer sits at a conical intersection between the surface along which the Daini King Seiko line was traveling and that of the Suwa Grand Seiko.
 Its movement, to my eyes, is every bit the equal of the glorious 5722, not withstanding one or two idiosyncratic elements, such as the bolt-on seconds stop arrangement.
 It provided the route to the follow-on Grand Seiko 4420-9000, the first of the grammar-of-design watches that came to define the look and style of most of the Grand Seiko designs that were to follow in the 8 or so years that mechanical Grand Seiko survived.
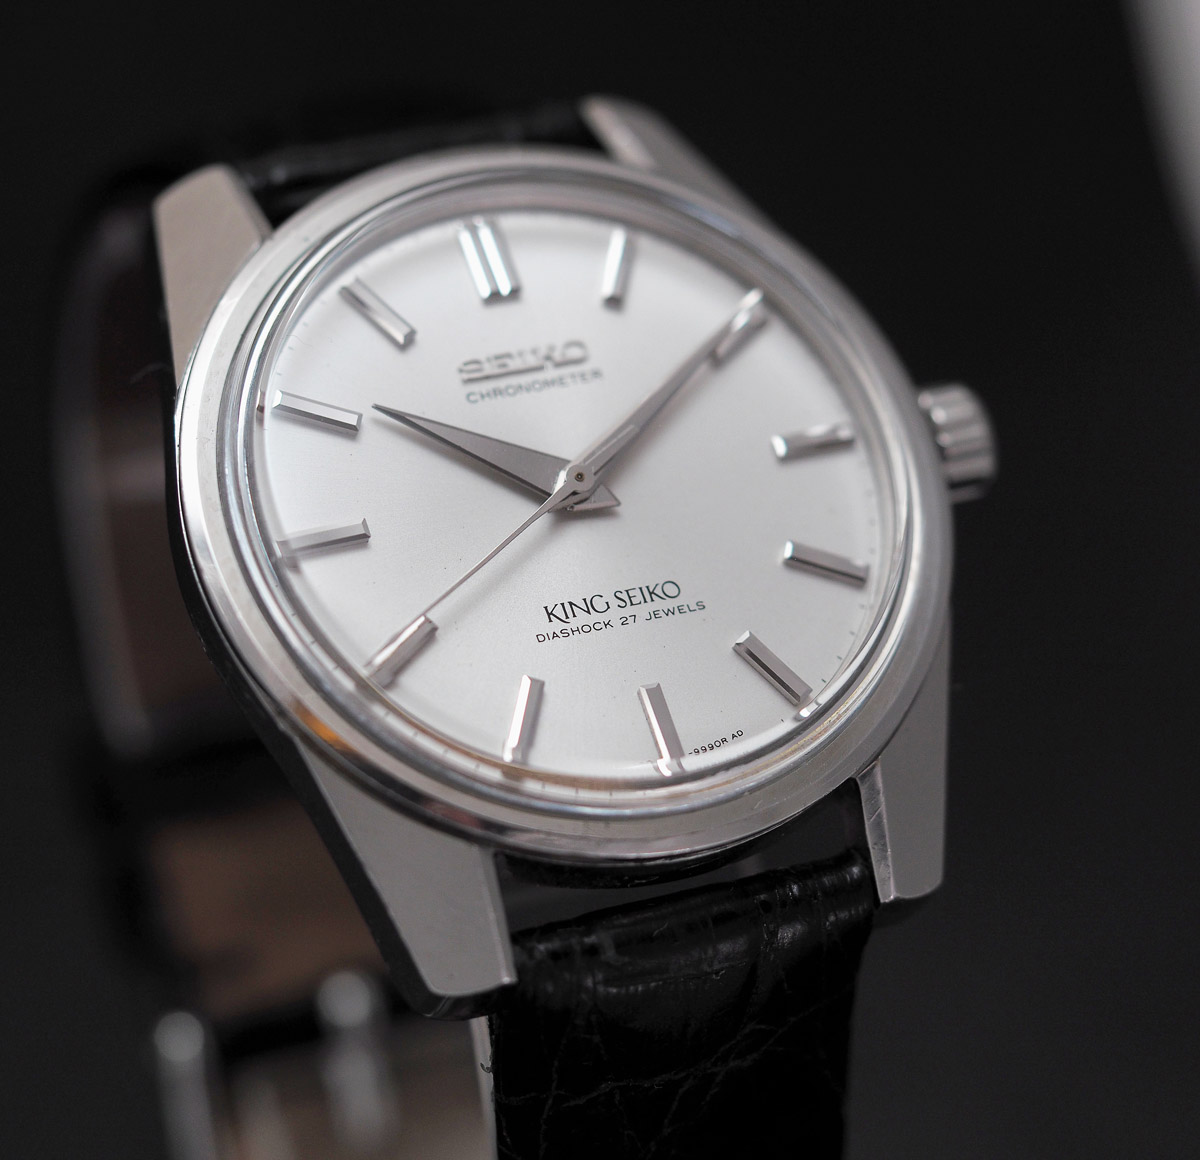 I think Seiko knew they had a bit of a star on their hands when they signed this one off, in spite of the fact that its profile when surveying the accomplishments of the company through the 1960’s remains somewhat discrete. Regardless of its subtle impact, I love the little design flourishes that mark this out as something special, such as the arrowhead-profiled seconds hand.
![]() I take some satisfaction that my appreciation of this watch has been amplified by the numerous obstacles it presented me with, seemingly to frustrate my attempts to revive it. My error in buying the watch in the first place has been mitigated by the end result.
I take some satisfaction that my appreciation of this watch has been amplified by the numerous obstacles it presented me with, seemingly to frustrate my attempts to revive it. My error in buying the watch in the first place has been mitigated by the end result.
 The King was dead. Long live the King


Dear Martin, I hope you’re well.
Thank you for your interesting and informative article, as always – the time and care you put into your writing, including back-ground information of the origins and evolution of King Seiko watches, shines through, as ever, and is much appreciated.
A slight correction, if I may. You state that:
“but most significantly, a jeweled barrel arbor bearing (also marked). The lesser 25 jewel King Seiko movements also benefit from all of the above.”
“This photo also allows us to see where the extra two jewels come from in this chronometer version of the 44 series. Not only are the barrel arbor bearings jeweled in the main plate and barrel bridge, but the base and lid of the barrel itself are also jeweled.”
I believe that it is the other way around for the various 25-jewel 44KS-generation movements, including the earlier un-numbered calibre with the external stop-seconds/hacking lever which is like this 4420A you show here, and the later 44A movement with the internal stop-seconds/hacking lever, and also the earlier, first-generation King Seiko movement which is generally said to have an un-numbered calibre, but which can be called the 5440 movement – the barrel and barrel lid are jewelled in all of these movements, but the barrel arbor ports in the bridge and main-plate are not jewelled, with these extra 2 jewels only appearing in the 4420A and 4420B (the later Grand Seiko version with internal stop-seconds/hacking lever) movements. To be pedantic about your phrasing, the later 25-jewel 45KS movement also does not have jewelled barrel arbor ports, as of course you have shown in your previous articles.
Sorry to nit-pick about your phrasing again – you also state that “The original Cronos 54A movement would find service in both the Cronos and Champion product lines” – this seems to imply that the movements are the same between the product lines, but they are clearly different in appearance and parts, as your experience with trying to substitute the different screws from these movements show. This source states that the Cronos’ 54A calibre number seems to more specifically be 5400, and 5402 for the Self-Dater version, and 5420 and 5422 for the Champion and Champion Calendar respectively: https://www.tapatalk.com/groups/seikoholicssupportforum/an-old-post-about-caliber-numbers-t381.html
I should have included that source when stating the calibre number of the first-generation King Seiko movement.
However, I have seen Cronos models marked with “5420” as the calibre number on the case-back, confusingly! See this eBay listing: https://www.ebay.com/itm/Vintage-1967-JAPAN-SEIKO-CRONOS-5420-1990-21Jewels-Hand-winding-/253791957319?nordt=true&orig_cvip=true&rt=nc&_trksid=p2047675.m43663.l10137
the images contained within which also show that the case-back is marked with the correct “C” model letter for “Cronos”, so it is not a swapped case-back form a Champion, which would be marked with “CH”.
Another source for the first-generation King Seiko’s calibre number – a late model, marked with the calibre number “5440”: https://page.auctions.yahoo.co.jp/jp/auction/u105810001
The Cronos and Champion movements are both based on the 54A as is made clear in the family tree provided in an early version of the Seiko Watch Parts catalogue as well as in the separate parts lists for all of the Cronos and Champion movements. My intention here was simply to flag that the 54A is the base movement for this whole family, including Cronos, Champion and indeed King Seiko. I have made a slight adjustment to the phrasing to refect this. Many thanks for your input.
Many thanks for this. My problem in making comparisons with movements on which I have not worked is that I have to trawl sources which do not necessarily highlight the differences. I have corrected the article to reflect the point you made about where the additional two jewels come from in the 4420 compared to the other 25 jewel low beat King Seiko movements. And my reference to lesser 25 jewel King Seiko movements was not intended to include the later high beat 45 series.
Hi Martin ! Another amazing post! I enjoyed a lot hearing about all the steps and all the hoops you went through. I like your perseverance… you must be a scorpio, like me (hehe)
You wrote : [A few of the hour markers are a little tarnished from having been in store for such a long time and so I give them a careful clean].
I was wondering how did you clean the marker… Did you use the cape cod ? (I have never done any watch fettling yet… one day when I get more peace in my life)
…and I love the dolphin hands of this watch! It is GS level here ! (the most beautiful hands in the world of watch IMO).
Hi Jerome, thank you. I’m a Sagittarius actually but close! I cleaned the markers just with rodico. I didn’t want to risk taking any of the plating off so played it safe.
I did not know about Rodico. Thanks! Seem like a wise solution indeed.
Very enjoyable read….as usual….patience is a virtue……..and blimy , you have some. I have allways found the progression of the gs range through the 1960″s somewhat perplexing…..at least with your write up i might be able to start to understand it..!!….especially if i read it several more times…!!…..keep up the good work.
Thank you! I am pleased you enjoyed it.
Hi Martin, I hope you’re well.
A note on chronology – you state: “A more refined version of the 54A appeared in the 23 jewel Cronos Special and it was this movement that then formed the basis of the 25 jewel King Seiko movement that would power the first King Seiko of 1961.” The Dragonfly Publishing reference books state that the Cronos Special was introduced in 1962, a year after the first King Seiko. Incidentally, they state that the same is also true of the Crown Special, which was introduced in 1961, after the introduction of the first Grand Seiko in 1960. So it appears that the Specials actually have down-graded versions of the King and Grand movements, I guess to help bridge the gap in price between the King and Grand Seikos and the non-Special Cronos and Crown models, using technology which was developed for the King and Grand movements.
Just a random note, unrelated to this specific article – I’ve read in your articles before about how easy it is to lose springs and other components. Adrian of Vintage Time Australia has Seiko movement tear-downs on his YouTube channel, and as a tip to avoid this happening, he shows how he uses a bit of Rodico to stick part of the spring to the plates before he releases the springs. He also suggests removing c-clips (as used to fix day wheels) with the movement inside a clear plastic bag, so if it goes flying off, it’ll get trapped by the bag, instead of flying off across the room. He also suggests not to remove Diafix springs completely, but just loosen one leg to get the jewel out, then pop the leg back in, and clean the movement with the spring in place, as apparently that’s how they’re meant to be cleaned, with the added benefit being that you won’t lose the whole spring by it flying off if all 3 legs are taken out. I hope you might find this useful!
On the chronology of the appearance of Crown Special and Cronos Special movements relative to those of the first Grand and King Seikos, I am sure you are right. The Catalogue numbers place the Special editions of the Cronos and Crown above those of the King and Grand Seiko movements, respectively, which suggests they appeared a little later. I’ll amend the wording accordingly.
As for lost parts, the approach I take to presenting my experiences here is warts and all and I do not try to hide it when things go wrong. Any watchmaker who tells you he/she never loses a part is being economical with the truth! These days I rarely lose springs, having learned from my mistakes in the past but I don’t like using Rodico in the way you describe because it is all too easy to then leave deposits that can then interfere with the operation of the movement. I prefer instead to use shaped spatulas made out of pegwood to hold parts in place as I fit them and find that this works really well. Rodico for me is used largely for cleaning purposes. Thanks for your contribution.
Ah, interesting. Could you let me know what the catalogue numbers for the Cronos Special, Crown Special, first King Seiko, and first Grand Seiko movements are, please? Thank you very much!
Cronos 54-00-1, King Seiko 54-40-1, Cronos Special 54-60-1, Crown 57-00-1, Grand Seiko 57-20-1, Crown Special 57-60-1.
Thank you. I am not sure that the ascending numbers are entirely to do with chronology though, as the 5740A for the Lord Marvel came out in 1964, as did the 571X Crown Chronograph movements, though it’s possible that they may indicate chronology in some cases but not in others.
Thanks for showing this nice King Seiko.
What reference you used for the new crystal please ?
Hi Sven, the crystal part number is 330W01AN.
Hi Martin,
I’m working on KS44 9990 from 67 (I think), and I’m looking for the “stop-second” lever, is there a reference for these four parts, a kind of set?
By the way, your work is amazing, I wish mine will look this way at last.
regards,
Hugo
Hi Hugo, the second setting lever as fitted to my 4420A has the part number 391490 but for the 44A which perhaps is your movement, the part number is 391442. If you do a Google search for 44A technical manual, you should find a link to the parts list. Glad you like the blog!
Thank you so much Martin, it really helps, seiko’s vintage world is obscure…
Hi Martin, WELL WHAT A PROJECT – you poor ba—-d, you deserve every accolade possible for you persistence & patience. I thoroughly enjoyed your summary of events so much so that i nearly missed my auction time as i am chasing my first King Seiko. I am only new to the antique watch world after inheriting my Fathers 50’s Eterna. As you can tell the bug has started. I can’t envisage you ever departing with that one!
Cheers
Rick
Thanks Rick. Yes, this one is not going anywhere. Glad you enjoyed the post.
Oh, what good is a crossword puzzle you can do in ten minutes? The best take a few days, a few cross-outs, and maybe some different-colored ink. It’s frustrating when you’re doing it, but far more satisfying when it’s done, and you remind yourself those are the ones you actually like!
Not a crossword puzzler myself but as you suggest, I inflict more than my fair share of problem solving upon myself! And yes, the biggest headscratchers and most frustrating, ultimately the most memorable and rewarding.
Fantastic write up of a challenging restoration.
Did you come across this weight on your hairspring:
“One unique aspect of the 4420A movement in the 44KS is that a tiny weight was attached directly to the hairspring to improve accuracy. This is often removed during servicing, since most watchmakers are unfamiliar with this practice.”
from https://www.watch-wiki.net/index.php?title=King_Seiko_44KS
Hi Jake, no I have read about these weights but did not come across one on the balance fitted to my watch. Thanks for your comment!
I’m planning on trying it (on a lesser grade movement). This is all I have to go on:

To be honest Jake, it is entirely possible that the weight is present and I never noticed it. I did not take any photos of the hairspring from beneath during the service and so have no evidence to scrutinise one way or the other. Next time I open her up, I’ll take a peak!
Hi, great post as usual. I’m currently working on 44-9990 and trying to find the correct mainspring (which is the same material code with 4402A). When I looked up Jules Borel catalog, it recommends GR 3342: 1.3 x 0.13 x 400 x 12, which is different from the dimensions you’re using. Upon reading your post, I decided to order GR 3296 too. Will try both and see how it goes. Thank you for sharing all the learnings.
No problem. Let me know how you get on.
Hi Martin, greetings. I tried 3296 and (unlike yours) the amplitude drops significantly. Amplitude with original mainspring (after CLA) was around 240, while with 3296 (also after CLA) is around 180-190. I’m just wondering whether you managed to refit yours with 3324 (0.125 thickness)? I haven’t try the 3342, as they look much thicker and longer; I guess 3342 is meant to replace OEM 401440 (for early 44-9990 with kama hand). Thanks.
I’ve stuck with the mainspring I fitted as the watch was performing so well and achieving amplitude >300 degrees. Your amplitudes seem quite low with all of the mainsprings you’ve tried and so I wonder if there is a problem elsewhere?
hi dear I need repair may king seiko 4420-9990
Hi, I’m afraid I don’t take in repair work at all. I only work on my own watches. Sorry!
Hi Martin,
Great work yet again, I enjoy your posts and actually always look for one when I’m about to buy a new Seiko 🙂
Can I ask something? I have king seiko 4402-8000 gold cap. I managed to source original crown, but it seems from the storage, the gasket became very stiff and cannot fit. Do you have any tips, from your experience, how can I make the gasket softer, or can I at all? Any suggestions how can I attempt to put it in place?
Thank you very much.
Best Regards
Anatoli
Hi Anatoli, if the crown gasket is hardened then it is no longer fit for purpose. It is commonly the case that hardened gaskets are also cracked and so even if you were able to soften them, they may not provide an adequate seal. The only way to restore some faith in the water resistance of the crown is to dig out the old gasket and replace it with a new substitute (documented in this post and elsewhere in the blog). You may be able to find an old stock new crown as a replacement but it is likely that the gasket in these would also have aged. Sorry not to be able to offer an easy solution. Good luck!
Thank you Martin,
Indeed the one that I got is an old stock new crown. Thank you for the tip, much appreciated.
Pingback: The Vintage King Seiko 4420-9990 Is A Grand Seiko In Disguise – Perpetual Cafe
Hi and thank you for the great article as always.
I hhave a question, how did you removed the second-setting disk?
Thanks
Marco
Hi Marco,
It just levers off. I can’t remember now what I used but maybe hand levers.
All the best
Martin