
Tags
I am by nature a reflective person and if I’ve learned anything at all in my time as an amateur watch fettler, it is that the making of mistakes or errors of judgement is a vital part of the process of gaining purchase on the slippery slopes of a learning curve.
It is easy to believe that some sort of rudimentary accomplishment in any field of endeavour gives licence to the conclusion that you have acquired an adequate degree of competence. A formerly dormant watch movement that springs into life as a result of your attentions can prompt a feeling of immense satisfaction but that does not mean that you have really done anything more than resuscitate the patient rather than restore it to full health.
My early experiences with watch movement servicing were conducted at a time when the resources at my disposal were frankly not really up to the job. In the beginning I used lighter fluid to clean movement parts, aided by a cheap ultrasonic bath, I did not really pay too much attention to correct use of oils and did not have access to a watch timing machine. My fear of handling mainsprings also meant that I was not initially in the habit of cleaning or replacing them. Consequently, any movement that appeared to run following a service could be regulated to a satisfactory level of timekeeping without any real insight into how well it was actually running.
An early triumph from my days as a bungling novice was the seemingly successful revival of a Seiko 6138-8020 dual register automatic chronograph. The post that I made here in 2012 that recounted a project completed a year earlier was entitled ‘A bridge too far?’ and reflected my own trepidation in tackling a complex chronograph movement whilst snow-ploughing around the nursery slopes of the learning process. The decent apparent timekeeping of the watch following the service may have been the result of fortuitous cancellation of significant variations in timing between different positions in everyday wear.
 To be honest, I’ve not actually worn this watch a great deal since and a recent urge to check its performance revealed a real concern about its health. On a timing machine, the watch exhibited modest to poor amplitude (160 degrees), excellent beat error but alarming variations in time-keeping between the dial up and dial down positions. Dial down, it was running at +40 s/day with reduced amplitude, dial up at -15 s/day, but with better amplitude. On the plus side, all of the chronograph functions operated correctly and so my concerns rested entirely with the core mechanical running of the base movement.
Let us start by refreshing our memory about the condition of this watch when I received it in 2010.
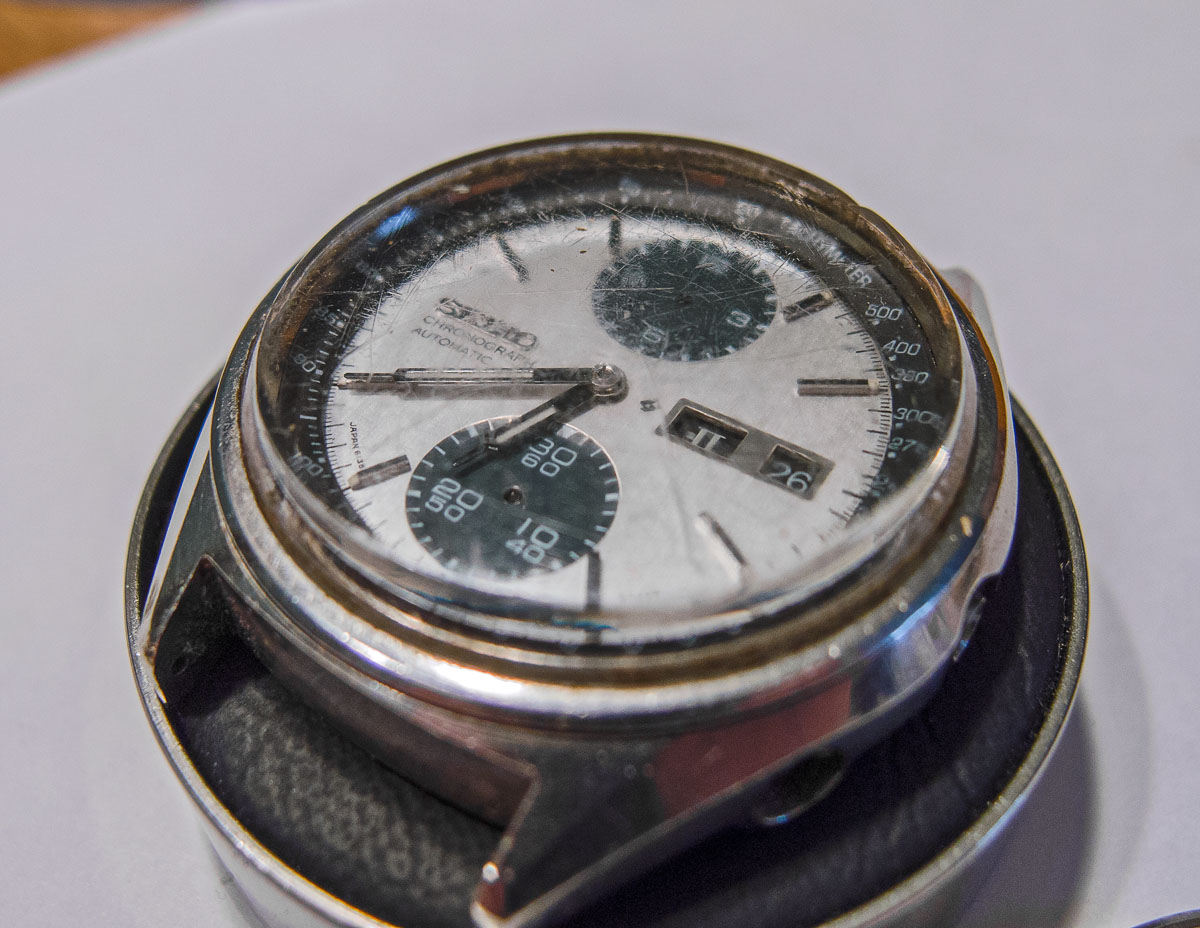 Pretty ropey indeed and so perhaps I shouldn’t underplay my achievement at the time in getting this up and running. Its initial revival was conducted in 2011 with a further iteration in early 2014 and it is in that state that we survey our patient for diagnosis, repair and restoration to full health.
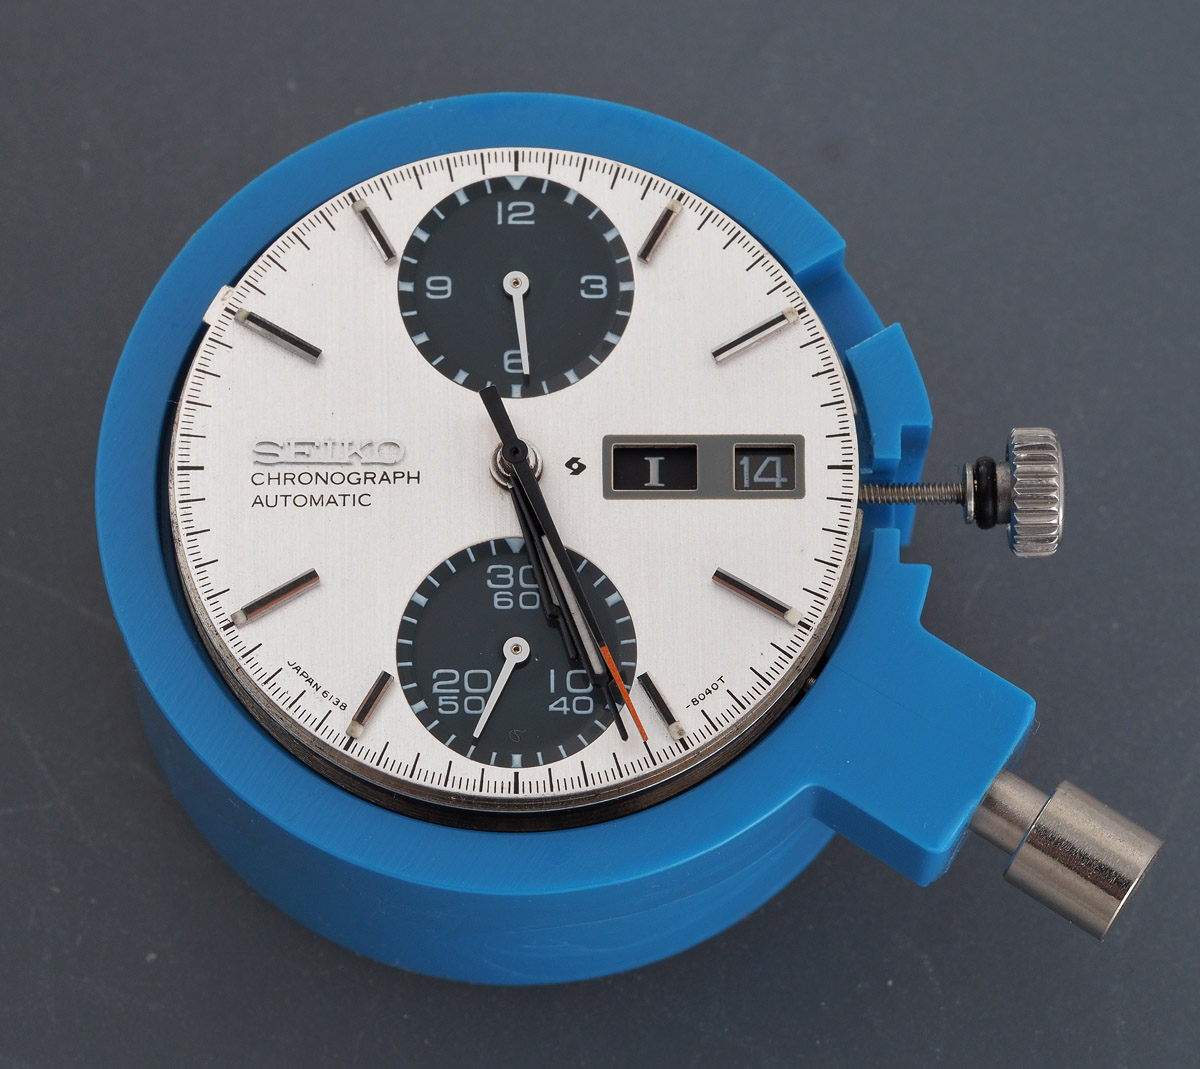
 Notwithstanding the hiccups occurring under the lid, this is undoubtedly an impressively handsome beast whose external appearance provides absolutely no cause for concern. This example dates from September 1975, two thirds of the way through the production lifetime of this landmark two-register vertical clutch automatic chronograph movement. By 1979, mechanical chronograph watches had completely disappeared from domestic Seiko catalogues. Indeed, this particular model, whilst widely acknowledged as perhaps the most iconic of all Seiko 6138 models, is surprisingly difficult to locate in watch catalogues of the era. The only entries I can find are from one Italian and one English language catalogue, both probably from the mid-1970’s.
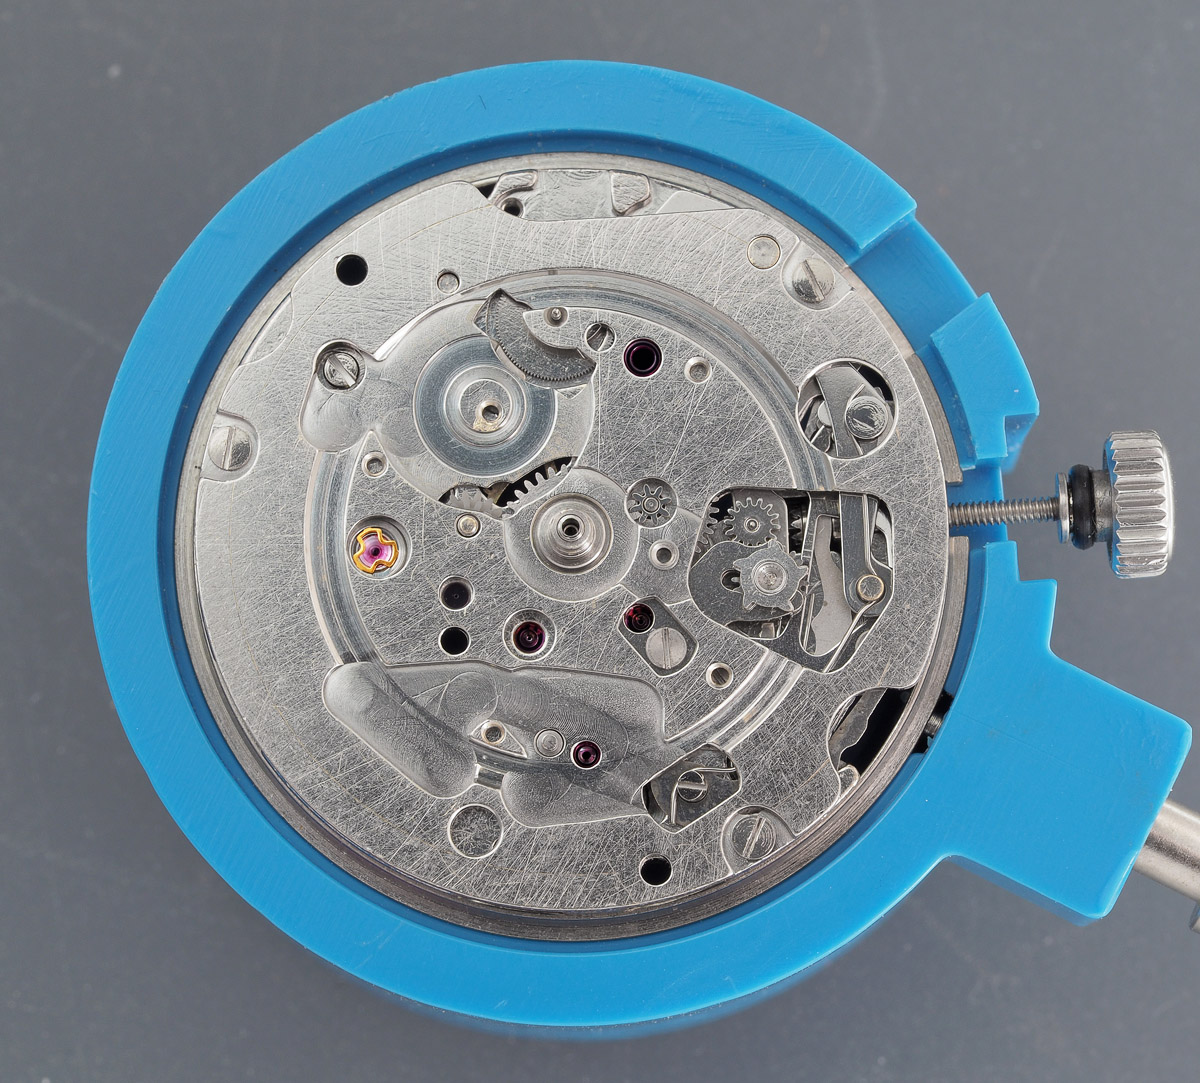
 Let’s get back to our candidate and take a gander at the movement, the first revision 21 jewel 6138B.
 It certainly looks pretty neat and tidy, as might reasonably be expected of a movement serviced only a few years ago. But there is a degree of mild tarnish that betrays the fact that the cleaning process wasn’t quite as forensic as it might have been.
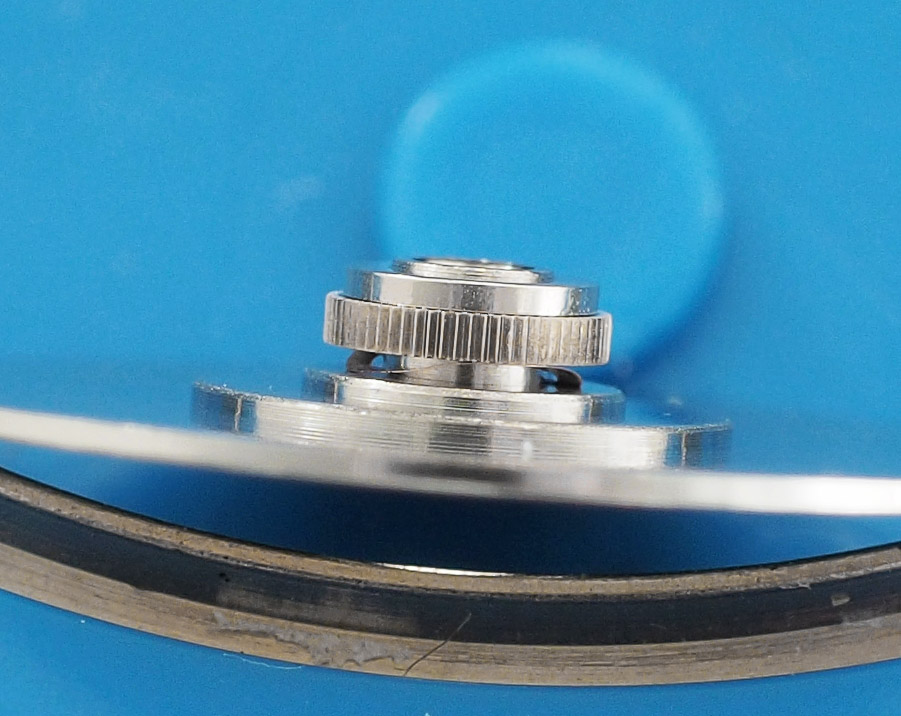
My intention is to conduct a complete nuts and bolt service that includes careful assessment of the condition of bearings and pivots to get to the bottom of the poor amplitude and positional variation in timekeeping. The first task is to remove the hands and so we start by aligning the hour and minute hand to the chronograph seconds hand to aid removal.
 The register hands are removed by loosening the dial feet screws and gently levering the dial upwards to pop the hands off. Care is required to avoid the hands shooting off into oblivion.
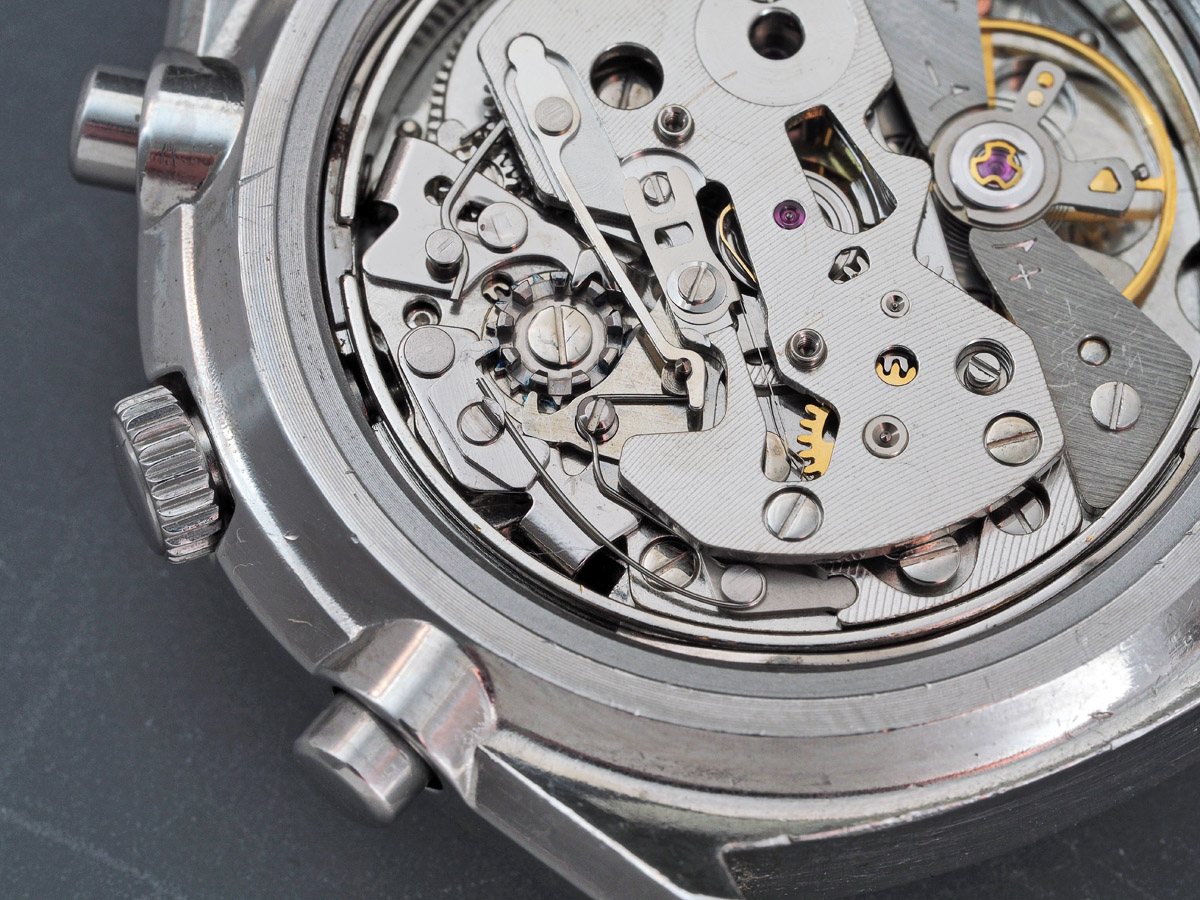
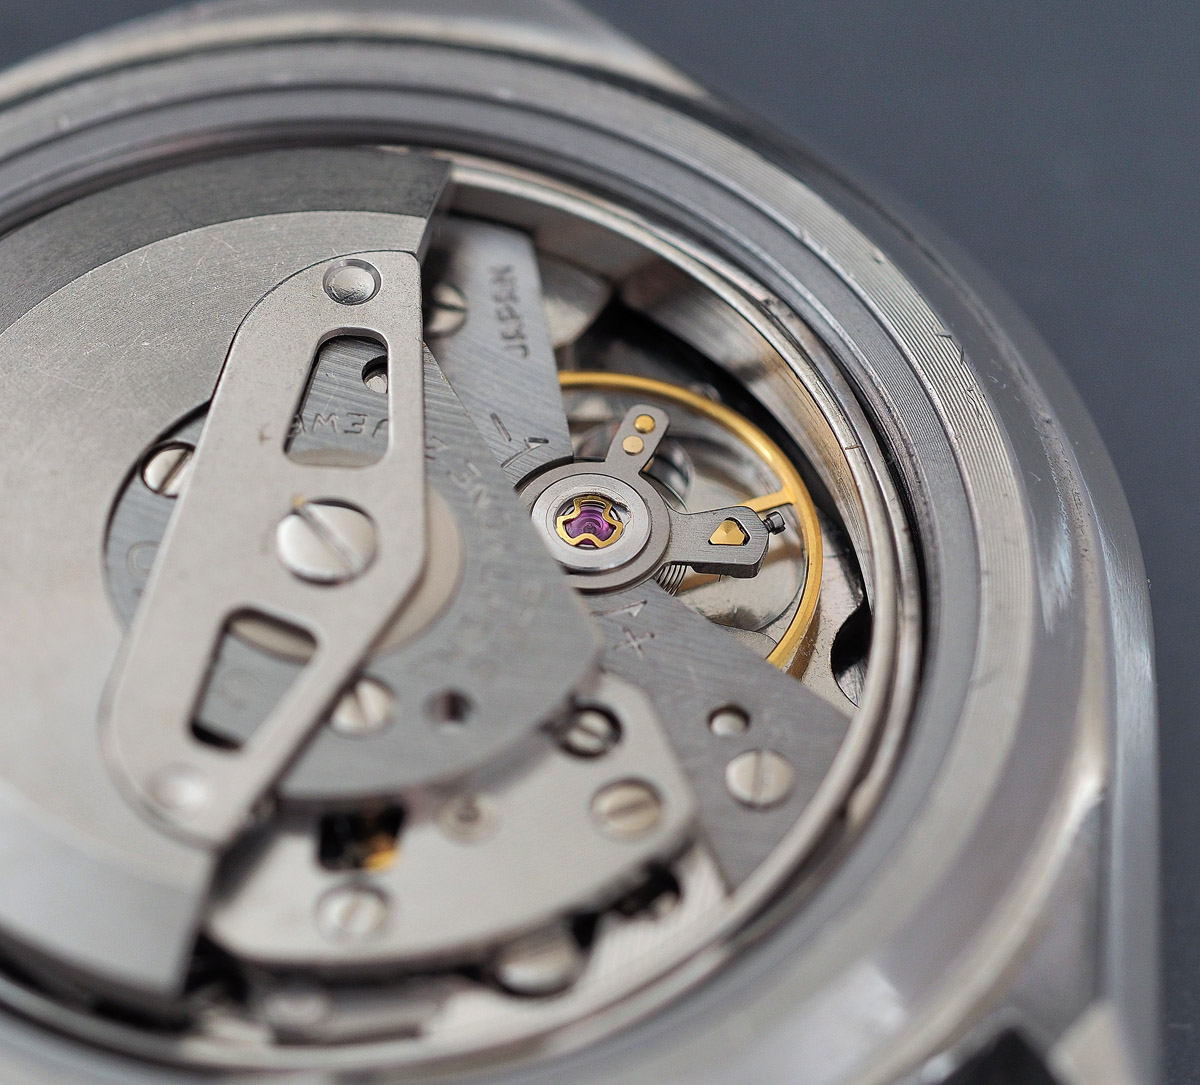
I have documented 6139 deconstructions several times in the past and as the balance side of the 6138 and 6139 are essentially the same, I propose to pause only to make pertinent observations. The first of those is to note the poor condition of the chronograph bridge pivot hole serving the intermediate minute recording wheel.
 This is almost certainly the result of the bridge being tightened down in the past with the wheel pivots not correctly located in their respective holes (not guilty, your honor, notwithstanding my opening remarks).
Our next port of call is the barrel and mainspring, the latter of which I overlooked when I first serviced this movement 8 years ago.
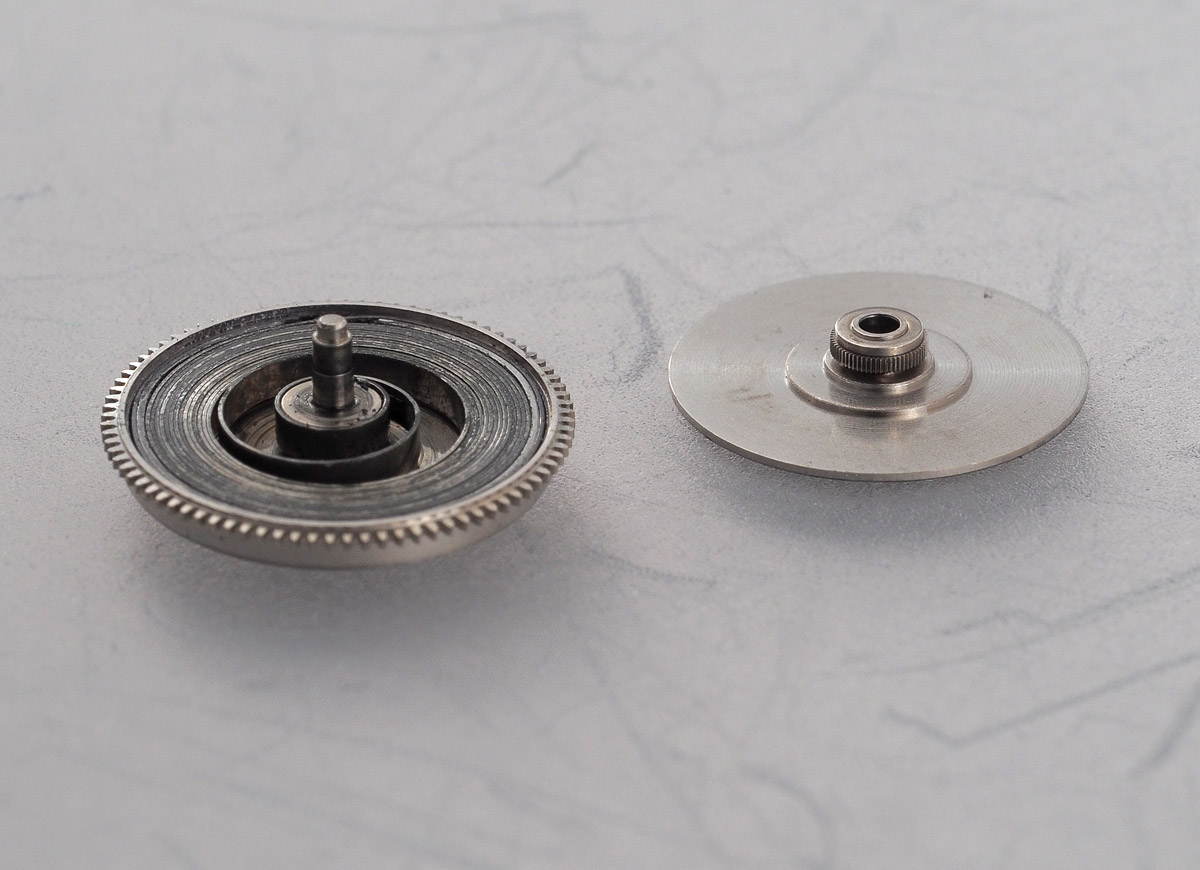 The mainspring looks exactly as one would expect but we can also take a moment to note the additional length of the barrel arbor and the presence of a wheel mounted on the barrel lid. We’ll come back to this shortly. In the meantime, I extracted the mainspring, manually cleaned the barrel, lid and arbor prior to a proper clean of all movement parts in the watch movement cleaning machine.
Post clean, we start by reassembling the setting parts as well as the dial side Diashock setting (because access to this will be impeded once the calendar plate has been fitted).
 Assembly of the dial side continues with the hour recording wheel parts. The hour recording wheel is driven by the intermediate hour recording wheel mounted on top of the barrel lid. The rotation of this intermediate wheel in concert with that of the barrel is regulated by a friction spring mounted between it and the barrel lid that allows slip when required.
 When the assembled barrel is fitted to the movement (once the calendar plate is in place), the intermediate hour recording wheel locates into its aperture, with the serrated edge of the wheel finding purchase against the similarly serrated edge of the hour recording wheel.
 When the chronograph is stopped, the hour recording wheel stop lever presses against the edge of the hour recording wheel, as a result of the force acting upon it by the stop lever spring, regulated by the eccentric stop lever spring axle. The action of the stop lever stops the hour recording wheel but the movement can continue to run because the friction spring serving the intermediate wheel on the barrel lid allows sufficient slip without significantly affecting the distribution of power to the rest of the movement. When the chronograph function is started, the stop lever releases its grip and the intermediate wheel starts to rotate the hour recording wheel.
With the hour wheel parts, hour hammer and fly-back lever in position, the calendar plate can be fitted, taking care not to damage the hour recording wheel axle in doing so.
 The calendar plate houses the jewelled lower barrel arbor bearing and so once the plate is fitted, we can contemplate refitting the barrel. In the photo below, you should be able to see the edge of the hour recording wheel sitting above the lower barrel arbor bearing and against which the edge of the intermediate hour recording wheel mounted to the barrel lid will sit.
 At this point in the proceedings, we would normally fit the escape wheel, third wheel and chronograph centre wheel prior to fitting the barrel and train wheel bridge. However, inspection of the escape wheel revealed a problem.
 Can you see the issue? The axle at the pinion end is bent, again almost certainly as a result of a previous tightening down of the bridge with the wheel not correctly located. This would certainly explain the low amplitude and positional timing variation and prompted me to take a closer look at the jewelled bearing serving the escape wheel on the barrel bridge.
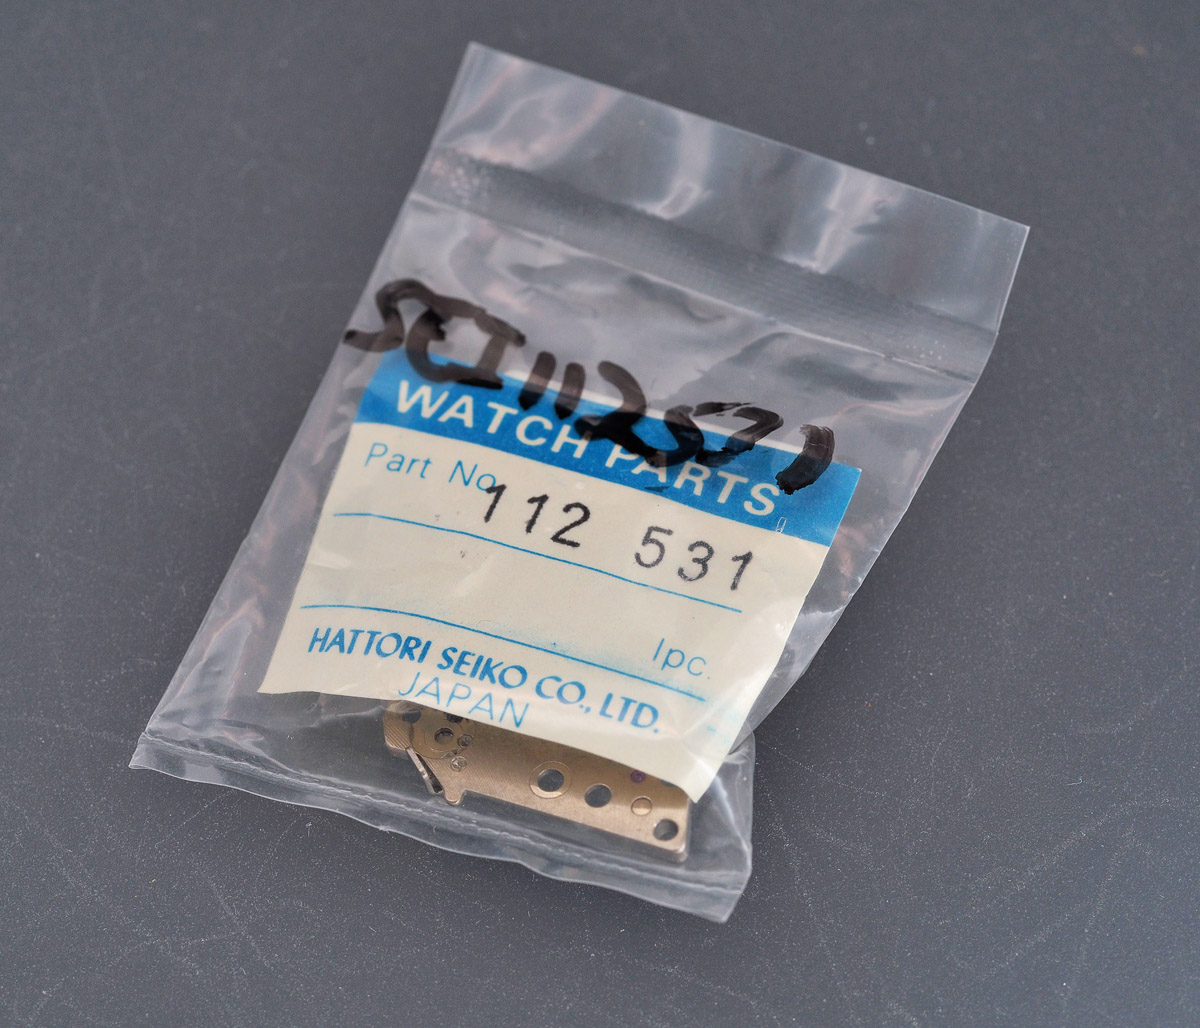
 The edge of the jewel hole is chipped. The third wheel bearing was similarly damaged and so I would need either to replace the jewels or replace the whole barrel and train wheel bridge. As fortune would have it, I had bought a spare 6138B bridge a short while ago, saving it for a rainy day that appears to have arrived sooner than anticipated. This saves me the trouble of trying to scavenge jewels from assorted junk bridges that might have offered up suitable replacements.
 The escape wheel appears no longer to be freely available as a spare part, being shared only with the 17 J versions of the 6139B but I do have the remnants of a junk 6139B loitering in my spares box and that offers up an undamaged part. The new bridge and salvaged escape wheel both need a clean before reconstruction can continue.
 The train wheels, complete with replacement escape wheel find their way into position, capped off with the new barrel and train wheel bridge (top left, below). The operating levers, hammer and minute recording wheel all follow suit (top right and bottom left, below). The chronograph bridge is a brand new spare, fitted as a precaution because of the damaged pivot hole in the original (bottom right, below). The absence at this point of a minute recording jumper is due to the fact that replacement bridges do not come so fitted. I will have to transplant the jumper from the original bridge.
 With all of the train wheels cleanly located, I adjusted the position of the two coupling levers to ensure that they engage with the clutch ring symmetrically. The next step is to check that everything runs cleanly and that the coupling levers correctly engage and disengage with the chronograph clutch. That process is shown in the video below.
With the chronograph in its stopped position, the two coupling levers are engaged with the vertical clutch. Depressing the operating lever disengages the coupling levers and the chronograph wheel and fourth wheel rotate together. Depressing the operating lever again stops the chronograph by engaging the coupling levers, separating the chronograph wheel from the fourth wheel. The fourth wheel now rotates independent of the chronograph wheel.
The free rotation of the wheel train in the video in both start and stop conditions reassures me that the gear train is free from impediments and reassembly of the movement can continue to the point of refitting the hands.
 At this point I left the movement to run overnight to check the correct operation of the minute and hour register hands through at least a full 12 hour cycle. This revealed no concerns and so I refitted the seconds hand and reunited the movement with the case.
 The proof of the pudding is in the eating and a session on the timing machine suggests that I have purged the gremlins: 235 to 240 degrees of amplitude dial up and dial down, dropping to about 220 degrees crown down; very little positional variation in time keeping (± 3 s across all positions) and between 0 and 0.2 ms beat error. A vast improvement.
Before refitting the autowinding mechanism, I thought it might be interesting to show the operation of the minute register wheel, in particular the transfer of a precisely regulated 6 degrees of rotation.
With the chronograph running and the two operating levers disengaged from the clutch ring, the chrono wheel rotates anticlockwise as viewed from the balance side of the movement. Once per minute, the chronograph finger mounted on the top of the wheel engages with one of the teeth on the intermediate minute recording wheel. This wheel turns clockwise in response which causes the minute recording wheel to rotate anticlockwise, advancing by one tooth, regulated by its jumper spring.
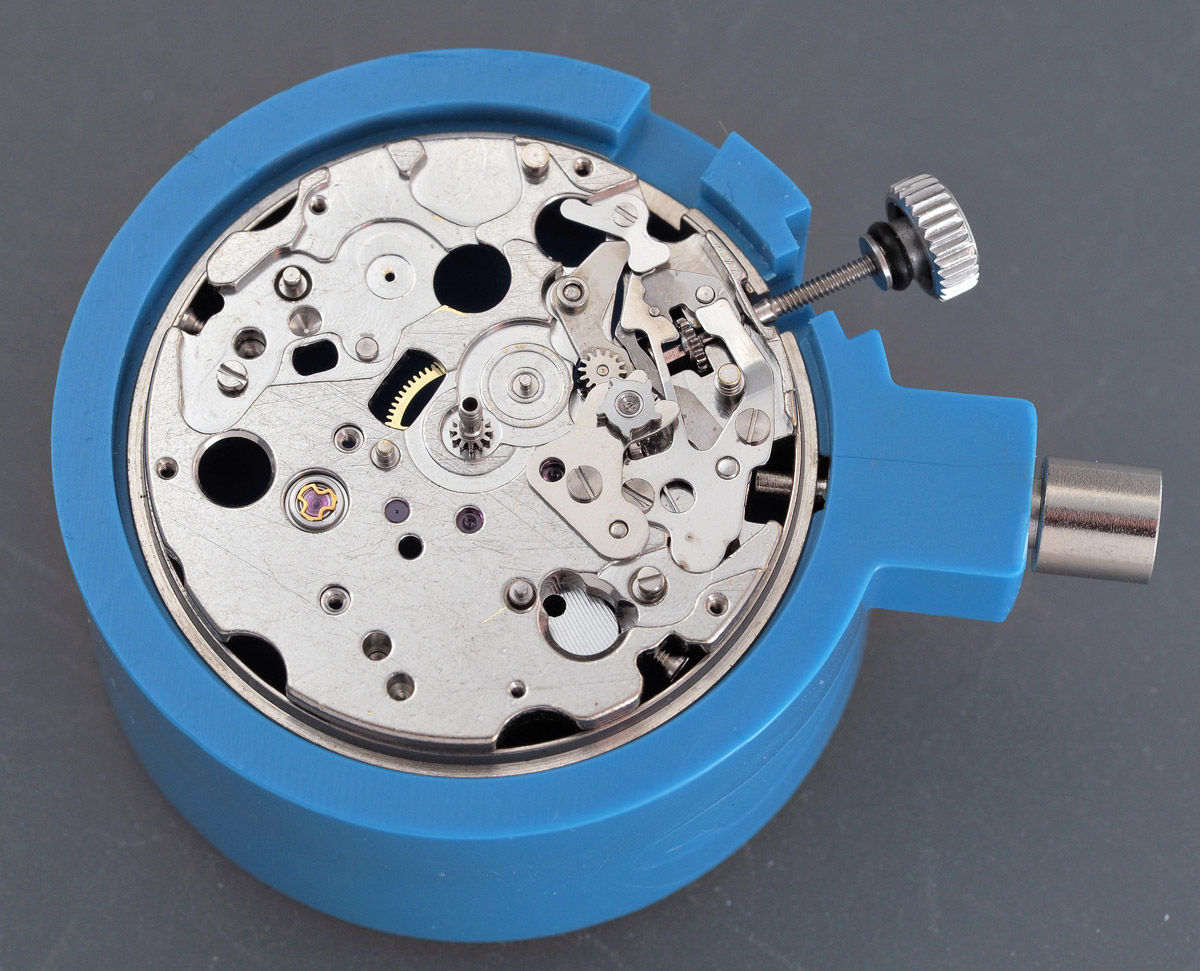
The final pieces if the jigsaw are the autowinding mechanism and winding weight.
 A quick spruce and lube of the caseback gasket and I can file this particular niggardly piece of housekeeping in the outbox.
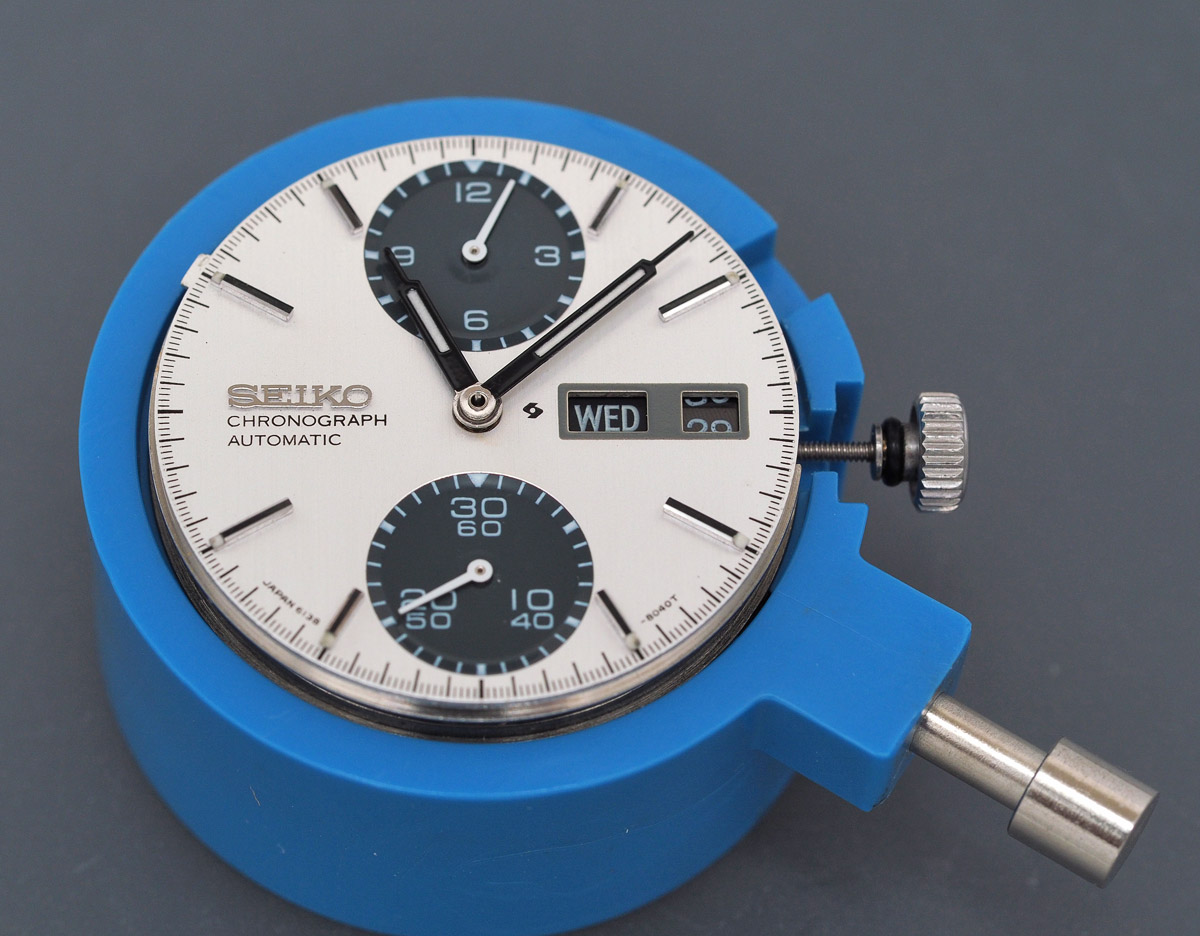
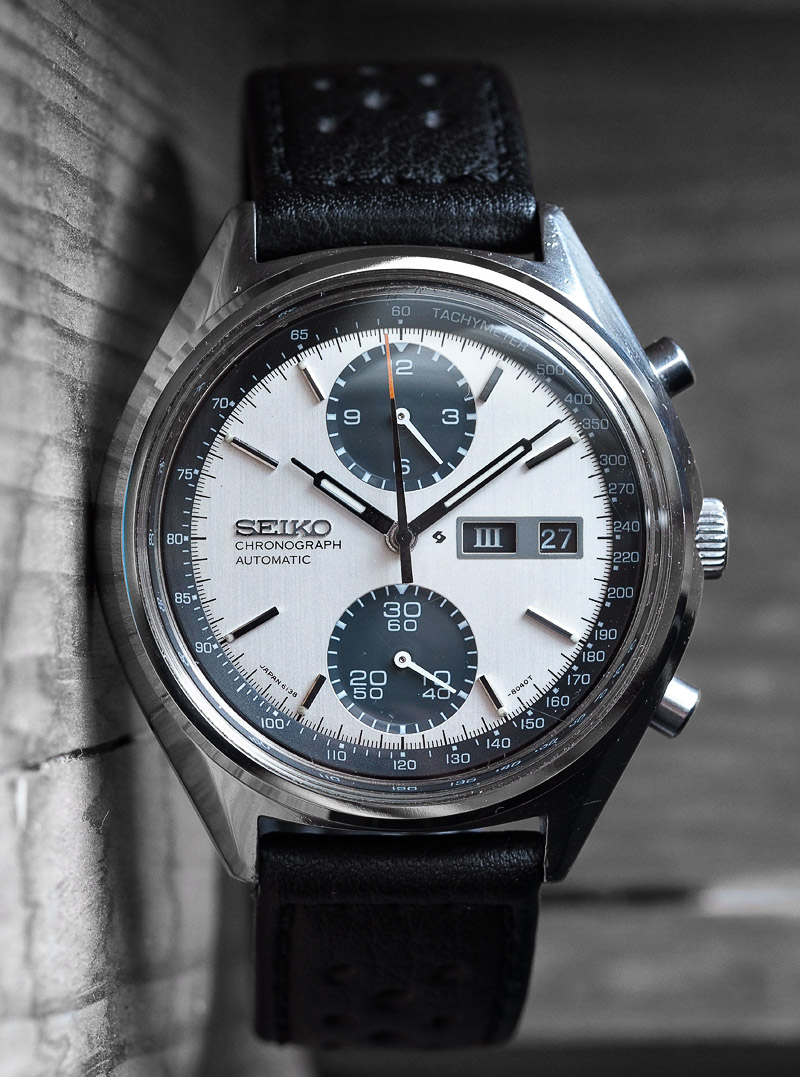 This was a landmark watch for me. It marked the point at which I graduated from casual footler to semi-serious hobbyist watchsmith. I was by no means accomplished in 2011 but I had acquired a degree of confidence that served to progressively allay my fears that each project might well result in some monumental disaster (although at least one did!). It is a testament to the robustness of these old Seiko designs that this particular movement has soldiered on so gamely in spite of the fact I had missed a number of flaws at my first pass. Let’s pay a final tribute with a portrait of this splendid specimen in majestic repose.


Hello Martin,
It is with great pleasure that I read your blog. I hope that one day, soon, that I shall be able to match your achievements. I say soon, as I am well into retirement and have only taken up the hobby in recent years but I am progressing.
I have several 6138’s and 6139’s, but as yet have been unable to find the courage to attempt one. As you know, it’s not the stripping of the watch which is the problem but the reassembly, and getting it to work correctly.
I am not in the hobby for profit only fun. Thank you again for your blog, it is very pleasurable to read.
Regards
George
It is my pleasure George. I am glad to hear you enjoy the blog and best of luck with your own projects!
Dear George and Martin, how are you today? interesting stuff here.
I am Cornelis from the Netherlands. I just bought a panda on Chrono24. Beautifull patina. On the caseback it says 6138 8040T? Not 8020…do you have an explonation for that? Also I wind it by hand by turning the weel 10 times and then where it for the rest of the day. But I don’t where it at night and when i lay it down it stops ticking after 1 or 2 ours. Is that normal or is something wrong you guess? Happy with an answer. Thanks in advance. Kind regards Cornelis
Hi Cornelis, I think you may have mis-typed caseback when you meant dial in reference to 8040T. The caseback should read 6138-8020 but the dial code will be 6138-8040T. It is quite common for them to be different.
On to your winding issue: the watch should not need hand-winding at all other than to start it up if you’ve not worn it for a few days. Once running, the autowinder should be able to wind in full power fairly quickly and after a normal day’s wear should easily then last 30 plus hours. If your watch is stopping in the night then the autowinder may not be working correctly or there may be some other issue. I suggest you try winding it to full power by hand and then see if it makes it through to the morning of the following day. If it does then the likely culprit is the autowinder mechanism.
“Dear Martin, Thank you for this quick response. I will try it out. Thank you very much and wish you well. Kind regards.
Well written Martin! Always a pleasure reading your blogs. Regards, Lyndsay (Perth, WA)
Thanks!
Another outstanding article. Echoing George’s comments, I thoroughly enjoy them, even though most of them go over my head! My first attempt to try something like this was to convert a Vostok Amphibian from an auto winder to mechanical by remove the winding bridge and mainspring. It went well, and even though I won’t ever reach your level, I really appreciate your taking the time to share your experiences.
Best Regards, Steve
Glad you enjoyed it. Thank you.
Thank you for the detailed article and the portrait part. Started collecting Seikos not that long ago and the Panda still manages to escape me… But not for long, I’m sure.
Quick question: are there any books/resources that you would recommend to someone who would like to start tinkering with watch movements?
I am not aware of any one stop shop type of resources other than the internet! There are one or two excellent YouTube watchmaker vlogs and the odd blog that might be worth a read! In my case, 10 years plus of trial and error, guided where possible by manufacturer technical guides.
Thanks for your reply, Martin. Have a great week.
Another excellent write up Martin, I’m always really happy when a new article appears on your blog as I wonder what I’ll learn this time!
Quick question: with the bent escape wheel pivot did you try and correct it using a jacot or anything or did you opt for the spare part as it was available? I’ve seen it done but only with pocket watch sized pivots, I can imagine with the much smaller escape it would be a lot more problematic.
Thanks Pip. I did not attempt to correct the bent pivot, opting instead to use the replacement from the spare movement. Glad you continue to enjoy the blog!
Dear Martin, compliments for your stunning Panda! I also own one with a “tropicalized” dial, so to speak, because it has gained a brownish tint, probably due to an extensive exposure to the sun by the previous owner. Unfortunately some time ago it stopped working while I was wearing it and while the chrono was running. It was neither bumped nor dropped as I was sitting at my desk. I am now in search of somebody who would be willing to lovingly and skillfully take care of it. As I imagine that your schedule must be quite busy, I do not dare to ask if you would have the time to service it (…even if that is my secret hope). Who would you then suggest could be a trusted watchmaker in europe who could take care of it? Thanks in advance for your kind help and advice.
kind regards
Vincenzo
Vincenzo, many thanks for your nice message. You may have seen in my comments under the ‘About’ tab, that I do not take on work for other people, preferring instead to use what little spare time I have to work only on my own watches.
In the UK, you could give Duncan Hewitt a try (but I know he has a large backlog of work) or alternatively in the USA, Spencer Klein. I have no personal experience of the work of either of these people but they both seem highly regarded by people who have used their services.
Good luck!
Thanks a lot Martin for your precious advice. I know Spencer from his interesting YT vlog, but checking on his site he has a waiting list of at least six months. I’ll will check with Duncan to see if he has some time to take a look at my panda. Yesterday I had a quick look at the watch and it seems to me that something could be wrong with the mainspring as I could not release the tension in it and it seems that the winding does not produce any effect. I might have inadvertently overwound it. I shame on me!! But in any case I am not able to go beyond that simple inspection. I’ll never have the guts (and the equipment) to disassemble it.
Thanks and kudos again for your website, I visit it regularly to enjoy the outstanding work you are doing, truly inspirational!
Thanks again Vincenzo. You cannot over wind an automatic mainspring because of the slipping attachment but that does not mean that the mainspring cannot break! The only real way to get to the bottom of the problem is to disassemble the movement and that requires an intervention from someone who knows what they are doing. Good luck. M
Pingback: The Seiko 6138B: a bridge too far? | Adventures in Amateur Watch Fettling
A late comment, I know, but isn’t it a gratifying moment when you gain the confidence that you can overcome mistakes, and then come to even welcome them … because you know you’ll learn from them?
As always, thanks for the insight, honesty, and good writing.
Oh, I had an idea: a sort of “cone of silence” that you could lower over you as you work on springs and other parts that can fly away. Maybe it could have a mild adhesive on it to catch them.
Thanks John. I appreciate that!
Hey Martin!! Could you help me in getting a Seiko Vintage Panda for a friend. It’s a wedding gift!!!
Hi Vrushank, I am not really sure what I could do to help really. If it is a wedding gift then it will need to be a serviced and fully operational watch in good overall condition. Anything you buy on eBay or Yahoo Japan is more than likely going to need attention/repair/service. Anything from a dealer claiming to have been serviced will cost considerably more and even then, there is no guarantee it will be as claimed. I do not know of any reputable sources of wearable watches because that is not where I get my watches from. I am looking for watches that need work! Sorry not to be of more help.