
Tags
At the British Labour Party conference held in Scarborough in 1963, Harold Wilson, the then leader of the opposition, made a speech in which he argued for a future Britain forged in the white heat of the technological revolution. His speech was designed to align the Labour Party to science and technology, to transform it into a future-looking party positioned to overthrow the stagnant status quo of the luddite establishment. The old-boy, closed shop, privileged-class establishment at the time, epitomized by the sitting Prime Minister, Sir Alec Douglas-Home, had been in office since 1951 and may have started to believe it was a permanent fixture, but it was in for a shock. The following year, Labour would narrowly win the general election and would remain in power until 1970.

Daily Mirror cartoon November 1963
Similarly, the establishment Swiss-dominated watch industry at the time was sailing serenely though the 1960’s, riding a mighty wave, oblivious to the stealthy encroachment on their traditional territory that had already started with the development of the first electric watch in 1958. By the end of the 1960’s, stealth had converted to conspicuous, with the release of the first production quartz watch in the Seiko Astron of 1969.

The Seiko Astron of 1969. Photocredit: seikowatches.com
Where that watch was produced in small numbers at immense expense (and easy to dismiss at the time as a flash in the pan), within two years, conspicuous became brazen with the release of the first production quartz movement produced on an industrial scale, the Beta21, developed by a consortium of Swiss watch makers known as the Centre Electronique Horloger (CEH). It seems ironic from the modern perspective that a good deal of the developing momentum of the onrushing crisis was coming from within.

An example of the Beta21 quartz movement in the form of the Omega 1300 Electroquartz. Photocredit: electric-watches.co.uk
The Astron 35A used a quartz crystal oscillator running at 8192 Hz paired with a circuit block featuring an integrated frequency divider circuit whose job it was to convert the 8192 Hz electrical signal into 1 Hz impulses. Those impulses were transmitted to a coil block driving a stepper motor resulting in the characteristic 1 tick per second of the seconds hand. The integrated circuit used in this movement was a hybrid design featuring 76 transistors and 29 capacitors, hand-assembled and hand-soldered onto a ceramic board (source: global.epson.com). This alone went some way to justifying the astronomical retail price of these watches when they went on sale in 1969. I would note that, as a measure of the seriousness of the Japanese intent compared with that of the Swiss, the Seiko movement looks slickly designed and neatly integrated whereas the Beta21 looks like something knocked up in a university electronics workshop.
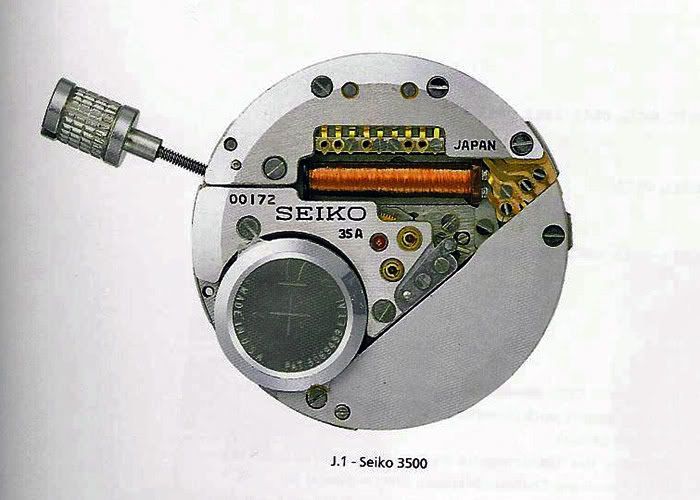
Seiko 35A quartz movement. Photocredit: http://tingsic.tumblr.com via Pinterest.com
The Beta21 also used a quartz oscillator operating at 8192 Hz but its frequency divider circuit reduced that to 256 Hz to drive a vibration motor connected to a jeweled index finger set against an index wheel. This mode of operation is very similar to that used in the Accutron hummer movements but with the additional benefit of the fine timing regulation that comes from the use of the quartz oscillator. The result was a watch whose seconds hand moved in a continuous sweeping motion rather than the characteristic tick of the Astron (and most quartz movements produced since).
By 1970, the Astron’s 35A had developed into the 3502, now running at a doubled frequency of 16384 Hz.

A rare example of the Seiko 3502-9010 dating from 1970. Photocredit: aucview.aucfan.com
About 1800 of the Seiko 3502 watches were produced between 1970 and ’71 at which point the 3800 series was released, marking the true beginning of the mass-produced stepper motor controlled quartz watch. The 3823A was launched in the Autumn of 1971 in the form of the futuristic 3823-7000.

A Seiko 3823-7000 from September 1971. Photocredit: garfre@thewatchsite.com
These were watches that were produced with no expense spared: the 7-jewel movements adjusted in 6 positions and temperature compensated; anti-magnetic covers fitted front and rear; hand-applied metal minute markers on the dial; and anti-reflection coating applied to the Hardlex glass.

A pair of early Seiko 3823-7000 from 1971. Photocredit: garfre@thewatchsite.com
All of that meticulous care and bleeding edge engineering came at a price. At launch, these watches were priced at 141,000 Yen ($400/£165), about two months salary for the average Japanese citizen at the time.
 Within a year or so, the dial text had been augmented by the letters, V.F.A. (Very Fine Accuracy), signposting the careful individual adjustments to timekeeping: the 3823A was specified to lose/gain no more than 5 seconds per month. The model number appears also to have changed in recognition of the slight cosmetic change to 3823-7001. It is an example of the V.F.A. version that forms the basis of the present post.
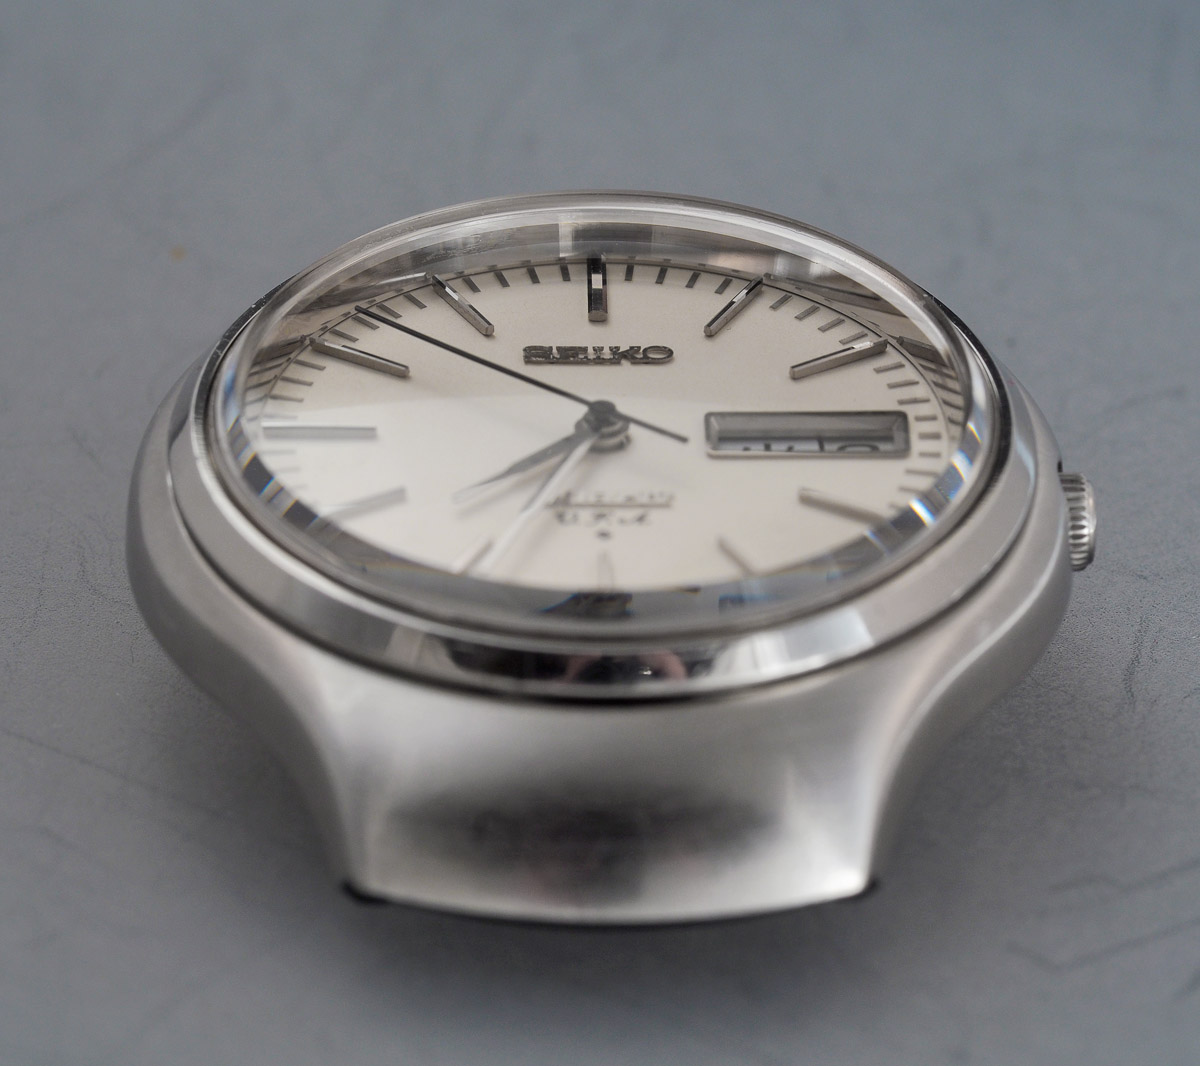
 This example dates from April 1973 and comes complete with its original bracelet. The exterior condition is excellent and the very clean dial and handset show no signs of any discoloration or corrosion. The only real exterior signs of wear are the numerous scratches and gouges on the coated Hardlex glass crystal. It is probably worth noting at this juncture that the watch was not running and this condition was not perturbed in the slightest by the introduction of a fresh battery.
The slippery, futuristic case is a front-loader monocoque and so entry can only be gained by first removing the external bezel that secures the bonded V-type crystal into position.
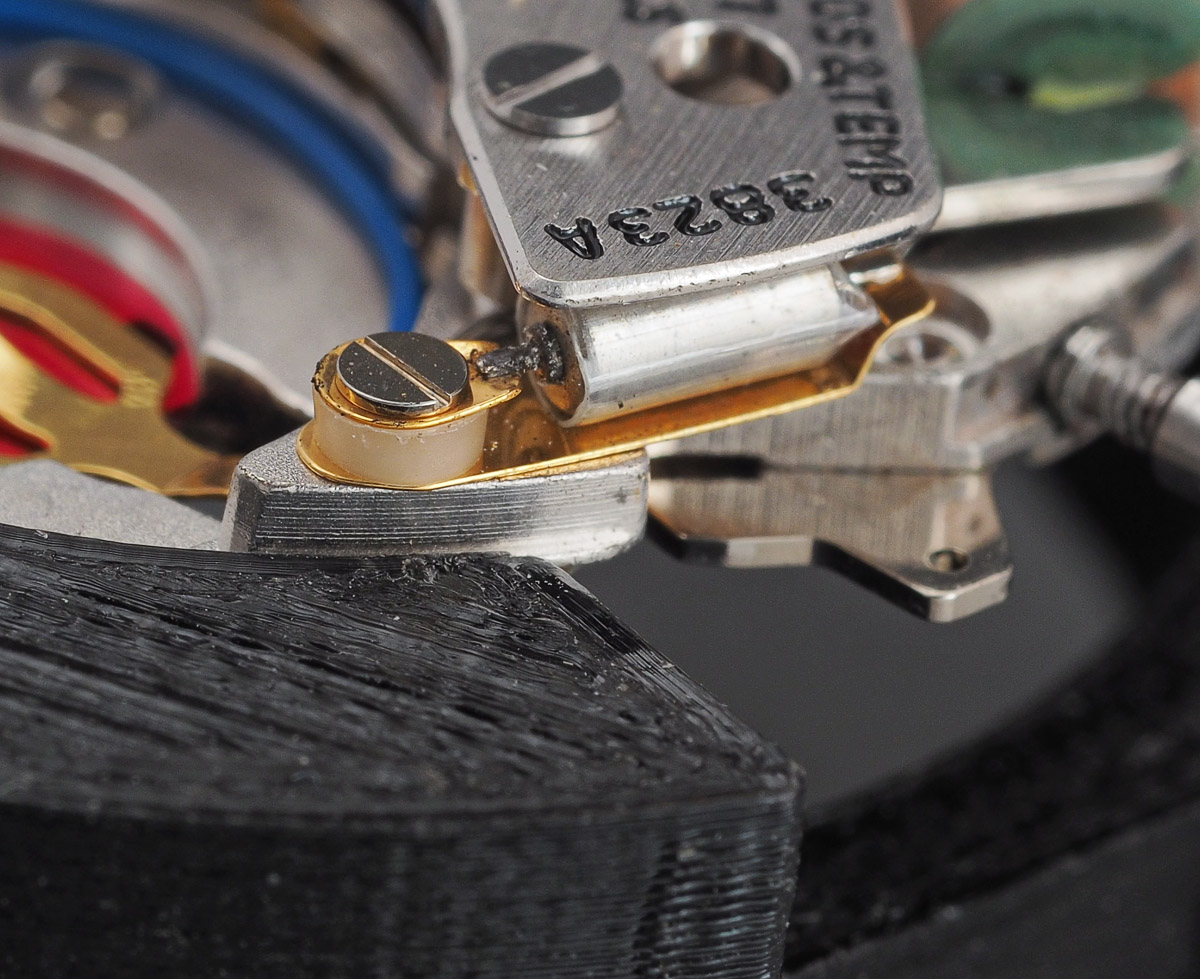
 As with the King Seiko 5246 described last month, the movement is released from the case by first rotating the locking case spring anti-clockwise (red arrow in the photo below) before then depressing the setting lever and removing the crown and stem (white arrow).
 With a little gentle coaxing, the movement comes free and can be tipped out of the case.
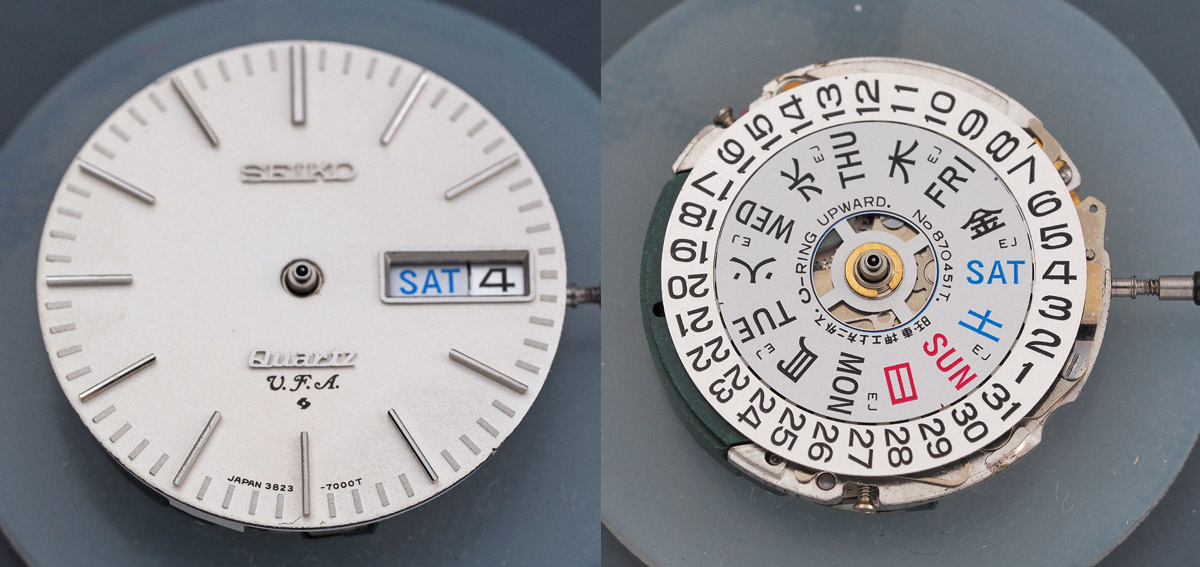
 The view of the inside of the case reveals the anti-magnetic shield fixed to the inside rear. Note the U.S Patent number. The dial and hands come off easily enough to expose a conventional day/date calendar arrangement with bilingual English/Kanji day wheel.
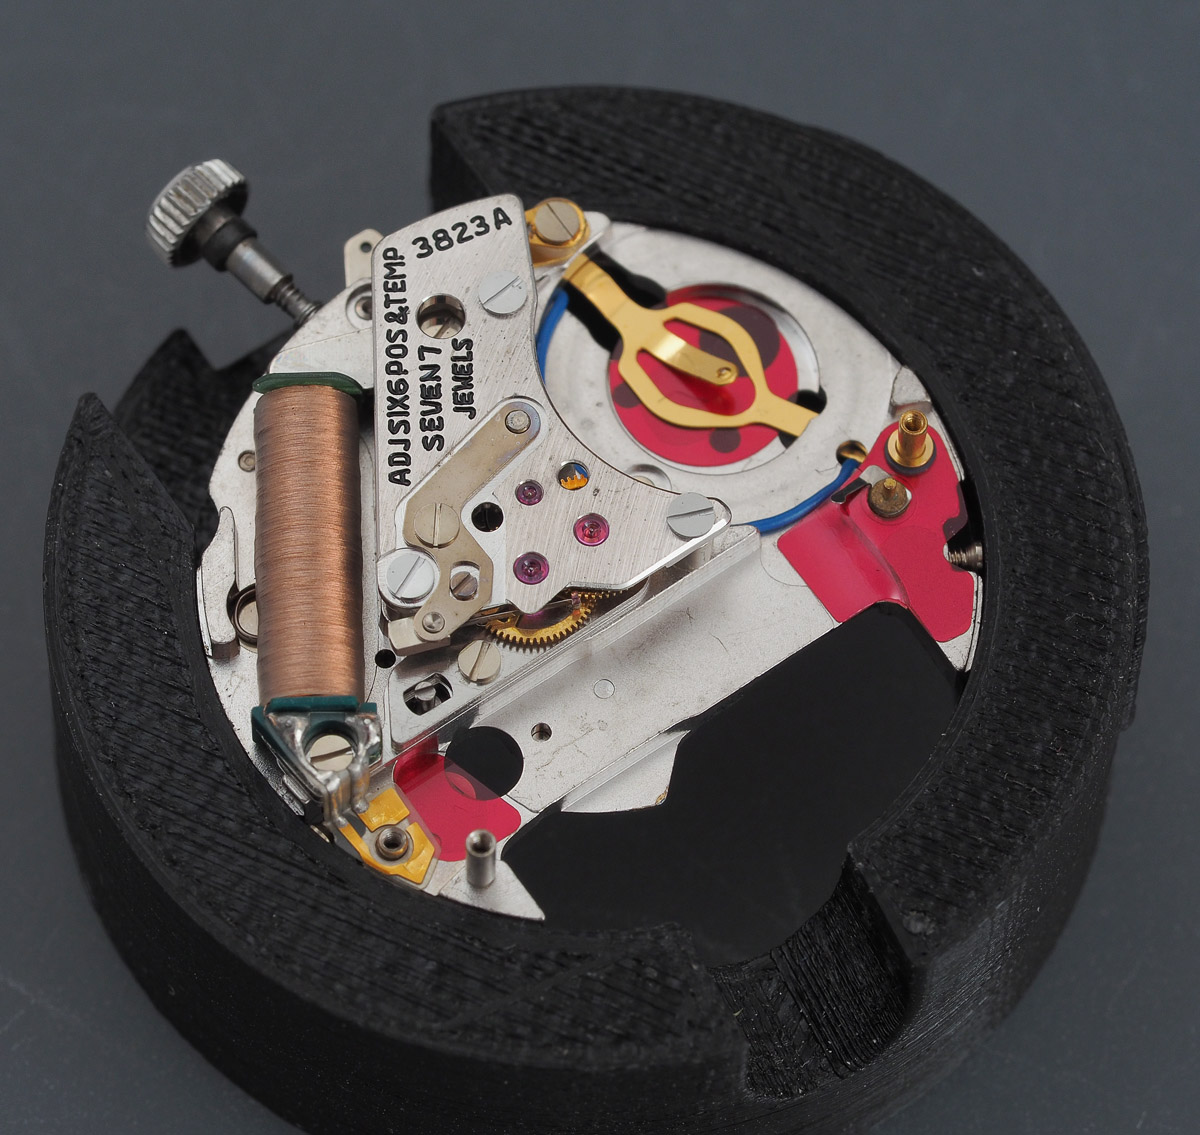
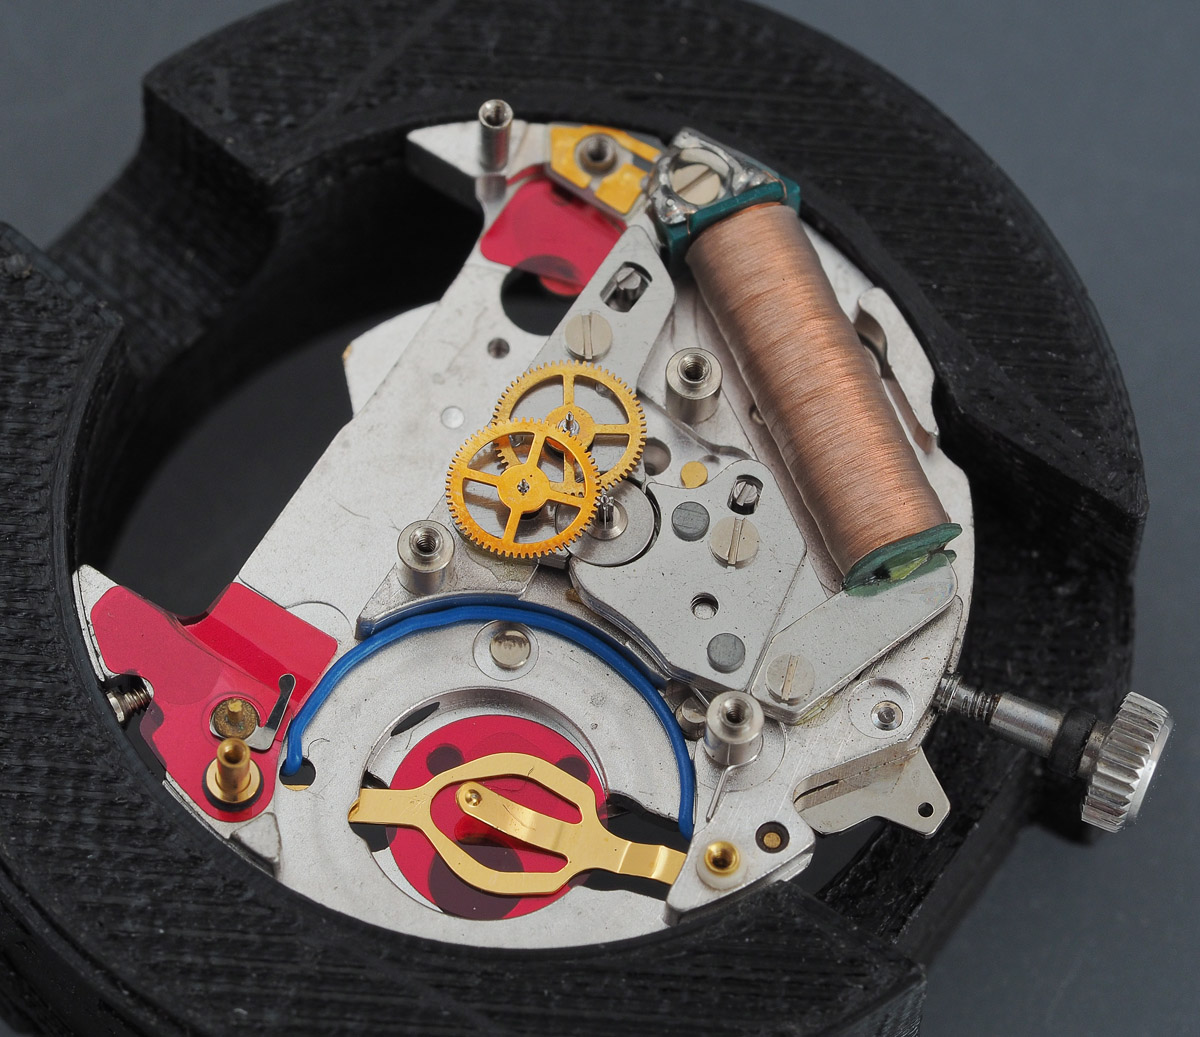
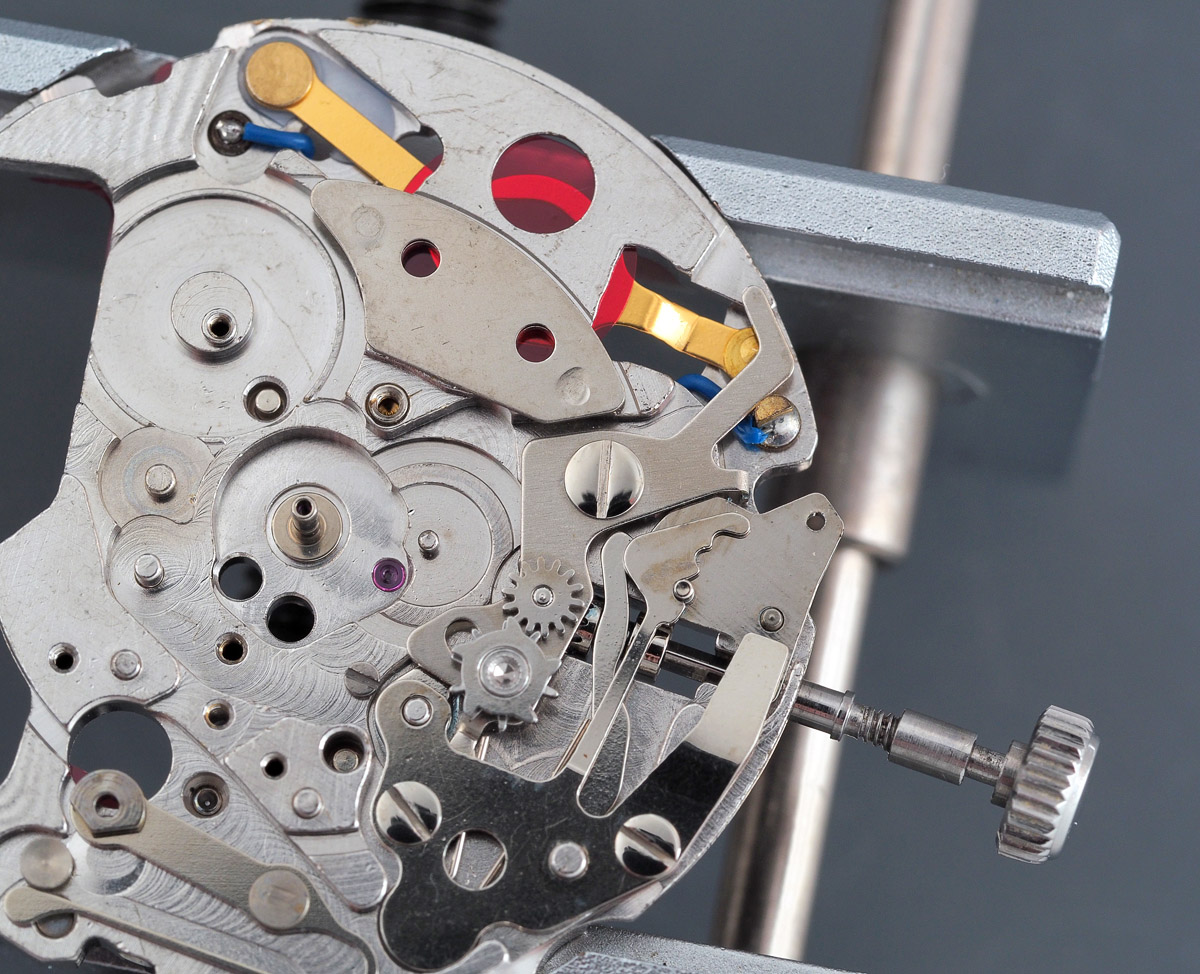
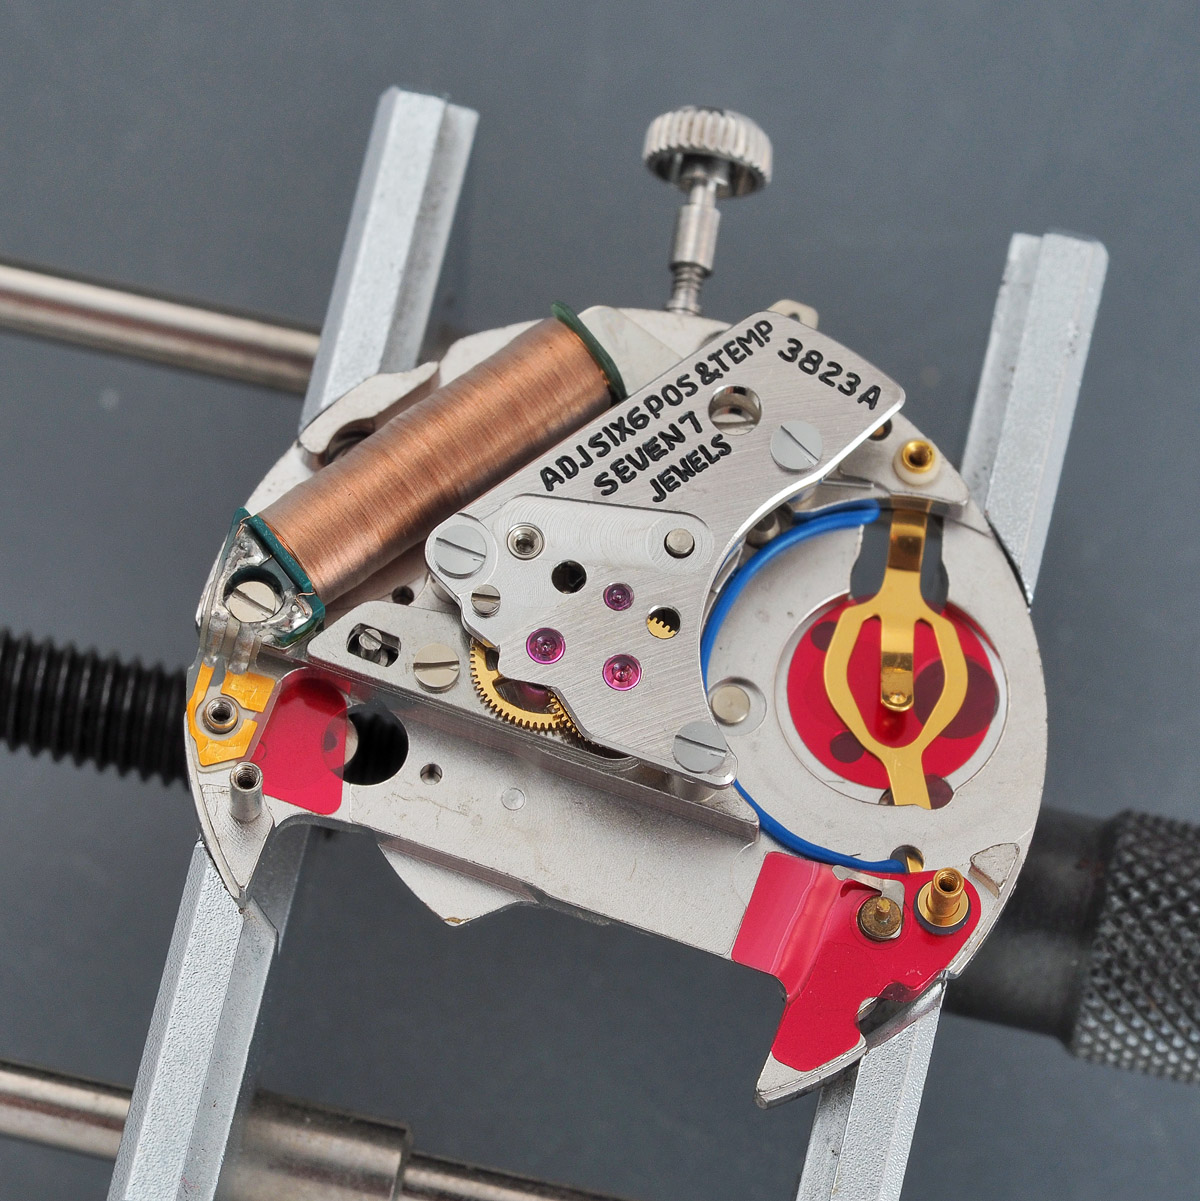
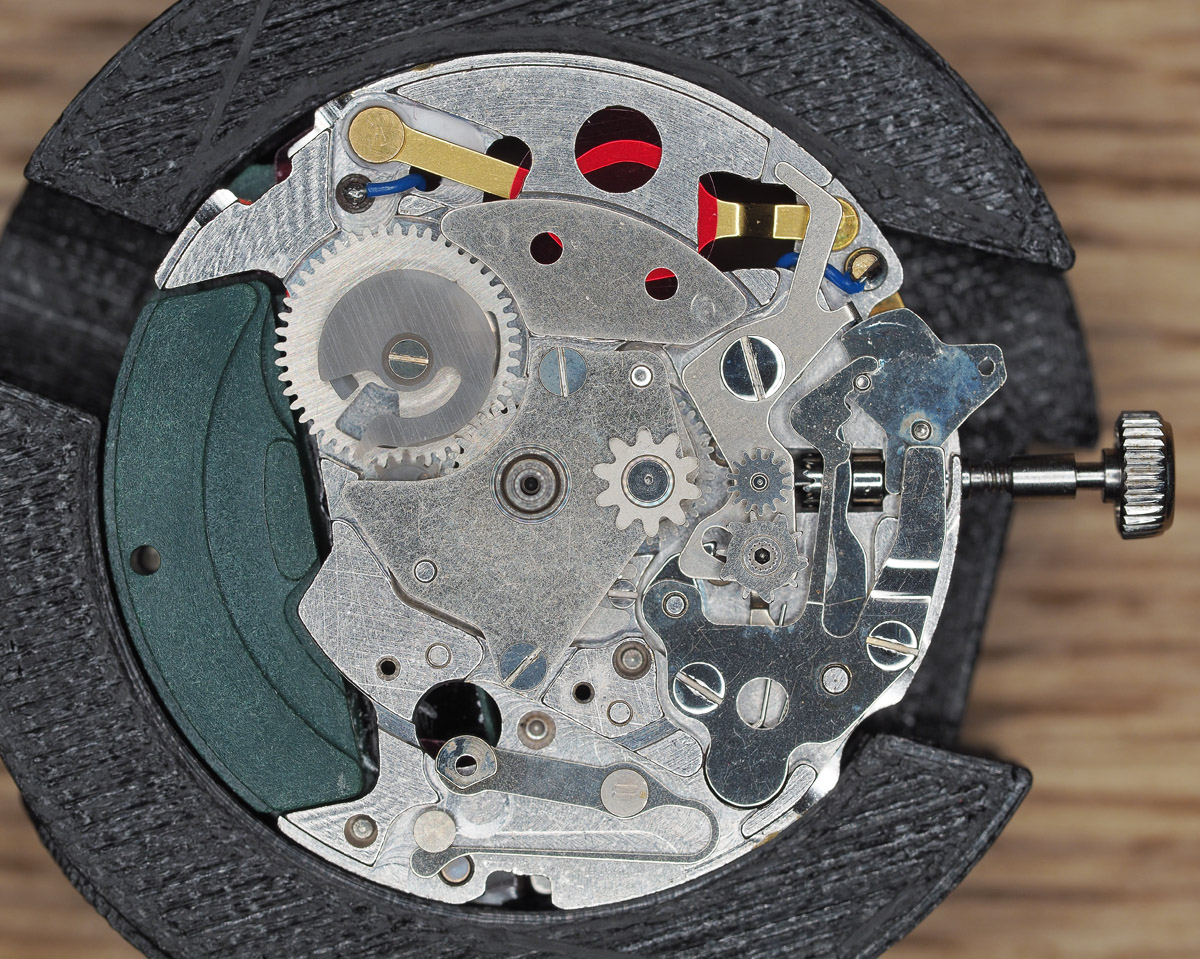
 Turning the movement over provides our first view of what is, quite frankly, a magnificent-looking quartz movement, dominated by the very large crystal oscillator unit, set against the step-variable condenser, and its substantial coil. The quartz oscillator runs at 16,384 Hz, half the modern standard but temperature stabilized and regulated in this form and therefore capable of excellent accuracy.
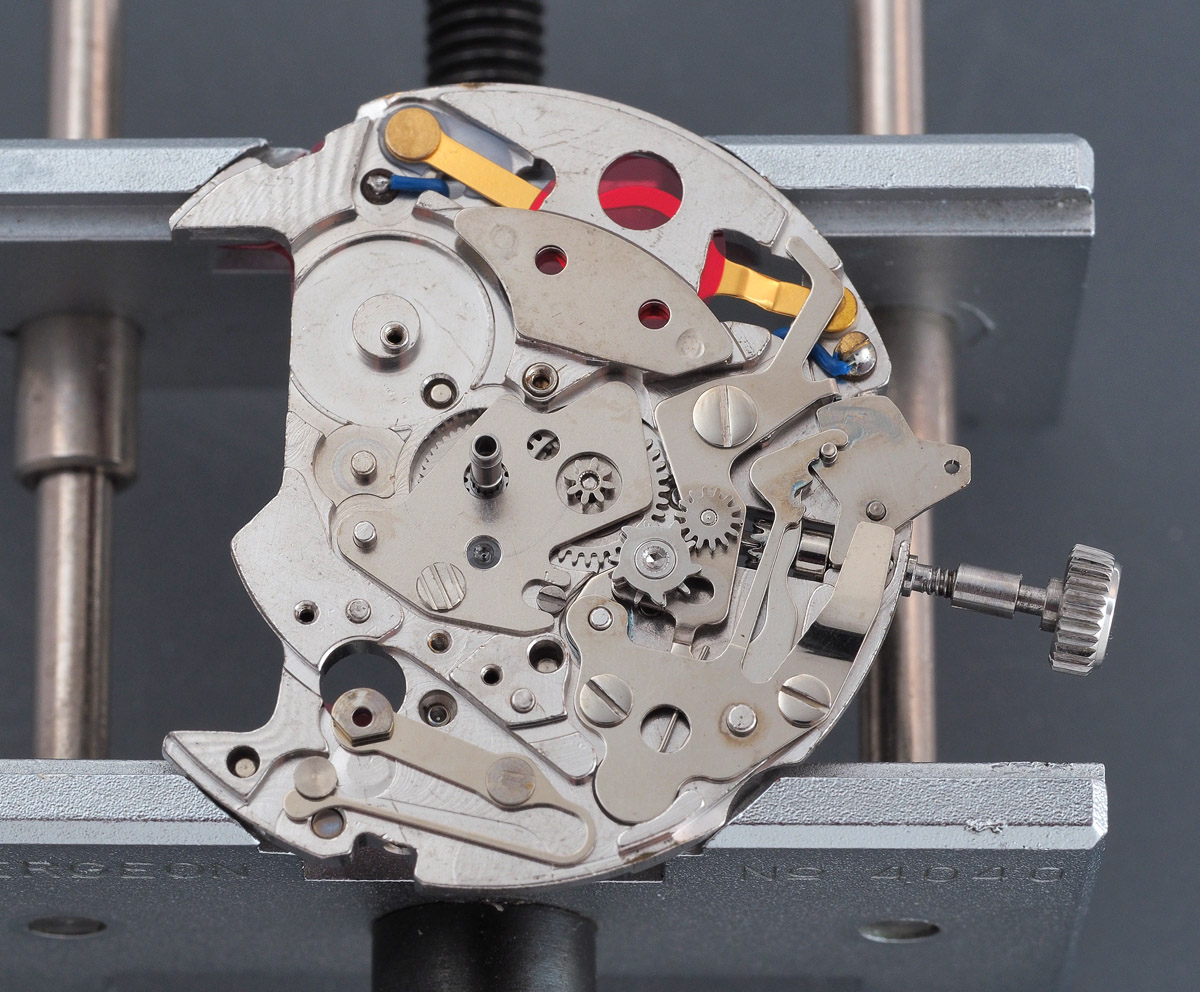
 Having completed my surveillance of the landscape I can begin the process of dismantling the movement, starting with the calendar side.
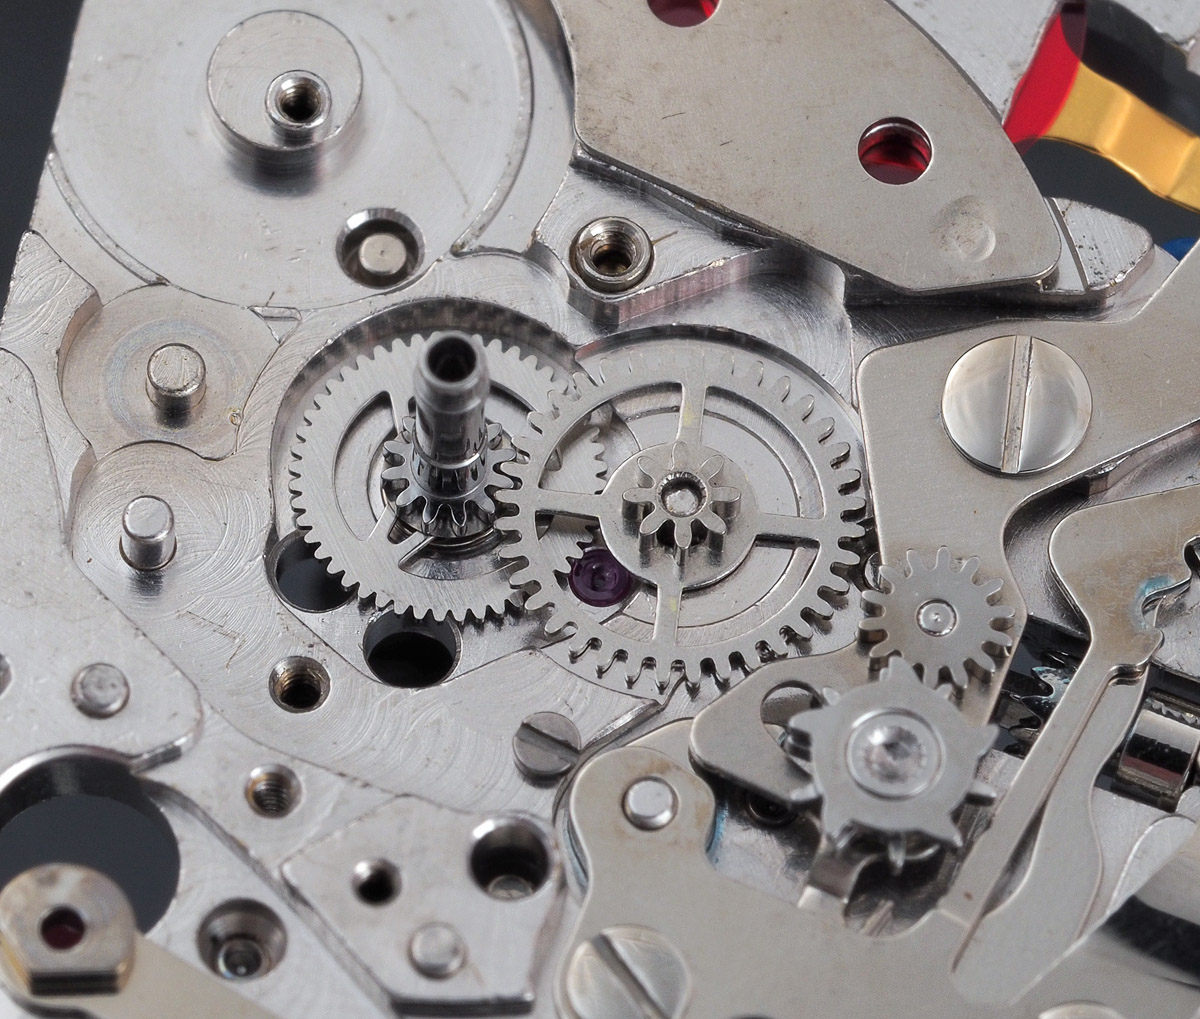
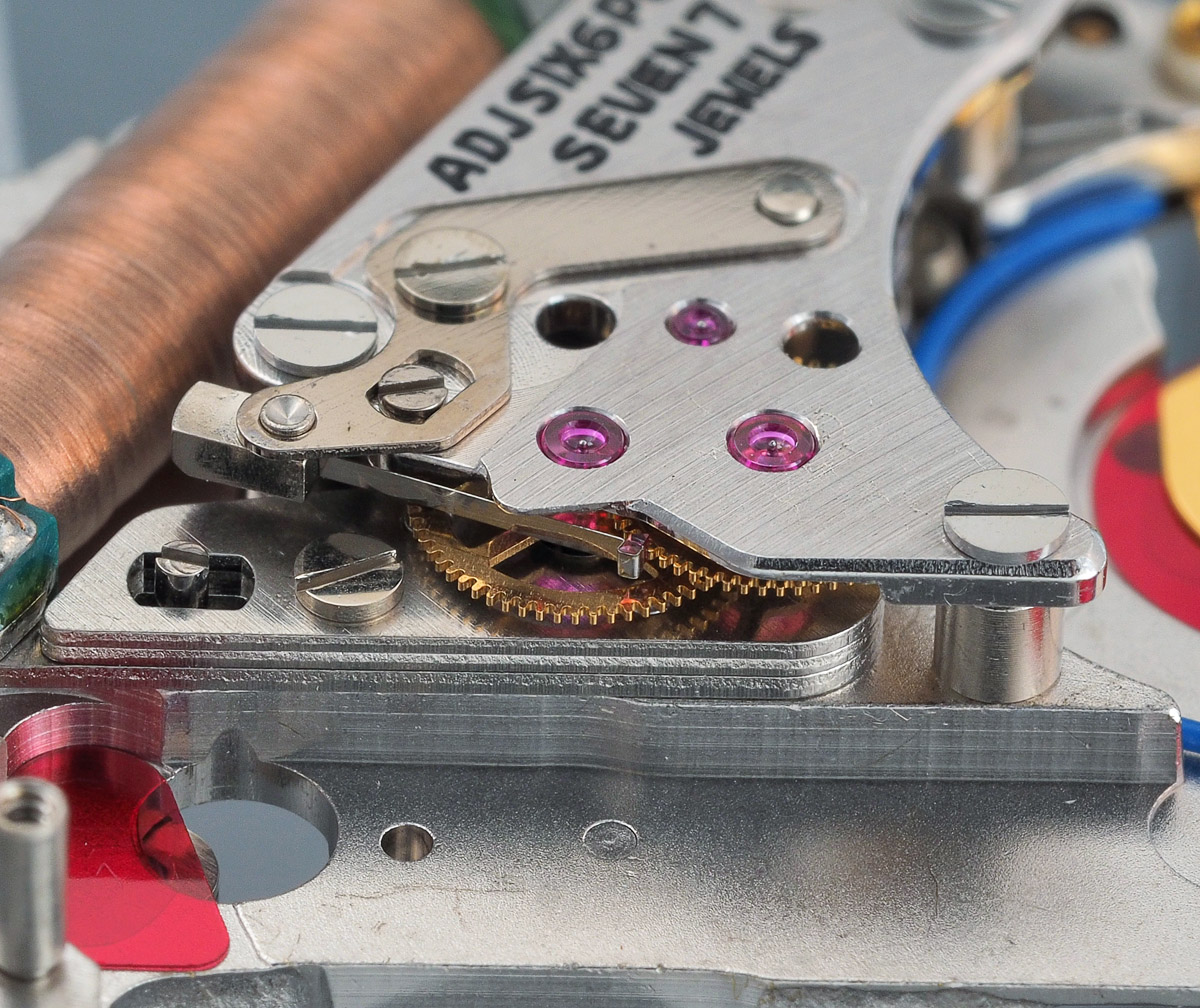
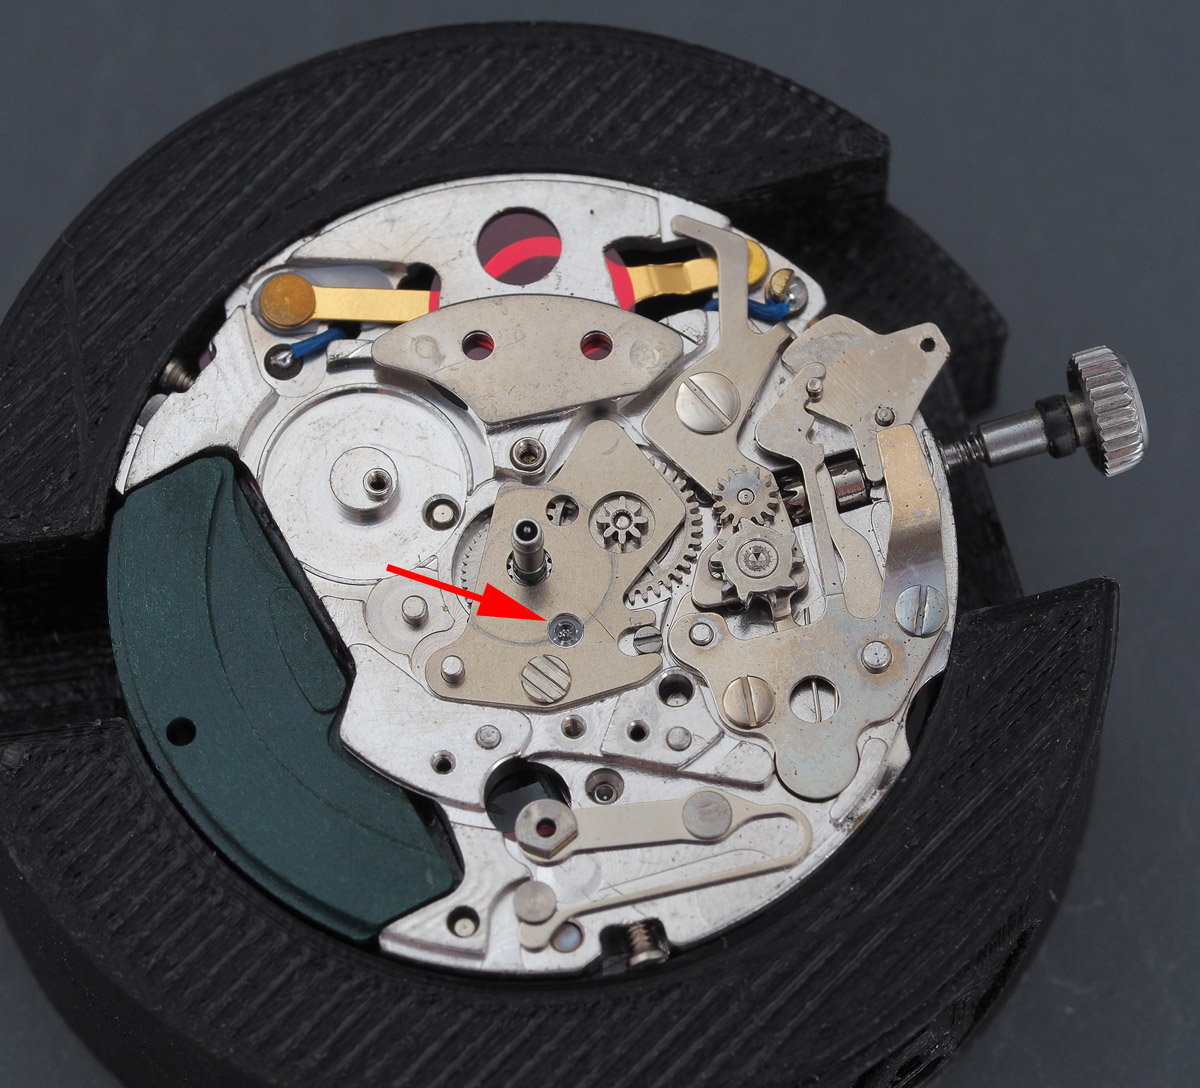 The setting parts are neatly designed and the general arrangement of the calendar parts conventional but one or two features caught my eye. At first I thought that for some bizarre reason this movement had succumbed to the ‘60’s Seiko habit of artificially inflated jeweling, as the ruby red disks on the captured date dial guard suggested the presence of two decorative jewels. However, this turned out to be an illusion: it was just the red plastic battery insulator film shining through. The second piece of intrigue was the presence of a colourless jewel serving the third wheel pinion (indicated by the red arrow above). We’ll come back to this later.
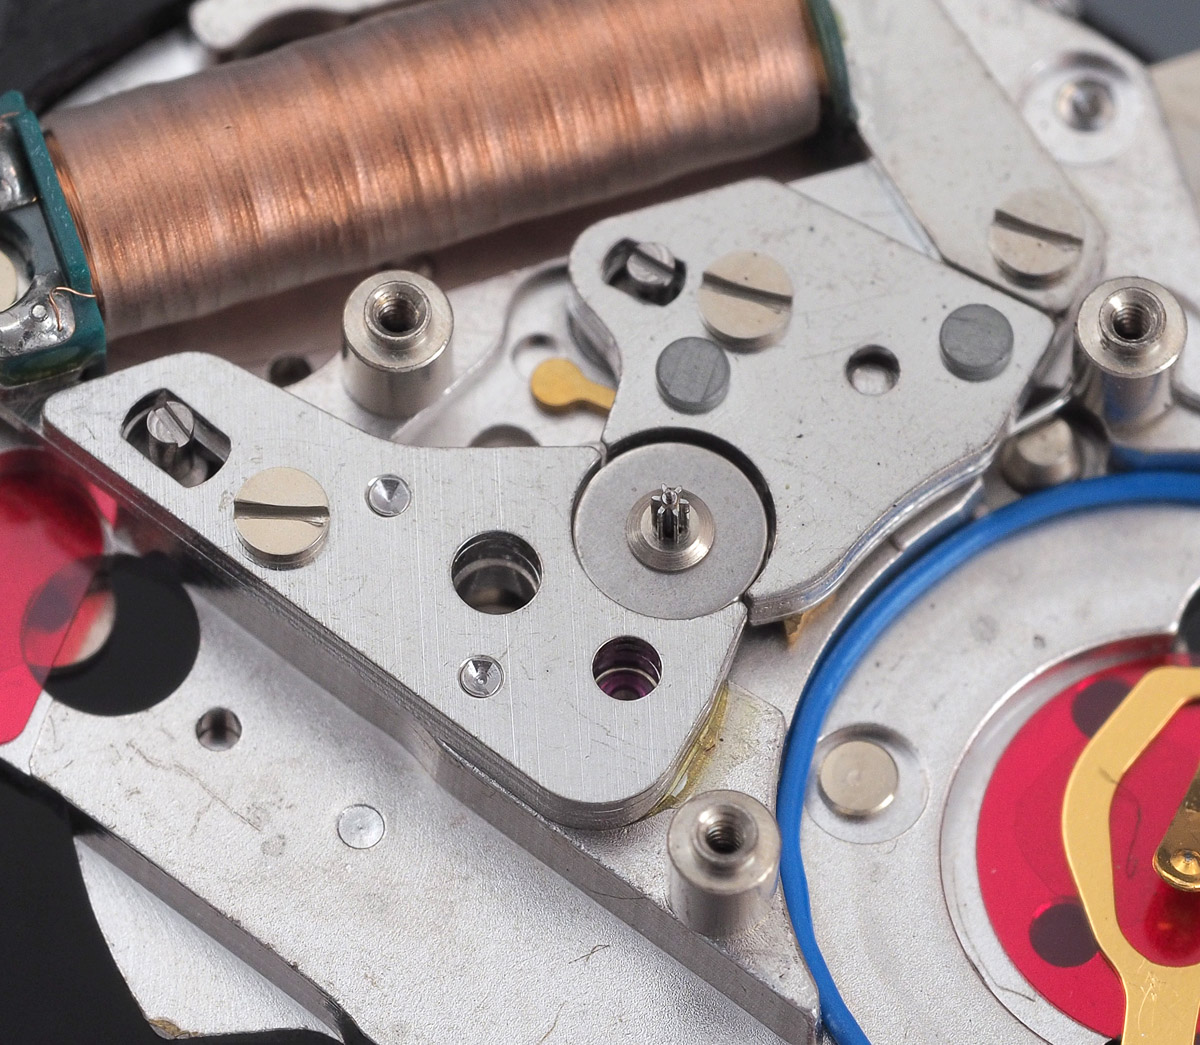
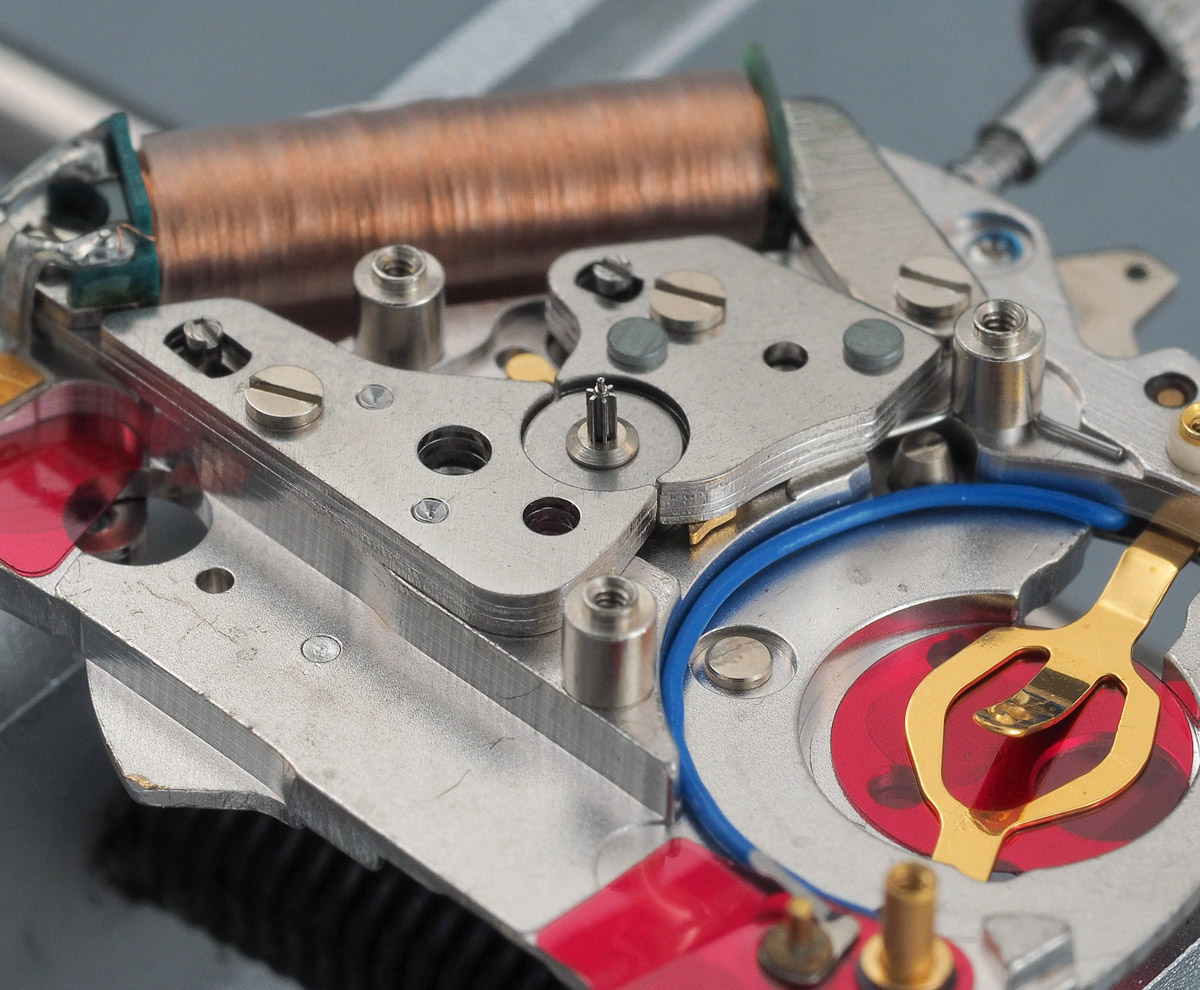
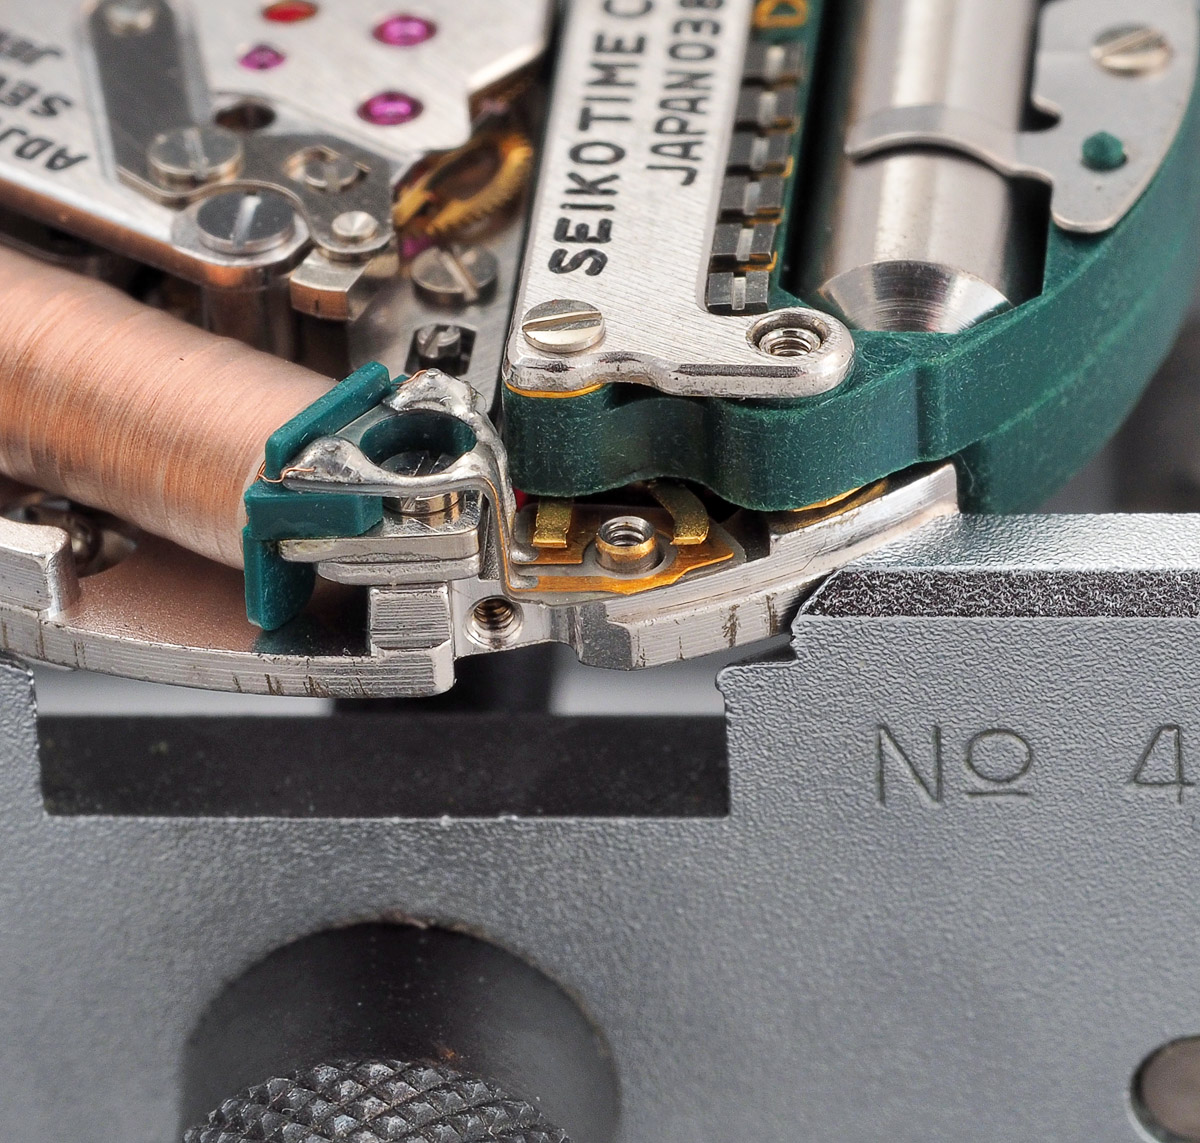
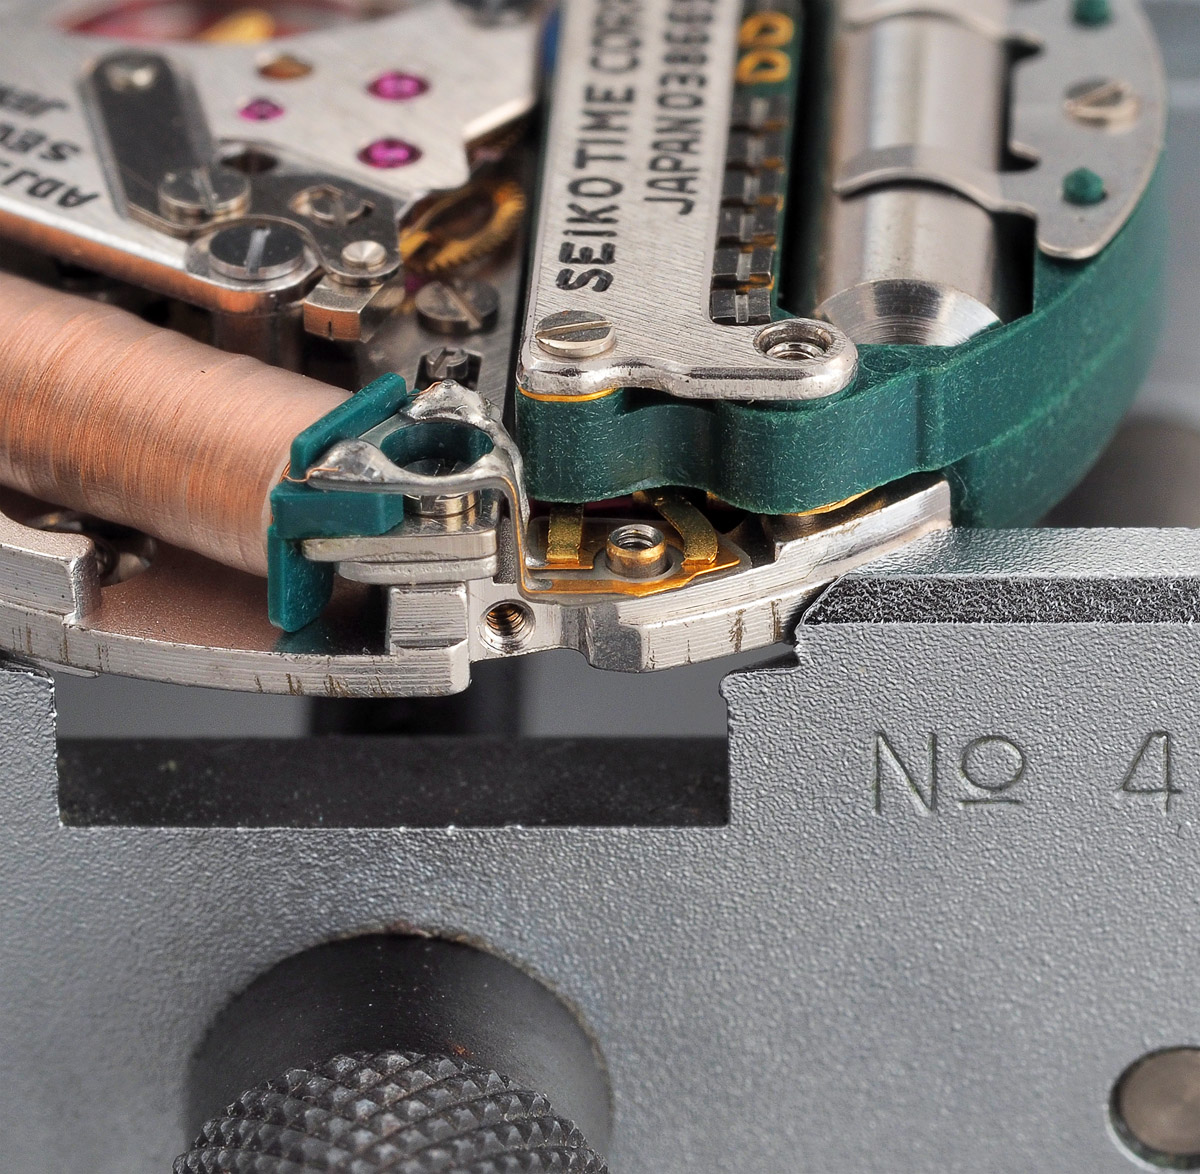
We pause at this point and turn the movement over to remove the circuit block. You should also be able to see the sprung jeweled second jumper attached to the train bridge and which acts against the sweep seconds wheel.
 Next, we remove the battery protection condenser.
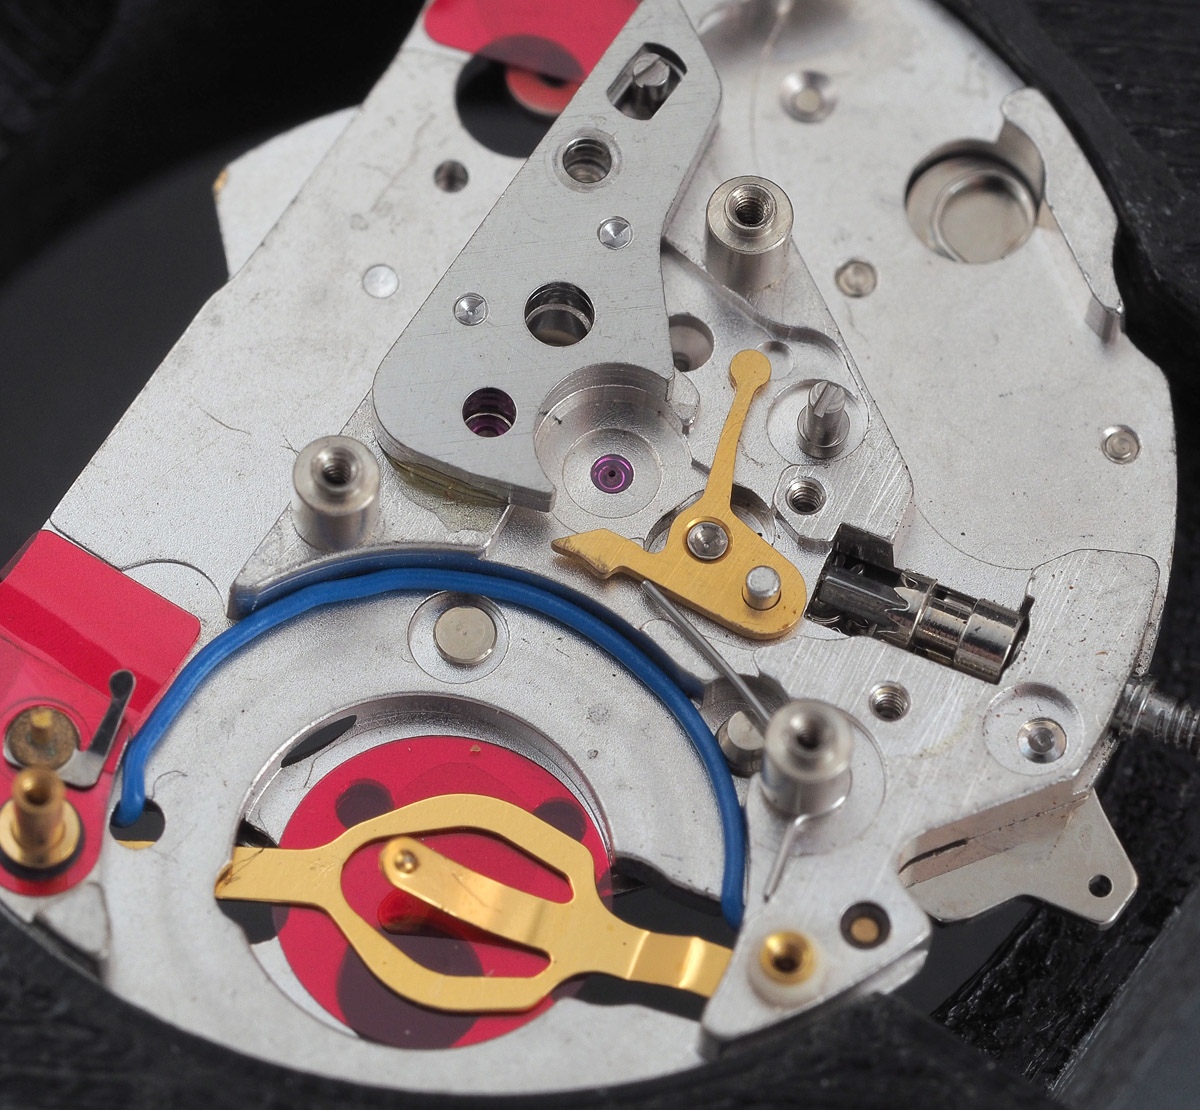
 The decks are clear now to remove the train wheel bridge, complete with seconds jumper to reveal the wheel train and step rotor beneath.
 It is hard to believe that this is the Godfather of mass-produced step rotor quartz movements given how mature the layout and design appears to be. The only aspect that really smacks slightly of improvisation is the blue wire snaking from the reset terminal on the left to the battery terminal on the right.
Incidentally, in attempting an initial diagnosis of the inoperative condition of the movement, I had measured coil impedance (2.58 kΩ) and circuit current with (11.4 μA) and without (2.9 μA) load and concluded that the key electrical components were healthy. The high current under load (with the movement notionally running) suggested that there may be some sort of mechanical impediment to its operation. My trouble-shooting later on would at least be able to rule out the need to replace either coil or circuit, neither of which would be easy to come by.
One curiosity that was exposed once I had removed the third and sweep seconds wheels was that one of the two rotor stators had been glued to the main plate. You should be able to see glue pooled just to the left of the blue wire in the photo below.
 Having removed one of the rotor stators and the step rotor itself, we get a nice view of the second setting lever that plays an important role in a nice feature of these early quartz movements. When the crown is pulled out to the time-setting position, the tip of the stem moves away from a pin on the rear of the second setting lever which causes the lever to rotate clockwise under the force of a spring. This causes the end of the lever to come into contact with a cam on the rear of the step rotor with the result that the seconds hand will always stop at an even-numbered seconds value.
 With the main plate stripped bare, I need now to give some thought to how to clean all of the parts.
 For a mechanical movement, I would typically park the lot into the watch cleaning machine and let the ammoniated watch cleaning solution do its stuff but that fluid is not appropriate for this main plate given the presence of the plastic coated wire and insulating film. Of course, the electrical parts should not be cleaned at all, other than removal of dust and general detritus. I opt to clean the main plate in isopropanol and most of the other mechanical parts in the watch-cleaning machine (the exception being the step rotor).
With all parts satisfactorily cleaned and thoroughly dried, we are ready to begin reassembly, starting with the setting parts.
 The centre wheel and pinion needs lubricating as indicated below before fitting.
 The minute wheel finds its home next.
 The centre wheel and minute wheel are secured into position by the lower end-piece for the third wheel with its mysterious colourless jeweled bearing. Note that the screw securing the end piece to the plate is left-threaded.
 We can turn over and start assembling the coil side of the movement. All traces of the glue were removed and the two rotor stators, the coil and the step rotor all refitted.
 The technical manual suggested that the train bridge can be refitted with the seconds jumper in place but in practice I think there is a real danger that the jumper would be damaged if attempting to do so. So first I removed the jumper before fitting the bridge (after some considerable jiggling).
 The jumper can now be refitted without worrying about inadvertently damaging the spring whilst distracted by the business of getting three train wheel pivots to locate into their settings.
 We are getting close to the point of being able to test the operation of the movement. I had assumed that the failure of the movement to run must simply be down to gummed up pinions and bearings and that, having cleaned the movement, it would leap back into action once the electrical parts were refitted and a suitable power source supplied. So next we fit the circuit block. Some care is needed here because it is all too easy to bend the output terminals out of position. In the photo below, you should be able to see quite clearly that they are not touching the circuit below as they should with the circuit block fitted.
 Consequently, I removed the block, bent the terminals downwards and refitted.
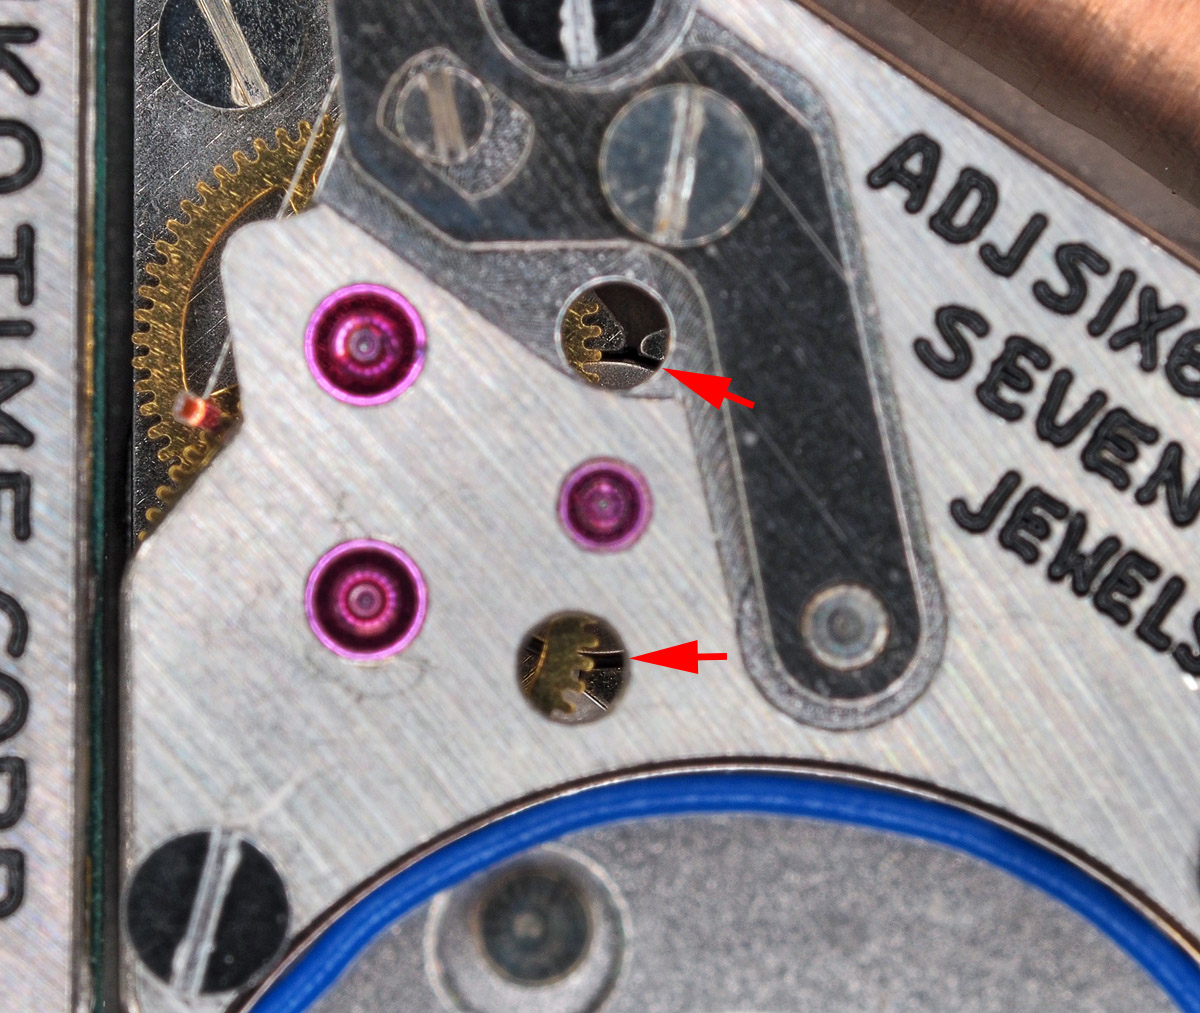
 Unfortunately, with electrons supplied by my Horotec Flashtest, the movement failed to jump into action. Under a loupe I could just about make out a slight twitching of the sweep second wheel which seemed to confirm that the electrical components were attempting to do their duty but the mechanical parts were not playing ball. I then proceeded to work my way down the very long trouble-shooting list suggested in the technical manual, with the movement seemingly passing each test one by one. Eventually, I worked my way down to Section L: Clearances between rotor stator and step rotor.
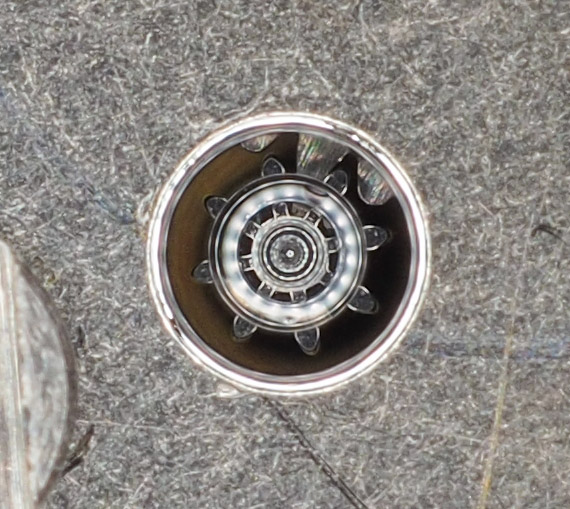
![]() The guide suggests that the gap between the edge of the rotor and rotor stator B (gap b above) should be larger than the adjacent gap between the rotor and stator A (gap a). These gaps can be observed through one of the two viewing ports in the bridge.
The guide suggests that the gap between the edge of the rotor and rotor stator B (gap b above) should be larger than the adjacent gap between the rotor and stator A (gap a). These gaps can be observed through one of the two viewing ports in the bridge.
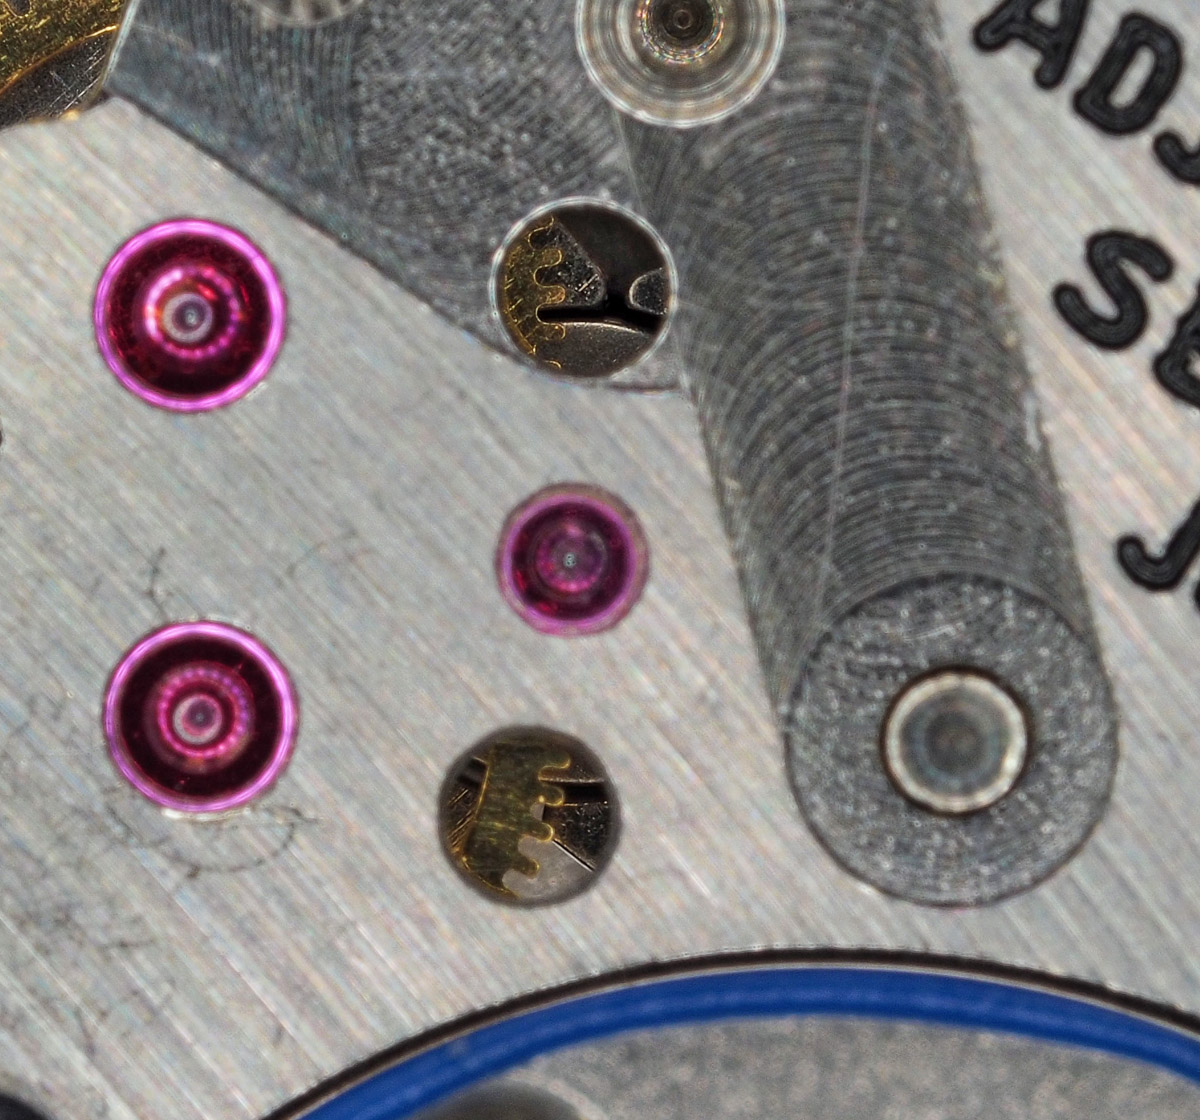
 In my case, gaps a and b are about the same and gap c perhaps a little large. Adjustment of the gaps requires the bridge to be removed and then one or other of a pair of eccentric screws can be adjusted to tune the positions of the rotor stators.
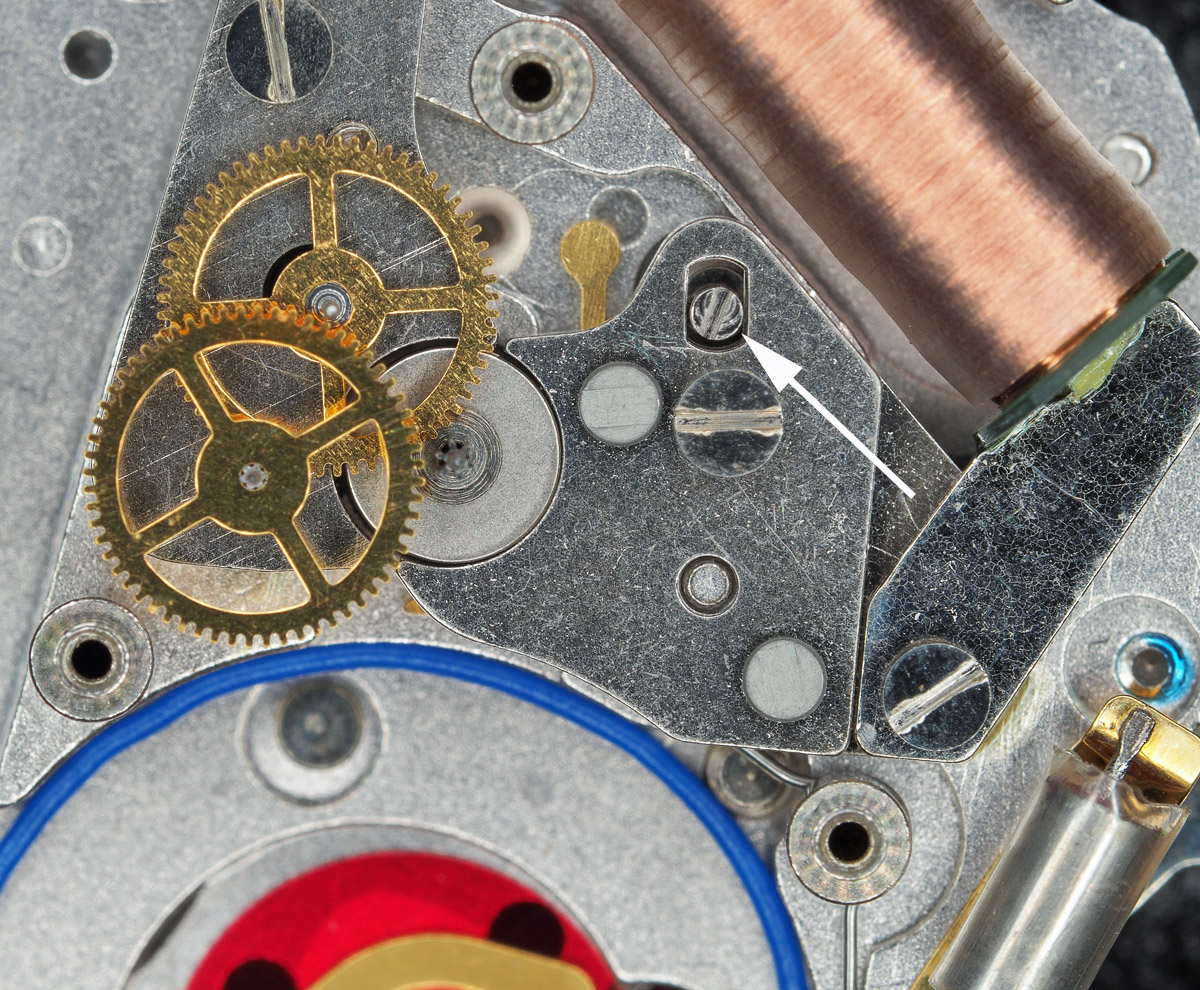 Before adjusting the position of the stator you have to loosen the screw securing the stator as well as that securing the end of the coil to the stator. A small rotation clockwise of the screw indicated above was all that was required to bring the alignment of the rotor to where the guide suggested it should be.
 I had no idea at the time whether this would do the trick but of course, as always, the proof of the pudding is in the eating. Reconnecting my Horotec resulted in more than a twitch. Indeed, the machinery kicks into action and away she goes. Licence then to proceed with the reconstruction and a return to the calendar side. We start by eyeballing that third wheel lower end piece.
 You will have noticed perhaps the eccentric screw located towards the bottom of the end piece. The purpose of this screw is to enable adjustment of backlash between the third wheel pinion and the centre wheel.
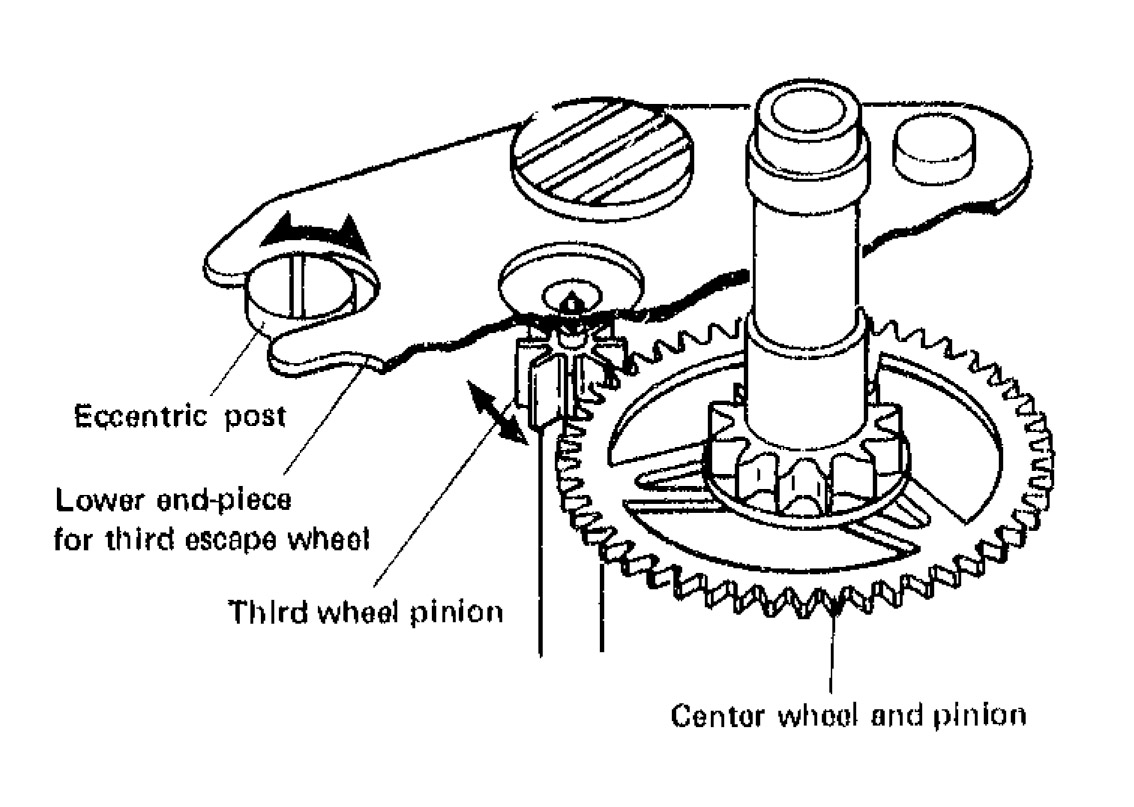 In order to do this, we need to be able to see the extent to which the pinion of the third wheel and teeth of the centre wheel are enmeshed which is why the jeweled bearing that supports the third wheel pinion is colourless.
 All looks fine in this department and so we can proceed with the reassembly of most of the remaining calendar parts.
 The captured date jumper aids the straightforward reuniting of the date and day wheels.
 The dial spacer is in position in the photo above, there to receive one component missing from every other movement I’ve ever worked on: an anti-magnetic shield.
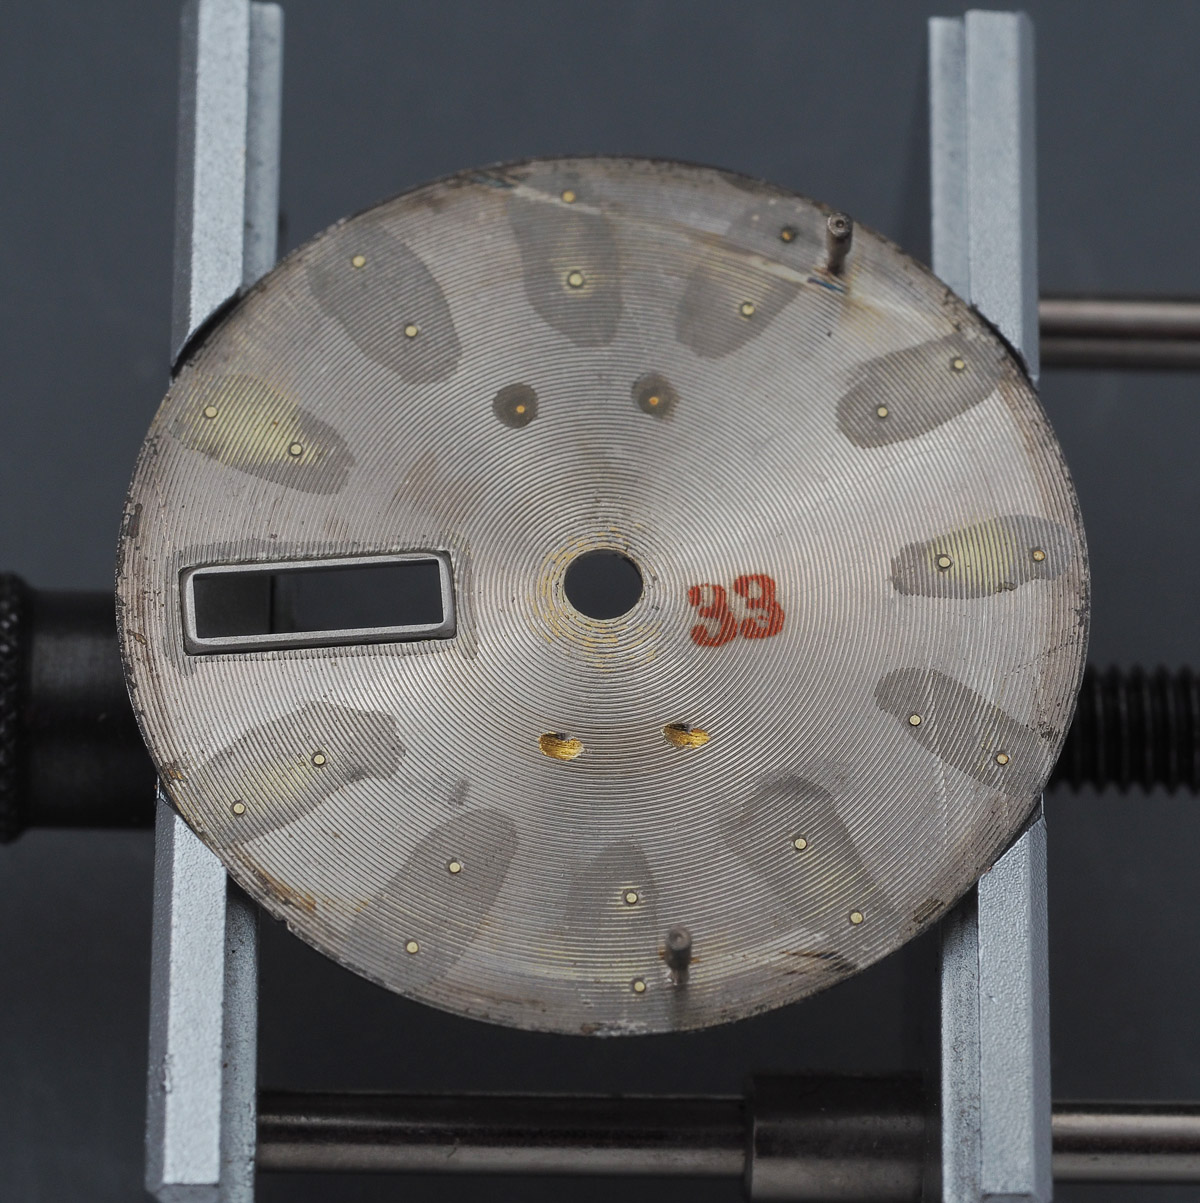
 It is always worth checking to see if the rear of the dial is date stamped and the extent to which that precedes the date indicated by the serial number. In this case, the marking to the rear of the dial suggests it was made in March 1973, one month prior to the April ’73 date given by the first two digits of the case back serial number.
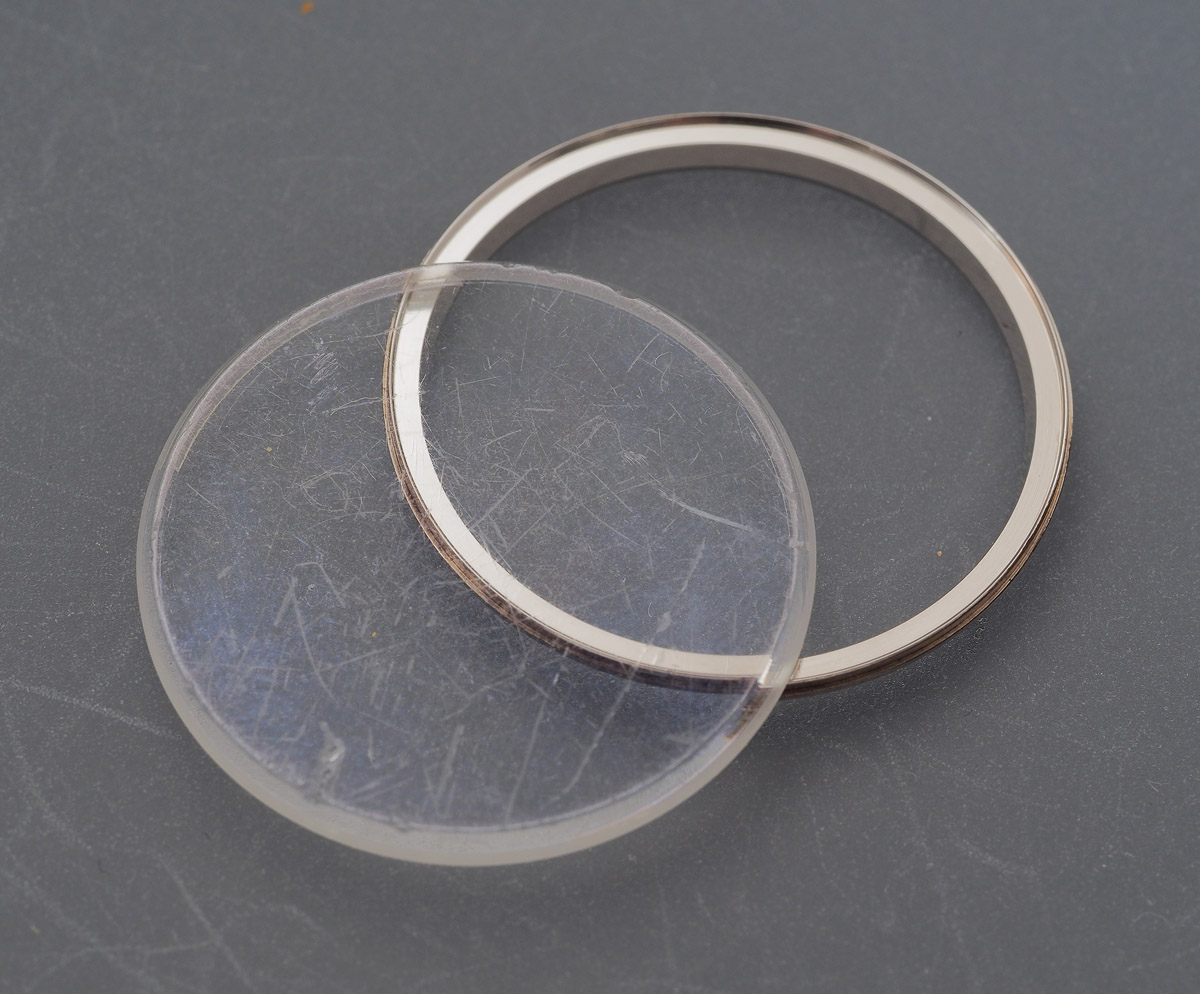
 With the dial refitted, I set the movement to one side and direct my focus to the case, and in particular to the gritty issue of the trashed crystal.
The crystal part number for this watch is 300V42GAS, one of numerous different 30 mm diameter metal frame bonded crystals but this one particularly noteworthy because it is anti-reflection coated (presumably indicated by the A in the part number). One other significant aspect is that it is seemingly impossible to find as a spare part and so I have to resort to my backstop routine of removing the crystal from its frame and replacing the glass with something suitable.
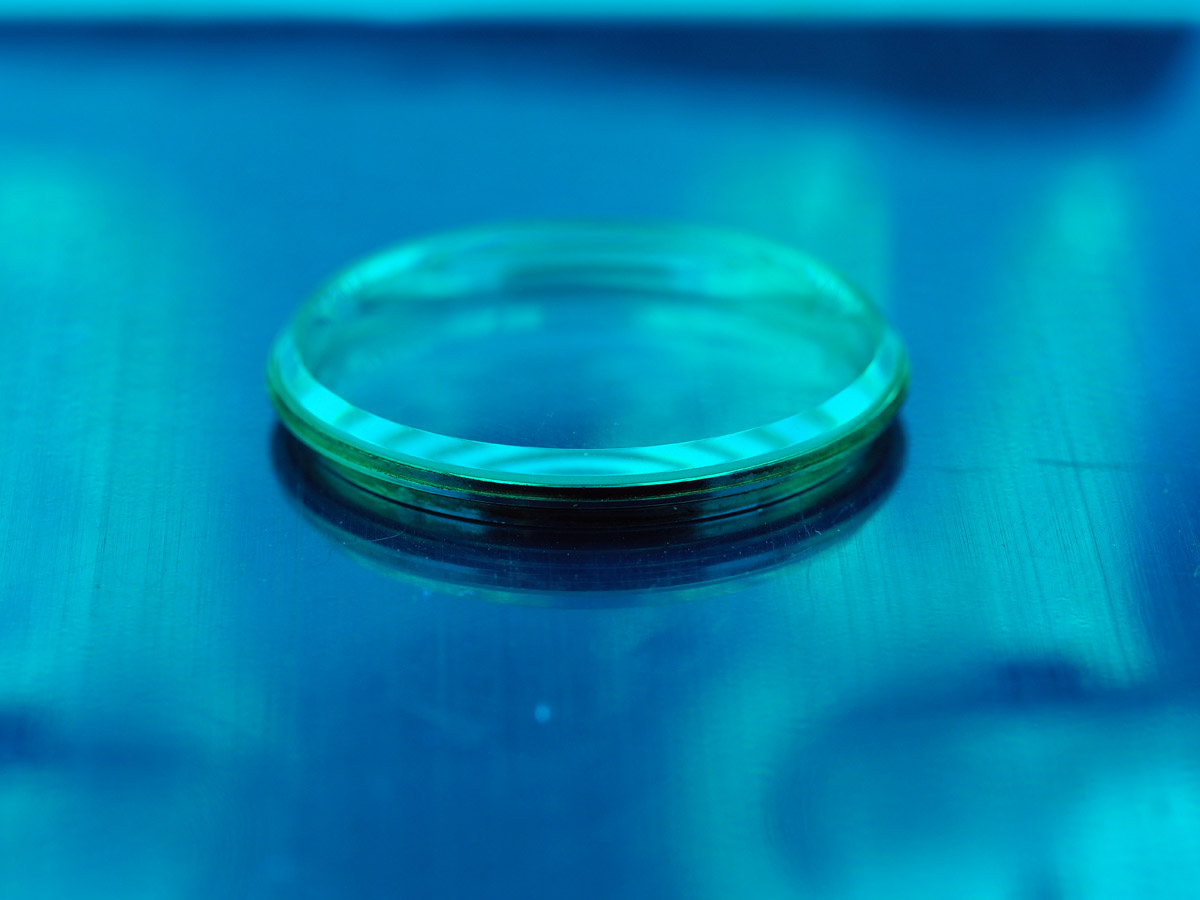
 Following a thorough clean of any residual glue, the frame is lightly coated in an even layer of Seiko S-314 adhesive, a suitable new Seiko crystal pressed into place and the complete unit then placed under a UV lamp for at least an hour to allow the glue to cure.
 The case itself requires a combination of manual gunk removal followed by an extended period in the ultrasonic bath. Once it is dry and I’ve conducted the usual stray dust/fluff snagging process, we can ease the movement, complete with dial and hour/minute hands back into the case.
 Now that the movement is in the case, I can fit a battery and measure the timekeeping for the first time.
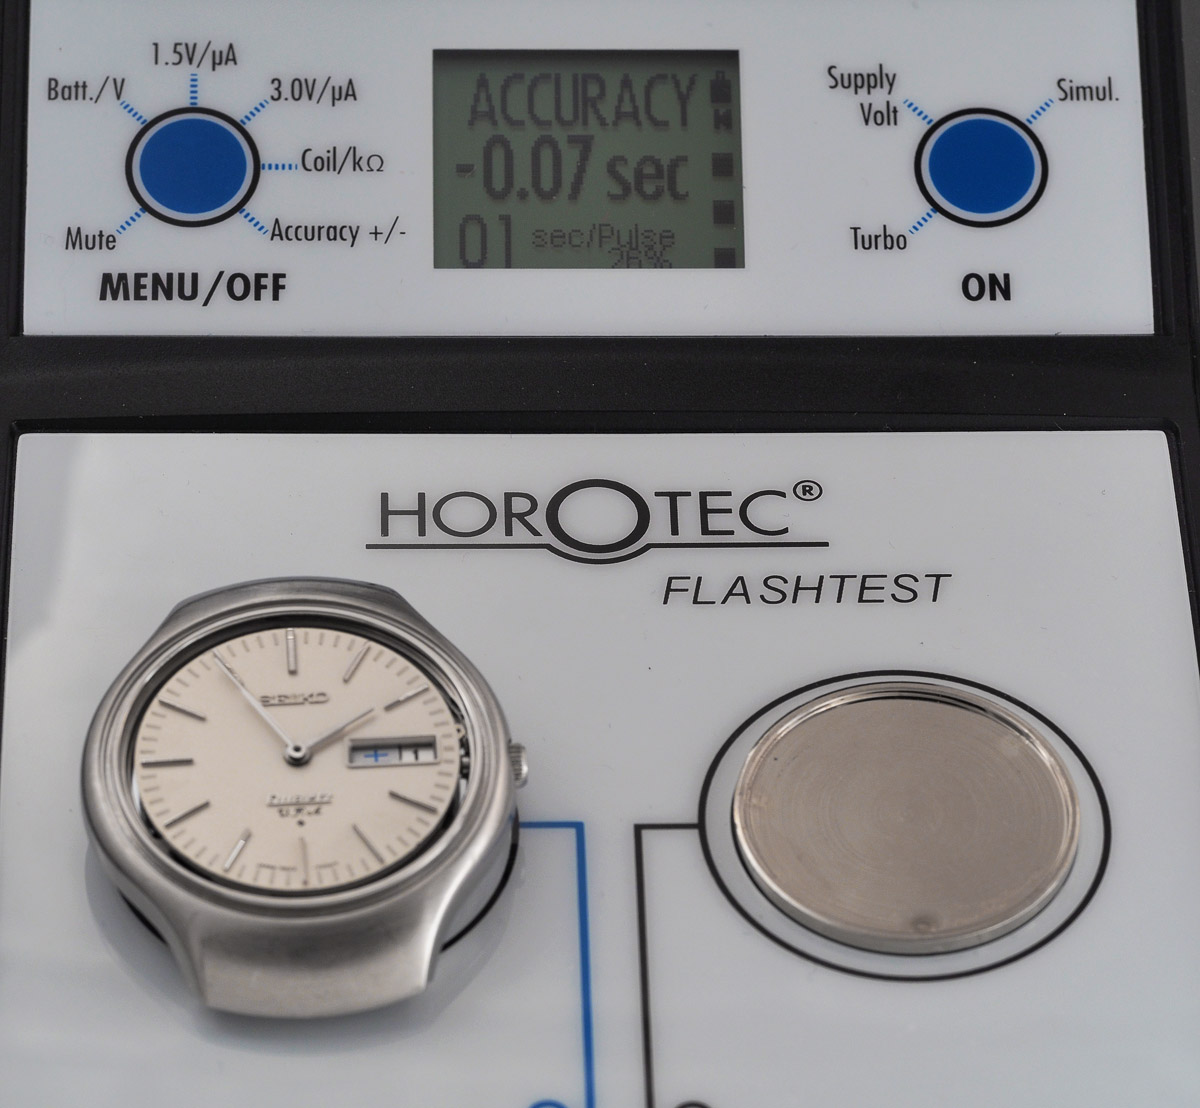 -0.07 sec per day is -1 second per 14 days which is about 2 seconds a month – better than twice as good as advertised. Not bad for a 45 year old watch with a 16,384 Hz oscillator.
I’ve waited to this point before fitting the seconds hand because I want to make sure that the movement is stopped with the battery in place (although the cam to the rear of the stepper rotor should ensure that the sweep seconds wheel is correctly aligned at an even seconds position). I take a little time aligning the seconds hand before pressing it home and that turns out to be time well spent.
 It is common with a modern quartz analogue movement to observe the seconds hand drift off from a perfect alignment with the minute markers as it works its way around the dial. Not so the 3823. Astonishingly, the alignment remains pretty much perfect throughout its 360 degree journey.
The crystal re-seats comfortably in its freshly-cleaned profiled rubber gasket and is then secured in position by the external bezel.
 I am pretty chuffed with how the crystal has turned out and certainly don’t mourn the lack of an anti-reflective coating. Perhaps I’ll stumble upon a correct replacement at some point but in the meantime, I am more than happy with the result.
A note of caution before we wrap up. The recommended battery for the 3823A is the Silver Oxide EPX-77. The modern replacement is a 303 SR44SW but this is clearly too tall for the 3823-7001 case.
 Tightening down the battery cover actually causes the movement to stop. Replacing the 303 with a 301 solves the problem.
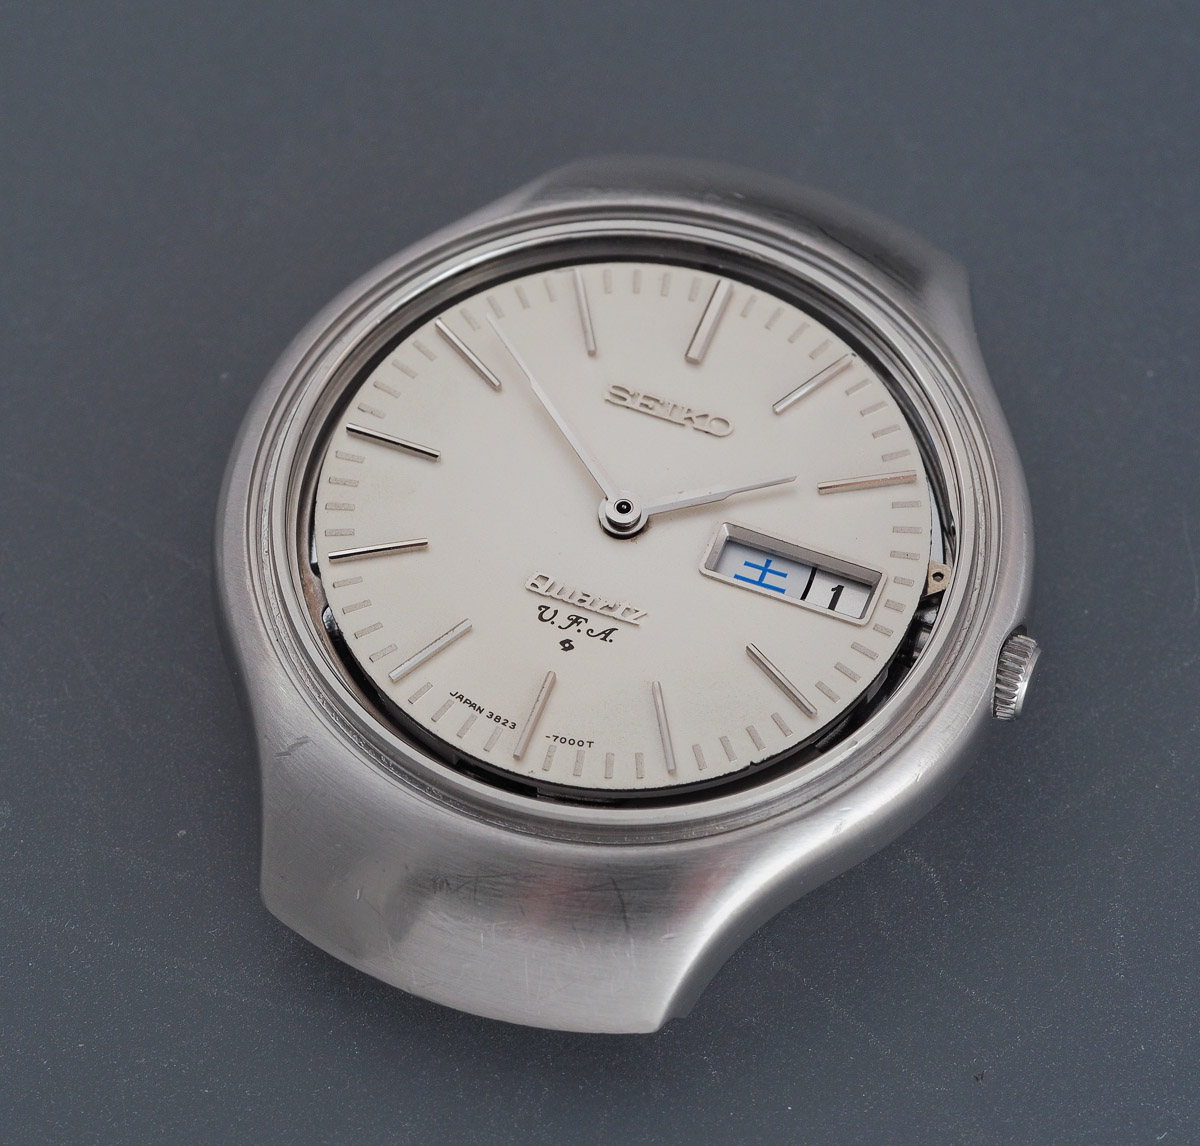
The original bracelet slips comfortably into position and we can survey our completed project in all its early ‘70’s space-age glory.
 While the forward-looking optimism of the Wilson Labour government of 1964 may have foundered by 1970, to be followed by a decade long descent into industrial strife and stagnating industrial output, in contrast, by 1977, Seiko was the largest and most successful watch company in the world by revenue. White heat indeed.


Another cracking read. Thanks for sharing Martin!
Glad you enjoyed it!
Hello Martin, that is a great write-up about about a somewhat underrated model. The high quality of the design and build certainly looks like it was built to last.
Thanks Ross – it may be underrated by some but not by me! Thanks for the comment.
A small aside – I have a 3823-7000 from June 1971 that has VFA marked on the dial.
Ah, that’s interesting. Could it have had a dial change at service? I’ll have to take a look and see if there are any photos out there of 3823-7000 with VFA dials. Thanks for the contribution.
Unpicking the history of these watches is not made any easier but the absence of any 1971 and 1972 domestic brochures on the web. It would be interesting to see if both versions appear.
Same here. I got a July 1971 with V.F.A. on the dial…
Hi Martin, Thank you for yet another meditative read. Insightful, informative and well written as always.
Rgds. Sten
No problem – glad you enjoyed it!
Hi, Martin. Quick & possibly silly question. What are the “EJ” markings on the day wheel? Is it the maybe obvious “English/Japanese,” or something else?
Thanks for letting us peer over your shoulder.
Hi Brian, yes, that’s right. For dual English/Spanish, the dials are marked ES, for English/Roman, EY, English/Arabic, EQ. No idea what the significance of the Y or the Q is though.
Hi Martin,
Very interesting read as always and the photos are incredible. Nice to see interest in vintage high quality Japanese quartz watches.
I currently own a 3883-7019 GFA with a two tone green and blue dial purchased not working, I serviced the movement and is currently working to amazing accuracy.
But sadly in its past moisture attacked the dial and case. I think in the not two distant future collectors will appreciate the early quartz watches for there quality.
Regards Mark.
Thanks Mark – I agree on all fronts.
Hi Martin, I enjoyed this blog post immensely, and not least because I have an Oct ’71 3823-7000 headed my way. No “VFA” on that dial, though. — I thought I was only into mechanical Seikos, but I guess I am not 🙂
Hi Martti, I am pleased that you liked the post. Enjoy your new watch!
I have blue dial but not working..can u repair it..im from malaysia..tqvm
Hi Bool, I’m afraid that I don’t take in work at all – I only work on my own watches. Sorry!
Hi, I just got one of these but I can’t use my caseback tool to open the battery back as it’s prongs are still too wide at their lowest,.what should I use to open it?
Improvising with anything other than a case opener is going to carry some risk of slippage and therefore damage. One option you might try is needle nose pliers but again, I would caution that you may end up damaging the finish.
Here’s what I’ve done to open difficult case backs.
I’m not saying that this is the best way or even a good way, just that it’s what I do…
I get a great big nut from my shed and hot glue it to the case back then use a wrench to open and close the case back.
When I’m done I use a torch to heat the nut until it can be pried loose.
Then I peel/pick off the hot glue.
Clean up any left overs with isopropyl alcohol on a microfibre cloth.
I’m careful not to get the watch hot.
Not that I recommend it but it always works great for me!
Please give me a tip on the SEIKO 3823-7001 replacement machine or who can tell you how to eliminate the machine fault – contact oxidation? The hands will jump on the tap of the case, etc. Thank you chronomaniat vintage B. Pokorný from Prague Czechia email bohuslav.pokorny@email.cz
I’m sorry, I don’t know how to advise on the fault you describe other than dismantling, clean and repair any parts that you identify as faulty.
Díky, že se ozval samotný “Martin”, nejsem opravář, jsem jen sběratel pár kousků SEIKO vintage, které i nosím, ale upoutaly mě jedny 3823-7001 o kterých je nahoře krásný popis renovace strojku. Právě o renovaci strojku 3823-7001 se pokouší jistý opravář v Praze a chtěl jsem mu nějak pomoci nebo ho odkázat na Vaší práci – viz nahoře . Náhradní strojek z let 1970 asi nelze najít . Ozvu se jak dopadla oprava strojku děkuje chronomaniak Bohouš z Prahy
Translation: Thanks to the fact that “Martin” himself, I’m not a repairman, I’m just a collector of a few pieces of SEIKO vintage, which I also wear, but I was attracted by some 3823-7001, which is a beautiful description of the renovation of the machine. A repairman in Prague is trying to renovate the 3823-7001 machine and I wanted to help him or refer him to your work – see above. A spare machine from the 1970s probably can’t be found. I will hear how the repair of the machine turned out, thanks to chronomaniak Bohouš from Prague
What a great read, thank you!
I have the opposite situation to some of your other readers; my 3823-7001 was made in Sept 1974 but doesn’t have a VFA dial. The date wheel is English/Spanish though so I wonder whether they had different dials for different markets (since “very fine adjustment” is AMF in Spanish).
Thanks Martin for such a great write up. I’ve recently restored two 3803s, a gold cap 7031 from 1974 and a blue sunburst 7020 from 1972. I replaced the crystals on both using your guidance. I did find the setup a bit finicky, especially the stator setup and then the minute jumper spring. On the 74 model the blue wire on the PCB is no longer there as that has been incorporated into the flexi PCB itself. Also I have seen some differences in the driving wheel and pinion. Some have a flat washer as part of the assembly (shown in the tech sheet) and some don’t. I did some work on regulation using a fixed capacitor and made a post on watch repair talk forum if anyone is interested. Really nice watches. Thanks again for your inspiration.
Hi Stephen, many thanks for the feedback and for the additional tips and observations. All very good intelligence for future forays into these beautiful movements!