
Tags
I am as guilty as the next man in allowing my eye to wonder, to catch the latest metaphorical flash of ankle but I find that more often than not, I am able to exorcise any potential for wayward behaviour by working my way through a hypothetical cycle of chase, acquire, consummate and discard. For those of you thinking I may be overstepping the mark and letting slip details of the dark underbelly of a secret life, I am afraid I am going to disappoint. I refer, of course, to the sport of virtual flipping, the act of going through the process of gaudy trinket acquisition followed by rapid disenchantment and disposal as a theoretical exercise without ever having to follow through.
Most recently, my eyes have wondered briefly in the direction of one or two Seiko anniversary models (the SLA017 homage to the 62MAS and the SLA025 ‘re-edition’ of the 6159-7001) but the ardour that I mustered in the face of artfully blurry pre-release snapshots, withered pretty quickly when flaws in their execution became apparent once clearer photos emerged following their official release. All of the preceding is of course almost entirely academic because any urge to act was always going to crumble in the face of fiscal common sense but the psychological process is nonetheless very real.
 Seiko, I think, understand all of this and the release of both of these upper end models was accompanied by simultaneous releases of homages to the homages at a much lower price point: The understudy to the SLA017 is the SPB051 and to the SLA025, the SPB077. Both of these cheaper alternatives superficially look very appealing (if you can get on with the design of the hands) but for me both of the lower tier alternates were eliminated from consideration as potential horological dalliances for the same reason: they are both fitted with the 6R15 movement.
A topical concept in these days of equality and diversity is that of unconscious bias. Now I am as much a supporter of equality of opportunity as the next man or woman but I confess to being something of a skeptic when confronted with the notion of unconscious bias. I am however a believer in the existence of conscious bias and (although not an advocate) of naked prejudice. I recognize both in myself in all sorts of contexts and am perfectly self-aware in acknowledging that my own dogmatic preconceptions have resulted in a longstanding disdain for any movement whose design roots lie adjacent to the Daini-produced 7000 series of movements released in the early 1970’s. The base three hander automatic 7005 effectively took the place of the discontinued 6619 as the metaphorical riffraff of the Seiko movement tree, fitted to a sea of humdrum mechanical watches that populated the back end of Seiko catalogues bulging with the fresh-faced quartz output that proliferated through the 1970’s and 80’s.

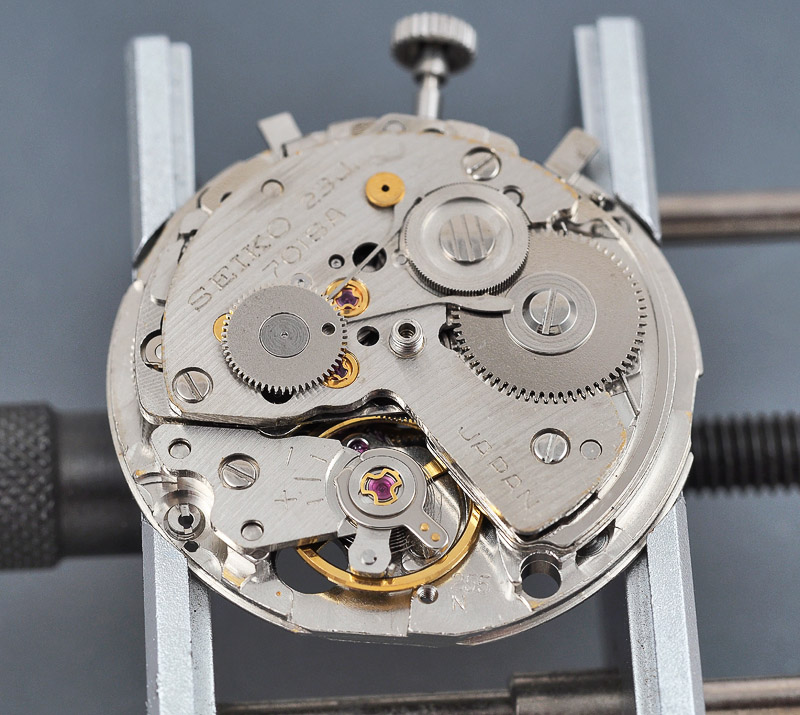
Seiko 7005A on the left, dating from 1973 compared to a contemporary NE15B (6R15) on the right.
The 7005 and later progeny (including the 7S26, 4R36 and 6R15) have always struck me as artless designs, conceived to be put together by robots and without a sufficient redeeming sophistication in their fundamentals to allow for subsequent refinement into something a bit special. I accept, however, that this impressionistic view was exactly that – and my prejudices have up to this point prevented me from seeing any redeeming features other than the economy of their pricing. I could be persuaded that the 6R15 might be regarded as being at the same level as the ETA 2824-2 as a mainstream workhorse but I suspect that my loyalty to the Seiko cause might then have played a part in my acquiescence.
So, where is all of this taking us? To find out, we need to take a backwards step and return to 1971 and contemplate the recent achievements of Seiko at that time in having developed and released the 6139 and 6138 automatic chronograph movements two years previously. Both movements at that point had proved themselves as reliable and accurate and had provided the engine for a wide variety of appealing and, from the perspective of the late 2010’s, iconic chronographs. All of those watches are noteworthy for their distinctive, original and in some cases, extravagant designs, as well as for their substantial dimensions. The size of those watches was dictated to an extent by the depth of the movements: both 6139 and 6138 were 27mm in diameter but the former a fairly considerable 7.2mm high and the latter 8mm. Both movements were also the product of the Suwa division and in the spirit of intra-institutional competition, the Daini men and women set themselves the challenge of producing a chronograph of more discrete dimensions and which offered something absent in the 6139: a fly-back function.
So in 1971, Seiko released the 7018A fly-back chronograph, a movement of the same diameter as the 6139 but a relatively svelte 5.9mm in depth that allowed it to be fitted to cases considerably smaller than those housing the deeper 6139 and 6138. The 7018 offered a day/date calendar as well as a central seconds chronograph and a minute sub-register. In these respects, its functions duplicated those of the 6139. The difference was the fly-back function which allowed the chronograph to be reset and restarted with a single button push where a conventional chronograph requires three button pushes to achieve the same: stop, reset, start. At the time, the 7018 was the smallest automatic chronograph movement in the world and remained so until Frederic Piguet released the 5.5mm high 1185 in 1987. Enough of this waffle. Let’s get on and meet an example of the breed: A Seiko 7018-7000 from December 1971.
 This is a very handsome watch, with a case design exhibiting a strong family resemblance to that of the Seiko 6138-8020 panda. The use of a bonded V-type crystal with a very deep chapter ring really sets off the dial too, playing nicely against the chromed markers and hands and silver minute sub-register dial. I am looking forward to seeing how this one turns out.
As usual, the first step is to open her up and take a look at the innards.
 From the balance side, you should be able to see the strong family resemblance to the 7005A pictured further up. The movement is held in place by a substantial movement ring, and the case back gasket sits on top of the ring, bridging the gap to the inner sides of the mid case. The gasket needs to come out first, then the ring at which point we pull the crown out to the time-setting position and the setting lever tap pops into view.
 A gentle pressure on the tab allows the crown to be eased out at which point the movement can be tipped out onto a case cushion. The order of play is a bit different with this model compared to a 6139 because the pushers are captured into the pusher tubes using C-clips and so we have to wait until the movement is released before we can extract the pushers.
One of my accidental purchases a few years ago was a Seiko S-510 movement holder. I don’t quite recall why I bought it – perhaps it was part of a lot – but I have had no cause to call it into action until now.
 While not strictly necessary when removing the hands, it is essential when refitting them and so in the interests of giving it a workout at this point in proceedings, I use it to secure the movement whilst removing the hands. With the dial now displayed un-obscured by the scratched crystal, we see that it is in properly excellent condition, barring some very minor bleed around the lower circumference of the minute register dial.
 The dial feet are secured by means of a pair of eccentric screws to the rear. Releasing the feet simply requires the screw to be rotated by 180 degrees.
 The dial can then be removed, a process that simultaneously facilitates the removal of the minute register hand without recourse to hand removers, whose use can damage the dial. The calendar side of the movement is then exposed to view and its disassembly follows.
 The main noteworthy point in breaking down this side of the movement is that the day finger that screws into the date driving wheel beneath, has to be removed prior to removing the date dial guard. You should also be able to see that the day jumper screws to the date dial guard rather than to the main plate itself. The arced spring visible in the lower left photo above is the day corrector spring. This movement is unusual in featuring a quickset date operated by rotating the crown in the first indent position and a quickset day operated by pushing the crown in from its rest position.
With the calendar parts removed, we turn the movement over and turn our attention to the balance side. In the photo below, we note the conspicuously visible magic lever assembly that is so characteristic of this family of movements. You should also be able to make out the presence of what appear to be two small Diashock settings. These serve the escape and third wheels. It is not clear to me whether these settings act as shock settings in the same way that they do for the balance arbor or whether they are simply a variation on the theme of the Diafix setting whose role is mostly to protect the oil reservoir in the bearing from contamination.
 The first reduction wheel and pawl lever are secured to the barrel and train wheel bridge by a C-clip and so having removed the bridge, that is our next port of call.
 The removal of the bridge provides a view of the dog’s dinner that is the collection of hammers, levers and springs that constitute the working heart of the chronograph operation.
 This is a cam-switching vertical clutch chronograph whose apparent external complexity hides what is actually a simplified mechanism designed to eliminate the need for fine adjustment and therefore make it easier to service. Once you get your eye in, you can see that the operational components are the operating lever that works in conjunction with the pillar wheel sat at the crown side of the centre chronograph wheel, and the hammer, which resets the chronograph. With these components removed along with the minute recording wheel stop lever, we can actually start to appreciate its simplicity.
 The component that coordinates the consequences of the various mechanical actions is the balance stop lever, which grips the pillar wheel at its centre. It performs two functions depending on the position of the pillar wheel ratchet gear position:
- When the start/stop pusher at 2 o’clock position is depressed, the operating lever acts against a tooth on the pillar wheel, rotating the wheel and pushing the two arms of the balance stop lever outwards. This action simultaneously releases the two coupling levers from the vertical clutch of the chronograph centre wheel, bringing the clutch ring into contact with the fourth wheel and thereby activating the sweep second axle. In concert with this action, the outer wing of one of the arms comes into contact with the minute recording wheel stop lever which releases the braking force that it exerts on the minute wheel.

- Pressing the operating lever in again moves a tooth of the pillar wheel ratchet gear to drop the balance stop lever into a hollow part of the pillar wheel which then brings the two arms inboard once more, allowing the coupling levers to lift the clutch ring up, breaking contact with the fourth wheel. The seconds axle therefore comes to a halt. Simultaneously, the inboard motion of the outer left wing of the balance stop lever releases contact with the minute recording wheel stop lever and it then comes into contact with the minute recording wheel under the restoring force of its spring. This stops the minute recording wheel.
 In either of the start or stop states, depressing the hammer, by pushing the pusher at the 4 o’clock position, brings the two hammers into contact with the hearts on the chronograph centre wheel and the minute recording wheel, resetting both to their zeroed positions. If the chronograph is in its running state then the seconds and minutes just soldier on from that point, if they are in the stopped position then they remain stopped.
 Once all of the operational components have been stripped away, the chronograph bridge comes off to reveal the train wheels and minute recording wheel.
 The minute wheel is an ingeniously designed component, reliant for its operation on the integrity of one delicate friction spring (see later).
 The spring sits in the lower channel of the minute recording wheel axle. When the chronograph is running, the friction exerted by the spring is sufficient to allow rotation of the minute recording wheel and its axle in concert. However, when the stop lever exerts its braking force to the axle, the friction exerted by the spring is small enough to allow the wheel to continue to rotate whilst the axle remains stationary. That spring also plays the central role in permitting the operation of the fly-back function which allows return of the minute recording wheel to its zeroed position while it is running.
Finally, with the wheel train and barrel removed, we are left with the more or less naked main plate, only requiring the centre wheel, its bridge and the remaining setting parts to be liberated before the whole lot passes on to the cleaning stage.
 Of course, we must not forget the mainspring.
 Let’s turn our attention to the case and those pushers. As I mentioned earlier, this case design features a V-Type bonded Hardlex crystal and so deconstruction follows the same path as the two King Seikos we met recently.
 The case is somewhat weathered but free from corrosion and so nothing much is required other than a clean and a fresh crystal. As noted earlier, the pushers are secured into the case using C-clips.
 The approach I took for their removal was to depress the pusher so that the pusher end and C-clip protrude into the case and then to use a flat bladed screwdriver to push the C-clip from its open end to the point that pincer at the end of the C finds purchase on the waist of the pusher. The clip can then be eased off with a sharpened piece of pegwood. This procedure works extremely well with the potential loss of the clip mitigated by the presence of a healthy dollop of Rodico.
 Having removed the C-clip, the pusher can be pushed out from the inside.
 The last remaining part of this exercise is to extract the metal washer and rubber gasket from the pusher tube.
 All of the case parts, bracelet and end links go into the ultrasonic bath for a thorough clean before being set aside to dry.
 At this point, the movement parts have been cleaned and dried and are ready for reassembly. We set the scene by rebuilding the setting parts and then fitting the centre wheel and its bridge.
 My inclination is always to grasp the nettle and get the fiddliest jobs done first and so next we tackle the two Diashock settings on the barrel and train wheel bridge. In the photo below, we are part way through that process, one setting complete and the other awaiting.
 The mainspring is in fine condition and so we can refit it to the now clean barrel.
 Notice the length of the barrel arbor, its upper part needing to extend through two bridges before reaching the ratchet wheel.
One or two of you may have been wondering why I’ve been off the grid for a while, at least in terms of fresh blog posts. Well, life has a habit of intruding at times but in addition to that, I suffered a minor calamity with the friction spring fitted to the minute recording wheel during the reconstruction of the movement. The absence of a technical guide in English for this movement combined with the fact that, yes, I do frequently make stupid mistakes, led to the breakage of the spring. This would not on its own have been a show-stopper were it not for the fact that a spare part appeared impossible to locate. I explored the possibility of shaping a replacement spring from 0.1 mm spring stock, following some sage advice from Adrian of Vintage Time Australia, but the spring stock proved tricky to source. In the end though, lady luck smiled upon me in conjuring up an auction on Yahoo Japan for not only the spring but a new axle and wheel. Unfortunately, she also frowned somewhat in having conjured up a part whose opening price could only be described as extortionate. Nevertheless, in the absence of other options, I lobbed in my bid and won the auction. Here then, the most expensive part in terms of £’s per gram I have ever sourced:
 The approach required to refit the axle is to release the spring from the end post, fit the axle and then manoeuvre the spring back into position.
 The minute recording wheel along with the other train wheels and barrel can now be refitted to the movement, topped off with the chronograph bridge. A view of the upper parts of the minute recording wheel in position shows how the wheel sits against the stop lever spring.
 In the photo below, with the balance stop in its running position, the arm of the minute recording wheel stop lever sits benignly against the stop lever spring. When the chronograph is stopped, the balance stop lever arms come together, lifting the clutch ring and releasing the force on the minute recording stop lever, allowing it to come into contact with the stop lever spring, thereby stopping the minute recording wheel in its tracks.
 The trickiest part of the remainder of the chronograph rebuild is the fitting of the hammer which is secured in three positions which have to be followed in a particular order.
 The rest of the rebuilt proceeds reasonably smoothly barring a slight misstep in the positioning of the pawl lever. The movement seems happy enough though as it nears the end of its ordeal, running sweetly with some power wound into the mainspring.
 The technical manual recommends fitting of the winding weight before completing the calendar side and so I undertake this operation next, paying particular attention to the requirement to align the winding weight with the end of the arrow pointing at the dot on the first reduction wheel. I’ve discussed the issue of autowinding efficiency in this family of movements elsewhere and so won’t revisit that again here.
 Calendar reconstruction proceeds without incident, so long as you remember that the day finger has to be fitted after you have fitted the date dial guard and not before.
 I am conscious at this point that I should be on the home straight but also knowing that I’ve not yet fully tested the operation of the chronograph. That will have to wait until I’ve fitted the dial and hands, which is what comes next.
With the dial ring in position, the dial drops into place, secured by those eccentric screws to the rear.
 The tear drop minute register hand is placed into position next and pressed home using my hand press, whilst depressing the reset lever.
 Incidentally, I’ve not mentioned that the minute register hand runs continuously rather than being regulated by a jumper. This is clearly one of those design features that serve the interests of simplicity rather than function but in practice, I don’t regard one approach or the other preferable in terms of the practicalities. At this point I check that the minute register hand runs, stops and resets in concert with the correct sequence of instructions from the start/stop and reset levers (which it does). Finally, the hour, minute and sweep seconds hands can be fitted, the latter whilst depressing the reset lever.
 With all functions working as intended, the final part of the process is to refit the pushers and fit a fresh crystal to the case before reuniting case with movement. The pushers comprise five separate parts: button, spring, washer, gasket and C-clip.
 The gasket and washer go into the pusher tube first, with the button and spring following. The C-clip then secures the whole lot into the case, pressed into position with the flat end of a piece of pegwood. Repeat the process for the second pusher.
 Happily, with this model, I do not have to mess about with ultrasonic baths and UV adhesive to reconstruct the crystal because the 300V11GNS crystal appears still to be in reasonably good supply.
 I fit the gasket to the crystal first and then crystal to the case.
 The crystal is held in place by the bezel, pressed into position with a crystal press.
 With that accomplished the case is complete and ready to receive the movement.
 The movement needs to be eased in from the lever side first to ensure nothing snags, followed by the substantial case ring and a fresh case back gasket.
 And that is about that. On with the case back, refit the bracelet and we are finished.
 The compact dimensions of the watch are somewhat disguised by the intoxicating design and only become apparent once it is on the wrist.
 In fact, even then, I’d not really noticed its comparatively discrete dimensions until my wife happened to remark how small it looked. That being said, the watch at 37.6mm is still comfortably broader in beam than, say, a Rolex DateJust, but considerably more compact than a Seiko 6138.

 For me, the size is just about perfect. It is extremely comfortable on the wrist and its bracelet complements the case and dial design beautifully.
 This has been an interesting experience for me. The ups, downs and frustrations I have had in rebuilding the movement have sat at odds at times with the trumpeted simplicity of design that is supposed to aid ease of servicing but at the same time I have developed a great deal more respect for the design and engineering of the 7000 series. I still think that its external appearance is anything but elegant – but that does not mean that it is not to be respected. As for the watch itself, I think it is a triumph. It looks fantastic, wears beautifully and performs brilliantly. My purging of minor prejudices can march on, this battle having been won.

Excellent write up and pictures! Bravo! Lovely tip on pusher removal too, I can’t recount the number of times those circlips launched into orbit while I was trying to remove them.
Many thanks Jay. Glad you enjoyed it.
Hi Martin, finally found one! Looking for a crystal, can you tell me where to look for? Non at cousins, ebay… Regards, Phil
Hi Phil, I sourced mine from Cousins but looking again just now and yes, they seem to be out of stock. I’m afraid I don’t know where you’d be able to find stock other than surfing the usual sources: eBay, Yahoo Japan, Jules Borel and other watch materials houses. Oh, and watch fora sales forums. Or just asking around! Good luck 🙂
Hi Martin, thanks for your reply. Looks like they are more than hard to come by. But I was lucky and could source one. Saw me already doing the bonding dance… Till next time, all the best, Phil
Glad you found one!
Do you mind sharing the source? I started looking for the crystal probably the same time as you, still not luck 😦
Hi Martin,
I have a 7018-7000 her and on the subdial I see a sort off all round circles.
Is this original or should the sundial be smooth?
Thanks in advance for answer.
Best Regards, Aad
I suspect that you may be seeing the circular machining marks left when the sub-dial was machined. Mine displays similar marks.
Hi Martin. I have a 7018-5000 in need of a service and was considering doing it myself (have only overhauled a chronograph once before – took a while but it worked!). Your explanation and photos here make me think it’s doable… Anyway, you said “The dial can then be removed, a process that simultaneously facilitates the removal of the minute register hand”. Does that mean the register hand is somehow part of the dial? Or that prising off the dial will nicely pull the register hand off too without damage?
I try to avoid prising the register hands off directly because it is so easy to damage the dial. Instead, I remove them as you say through the action of levering up the dial. Take care though because it is easy then to lose the hand.
Thanks for the quick reply. That’s a good tip, I hadn’t thought of that. Sounds like a job for Rodico to keep the hand from flying away, as you did with the circlips. Now I just need a day of no distractions to give it a try!
Hi Martin,
Sorry to bump an old post, but do you have any insight regarding continuously running the chronograph, particularly during storage? I have heard others mention this when referring to the 6138/9 series of movements but am not sure whether those share the same architecture as this 7018.
Lovely blog by the way, keep up the amazing documentation!
Hi Tom, this movement uses a vertical clutch and so to avoid fatiguing the spring, it is probably better to leave it in the running condition when storing it as this releases the tension in the spring, bringing the two mating surfaces of the clutch together.
Glad to hear you enjoy the blog and I welcome comments on all posts, old and new!
Pingback: Watches for sale | Adventures in Amateur Watch Fettling
I’m in the process of having my 7018-7000 overhauled and was wondering if you still owned the S-210. If so, would you be willing to sell it?
Thanks,
Darin
Hi Darin,
I’ve only got the one example of that movement holder and may well have need of it again in the future. So, sorry, it’s not for sale.
Thanks for your reply. Darin
Sent from Yahoo Mail for iPhone
Sorry, I meant your S-510, not S-210.
Darin